Today I am excited to give you a tour of the shared girls room at the cottage. Though far from fully decorated, we have done quite a bit in the space already and would love to show you around!
Our newly built cottage has a total of three bedrooms (technically four if you count the basement bonus space). The master suite is on the main level, and there are two additional bedroom upstairs. One for the boys and one for the girls. Our entire family appreciates the simplicity of this arrangement. Truthfully, our kids do not mind one bit that they share with their siblings. In fact, they prefer it!
As a result of our hard work, we are extremely happy with how the ceilings look. Because they are vaulted, the natural daylight that comes in through the single window bounces around and really brightens up the entire room.
Oak flooring creates a beautiful, neutral backdrop for furnishings and decor. In addition, the all white walls and trim have the same effect.
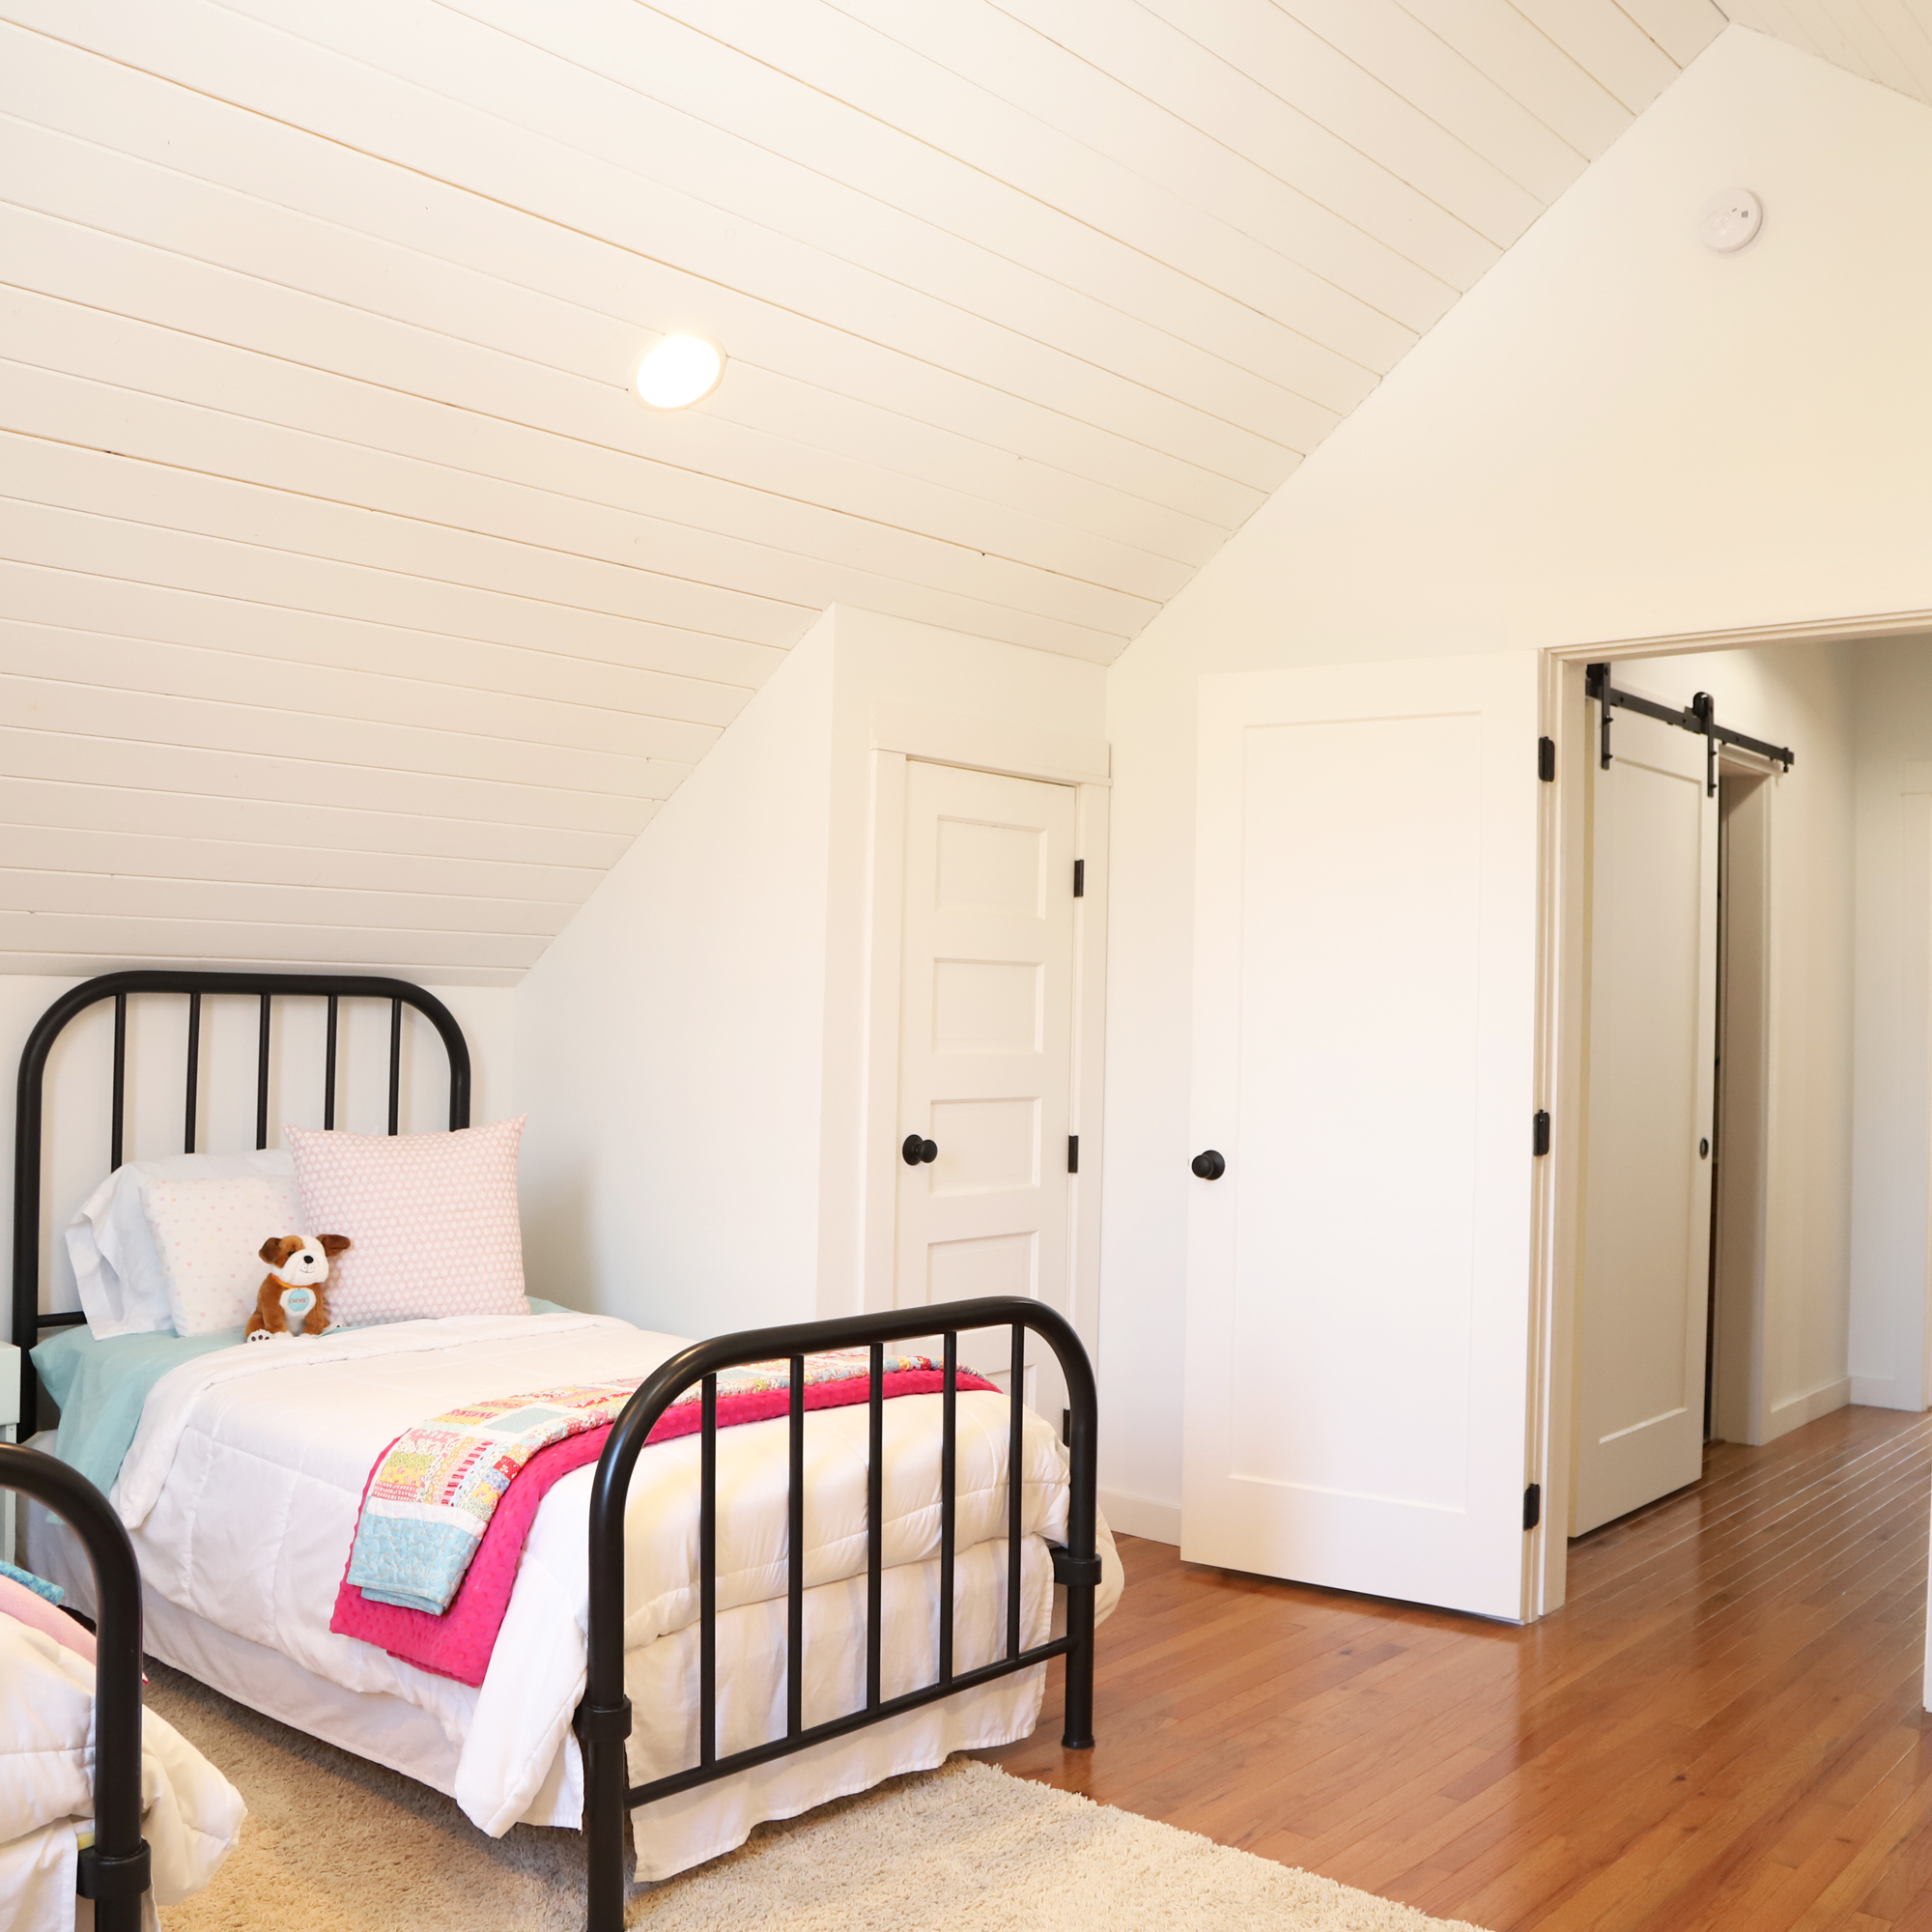
When I designed the girls room, I was careful to create a space that would serve the girls for years to come. For example, although the girls currently enjoy having their beds close together at night, they might not always prefer this set up. The dimensions of the room were worked out so that each girl could eventually claim their own ‘half’. There are two closets in the room as well.
Sleeping Space
One side of the bedroom is designated for sleeping and quiet time. The two antique metal beds found on this side were an absolute labor of love for my husband. He painstakingly restored the beds over the course of several months. Although the beds spent many years in a friend’s barn, you would never know it now!
My husband documented the process of restoring the beds through a series of videos. I am so impressed with how they turned out. Most importantly though, the girls love them.
A small table is positioned between the beds. It is the perfect size for a reading lamp, and a few books.
I chose white comforters for the beds. They are easy to clean and provide a neutral base that can be changed up easily with accent bedding and pillows. For now, the accents of pink, aqua, and yellow are fun and girly, while not being age specific. One thing I am still on the hunt for are matching quilts or duvet covers for the ends of each bed.
Play Space
The opposite side of the room is set up as a kind of pseudo mini house – every little girl’s dream! It is complete with a small play kitchen, table, and two pink chairs. In addition, a sweet doll crib – made by the girls’ great grandpa – holds special sentiment.
The girls have literally spent hours creating make believe scenarios with their stuffed animals and dolls.
Their play kitchen is something I posted about a couple of years ago. It was made using a vintage dresser as the primary structure. More information about the process of building the play kitchen, and links for many of the accessories, can be found in THIS POST.
You may recognize the small red table from this past year’s Christmas decorating. I recently found an enamel top table at a local antique shop. This new table is a bit larger and more useful for our annual winter puzzle endeavors. For this reason, we moved the little red table up to the girl’s space – and kept the enamel topped one on the main level. These two tables will definitely be moved around the house throughout the years, depending on the needs of our family and my seasonal decorating desires.
Other Furniture + Decor
The only other piece of furniture the girls have in their bedroom is a dresser. It is, yet again, another special hand me down item. Purchased by my grandparents, the dresser was mine as a little girl. The perfect size, it has four drawers – two for each daughter. We have it organized so that each girl has one drawer for their shirts, and one for their pants/shorts/skirts.
Atop the dresser are a few special and sentimental items. A beautiful watercolor print, which was purchased on Etsy, provides a bit more color to the room. The small wooden box holds the some of the girls’ cherished special items. Lastly, the pink bunny was hand sewn by the nannies at our older daughter’s orphanage. They gave it to her as a gift on her adoption day.
Though I have more decor ideas for the room, there is no rush on getting everything implemented at once. Kid spaces have a tendency to evolve and change as the occupants grow. The girls bedroom will be no different, I’m sure.
Girls Shared Room Video Walkthrough
Sometimes, it is easier to see a space in video format. I’ve created a video tour of the room for just that reason.
I hope you enjoyed this little tour! Stay tuned for more space reveals, as we continue to decorate at the cottage!
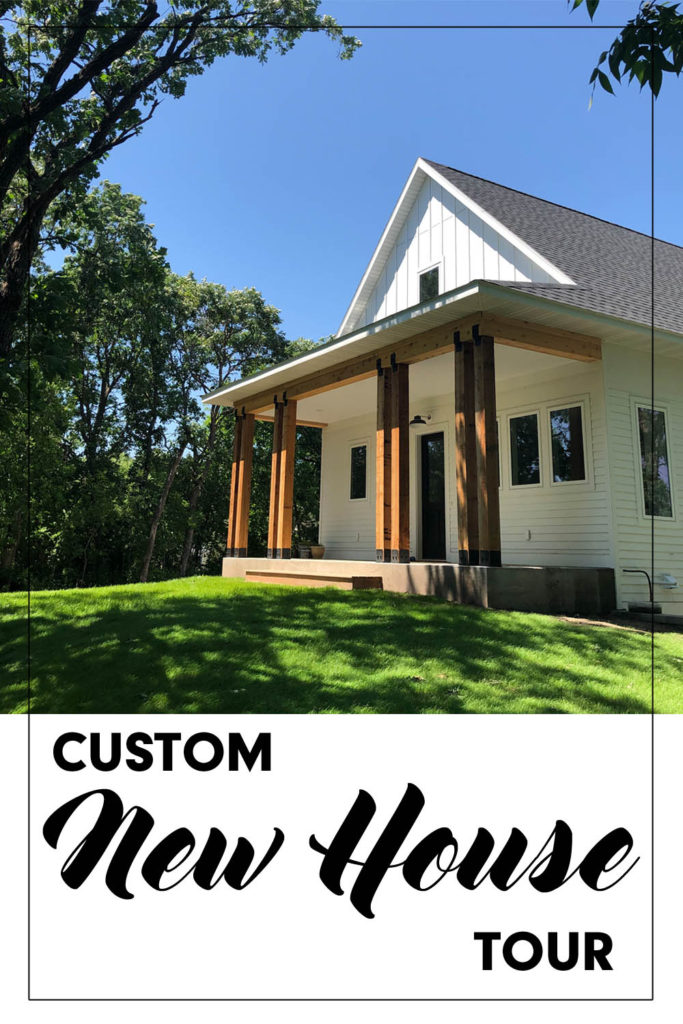
Today I am going to share with you the long awaited custom new house build tour. This post is a long time in the making, and I thank you all for being so patient with me over the past months as we finished our build! Eventually, I will take you on a tour of the exterior spaces; But for now, let’s step inside and look at the interior.
OUR CUSTOM NEW HOUSE BUILD
Time has literally flown over the past months. I think the last time I wrote an actual blog post (other than the quick Around Here variety) was in October! So sorry about that!
I was doing so well keeping you all updated at the beginning of our custom new house build. That is, until my husband and I started doing OUR portion of the work. At that point, we needed to focus all of our extra attention on getting the job done so that we could pass the inspections, and that the appraisal would go well.
We poured a lot of sweat equity into our new house, and I will definitely go back and share all those details with you. For now though, feel free to compare what you are about to see with the most recent building update I have provided: The Framed House Tour | Building Update No 6. It will help you appreciate how far we have come!
PHOTOS OF OUR CUSTOM NEW HOUSE BUILD
Let me take you on a tour via photos. Please keep in mind that we mostly just moved in furnishings and decor that we had from our previous space. We had a huge garage sale before we moved, and only brought into this house the things we love. That means many of the rooms are rather bare. It’s actually okay with us, since we prefer a more clean, minimalist vibe. But, they definitely aren’t polished and complete. That will come with time.
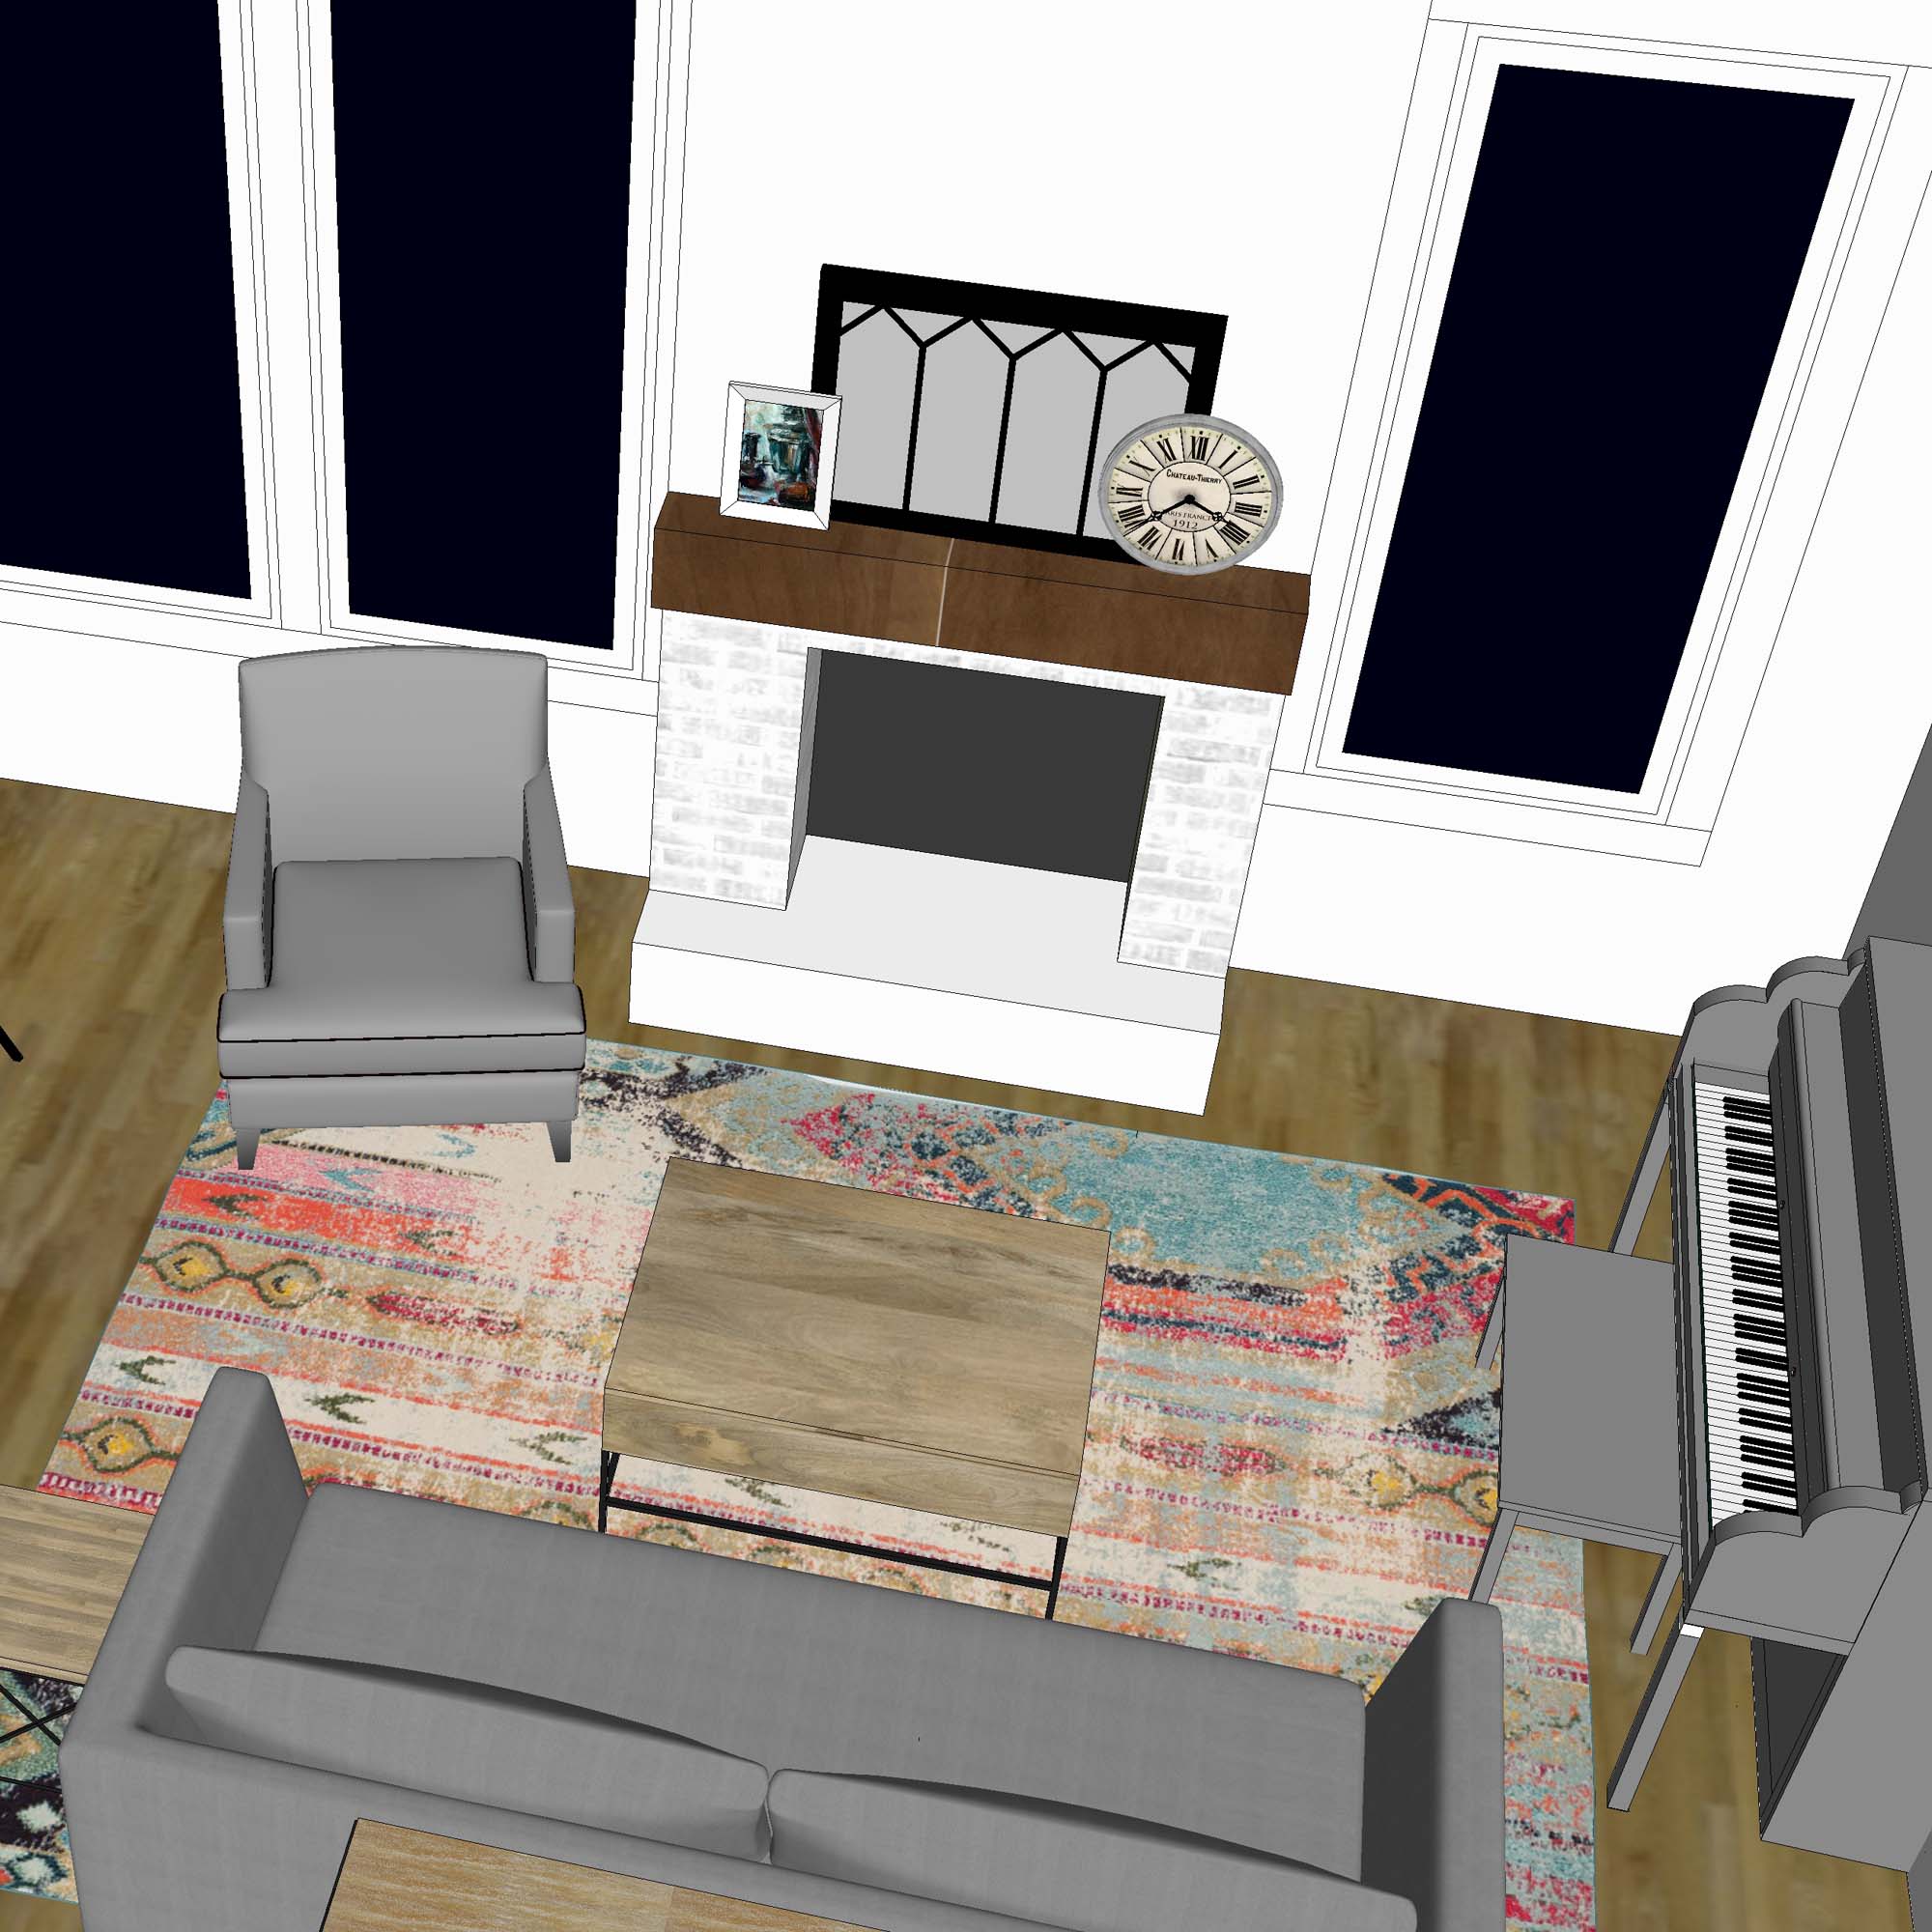
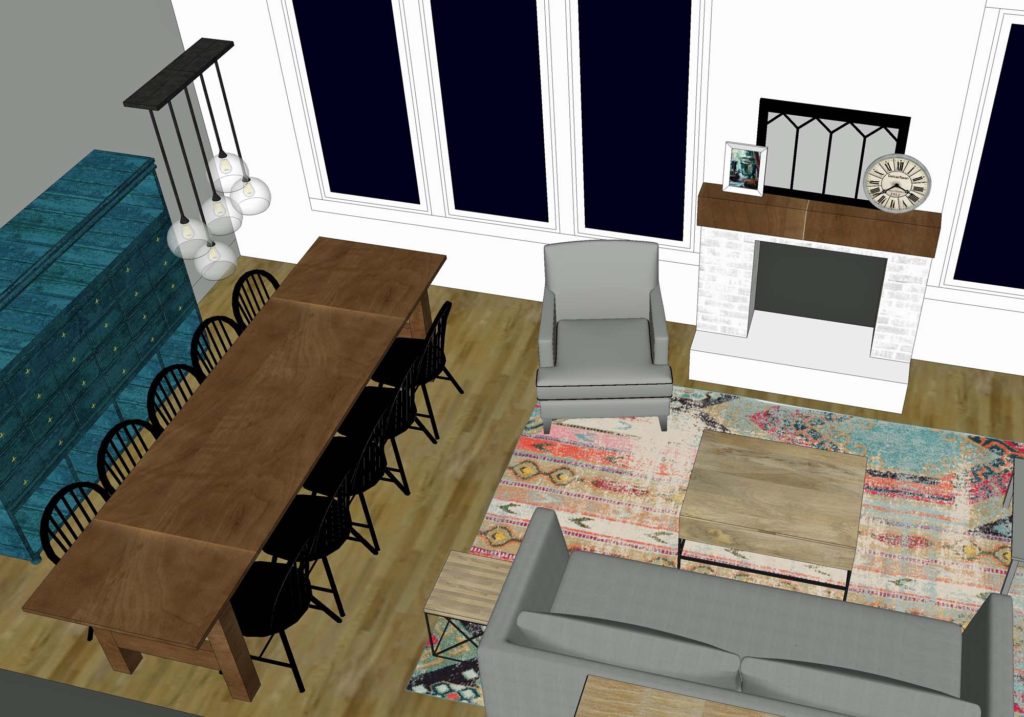
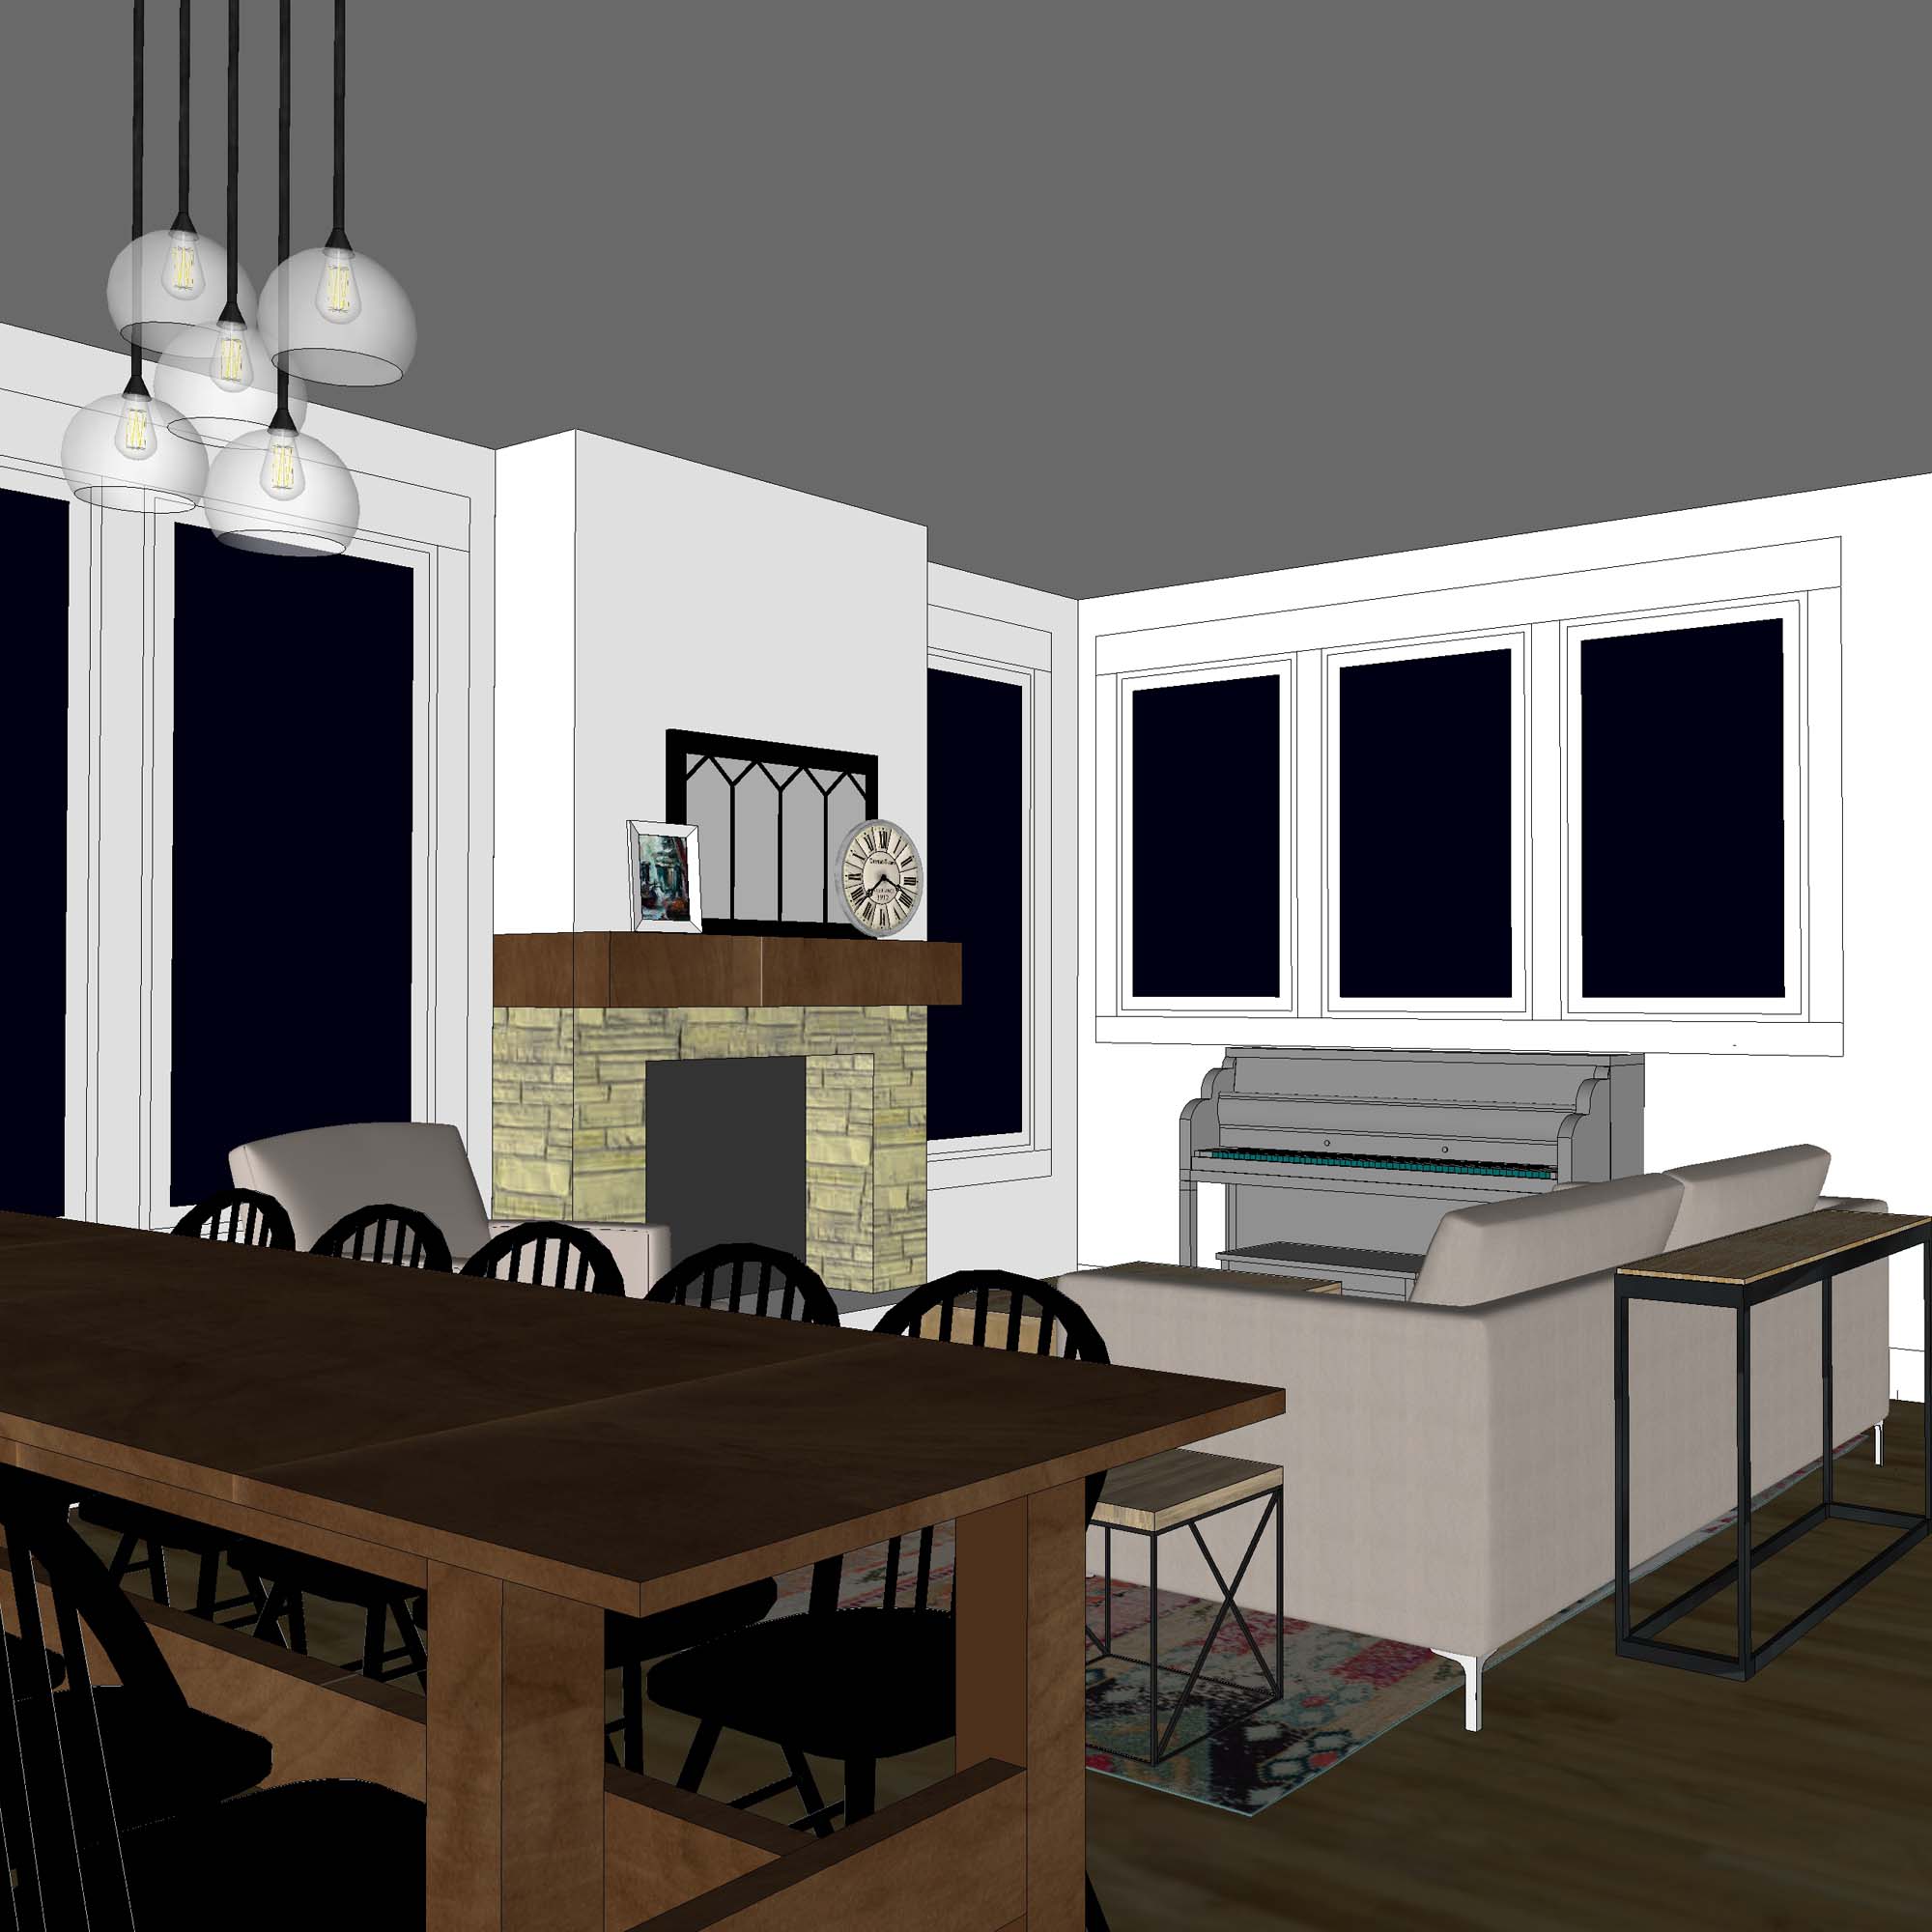
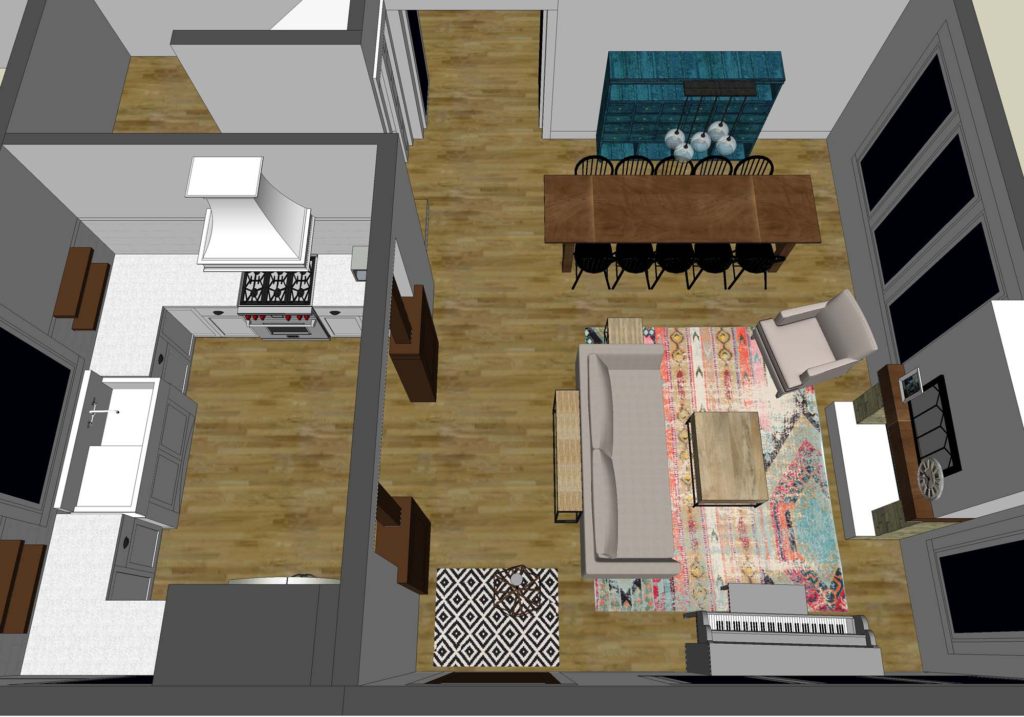
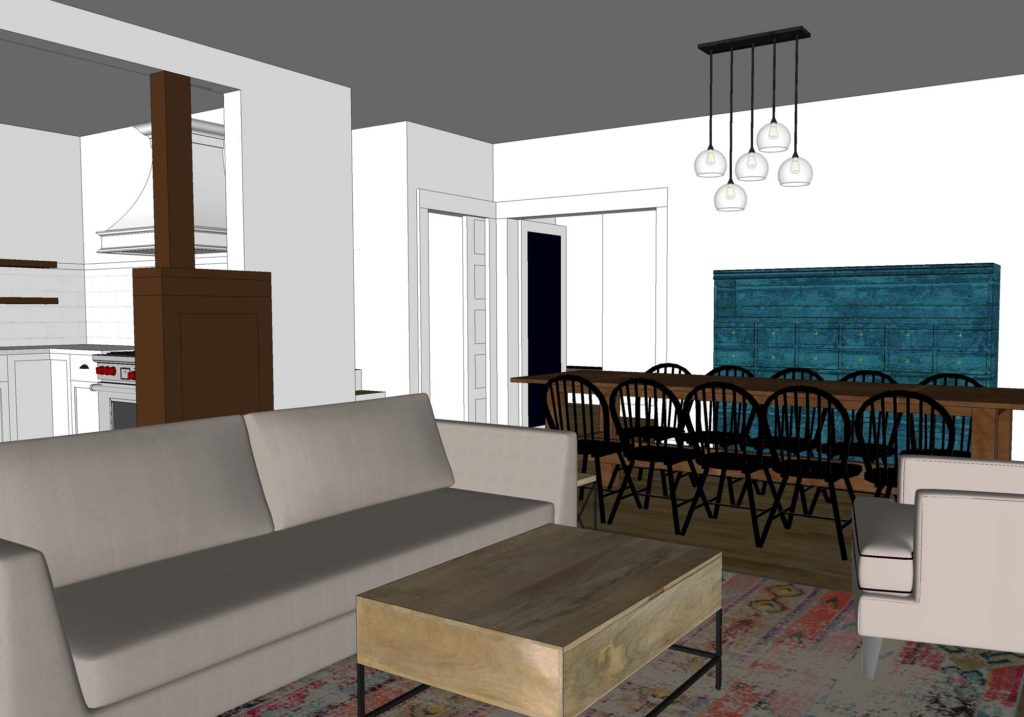
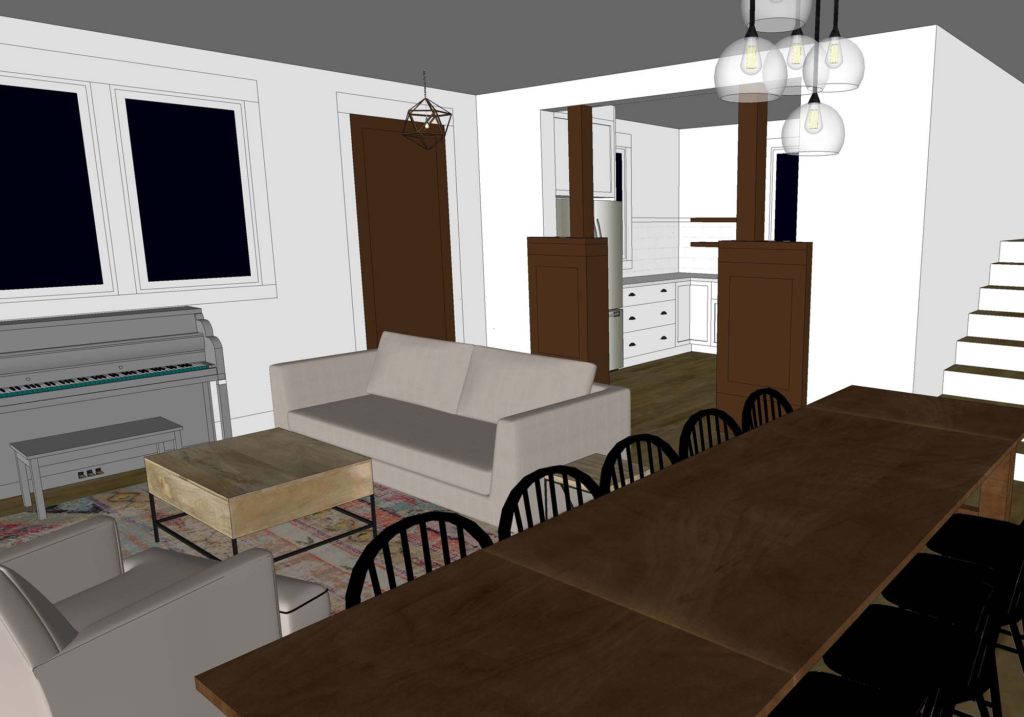
LIVING/DINING
You may remember the last minute design change I squeezed in WHILE the foundation was being poured. My goodness I gave my husband a scare with that one! Ultimately though, we are so pleased with the way the revision opens up the entire main floor in a beautiful way.
One of the top priorities on our new house wish list was natural light. This space does not disappoint in that regard. The four large east facing windows bring in plenty of morning and early afternoon light, which is filtered by trees in the summer. The three southern facing windows are protected from direct rays by the porch. They too let in a ton of glorious daylight.
Both the dining table and the fireplace mantle are made of white oak, harvested from our property. A local miller was able to transport about six large tree trunks to his property. There he cut them into boards and kiln dried them.
He even constructed a table top for us, which we weren’t expecting! We love being able to have that bit of history here with us every day.
During the day, this is my absolute favorite space to be in! It is so cheerful and bright! In fact, we rarely need to turn the lights on in most of the rooms in this house until the evening hours. The red oak floors, which we installed, are beautiful and should hold up to our crazy crew’s wear and tear.
We absolutely love our dining room light fixture. Sources for this fixture, as well as the other light fixtures in our home can be found HERE.
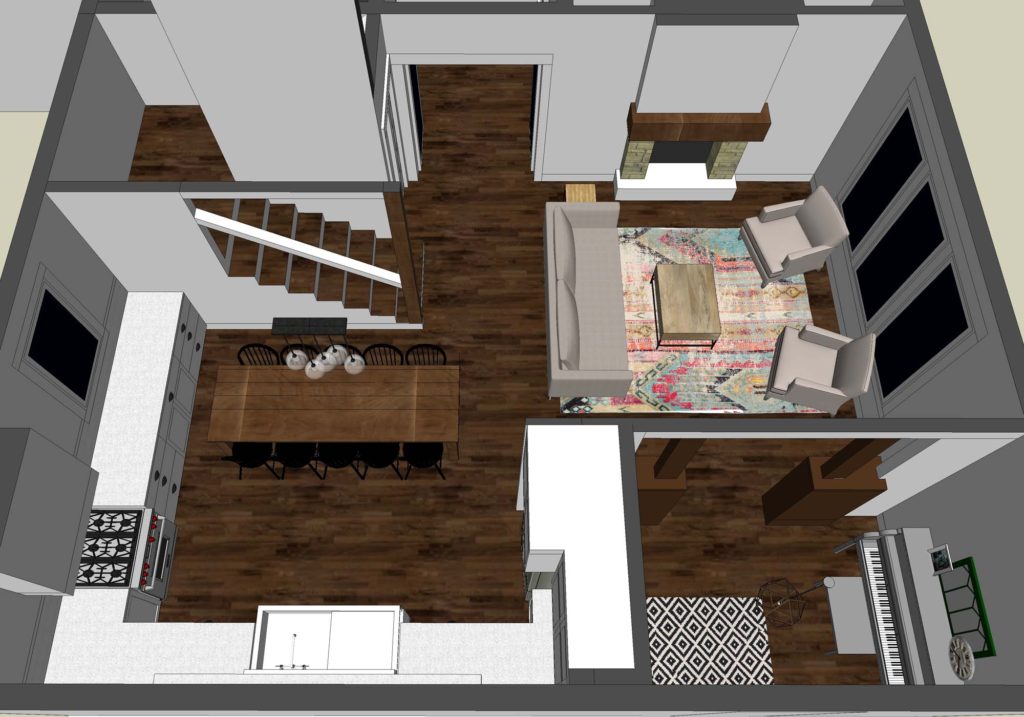
KITCHEN
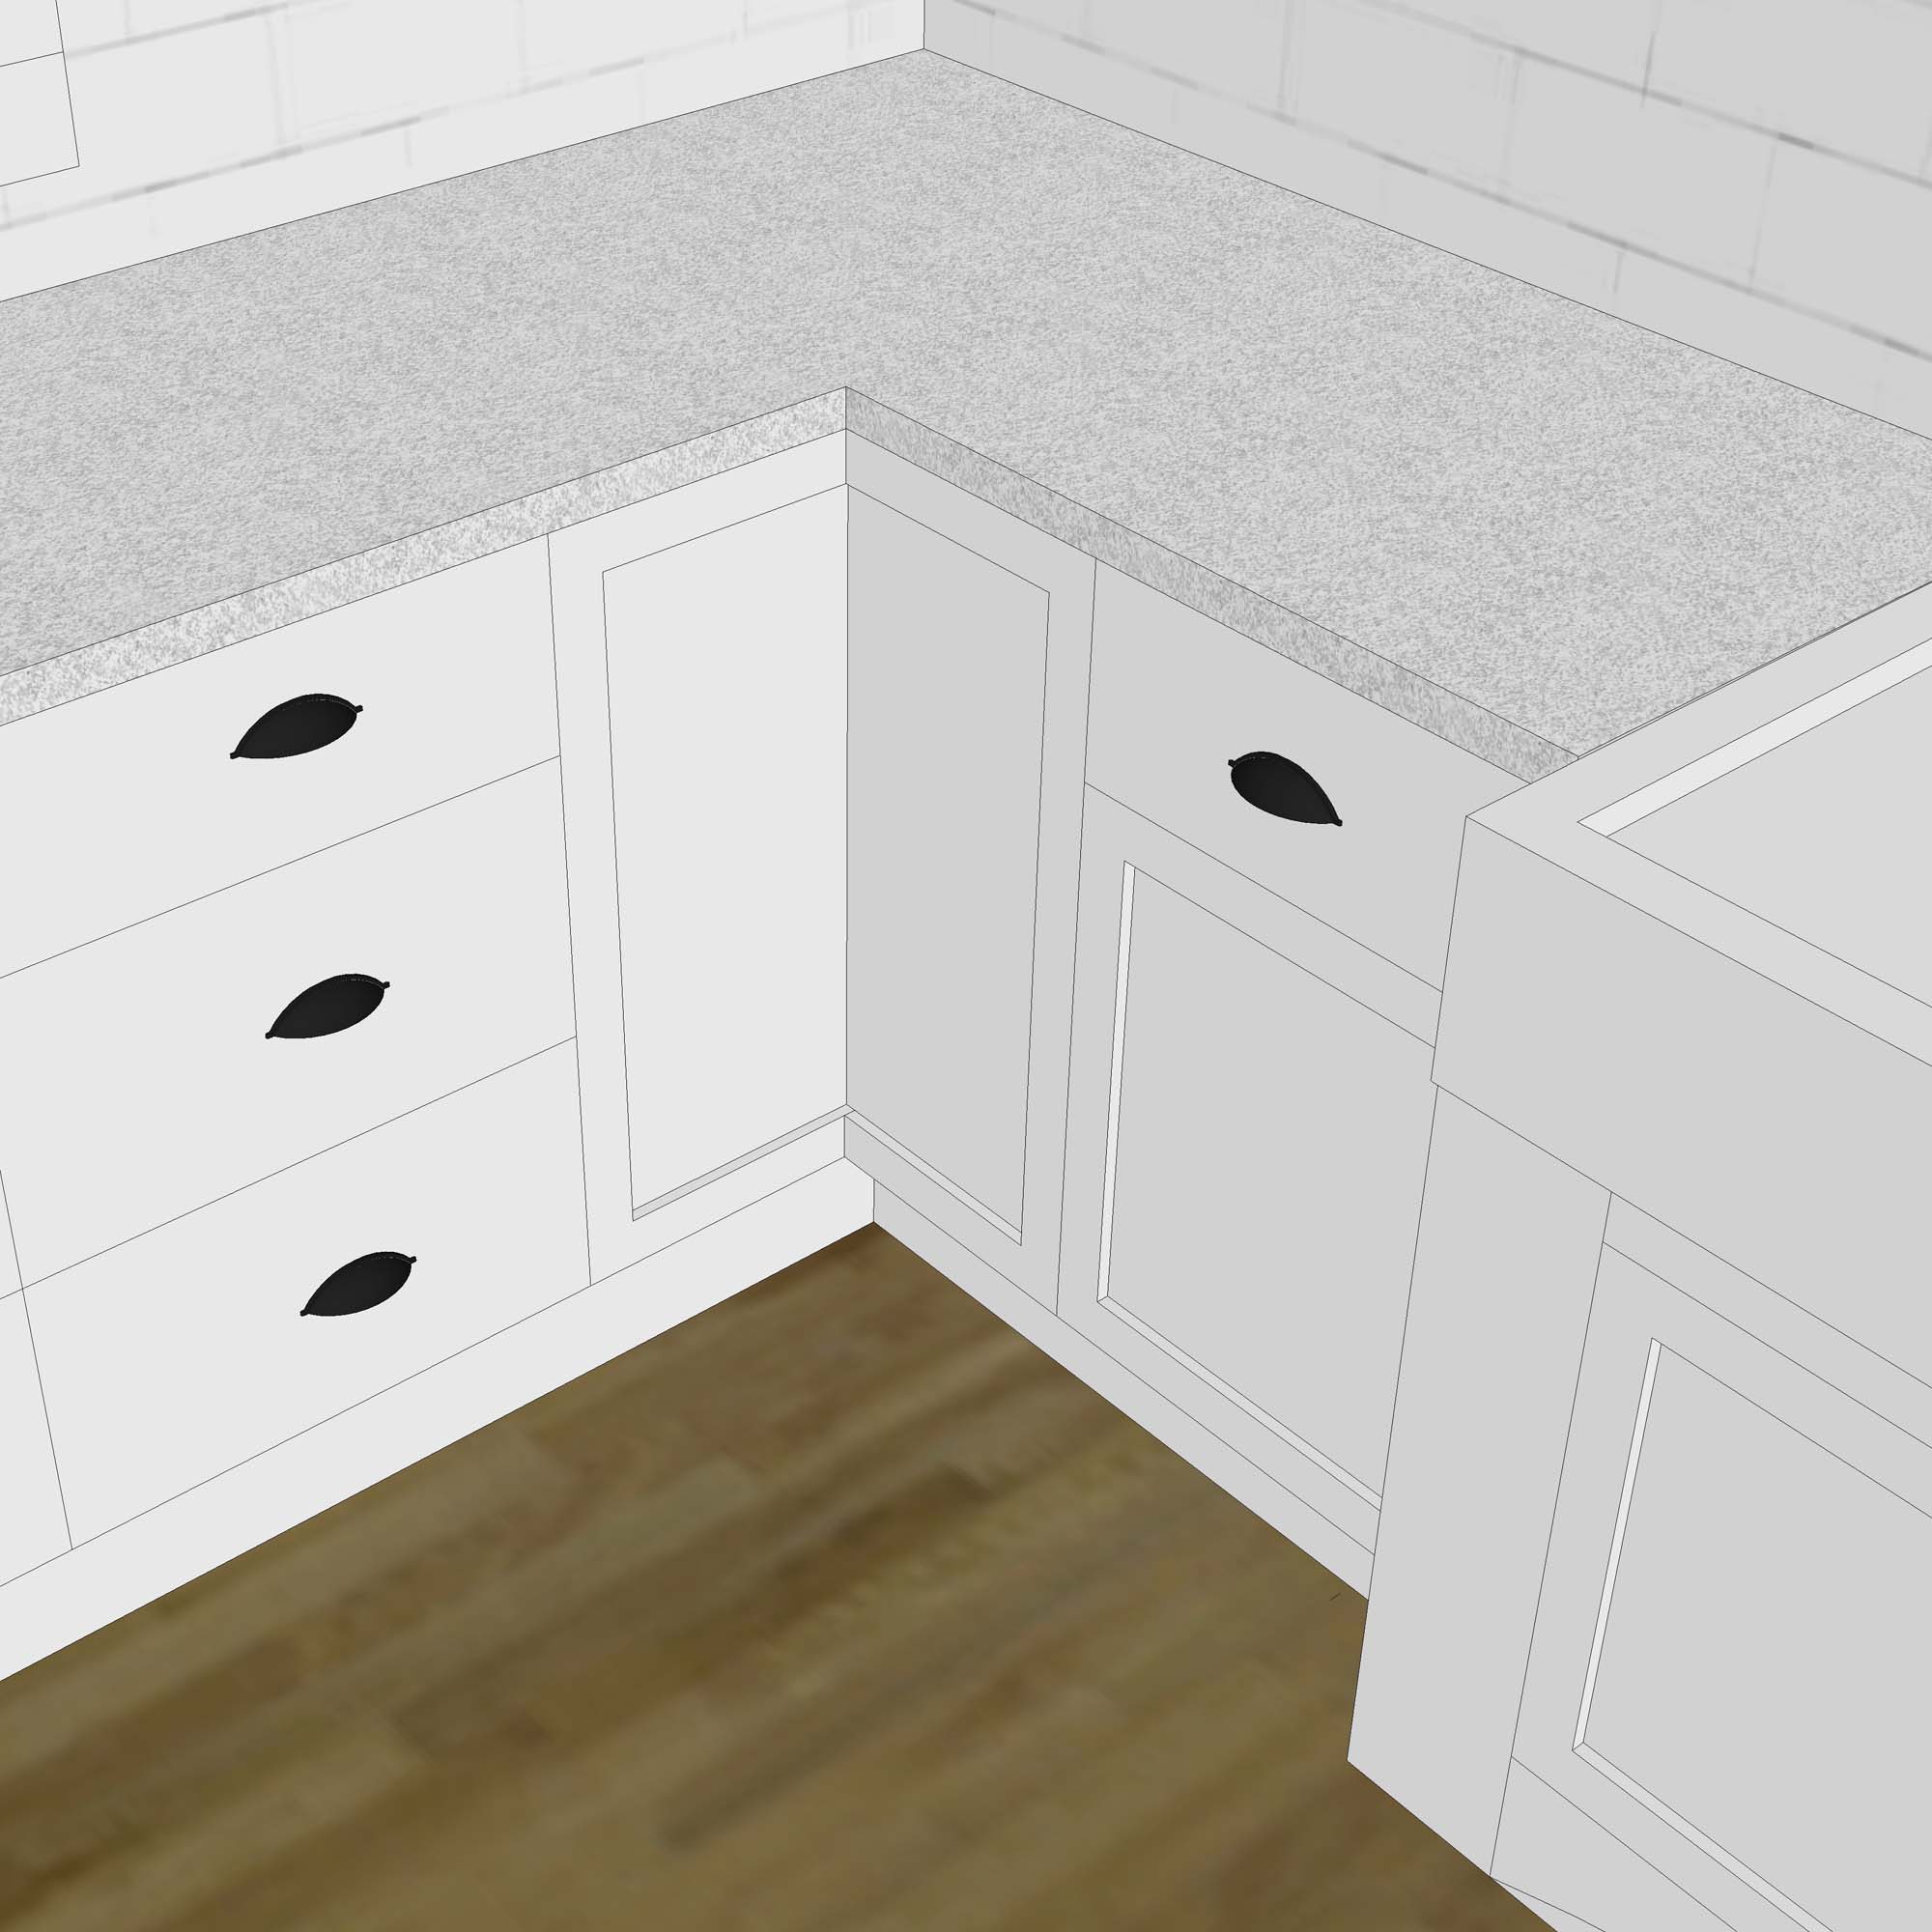
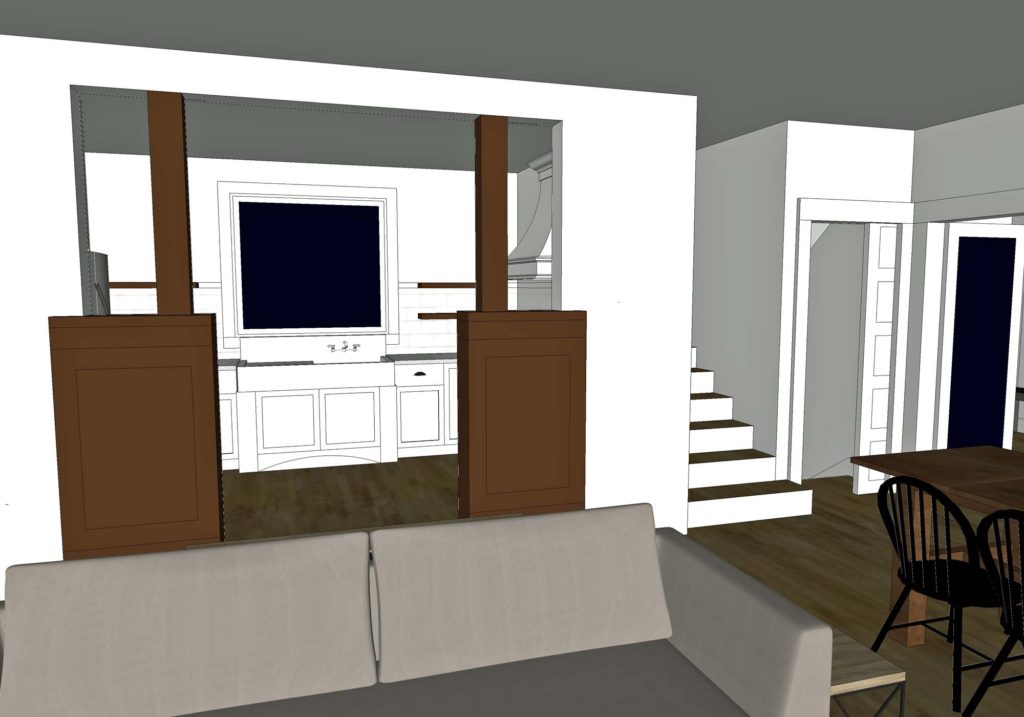
Just off of the open living/dining room is the kitchen. The opening is flanked by restored antique cabinets. We may eventually add the columns above, but we ran out of time and actually like the flow between the two spaces as it is right now.
You will remember from previous posts that we purchased all of our cabinetry through Cliq Studios. I owe you all an update on how the delivery and installation process went. But, until then, I can say that we are more than satisfied with the outcome.
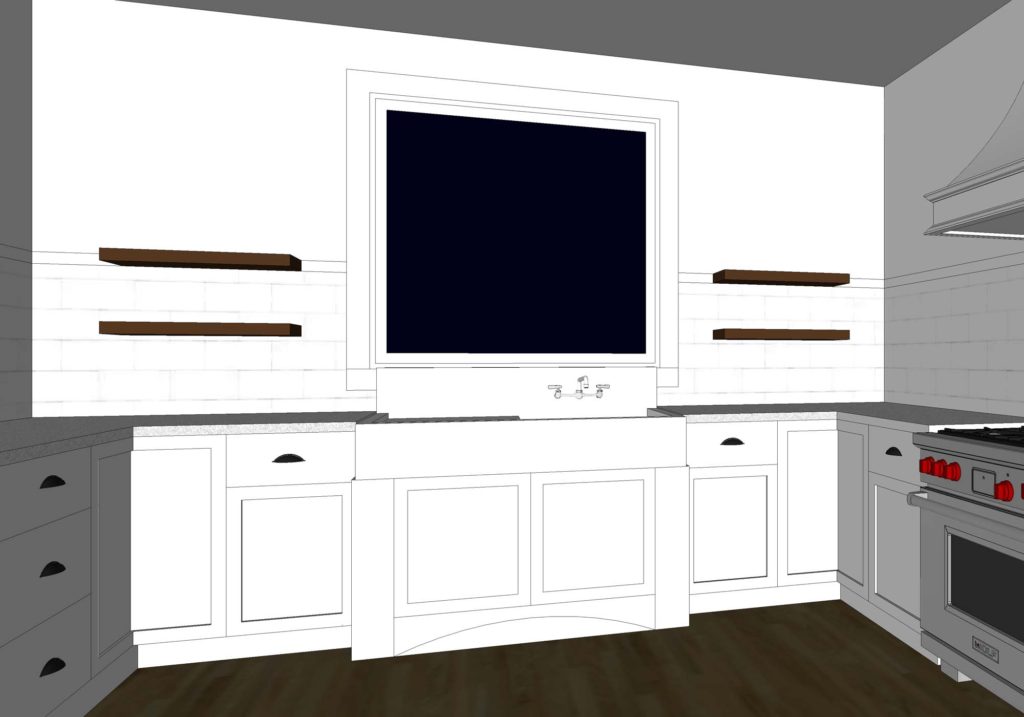
We got our vintage Kohler sink installed, and it fits in perfectly! Choosing appliances was another adventure in and of itself. I fretted about whether or not I should make the switch to a gas range or not. I’m happy I took the chance, because I absolutely love using our KitchenAid appliances!
This room has a bit of unfinished business, in that we still need to install a tile backsplash. We also have plans for some big chunky open shelves on either side of the window. All in due time.
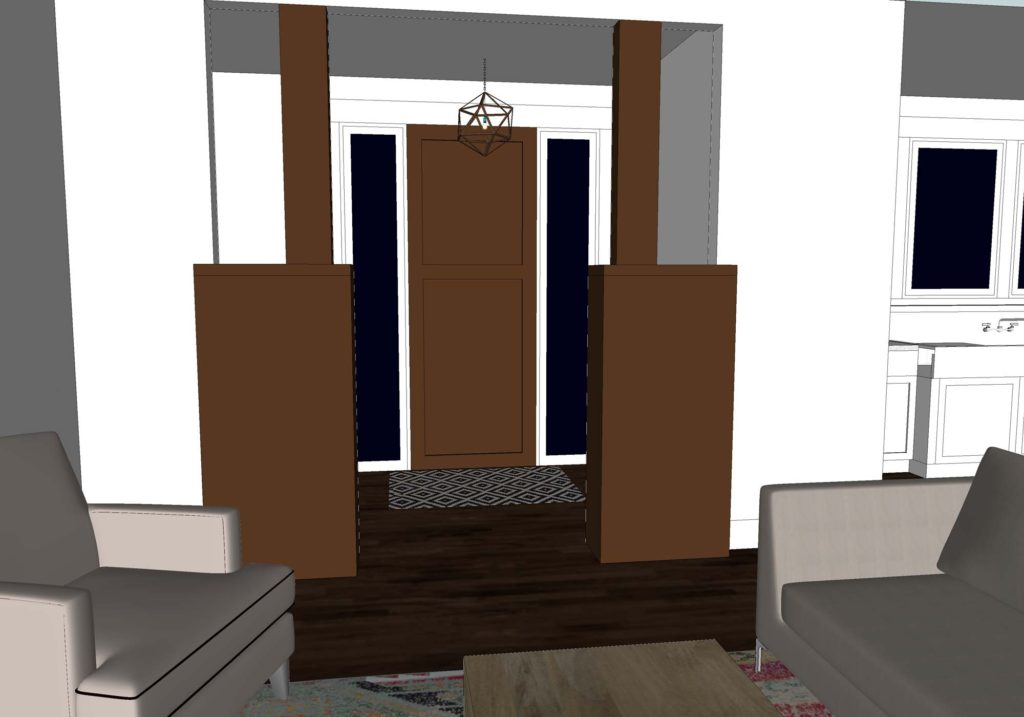
HALL/MUDROOM
One of the ways we were able to utilize every square inch of our floor plan was to make every single space useable. The small hall space that separates the more public areas of the main floor from the private spaces is a great example. First, we used a set of vintage french doors from the family farmhouse. It is another piece of history that we love having in our new home.
We were able to squeeze just a few square feet in the hall space for our upright piano. When someone is practicing, the french doors can be closed as a sound buffer.
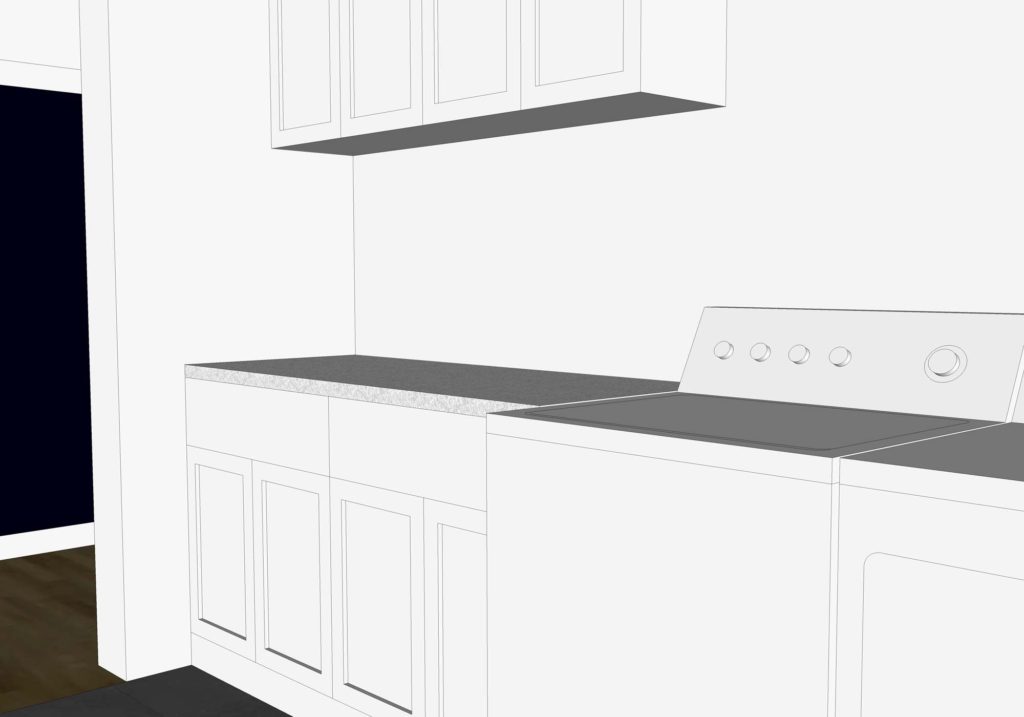
To the left of the hall is the mudroom. This is a hardworking room, but I also wanted it to be beautiful. It features a luxury vinyl plank flooring from Coretec. This means I don’t need to get all worked up if the kids track in dirt from outside. The washer and dryer are conveniently located as well. And the large bank of cabinets and counter space functions perfectly as a drop zone and charging station.
The far door in this room leads out to our attached garage. I’m convinced that this is not a luxury in Minnesota, it’s a necessity. We have never had an attached garage before this though, and we feel pretty spoiled!
The other door leads into the powder room/half bath, which gets a lot of action from the kids. It features the restored 1930s cast iron sink, which is holding up beautifully.
MASTER BEDROOM
To the right of the hall is the master bedroom. It is really not a large space at all, but it fits all our needs. Funny enough, since these photos (and video) were taken we changed the orientation of the bed. We decided we liked the layout better with the head of the bed on the east wall, in front of the tall window.
Although it is almost standard in custom new house build to have a large walk in closet, we opted instead for two smaller closets.
The left closet, plus the dresser, holds all of the clothes my husband and I own. And the right closet is used to store the vacuum, broom, and other misc. items.
MASTER BATH
Our master bathroom is also not very large. It is, however, very functional. We put in quite a lot of effort in this room. My husband actually built the vanity, based on a design I had drawn up. It features one drawer, which holds all of our toiletries. The shelf below is large enough to hold two baskets, one for dirty clothes and the other for clothes that we plan to wear again.
My husband and I worked together to tile the shower space and floor. This was our first time doing any sort of tile work, and we are very happy with how it turned out!
UPSTAIRS LANDING
The upstairs of our house is very simple. There is a small landing area with a bathroom, and one bedroom on either side.
There is a small nook area in the landing, where we have a shelf that holds children’s books. I try to rotate them out often, for interest.
UPSTAIRS BATHROOM
This bathroom is mainly used by the kids in the morning and evening hours. We love the round mirror and the subway tile tub surround.
The sliding barn door is another fun feature of the bathroom!
GIRL’S BEDROOM
Our two daughters share this bedroom. There is still quite a bit of decorating that needs to happen in their room, but it will be a really fun space!
They currently sleep in their small toddler beds; However, my husband has been working on restoring two matching cast iron bed frames, which I hope to share with you all soon!
BOY’S BEDROOM
The boy’s bedroom is also a work in progress. Their room is unique in that each boy has their own private sleeping nook. Granted, right now their mattresses are on the floor, but we have plans for custom platform beds.
One unique feature in their space is the barnwood accent walls at each of their headboards. This wood is from the summer kitchen that was taken down from my in-laws house.
Each boy has a small reading light that they can use in the evening hours without disturbing the sleep of one another.
FAMILY ROOM
Because of how our site slopes, it made sense for our house to have a full sized, walk out basement. The largest room in the basement is the family room space. It is also the room where we currently spend the bulk of our time.
We love the large sectional couch we were able to purchase with proceeds from the garage sale we had before our move.
MAN LAND/ OFFICE
The other room in the basement that gets plenty of use is my husband’s office, aka ‘man land’. Because we were able to utilize the space under the stairs, this room ended up being larger than we expected.
He has his desk, bookshelf, and a couch in the room. It was great to have this dedicated office space during the quarantine, when he was working from home and the kids were schooling from home!
OTHER LOWER LEVEL SPACES
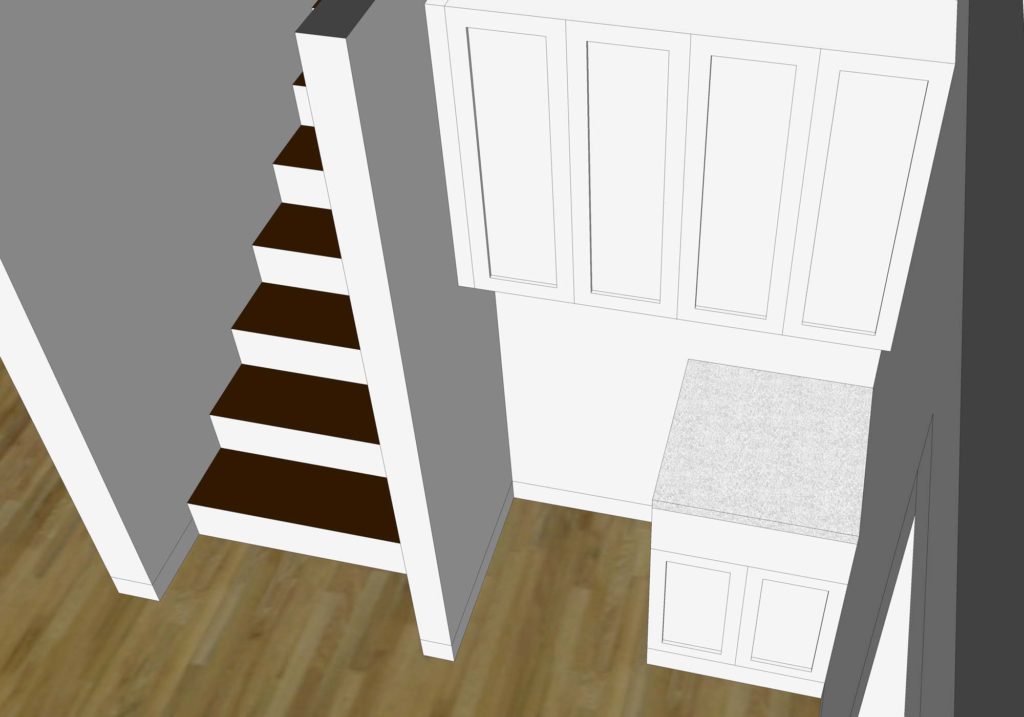
Between the family room and the office is another fun space, which we are calling the Rec Room. It is technically a fourth bedroom in the house, but it is unlikely we will use it as such. To make it qualify as bedroom status, it has a small closet as well as large sliding barn doors.
Since this photo was taken, we have added a nice ping pong table to the room. It is the variety that can be folded up easily and stored along a wall. This allows the space to be fully open and available for a variety of activities, such as lifting weights, home workouts, or even as a guest room.
The lower level of the house also features a small 3/4 bathroom. Both the mirror and the vanity were found for ridiculously low prices at our local Habitat ReStore.
As you can see, we opted for more bathrooms that were smaller in size rather than fewer large bathrooms. It is great to have one on each level of the house, that is, unless it is cleaning day!
The mechanical room is the final space of the house. Everything is efficiently laid out and easily accessed. There is even a little space where we can build shelves for extra supply storage if needed.
CUSTOM NEW HOUSE BUILD PLANS
If you would like a visual reference of how each of these rooms are laid out, please reference the Minimalist Cottage Virtual Tour. It has the most up to date floor plan of our home, although a few minor changes were made during construction.
CUSTOM NEW HOUSE BUILD VIDEO TOUR
Come with me on a walk-through tour of our brand new house!
CUSTOM NEW HOUSE BUILD
Pin this post for later reference and to share with your friends!
If you enjoy new house builds, check out my friend’s homes that are under construction!
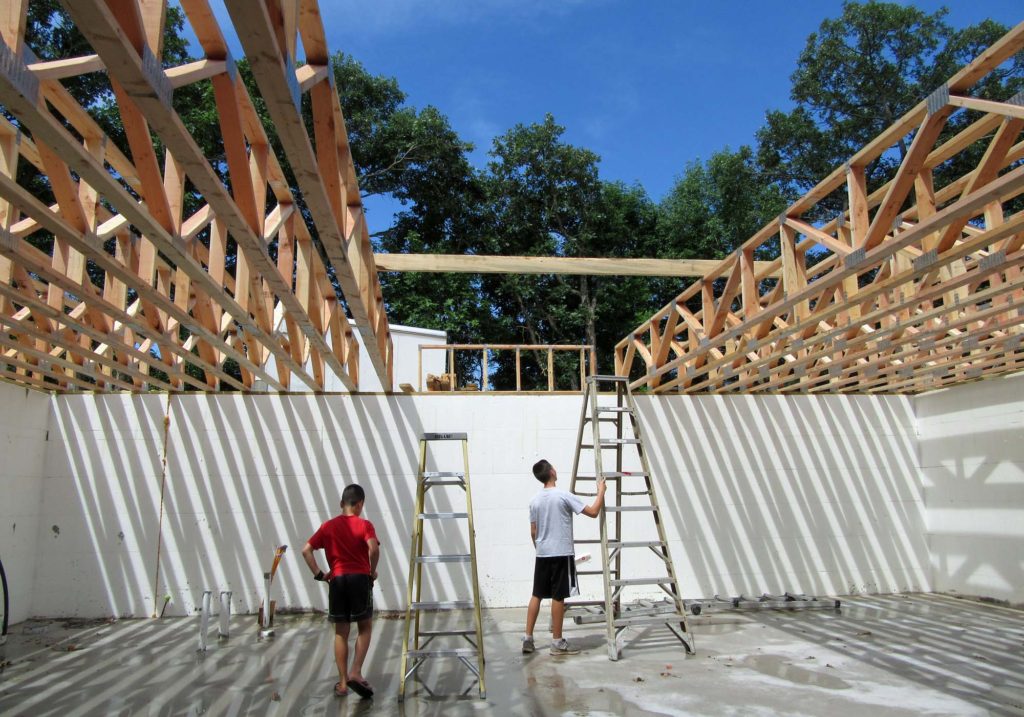
Join me today as I share a full tour of our framed house! So much has happened since I last posted about the progress at the site, and I’m excited to show you everything!
Last we left off, on construction update no. 5, the second floor trusses were just being delivered to the site. Boy have things changed a lot since then!
PROGRESS IMAGES
Here’s a quick photo recap of all the little steps that have happened from then until now.
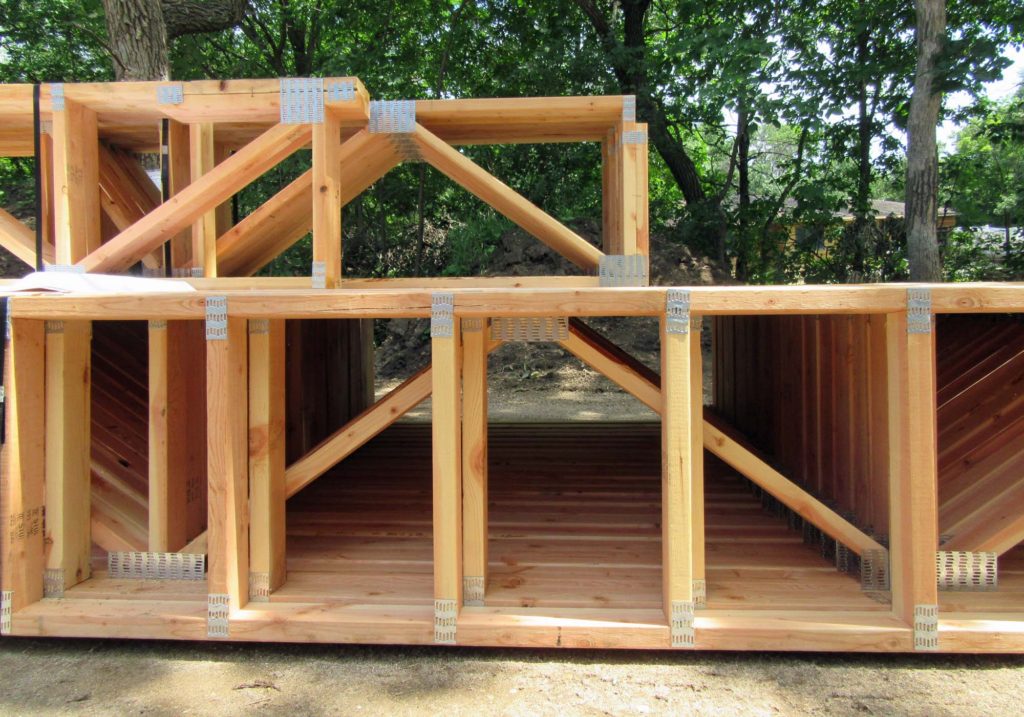
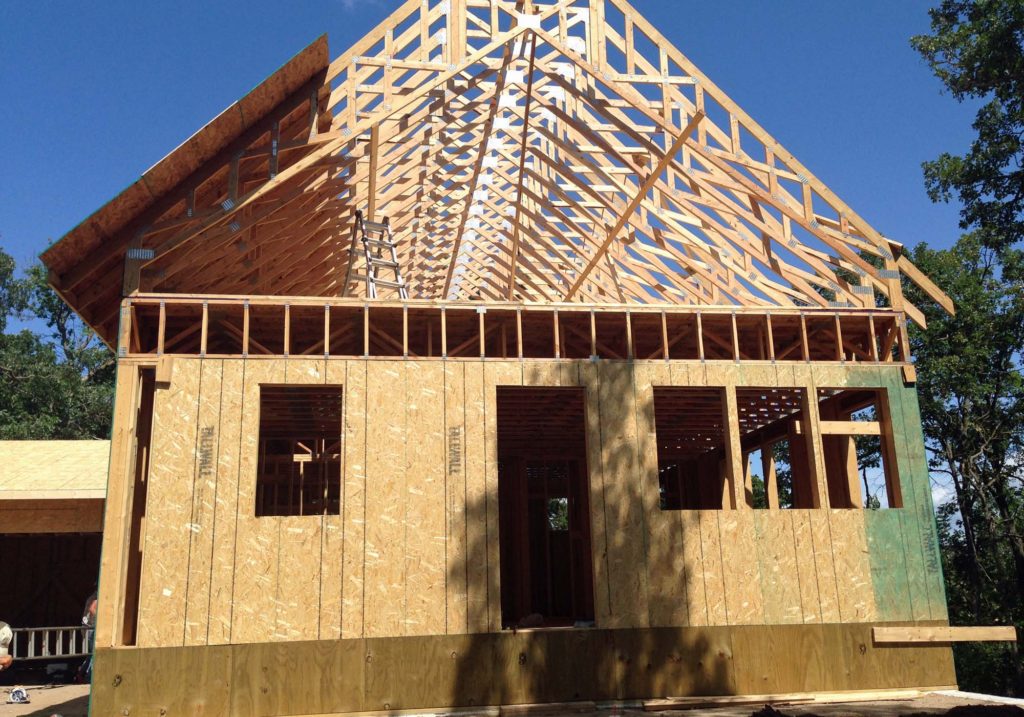
The large scissor trusses for the second floor were delivered. They are massive! With no dormers on the roof, they were able to get everything in place very quickly. In just a few hours they were ready to put on sheathing!
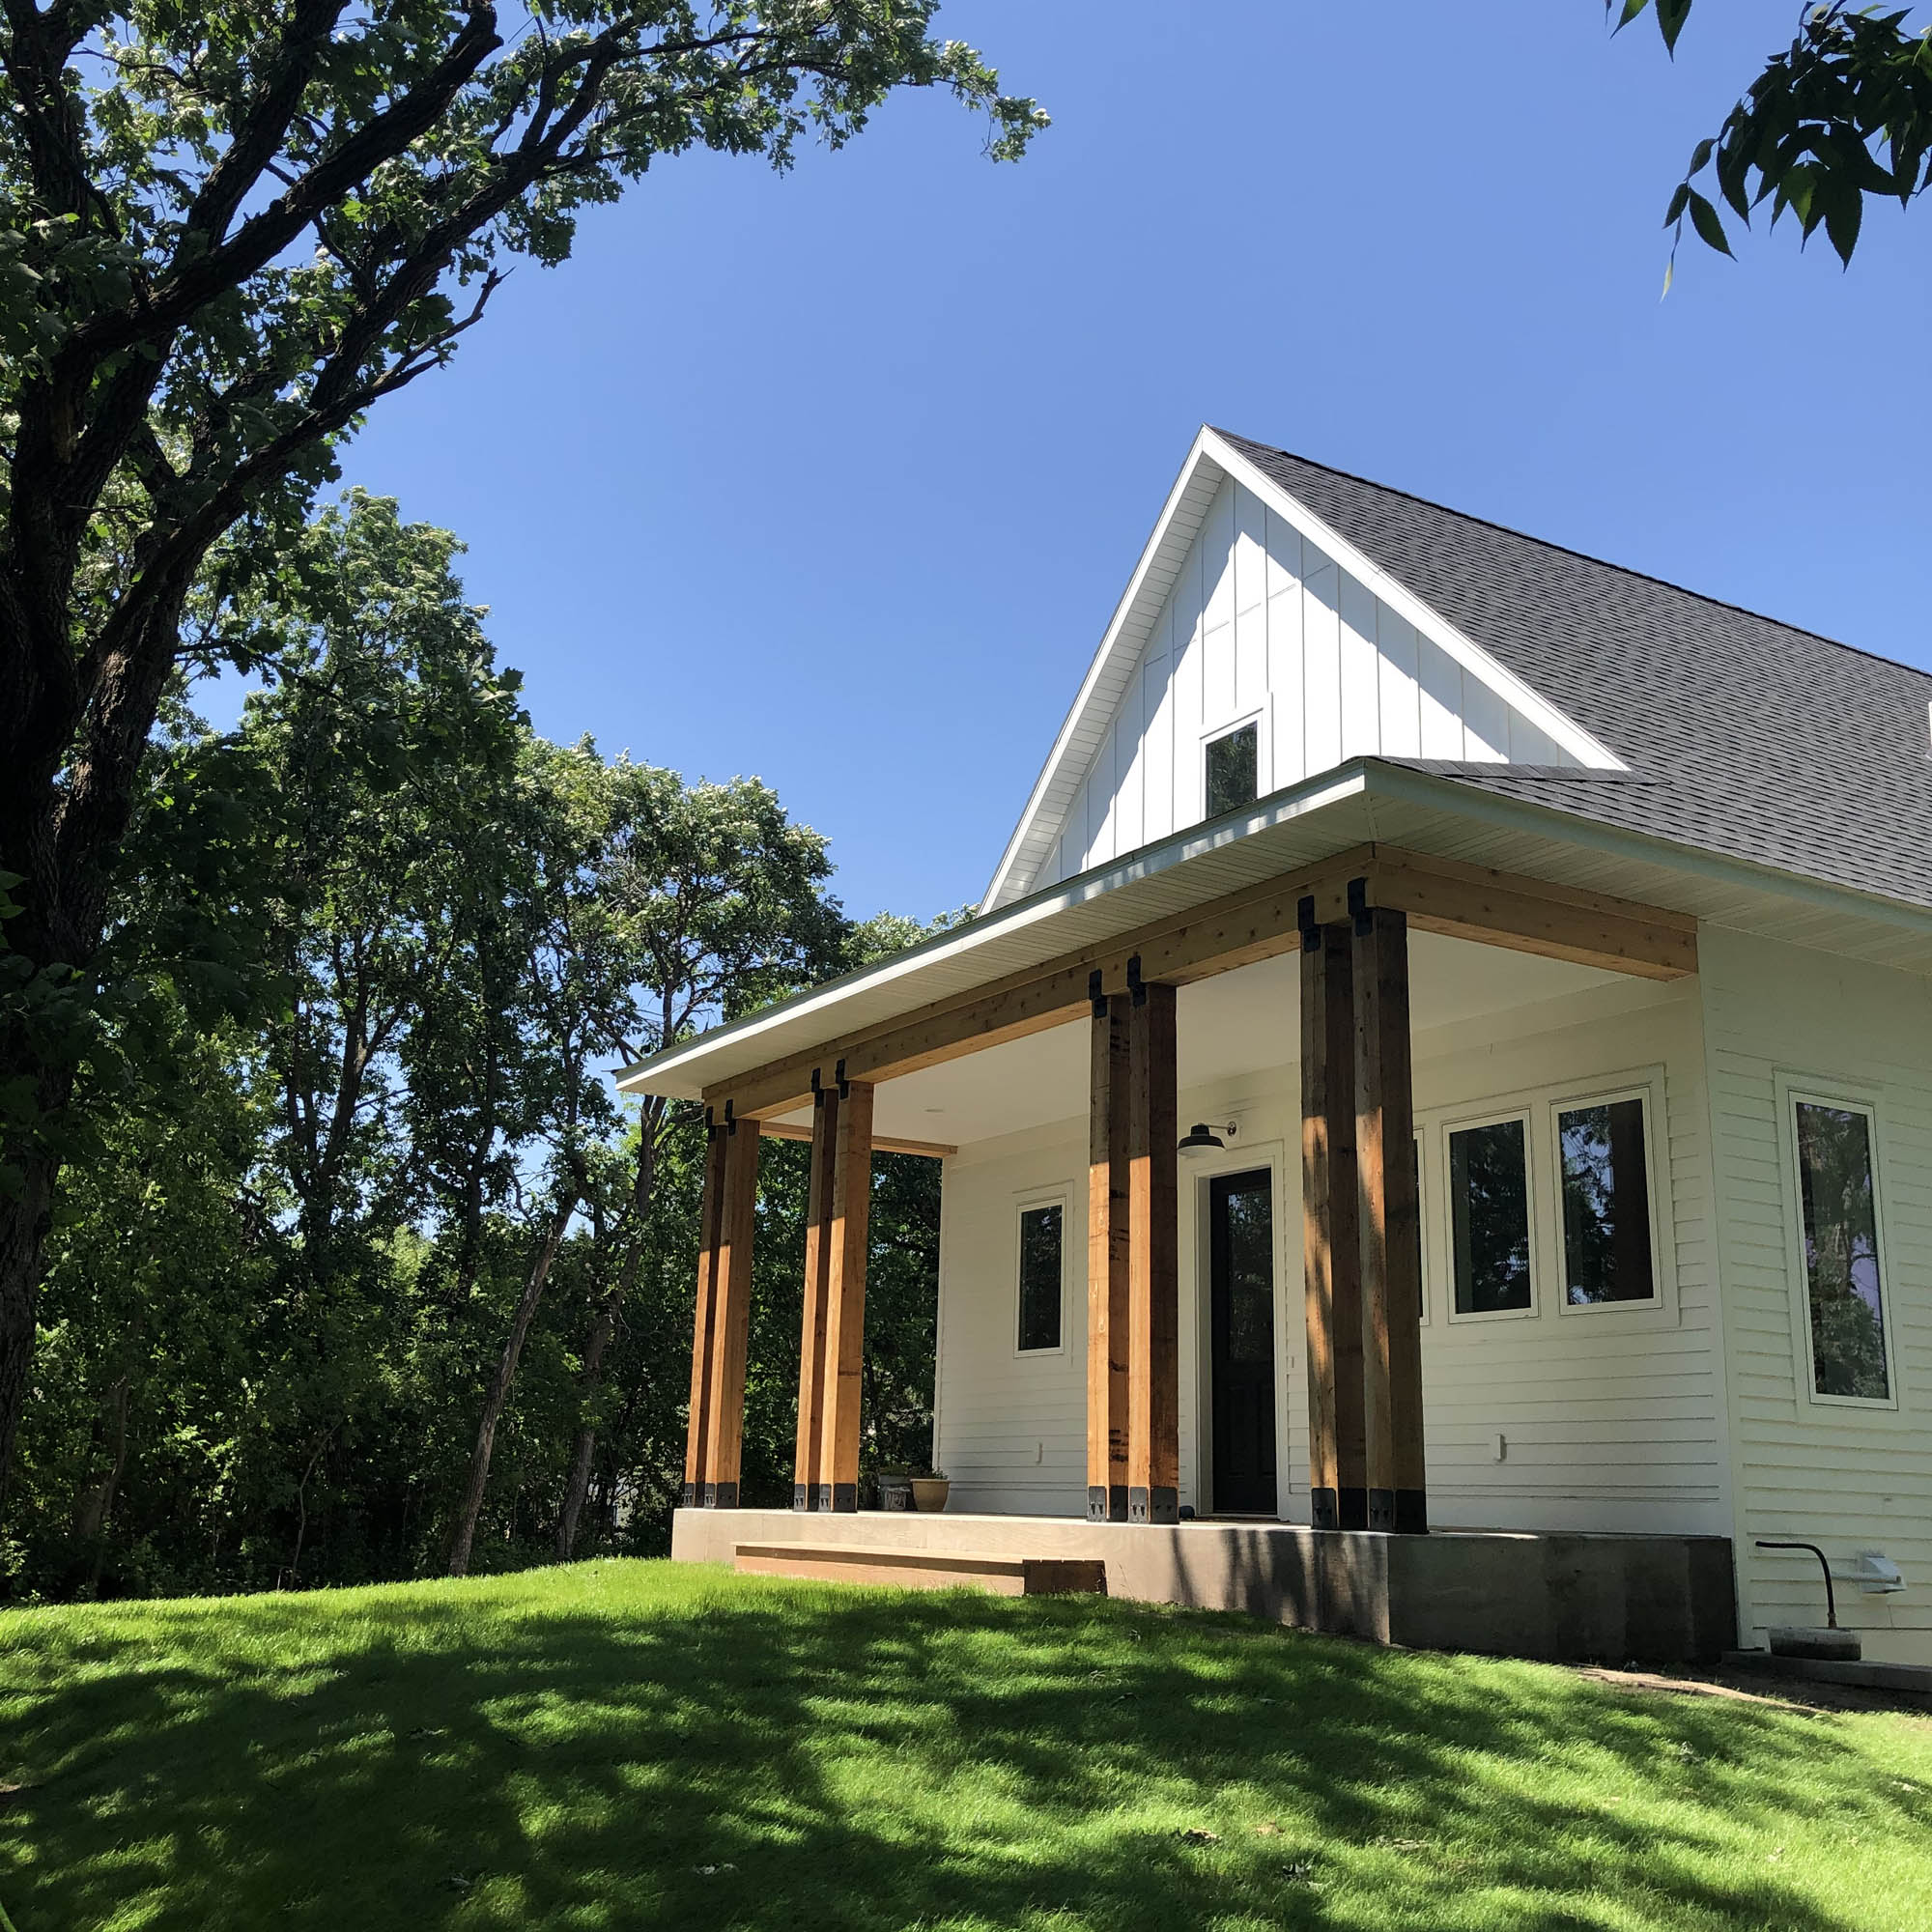
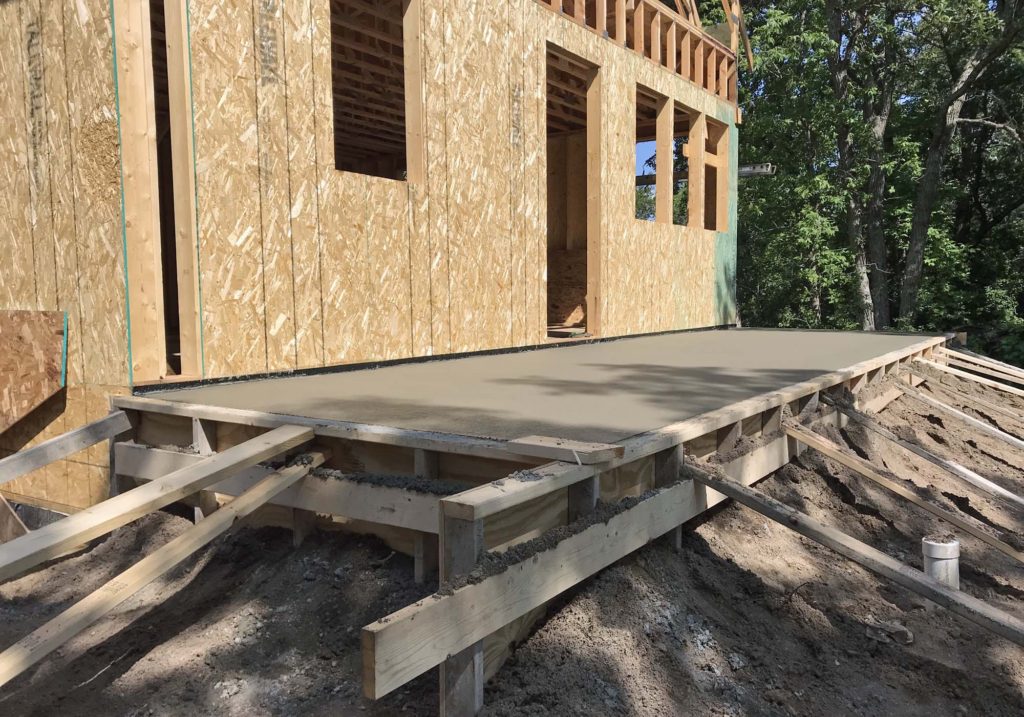
Next, the concrete for the porch was poured. They did beautiful work, and applied a broom finish. Because the posts needed to rest on the concrete, the porch floor needed to cure a bit before the next step.
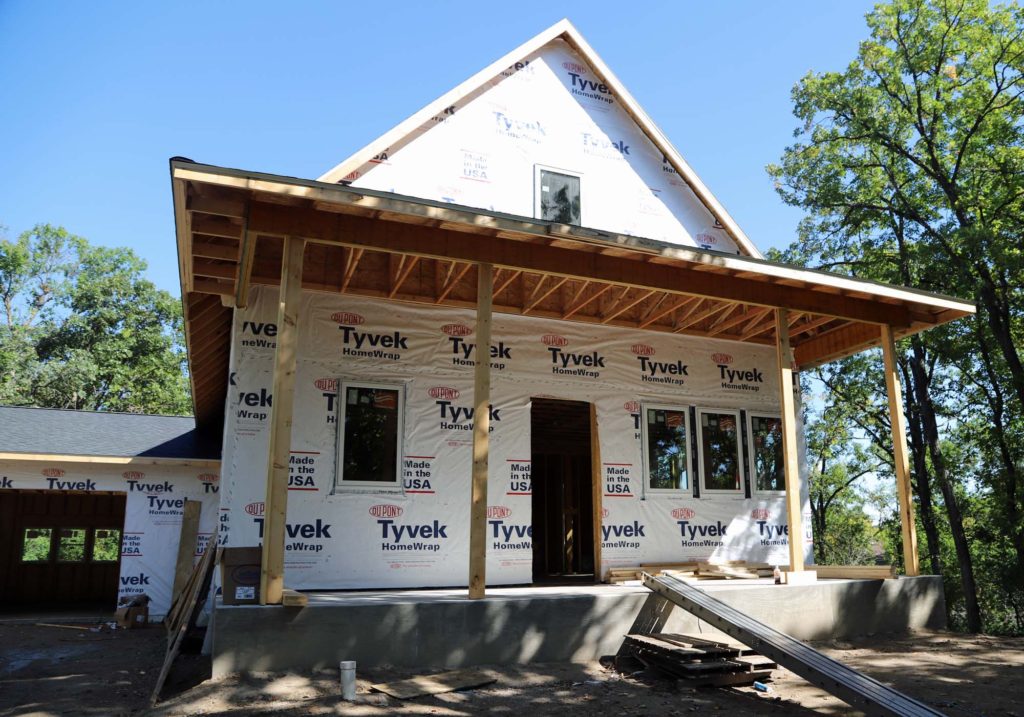
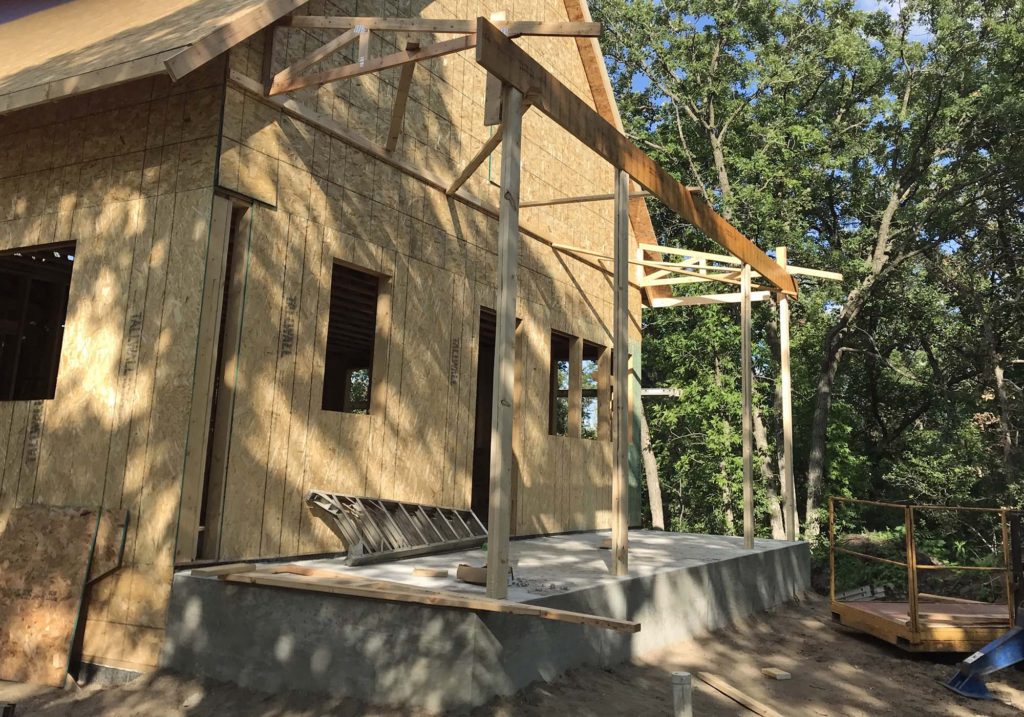
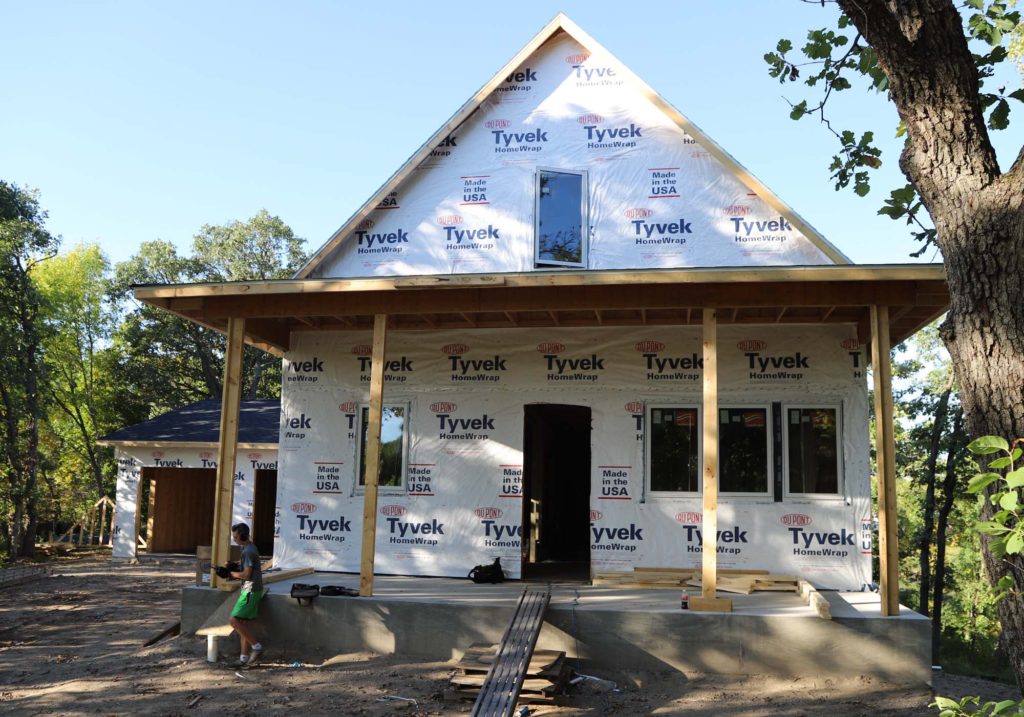
They finished sheathing the front gable end and began to set up the framework for the front porch. The posts are only temporary, until the thicker cedar posts are ready to be installed.
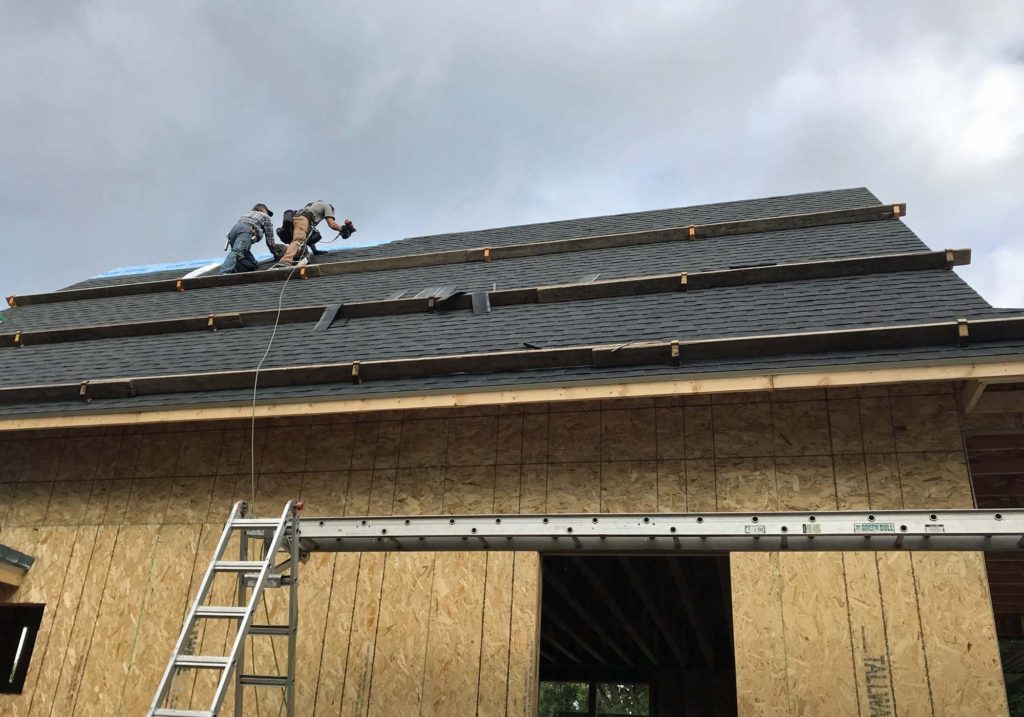
Once the porch roof was on, it was time for the shingles! We were more than excited for this step, as our area has experienced heavy amounts of rain for most of the Fall. It was finally time to get this huge asset of ours protected from the elements!
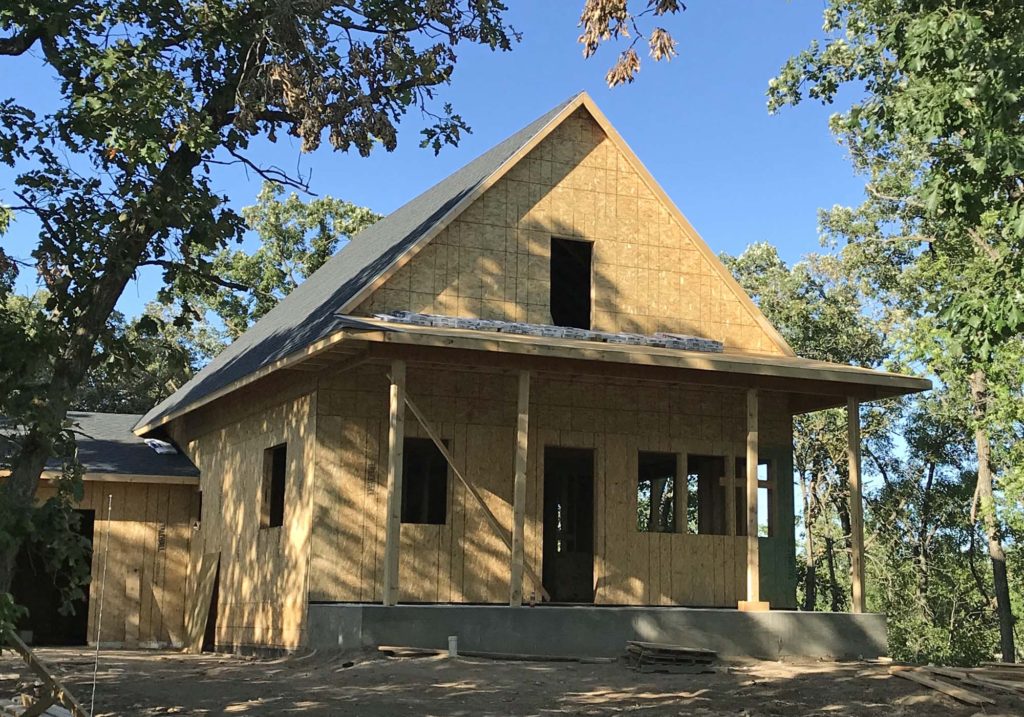
View from the front of the house with the shingles finished, windows framed out, and temporary porch posts. We will be doing some grading so that we don’t have so many steps to the porch.
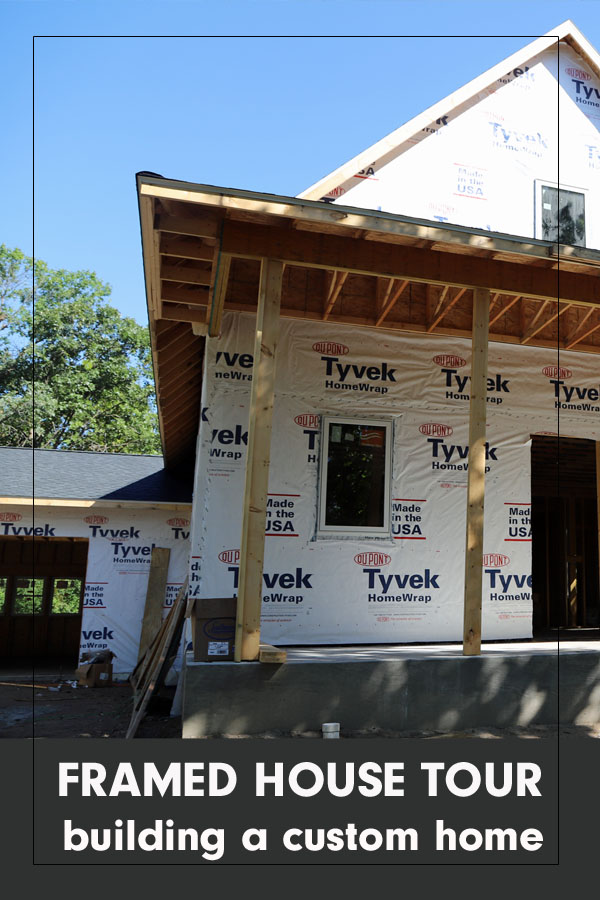
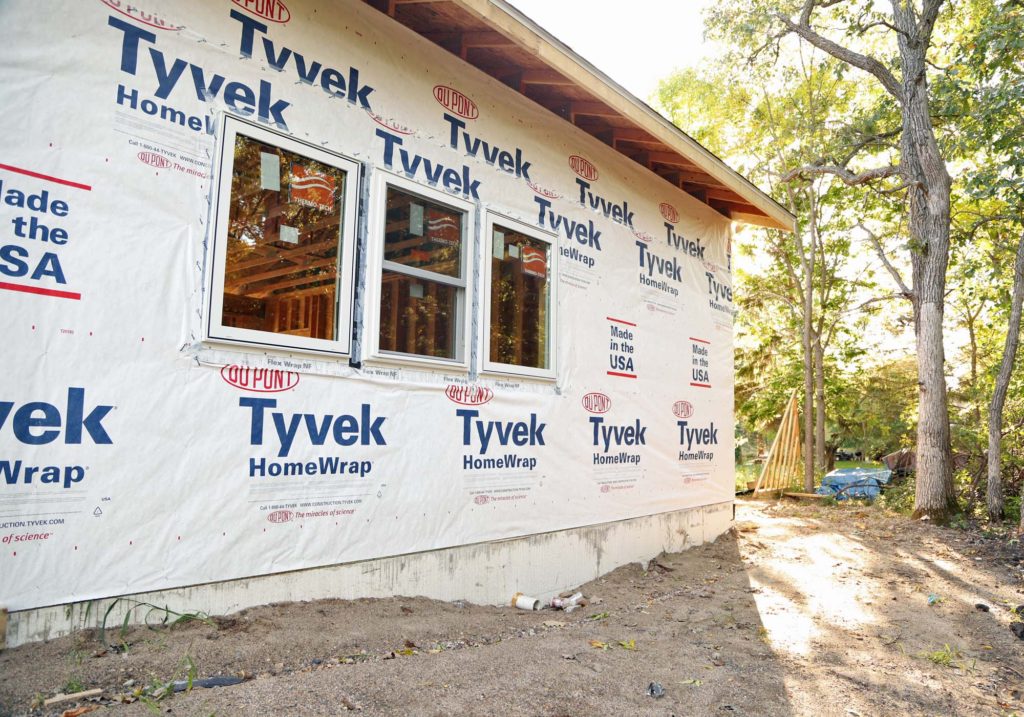
The waterproof wrap was added to the exterior, and the windows installed! This step really helped to brighten up the entire exterior of the house! Since our final siding and trim will all be white, it is fun to see it this way.
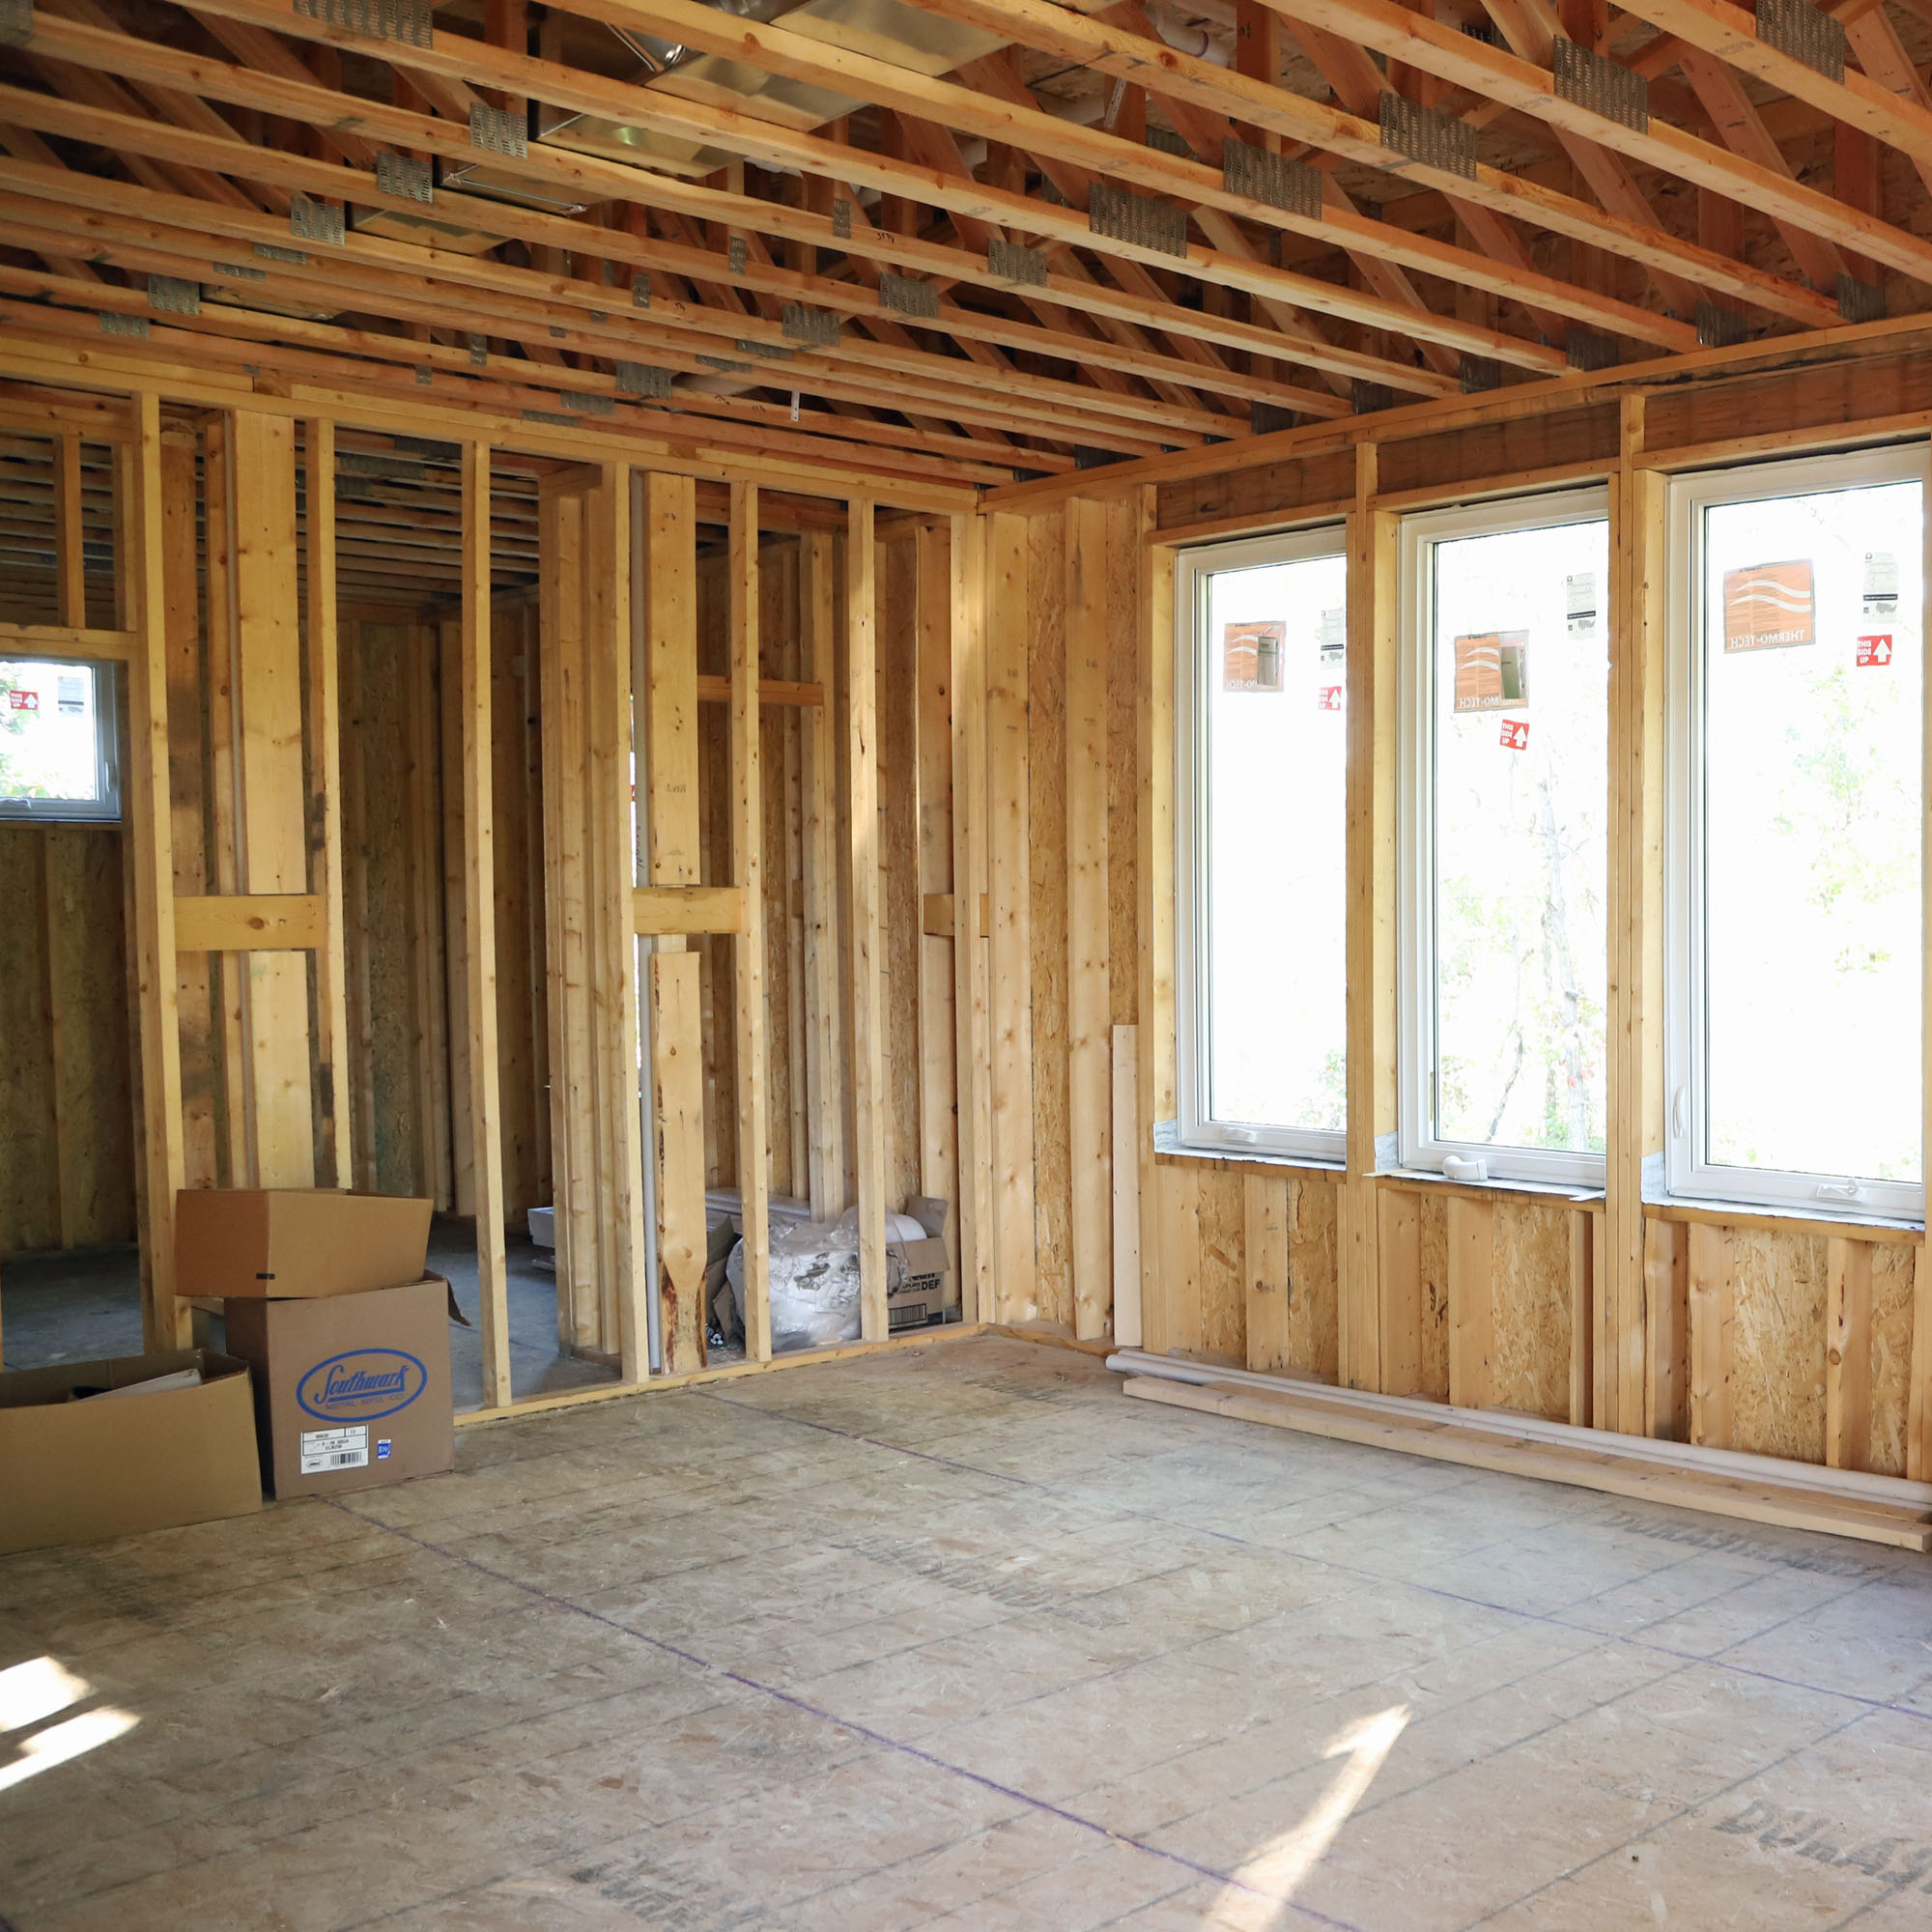
FRAMED HOUSE TOUR
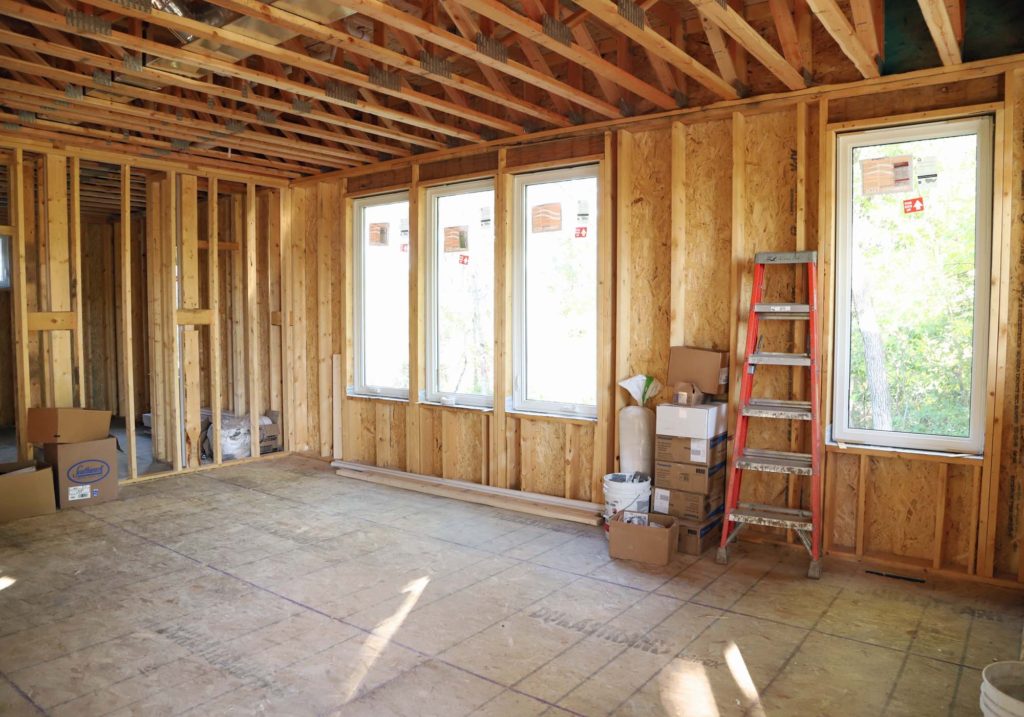
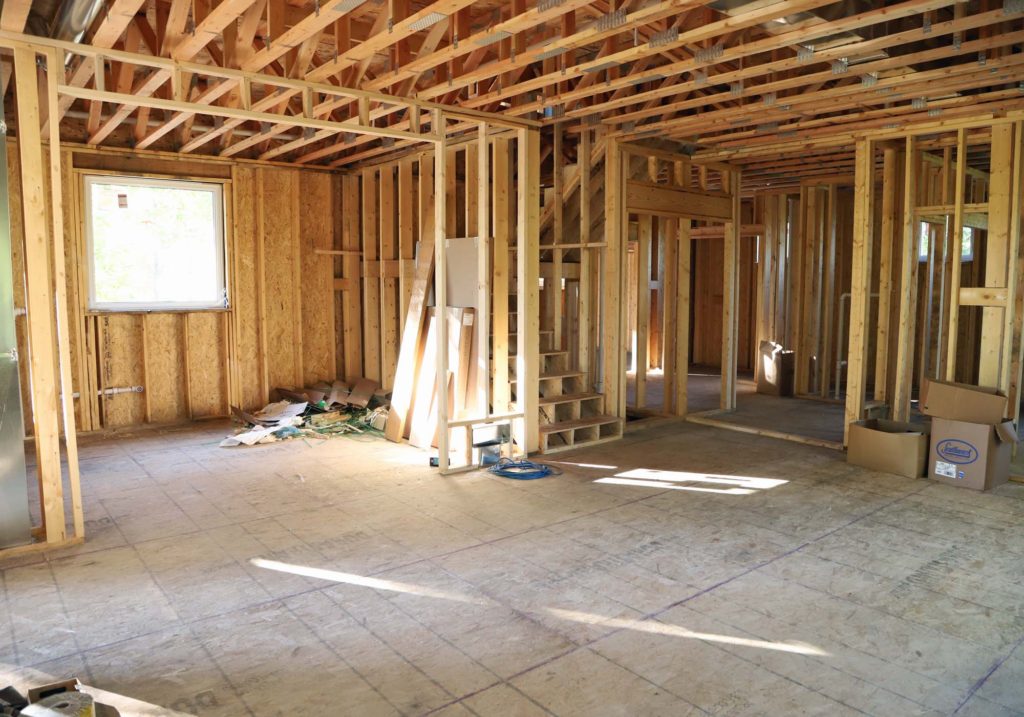
While all this was happening on the outside, a ton was also going on inside the house. In fact, the inside framing process is essentially complete! The HVAC crew has started running ductwork, and the plumbers have been coordinating as well. I thought it might be fun, before all the walls are covered with drywall, to take you on a full house tour!
Below are a few pictures from the interior of the house. Scroll through to the bottom of this post for a link to the video tour, and see every nook and cranny of our future house!
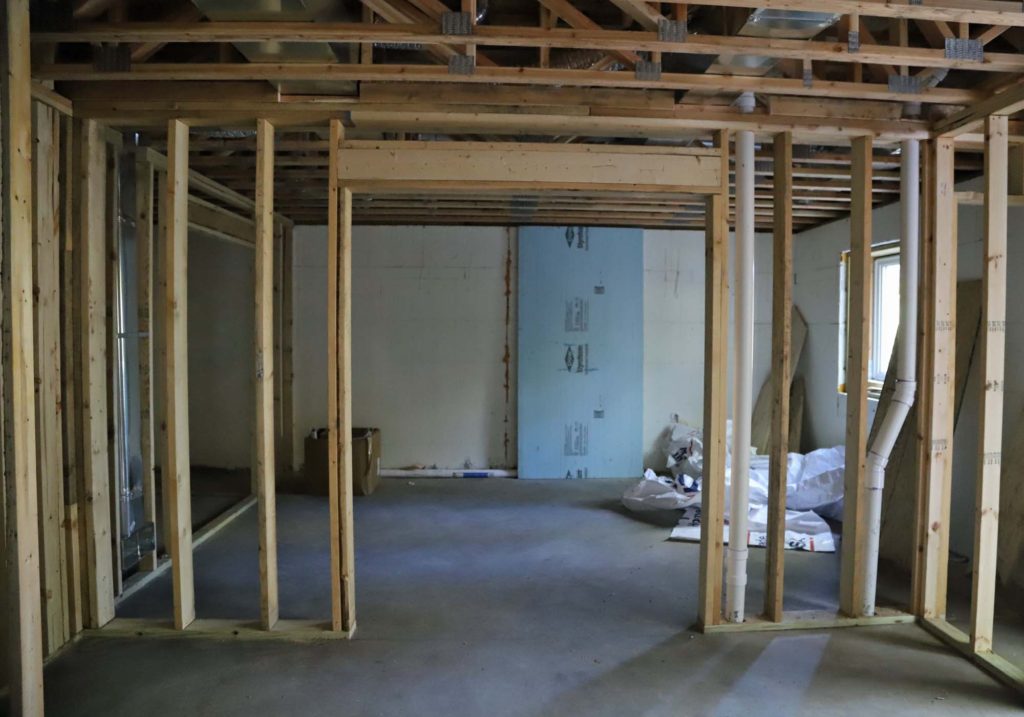
View of the living/dining space
Looking toward kitchen and stairway, from the living room
Master bedroom
Mudroom/ laundry room space
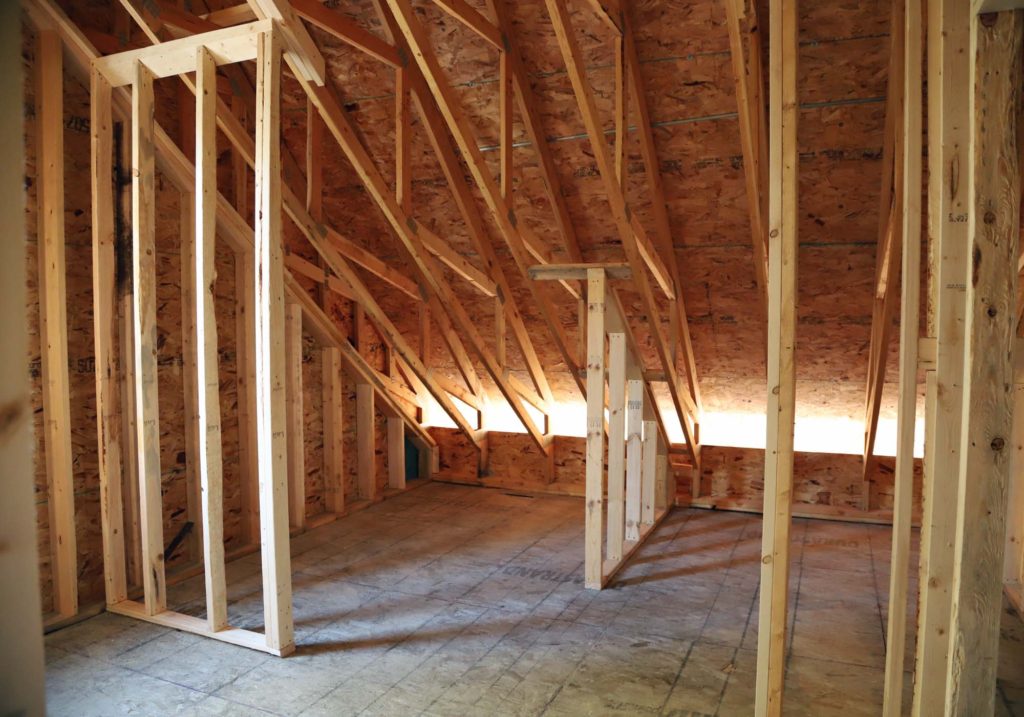
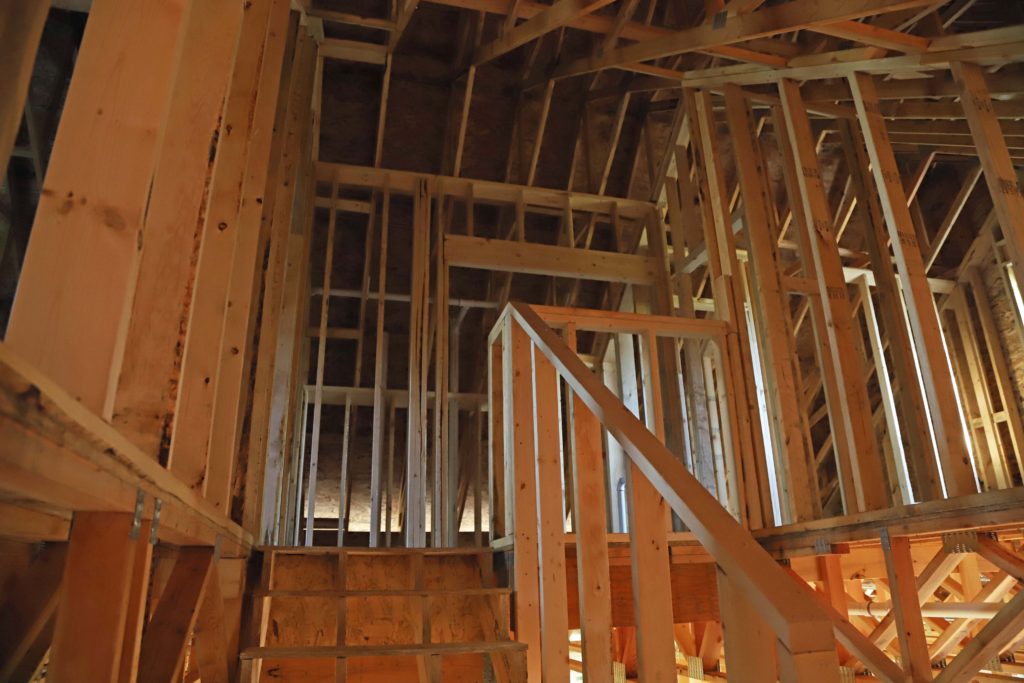
View of upstairs hall space and vaulted ceiling
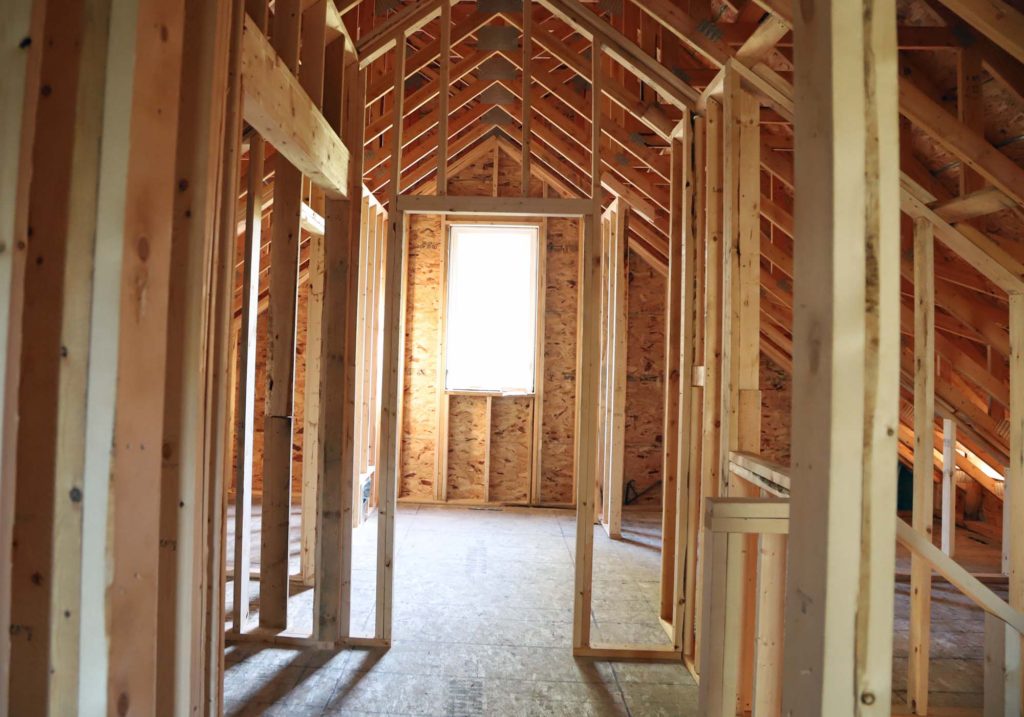
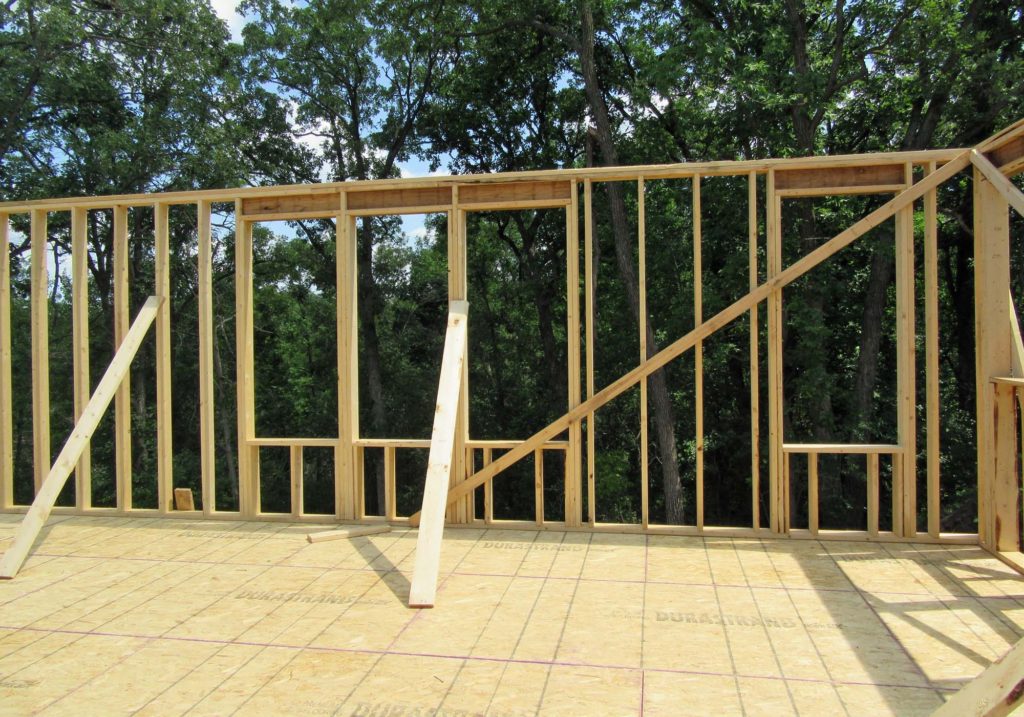
Girls bedroom space
Boys bedroom space
View from hallway space into boys bedroom
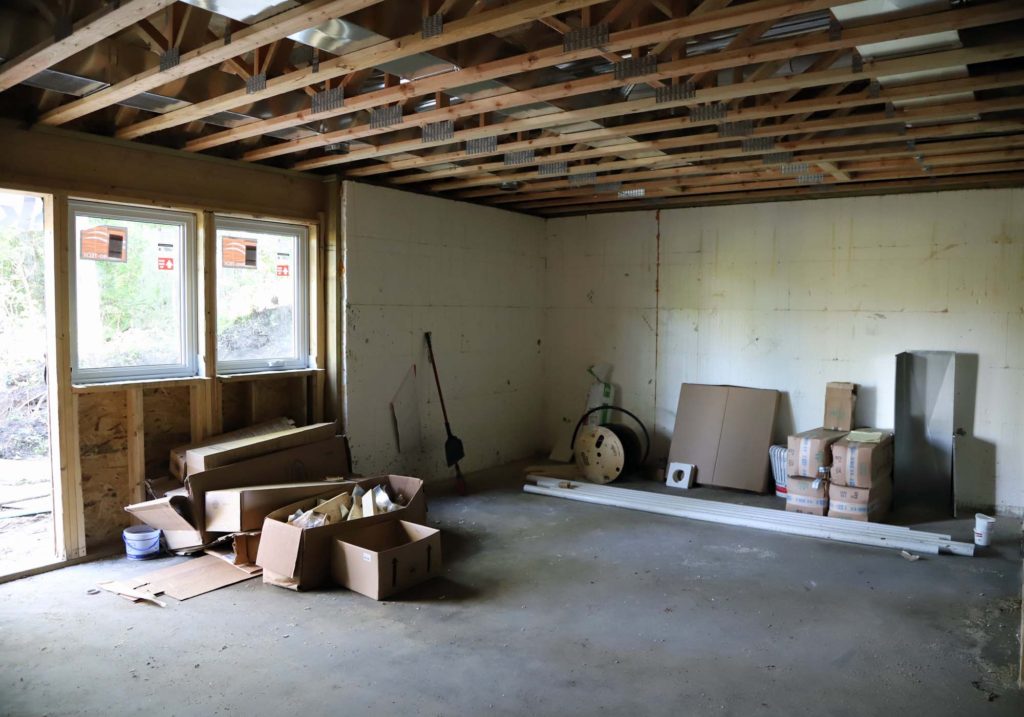
Basement family room
View from family room into the ping pong table space
FRAMED HOUSE VIDEO TOUR
Join me on the first full house tour of Arrow Hill Cottage!
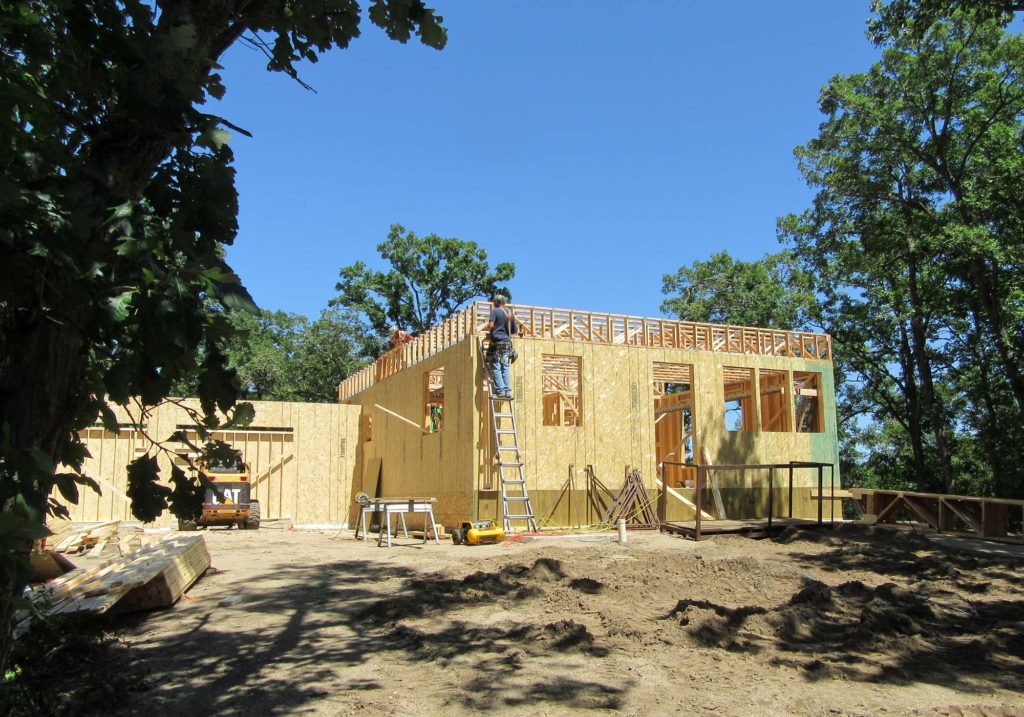
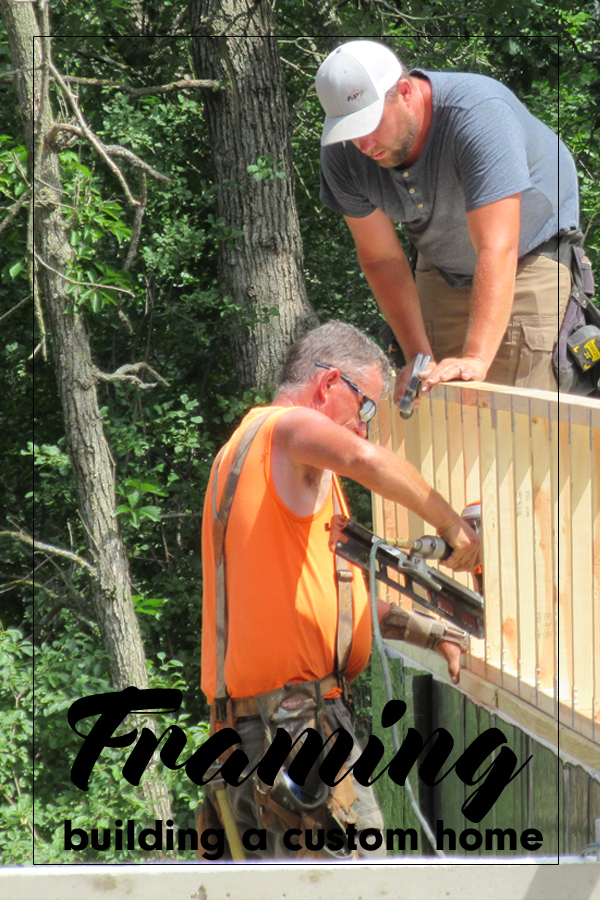
Time for another building update! In this week’s update I share all about the wood framing of our custom home build! Though I was hoping to share the entire framing process, things aren’t moving quite as quickly as we had hoped. This post will discuss the portion of framing that has been completed. And I will be sure to update again once the rest is finished.
At the end of Update No. 4 the foundation had just been completed. Essentially we had a very pretty looking hole in the ground, and were ready to begin the wood framing. I mentioned how excited we were for this step, when the building will start to take shape and begin to actually look like the house we had envisioned!
WOOD FRAMING STEP 1 | FLOOR TRUSSES
The first step in the wood framing process is to attach a wooden sill plate to the foundation. The sill plate is anchored to the concrete with large bolts and creates a base for the floor trusses to be tied to.
Floor trusses work essentially the same way as standard 1x member construction, with a few advantages. They allow for longer clear spans, as well as offering space for mechanical duct-work and plumbing. For these reasons, as well as the ease of installation, trusses are favored over traditional hand framing in residential construction today.
To install the floor trusses for our main level, the framers had to do some fancy footwork. The younger of the two was set with the task of almost ‘tightrope’ walking across the walk-out side wall. With a drop of over eight feet, it was a dangerous mission. He admitted to me later that it was a bit un-nerving! They did eventually get all the trusses in place.
For our family, it was fun to go into the basement and look up at all of the installed trusses since this was the first time that we had a mostly enclosed space to go into. Sensing the personal/ human scale of the project is very important and was something that we hadn’t yet been able to experience, having the spaces open to the great outdoors.
ADDING THE SHEATHING
The next step in the wood framing process was to add the sheathing on top of the installed trusses. Once installed, the sheathing plus trusses work as a monolithic system, providing superior stability.
We were sure to take advantage of walking on our main level for the very first time. In fact, we made an evening excursion of it by picking up food from Dairy Queen and having a picnic on the site of our future dining space. The night was ideal, and the first moments we spent at our house together is a memory I will cherish forever.
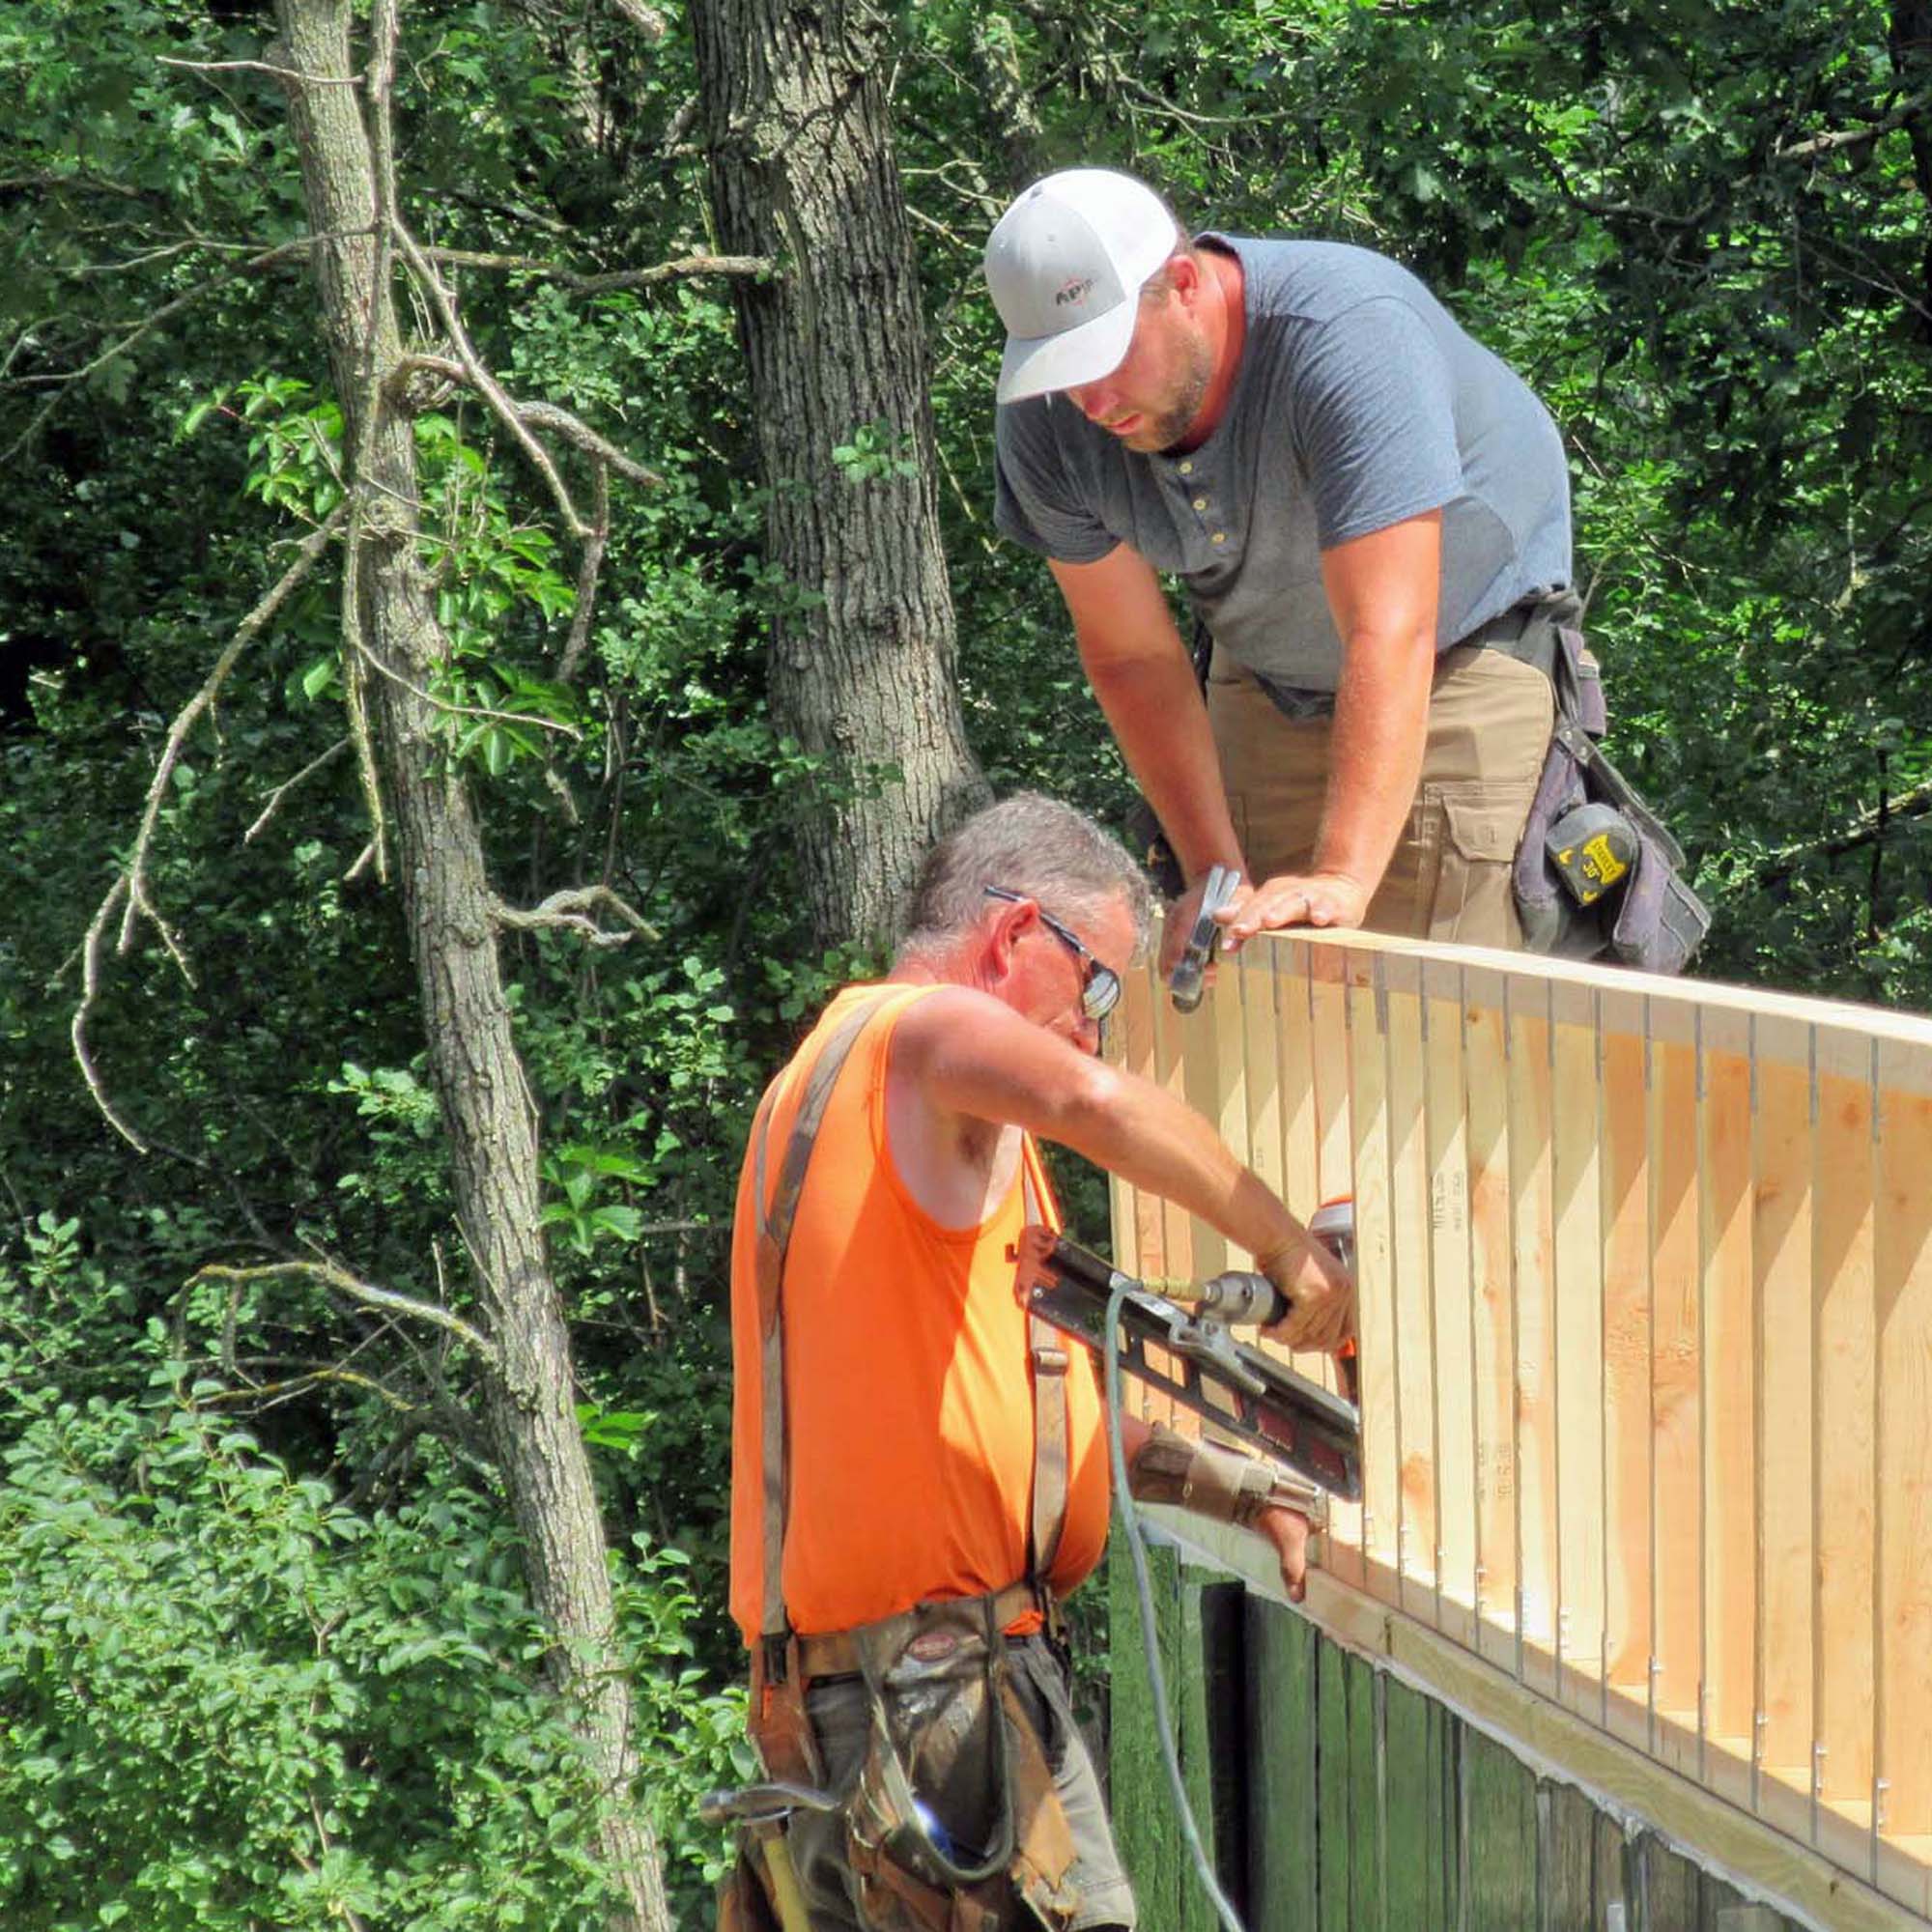
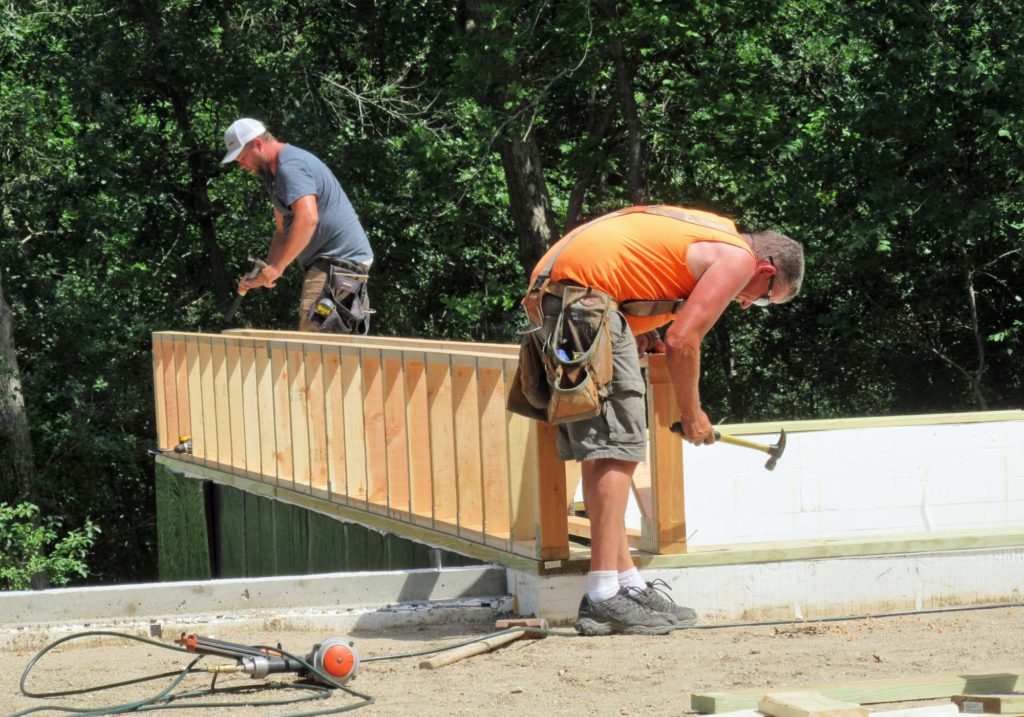
WOOD FRAMING THE WALLS
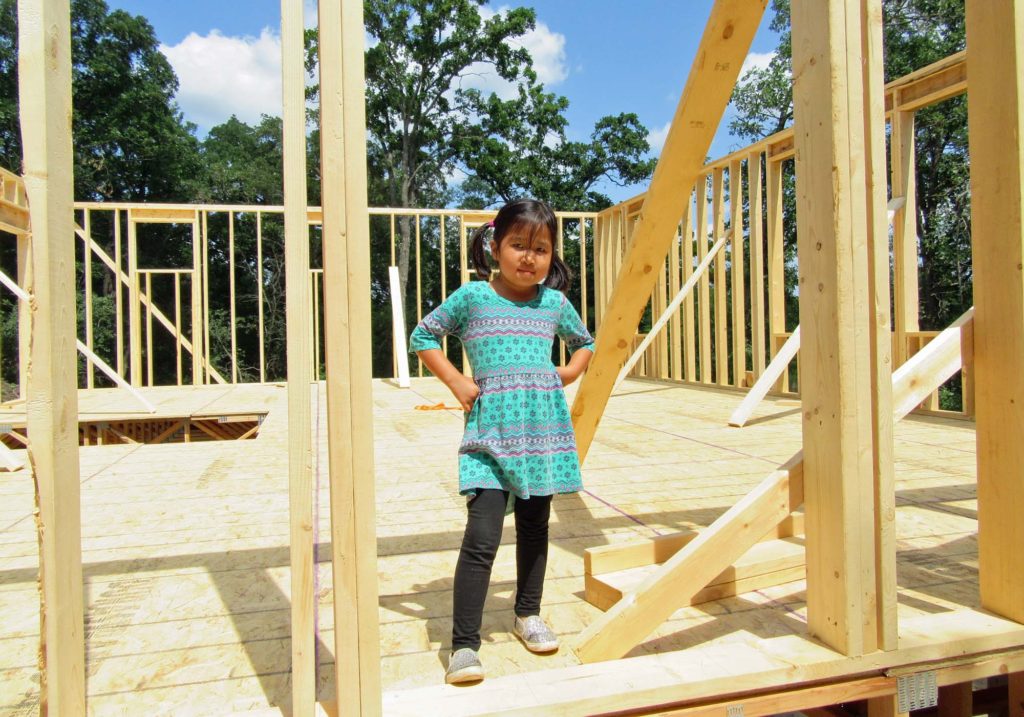
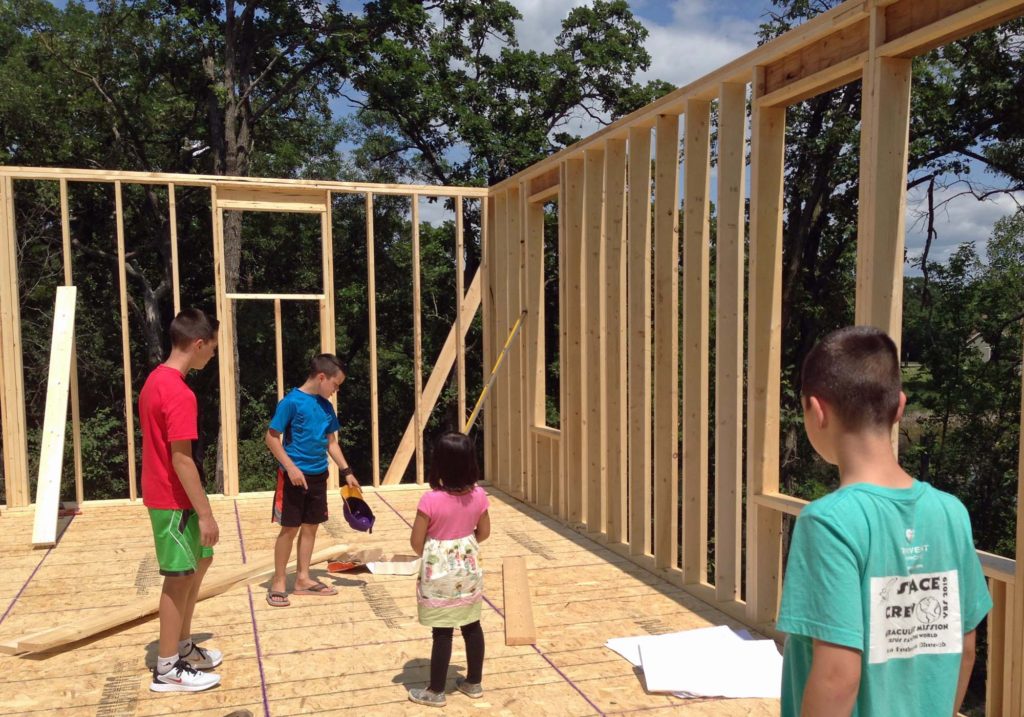
Up next came the main floor wall framing. With the window locations set up, it was exciting for us to finally be able to see what the views from each of the rooms will be.
It came as no big surprise that the most awesome view of all is from the open living/dining space, overlooking the woods and pond. The western facing kitchen window though displays a great sunset view, which we weren’t expecting.
How cute is she, standing in the location of our future front door!
Walking through the shells of each room on the main level, I couldn’t help but imagine all of the memories that are about to be made here. We feel so blessed that we will soon be calling this place home.
Though I have given a bit of a mini walk through over on Instagram, I do plan to also film an entire ‘under construction’ house tour – once the wood framing is complete. Be watching for it!
CONSTRUCTION SITE VISITS
During the wood framing portion of the construction process, my husband and I settled into a nice site visit routine. I will typically stop by in the early afternoon, while out and about with the kiddos running errands. This is a chance for me to touch base with the crew, and answer any questions they may have. Craig will also swing by after he is done with work for the day. Typically the crew has left the site by that time, which allows him to take in the progress a bit more slowly. He generally takes a bunch of photos, then shares them with me.
These site visits help us to take in the day-to-day changes, as well as quickly catch any mistakes in the framing. One day Craig texted me a series of images and I discovered that the back three square windows weren’t centered properly. It’s something I hadn’t noticed earlier in the day, but from his pictures it was very obvious! The middle window should line up with a centered second story window, and it would have looked very goofy if the windows weren’t in alignment.
The center window should be centered on the back wall
And, though we are non-confrontational people, I contacted the framers right away to inform them of the mistake. Thankfully they acknowledged the problem and corrected it right away.
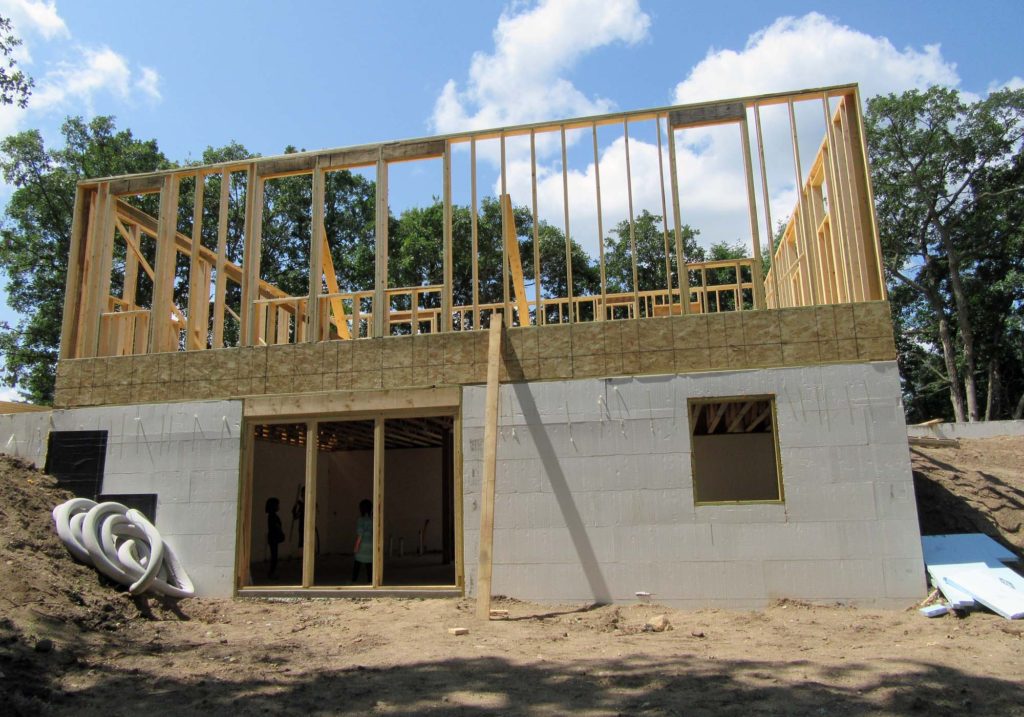
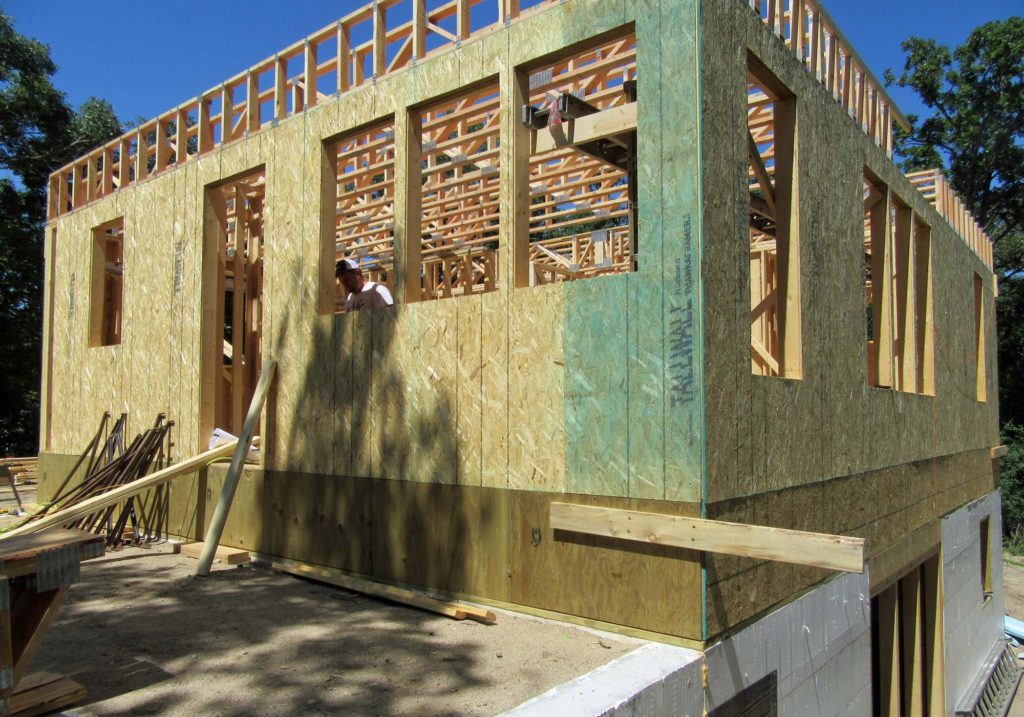
WALL SHEATHING + GARAGE
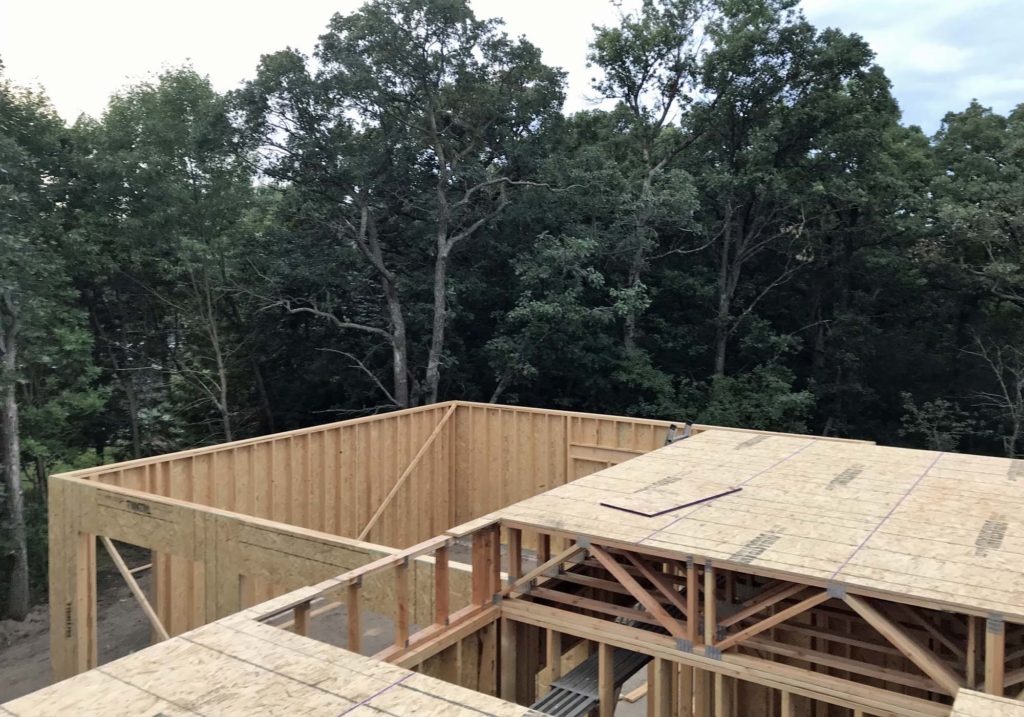
Next came the exterior wall sheathing. Covering the skeleton of wood studs really made the house shape come to life!
The garage framing was also put into place. During the construction of the garage we did make a couple of minor modifications. We raised the sidewall approximately six inches, which in turn created enough space for eight foot tall overhead garage doors. Previously we had seven foot tall doors, but figured the extra foot will come in handy if we ever decide to get a larger vehicle for our large family.
I am over the moon excited for my husband to finally have a fully functional garage, complete with good lighting, plenty of open floor space, and a proper tool bench. He has waited a very long time for this!
We are also anticipating that we will love having an attached garage during the bitterly cold Minnesota winters! Our oldest daughter, who has mobility issues, will be especially appreciative. The icy winter morning walks to our current detached garage have been full of anxiety and frustration!
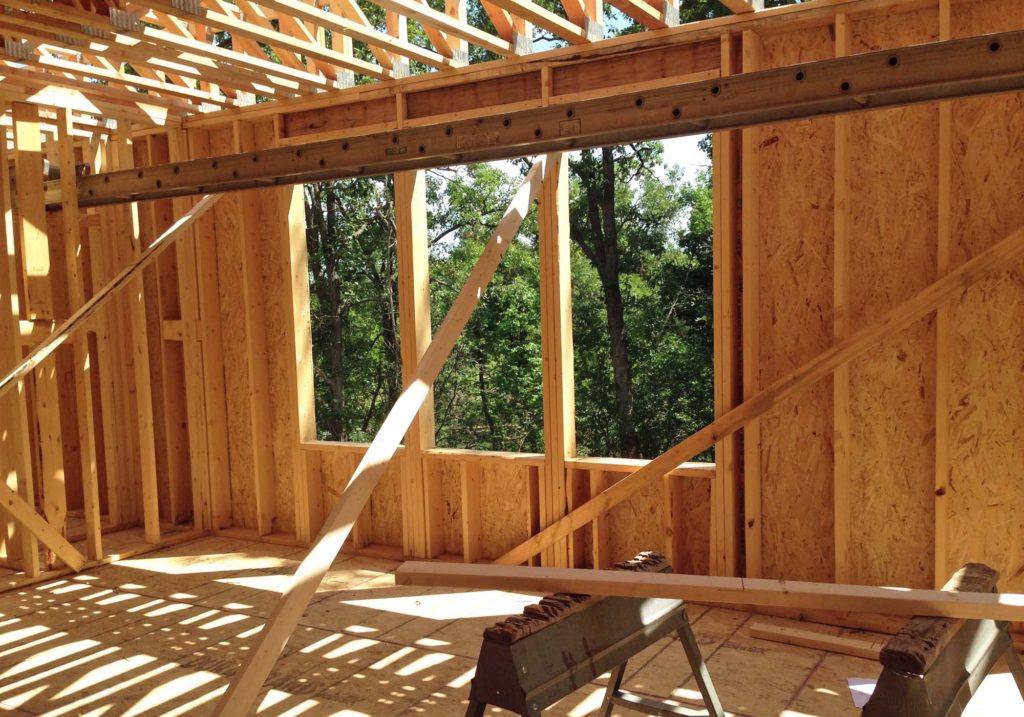
The wood framing continued with the setting of the second floor trusses plus sheathing. Because we were so anxious to see the view from upstairs, one night we took a ladder and climbed up. Without any walls for protection, it felt like we were standing on top of a mountain! It was a mighty sight!
Of course, the view won’t be quite as expansive once the walls are up. There are only two windows upstairs. One in the boys bedroom, which faces the street. And one for the girls, with a spectacular view of the woods.
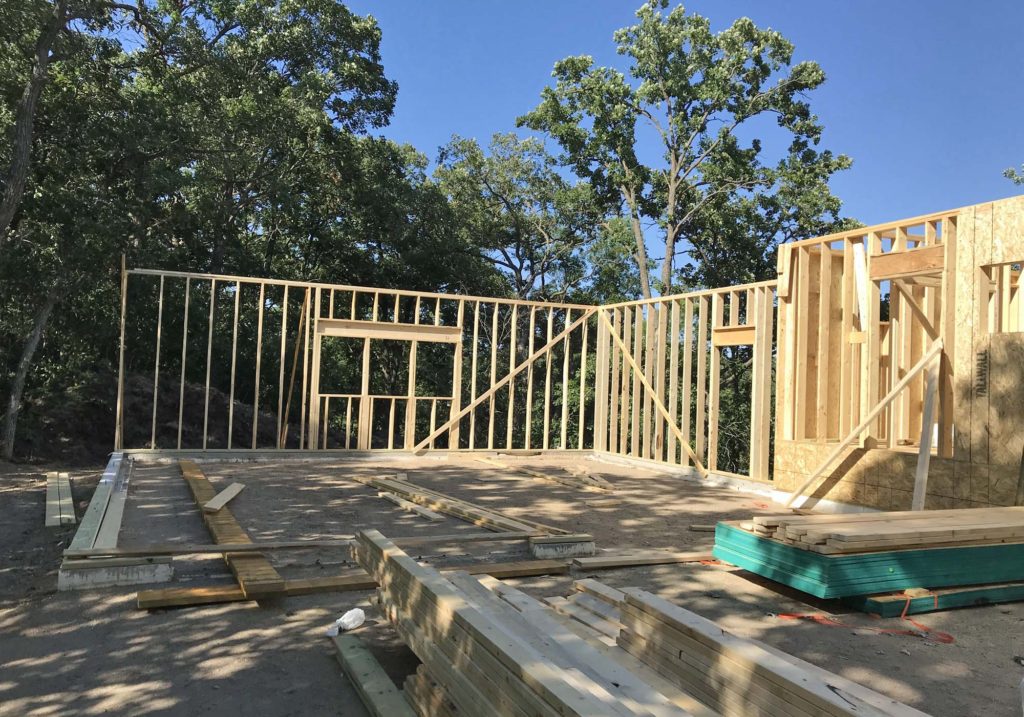
WOOD FRAMING | NEXT STEPS
This week we had a bit of a standstill on the site. The concrete guy was supposed to be back to form up the porch stoop and have it poured – so that the roof trusses for the house and porch could be set at the same time. Unfortunately, the roof trusses were delivered a day too early. This meant that there wasn’t enough space on the site for a concrete mixer truck to come in and pour.
The new game plan is to install the roof trusses for the house and garage first, starting early next week, then come back to finish the porch and get the roof on that portion.
I am beyond giddy for the roof to go up, and to see the house shape in it’s completion! However, that will have to wait for the next update.
Be sure to stick around to see this little house of ours come to life! Thanks for checking in today!
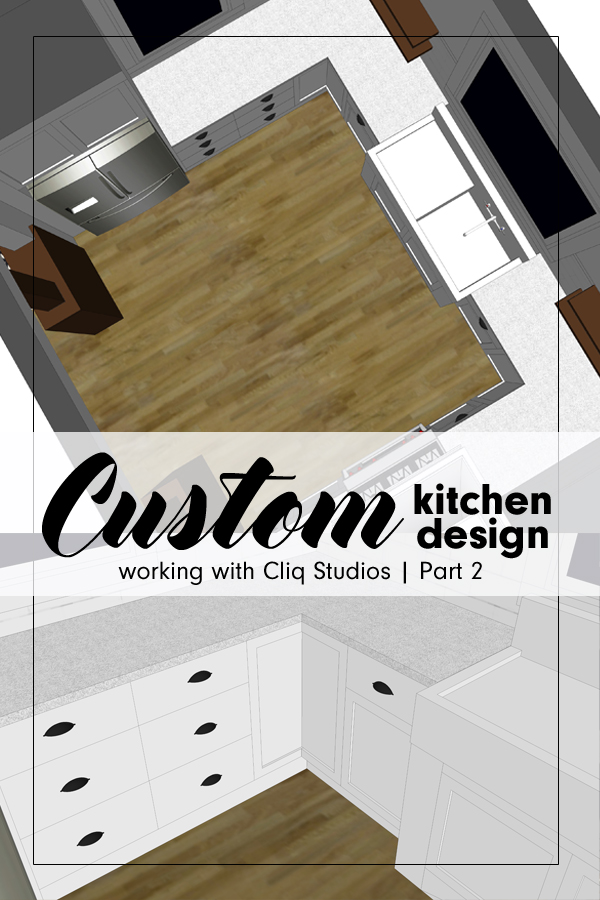
In this post, I review the process of working with the online cabinet company Cliq Studios. All opinions are my own and I was not compensated for my thoughts. I am in no way sponsored by or affiliated with the company.
Construction of our minimalist cottage has been moving along at a steady pace. With framing well underway, we are beginning to hit crunch time. Finish selections need to be made and ordered soon. In fact, we have already begun ordering the items that require a longer lead time. The cabinetry included.
We began our kitchen design over a year ago, as documented in this post. At the writing of Part 1, we were fairly confident that we would be using Cliq Studios for our cabinetry. And now that we have placed our order, I can confirm that I was right!
Today I want to share with you how the process of working with Cliq has gone for us so far.
WHY CLIQ STUDIOS?
I encourage you to go back and read Part 1 of this series for the full run-down. Essentially though, our decision to work with Cliq was primarily done because of budget constraints. Simply put – it isn’t cheap to build a house, and if you’re on a budget, something’s got to give!
We were confident that we would be able to attain a custom looking kitchen, for a fraction of the cost.
DESIGNING THE KITCHEN
When I first started the kitchen layout process with Cliq Studios, I was assigned a designer from the company. She was wonderfully patient and held my hand through a lot of revisions. And when I say a lot, I mean, A LOT. If you remember – our kitchen was in a completely different corner of the house at one point! This designer was very responsive, answered all of my questions, and gladly made any changes that I asked of her.
A few months ago, my designer took a job elsewhere and I was transitioned to someone new. This made me a bit nervous, wondering if the new designer would truly understand the ‘vision’ I had for the space.
The great news is – he totally got it!
Our Kitchen
I made a major last minute floor plan revision right around the time that he came on board. He was happy to start fresh with the new kitchen layout, while keeping in mind the design decisions that had already been made.
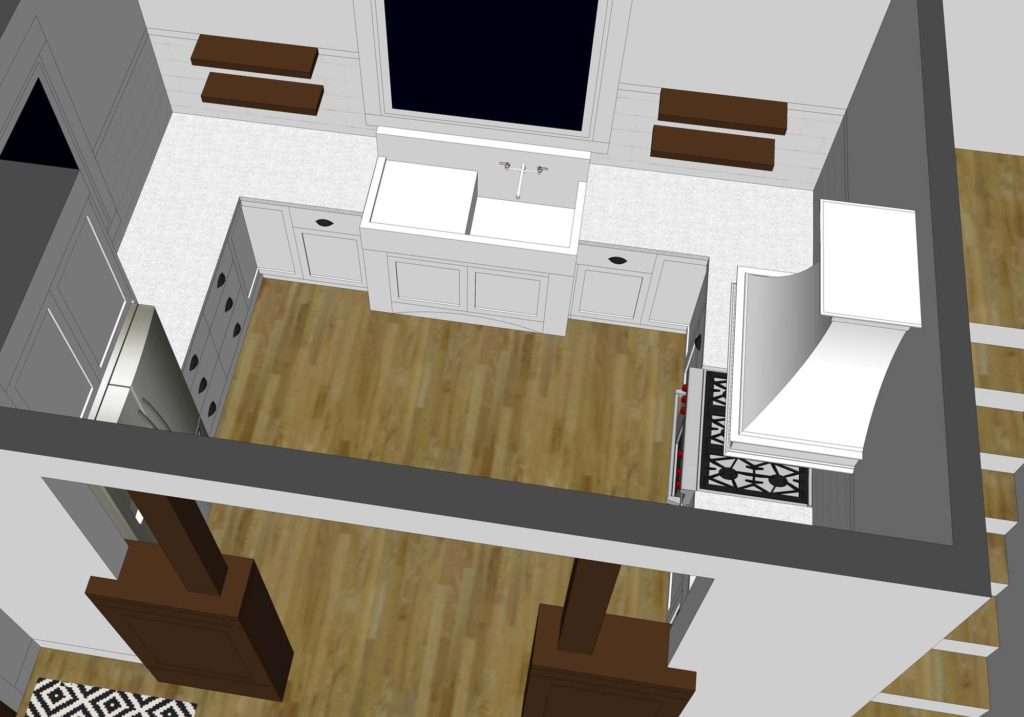
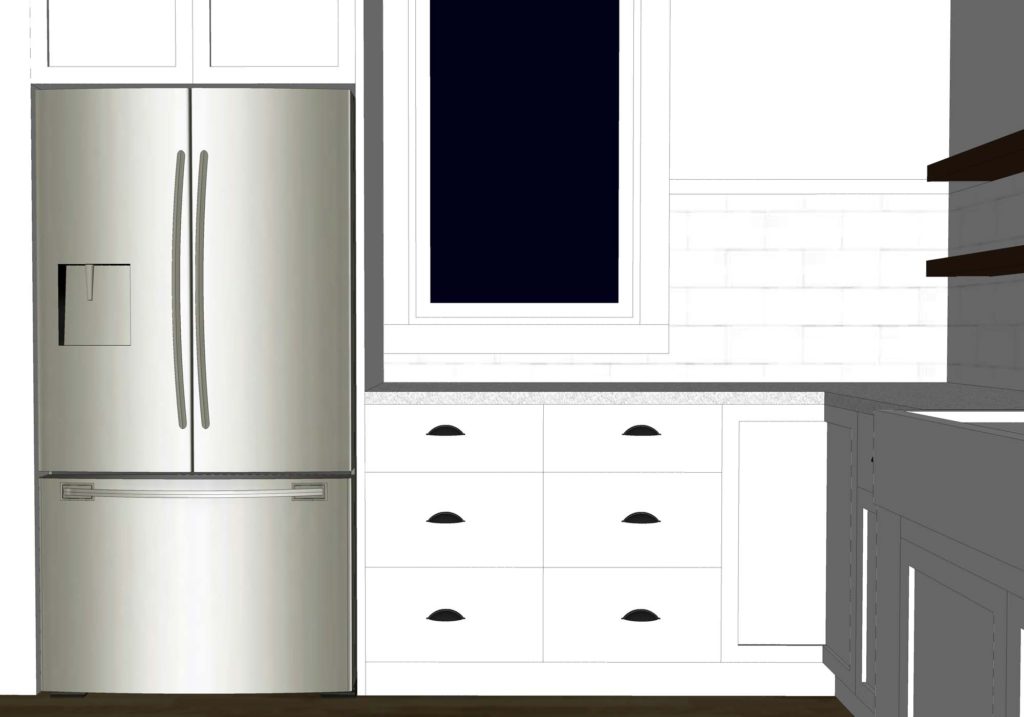
Our kitchen is roughly 10′-6″ x 13′-6″ and is a basic rectangular shape. It was always my intention to keep the design of the room extremely simple. The showcase of the space is the 1930’s era cast iron sink that we inherited. It will be centered on a large west facing window. Stainless steel appliances will complete the kitchen work triangle.
Because I personally don’t like the way upper cabinets tend to make a kitchen feel heavy and closed in, we opted for open shelving. These shelves will be custom made from trees harvested from our property, and hold the dishes we use on a daily basis. The one upper cabinet that is included in our kitchen design is located above the fridge. It’s depth will be perfect for large roasting pans and rarely used holiday platters.
Other Features
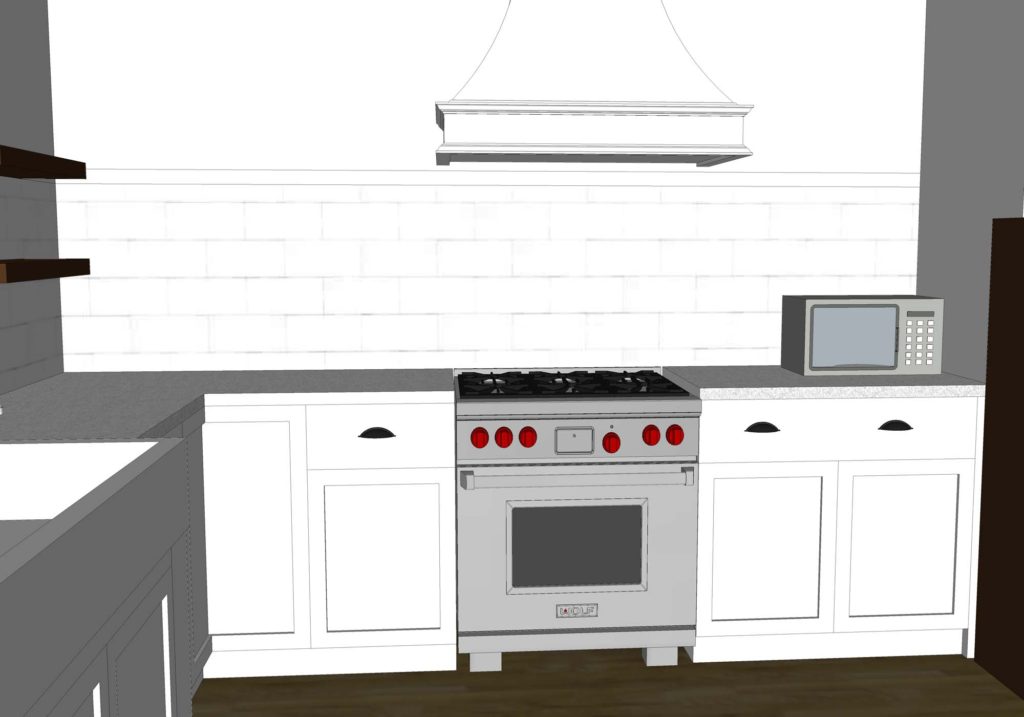
Another favorite thing in our future kitchen is the curved ‘artisian’ range hood. Though Cliq does offer this style, I have found another brand online at a better price. I’m all about finding the best deal.
Our microwave will be a smaller counter style. I would love to get one small enough that we can stash it in the cabinet below when it isn’t in use and keep the counters clear. We actually rarely use a microwave, and I value the counter space more.
As far as where the dishwasher will go… we won’t have one! There are a lot of strange looks when we tell people this. Truthfully though, we have never owned a dishwasher. This is another instance where we value the cabinet space over the appliance. Should we ever change our mind or sell the house, we have cabinets on either side of the sink that would accommodate a smaller model.
TIPS FOR WORKING WITH CLIQ STUDIOS
There are a few difference I have found between working with a custom cabinet maker and Cliq Studios. Should you choose to go the semi-custom route, keep these tips in mind.
Finish choices are limited
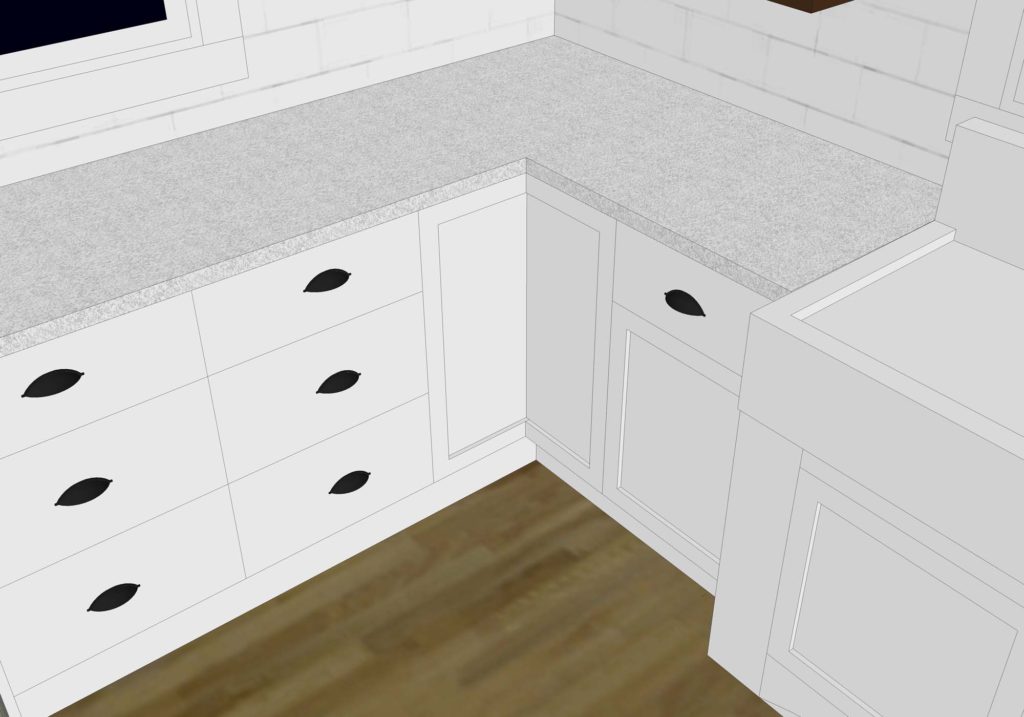
Though they offer quite a variety of wood grain and painted finishes, Cliq Studios can’t compete with a custom shop when it comes to selection. Certainly this is, in part, one of the reasons they are able to keep the consumer expenses down. I wanted simple, shaker style white cabinets for our kitchen. The ‘Rockford’ cabinet style, painted in ‘Cloud White’ was the perfect fit for us!
Size matters
Be aware that the more simple you can make the design of your kitchen, the less expensive it will be. Avoid having too many ‘custom’ sized items, which will drive up the cost. For example: The standard base cabinet is 2′-0″ deep. Requesting a cabinet that is 2′-6″ deep OR 1′-6″ deep will cost you more money.
Width of cabinets is another factor to keep in mind. Measurements need to be kept to an even inch, 24″ versus 24 1/2″, for example. I also found that there are max sizes on certain items, such as base drawer units, which don’t go over 3′-0″ wide.
Fillers are your friend
For those tricky spots where one of the standard sizes won’t fit, fillers are your friend. My designer was great about noting where fillers where going to be needed.
There is also the offer of larger side panels, such as those used to enclose a large fridge, for a more built-in look.
Add-on’s are extra
While Cliq studios does offer custom add-on’s such as garbage pull outs and drawer dividers, they are going to cost you extra. I did some research and found that the organization items I wanted could easily be added, after installation, for less. Another bonus of waiting is learning how the kitchen functions. After using it for a while, I may find that those upgraded features aren’t necessary.
Finally, your designer can assist you in selecting counter tops and hardware. Be advised though that the counters are only available through one company, Cambria, which sells a solid surface material. This limits your choices, and they may not have the look you are going for. Drawer pull selection is also limited, and a bit higher priced.
However, if you are fine with fewer options, and like the idea of a ‘one stop shop’ for the entire kitchen design, Cliq Studios can make it happen!
CABINETRY COSTS
After working through the redesign for a few weeks, I finally felt settled and ready to order. I had been given cost updates all along during the process, so the final numbers weren’t any huge surprise to me. Because I know that it might be helpful for someone reading this review to see the actual costs associated with ordering cabinets, I am sharing the break down of expenses.
Included in the kitchen
(2) 3′-0″ x 3′-0″ corner lazy susan cabinets
(2) 1′-9″ x 2′-0″ drawer bases
(1) 3′-0″ x 2′-0″ standard base cabinet
(3) 1′-6″ x 2′-0″ standard base cabinets
(1) 3′-0″ x 2′-0″ upper cabinet
(1) tall side panel for fridge
(2) cabinet doors + pieces to make a custom cabinet for under the farmhouse sink
Various filler pieces
TOTAL COST: $5,242
As a result of this wonderful cost savings, we were able to add a few additional cabinets. Both for the mud/laundry room and a small snack station for the basement family room.
Included in the laundry room
(2) 2′-6″ x 2′-0″ standard base cabinets
(2) 2′-6″ x 3′-0″ upper cabinets
side panels for both
TOTAL COST: $1,555
Included in the snack station
(1) 2′-0″ x 2′-0″ standard base cabinet
(2) 2′-0″ x 3′-6″ upper cabinets
side panels and filler piece
TOTAL COST: $913
OVERALL COST for our Cliq Studios cabinet order: $7,710. When ordering, the taxes for our zip code were calculated. This added an additional $500 to our cost. Being able to get such a large number of plywood construction cabinets, with soft close drawers, for that price was a steal!
NEXT STEPS
Because I wanted to make sure that we didn’t hold up the process at all, I ordered our cabinets well in advance. Notice came just the other day that the cabinets are in production and should be shipped mid August! Unfortunately we won’t be quite ready for them yet. They need to be delivered to a climate controlled house, and I can’t guarantee that at this point.
Worried that this could cause a problem, I contacted our designer and asked if there was any way to delay shipment. He asked around and was able to confirm that the shipping company can offer us a 30 day extension should we not be ready to receive the cabinets. After that point we would be charged a rate of $50 per month for them to store the shipment. Certainly, this gives us peace of mind!
Overall, so far we have been very pleased with Cliq Studios! Be sure to check back for Part 3 – when I discuss delivery, installation, and my thoughts about the overall quality of the cabinetry!
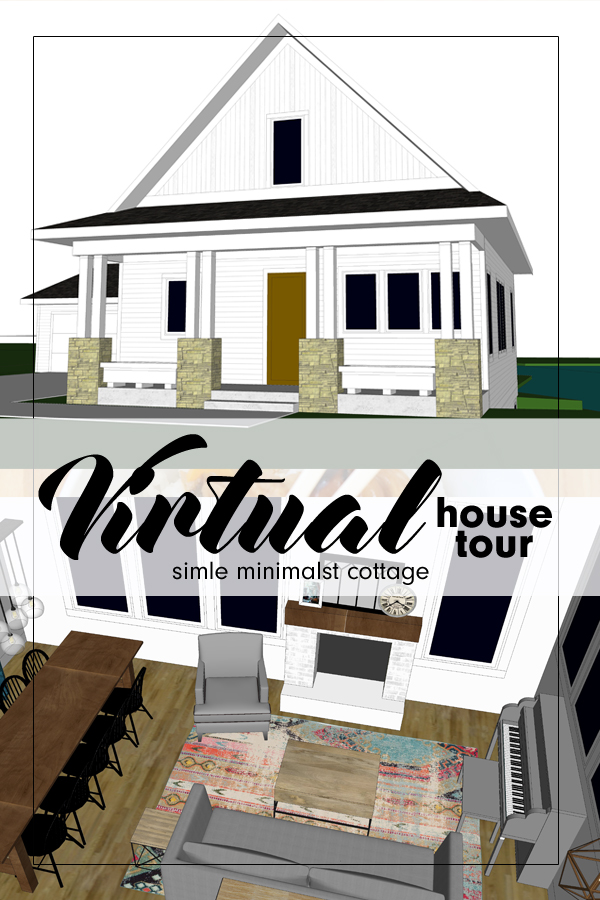
Join me today as I give a virtual tour of our minimalist cottage! This is the home we hope to spend the rest of our lives in, and we have worked diligently to design it to meet all of our needs, now and in the future.
With framing in full swing, I thought it might be a good idea to do a quick virtual tour. This could prove helpful for anyone following along with our real life progress updates. I share day to day on Instagram Stories. And also give detailed updates every couple weeks on Youtube. It will be fun to look back and see how close to the original design intent the house ends up.
When this blog was originally started, about two years ago, we were under the impression that the house would be built within the first year. But, as you know, that wasn’t the case. And, though the delays were frustrating, I am able to look back with gratefulness for the extra design time.
DESIGN CHANGES
For reference, THIS is my very first post regarding the design of the house. It was quite a bit larger then. We realized fairly early on that we needed to make major square footage cuts to keep the budget in check.
In fact, it seemed that as time went on we continued to simplify the design MORE and MORE. But with each revision we became increasingly satisfied with the house. There hasn’t been a single change, or simplification, that we have regretted – including THIS surprise last minute revision that created a more open concept main level. Every single change has led us to where we are today.
And where exactly are we? Home. A structure so perfectly suited for our family of seven that I hesitate to call it a house. It genuinely already feels like home, and we can’t wait to move in!
OUR MINIMALIST COTTAGE
The design of Arrow Hill Cottage has forced us to look closely at the way our family lives. And to explore our spacial needs both now and in the future. We realized during this process that, in many ways, we are quite minimal. It is more important for us to have time together within the same spaces, rather than retreat to our own rooms. And the storing of rarely used items is not a priority for us either.
We were able to settle on a comfortable floor plan that is just over 2,000 finished square feet. This includes the basement, main and upper levels. It should meet our needs now, with five growing children, and also accommodate my husband and I with main floor living, as we age. There is even potential, when all the kids are grown and moved out, to rent out the lower level for additional income.
TAKE THE VIRTUAL TOUR
I encourage you to watch the video of our cottage. It is quite a bit longer than the typical video I put out, but there is a ton of information! And, I think it gives great insight into why certain design decisions were made. I hope you enjoy!
Be sure to keep checking back for more house progress updates in the near future!
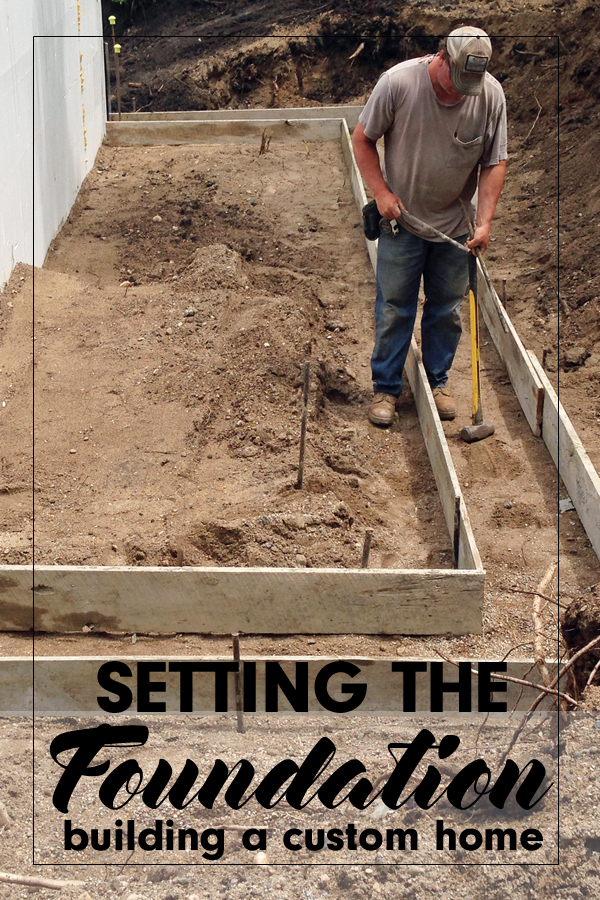
The foundation for our new house and attached garage/front porch is finished! It has taken a while to gather all of the footage and photos to document this portion of the build, but today I am ready to share with all of you this exciting step!
I have heard from those who have gone before us in this building process – that the foundation portion is perhaps the most slow moving. And, so far, that has been the case for us as well. I think it has to do with the fact that the process has to be done in multiple steps. First, the footings. Then, the foundation walls for the basement (if any), and finally the garage and porch foundation.
For our property we had an additional couple of steps because of the walkout portion of the basement.
OUR FOUNDATION
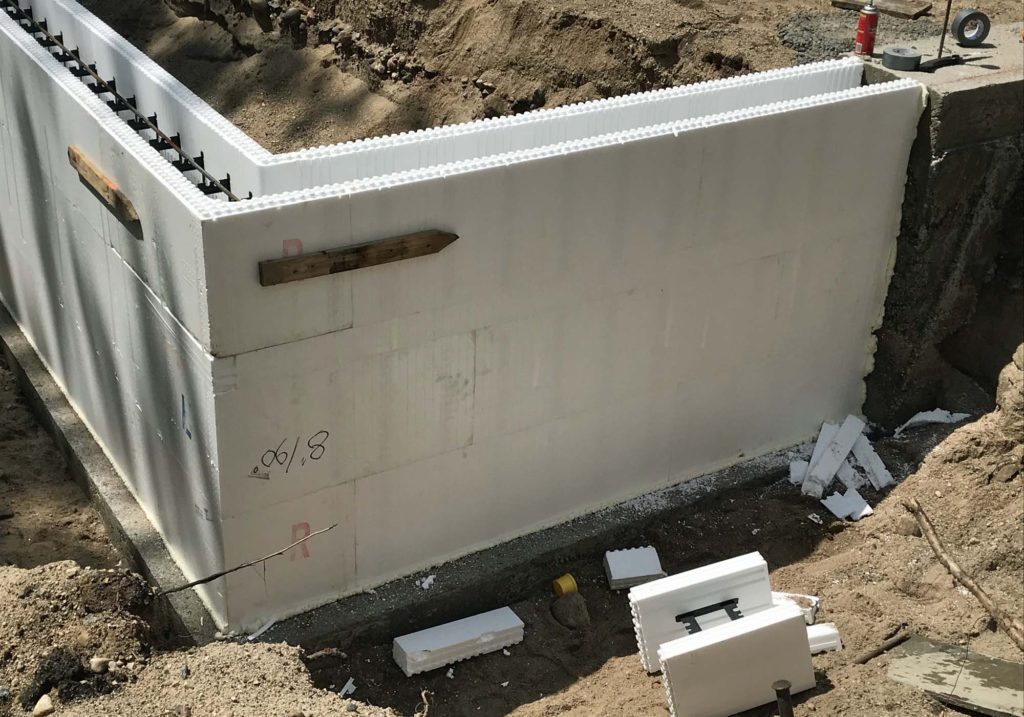
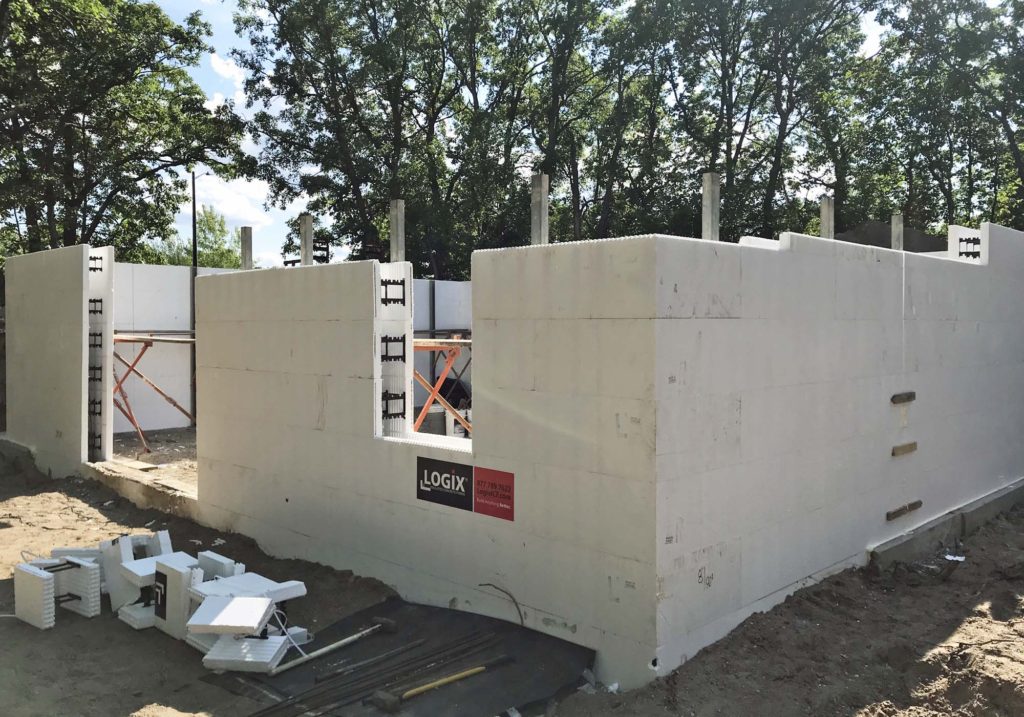
When it comes to foundations, there are a variety of options available. We chose to utilize a somewhat new technique called ICF foundations. Insulated Concrete Forms are becoming more of a standard in home construction. Though they are a bit more costly material wise, but the final product provides a very thick and sturdy foundation wall.
The main difference between an ICF foundation and a traditional poured foundation is that the forms they set before filling with concrete are permanent. They become a part of the foundation itself. With insulation on both sides, there is no need to add any after the fact. You can read more about Insulated Concrete Forms here.
PHOTOS OF THE FOUNDATION PROCESS
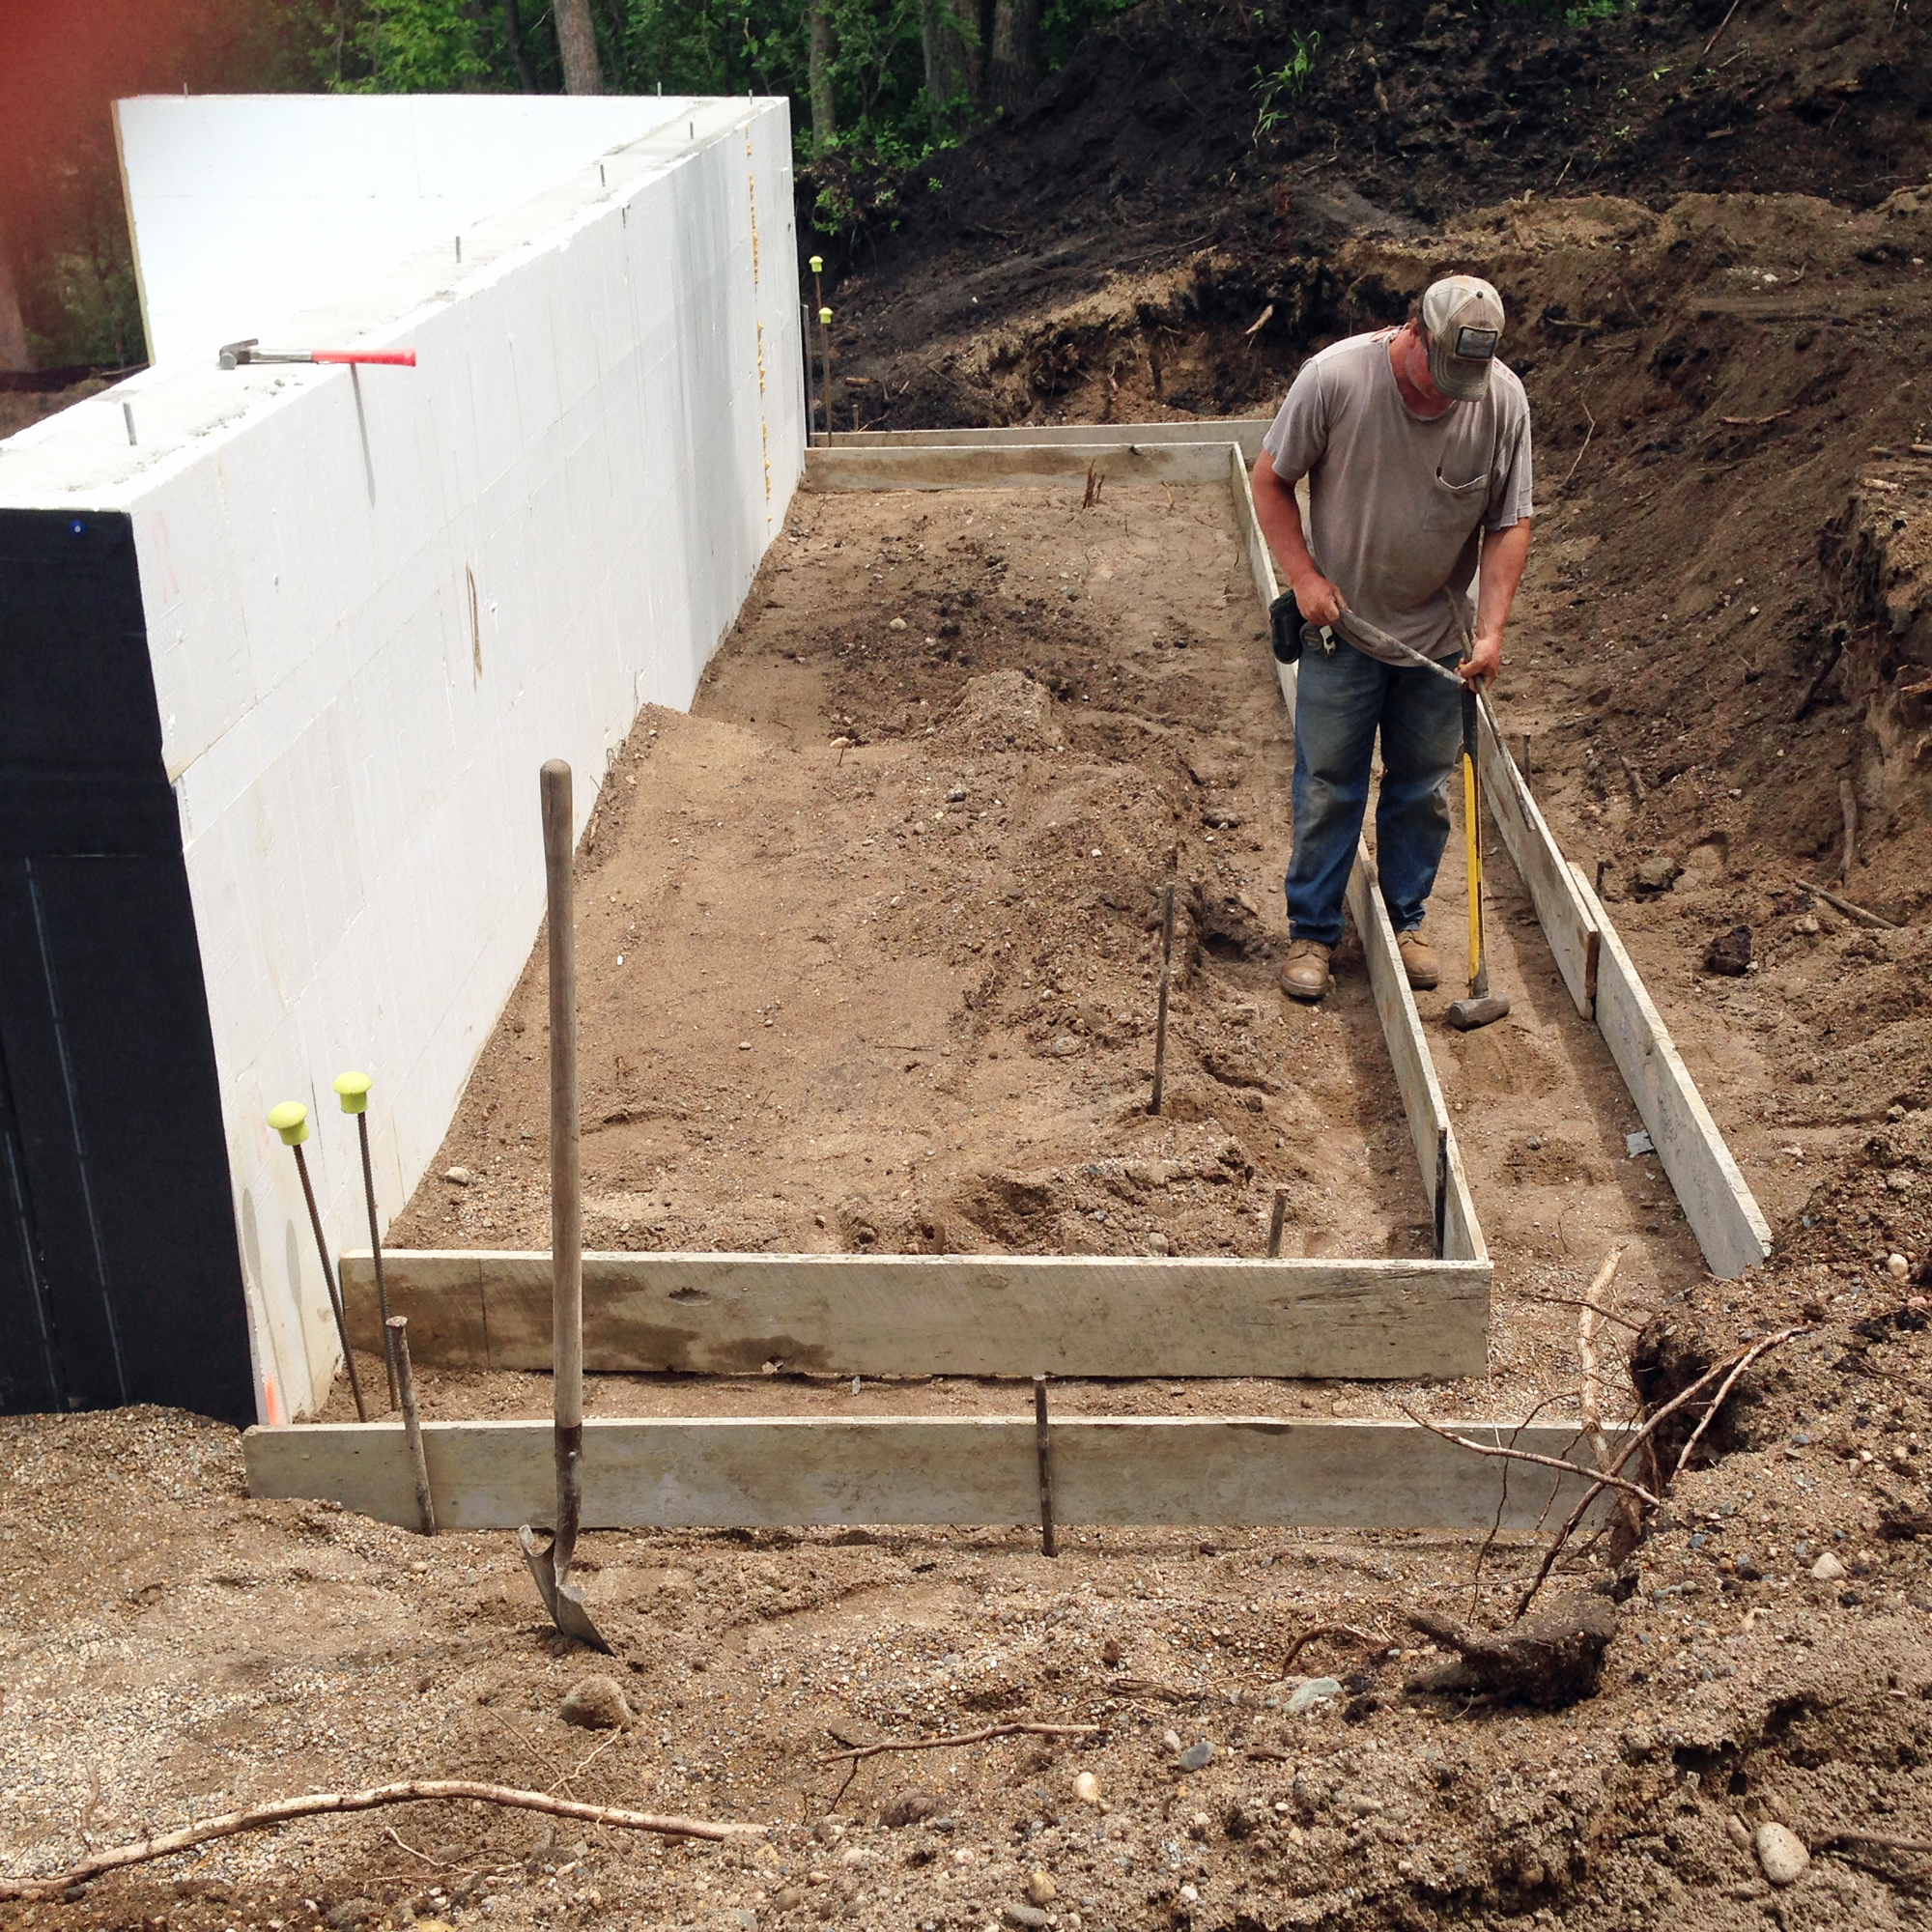
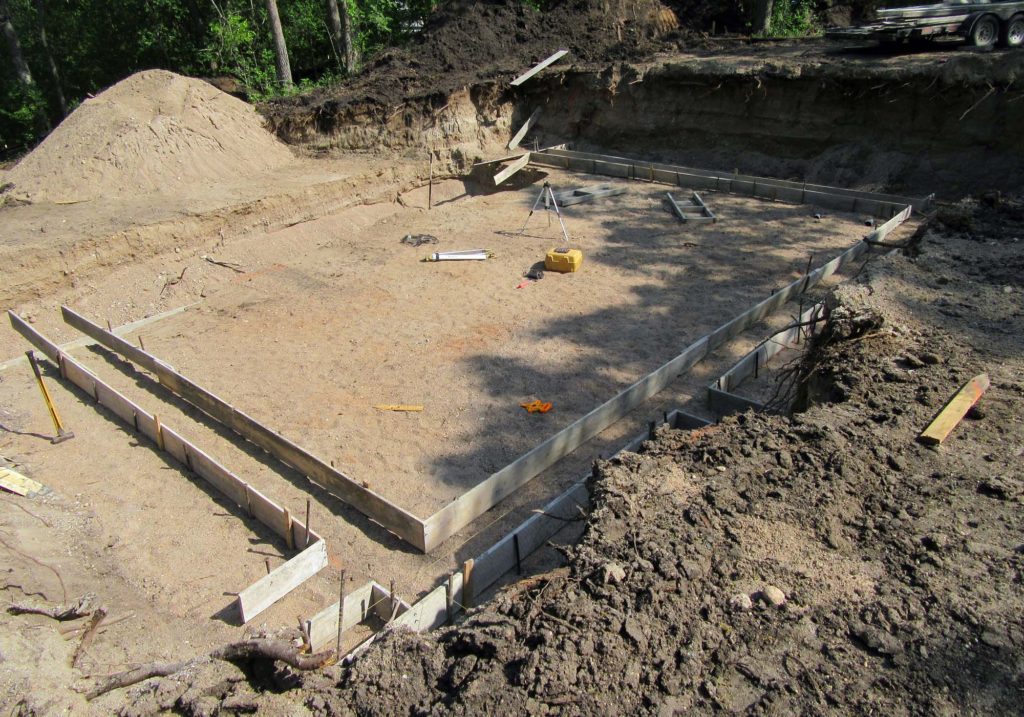
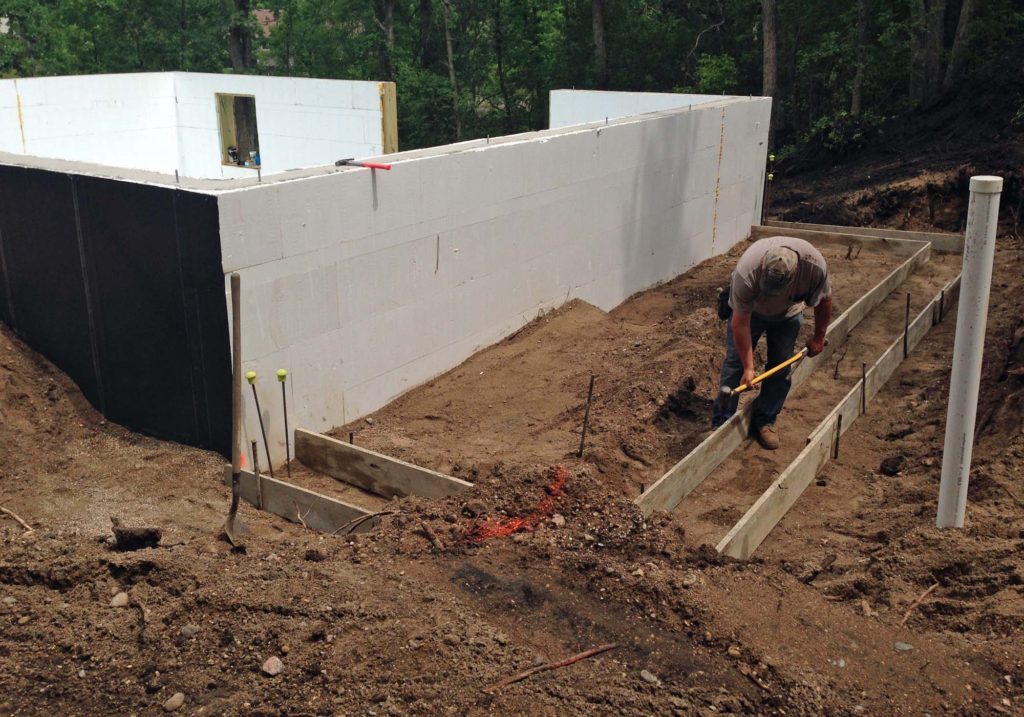
The very first step of foundation work is to set the footings. They are slightly wider than the foundation walls, and need to rest below the frost level. Here in good ol’ Minnesota, that means a minimum of five feet below finished grade. That is one of the reasons that most homes in our area have finished basements. The excavators are already digging so deep, that it isn’t a lot of extra work to add them!
Our basement includes one wall that is a walkout. This will be great for evenings out on the patio, and for the kids when they have friends over. Because the finished grade on the walkout side is lower than the rest of the site, they started the digging there.
They set the footing forms out of wood, then poured them with rebar inserted. You can see from this picture how the lower level is ‘stepped’ to include the walkout wall.
This picture shows the same walkout wall, now poured up to the finished basement floor height, in line with the rest of the basement.
The walls went up rather quickly using the ICF’s. This is, again, the walkout side of the house. We are really loving the privacy back here!
Viewing the foundation from the street-side though, I had a bit of a panic attack. One of my goals all along was to minimize the height of the house, to help it blend in with the neighborhood surroundings. And to me, the foundation looked like it was sitting so high out of the ground!
This happened in part because of our sewer dilemma. In order to avoid needing a sewage lift station in our basement, they raised the entire foundation by six inches. We discussed options to make up for these extra inches, including using shallower floor trusses. Ultimately though, we were reassured that the grading would help everything blend in nicely, and so we decided to just carry on.
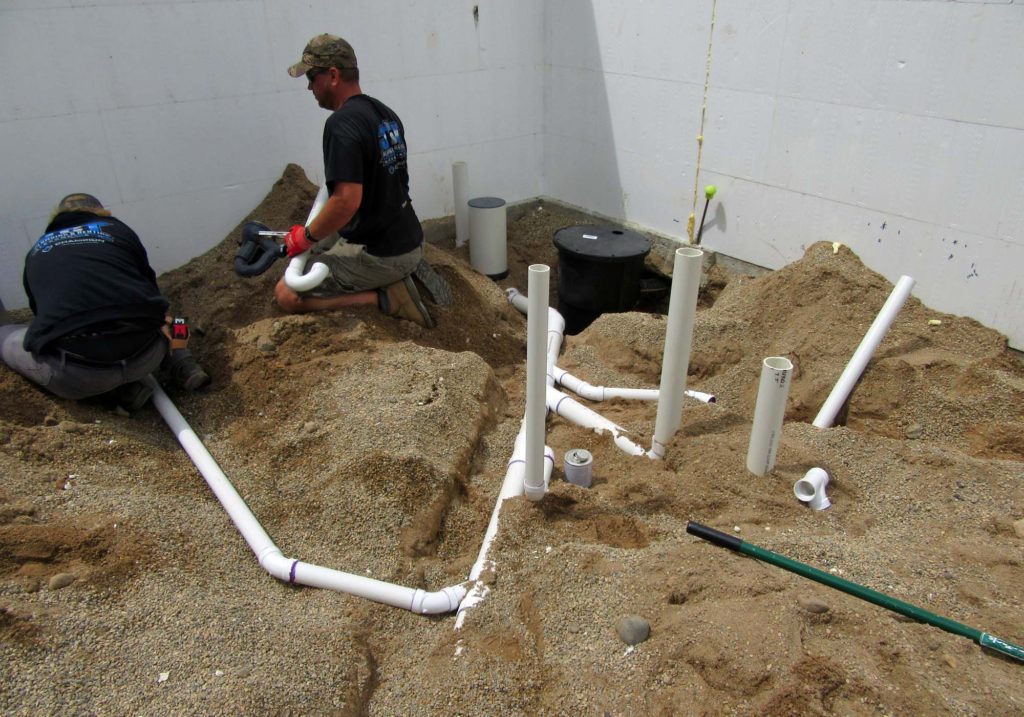
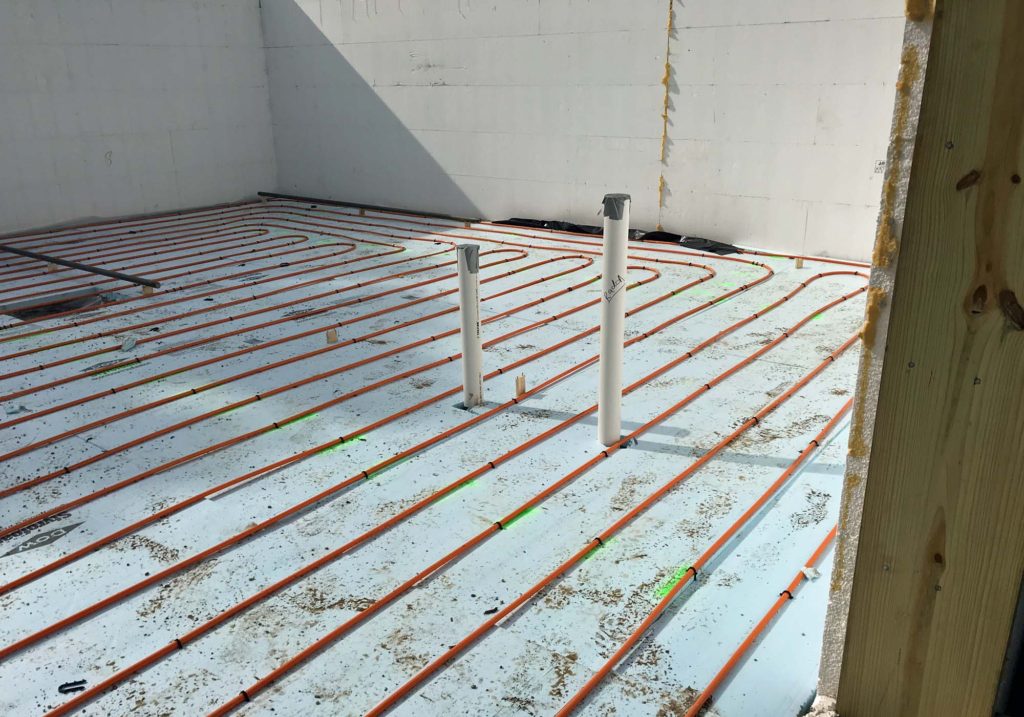
BASEMENT PLUMBING
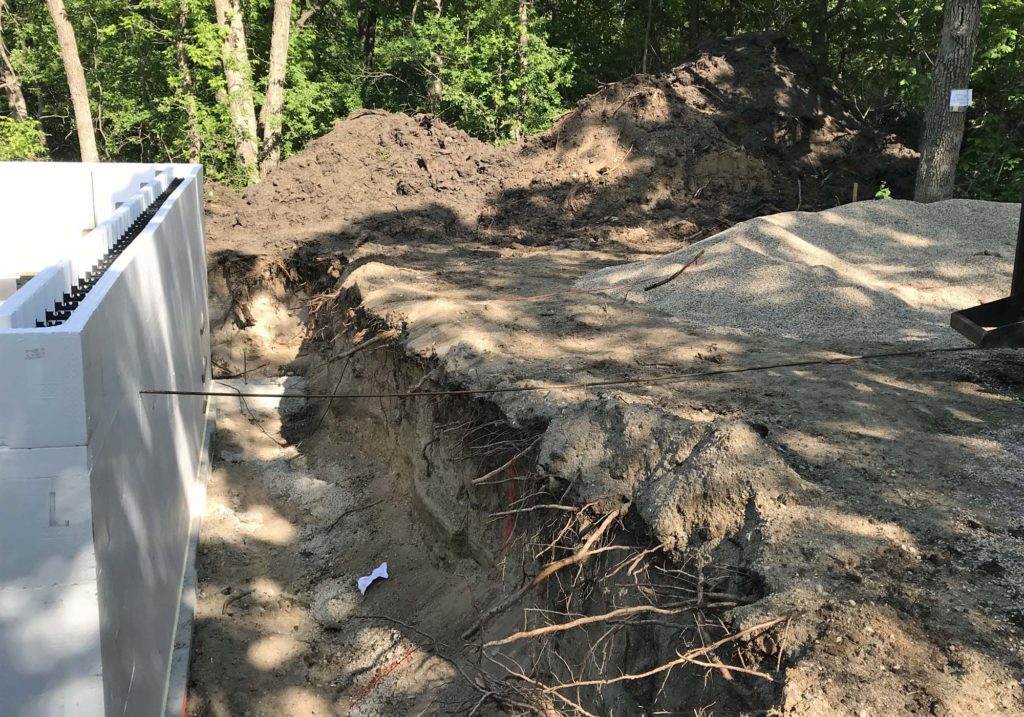
The plumbing crew came in and added the basement connections. They also added a radon mitigation system, which will run from below grade to above the roof. This is a new requirement for residential construction. Essentially it will help to release any radon gas that accumulates below grade, making it a safer place for us to occupy.
Once that was finished, they also connected the house to the city water and sewer system, which will run under the driveway. This created another freak out moment for me when I noticed a large PVC pipe sticking out of the ground right where the front of the porch would be!
Turns out this is the sewer clean-out. I was again reassured that grading would put this pipe at grade, and that it could be disguised with landscaping.
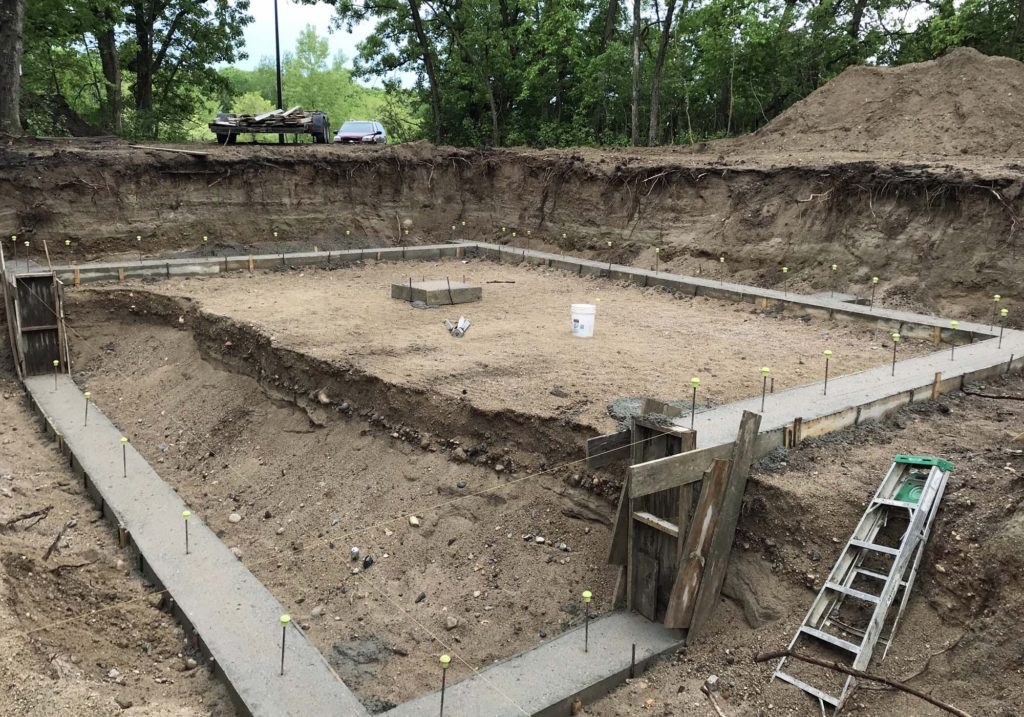
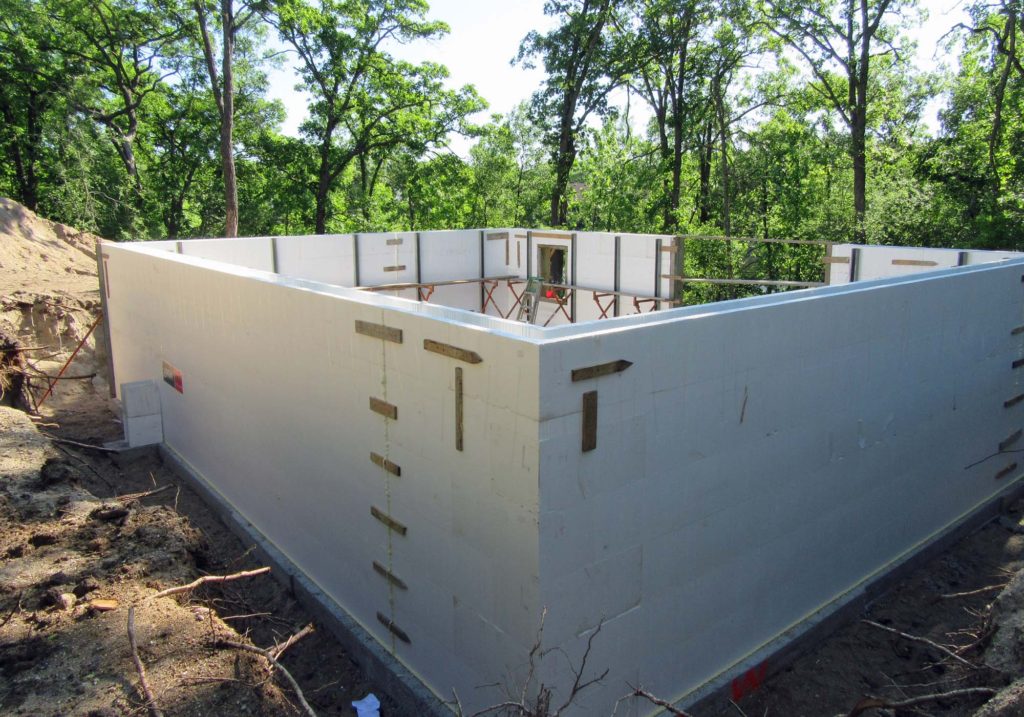
PORCH AND GARAGE FOUNDATION
The crew moved onto the porch and garage footings and foundation. Because there is no lower level below them, they didn’t need to dig quite as deep.
Meanwhile, they prepped the basement level for our in floor heating system. We are very excited to enjoy this feature in the cold winter months!
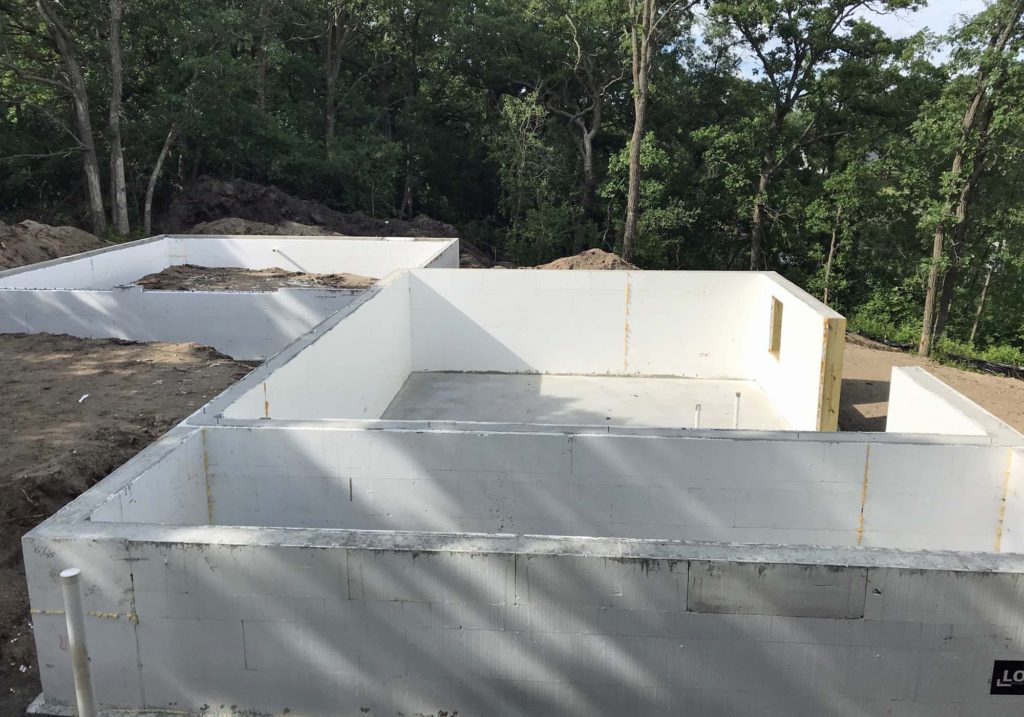
The crew was able to pour the porch and garage footings and the basement floor on the same day. That was very exciting! They came back the next day to set the foundation walls and poured them soon after.
This image shows the finished foundation walls. Standing in front of the porch and looking toward the house. The garage is set back, on the left.
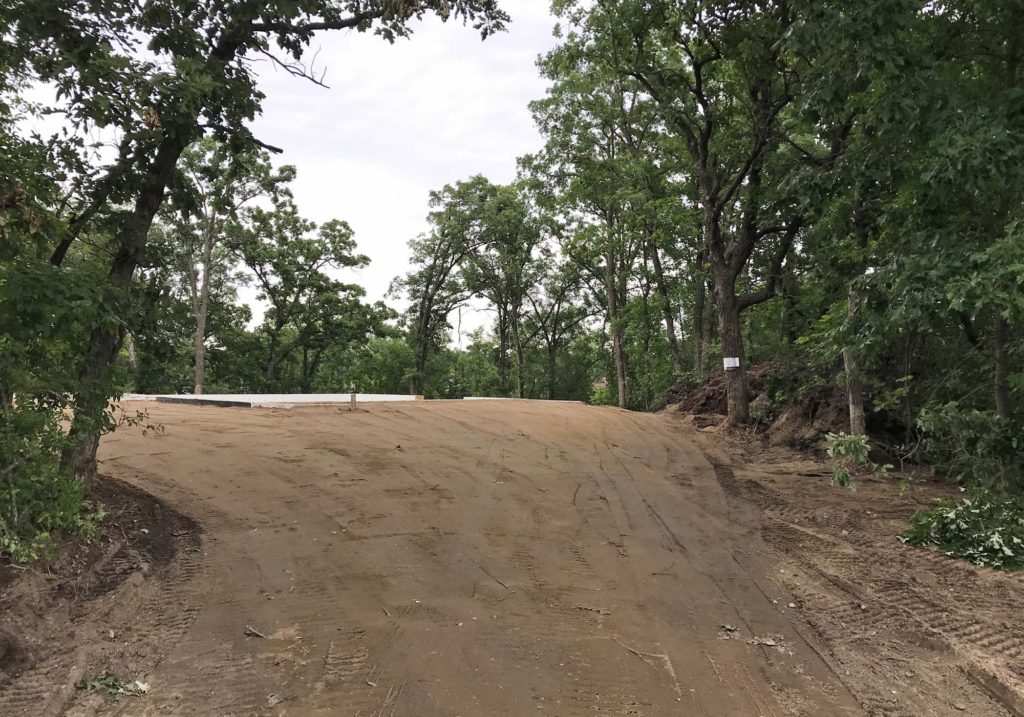
PRELIMINARY GRADING
The excavating crew came back to smooth things out and, I have to say, they worked some magic. I was quite pleased to see that the grade did indeed help minimize the height of the foundation. It is still a bit higher than I would have liked, but ultimately there wasn’t much that could have been done. Looking on the bright side – being the highest house in the neighborhood should mean we will never have any water problems!
View from the street/ drive entrance looking toward house. You can use the pipe sticking out of the ground for reference. Watch the video below to see a more panoramic view of our site with the foundation finished.
UPDATE NO. 4 VIDEO
See our property take shape in this video!
That’s all for this update! I hope to be back in just a couple of weeks with the next step in our construction process- wood framing. We are super excited for this step, for a couple of reasons. One, it is supposed to go rather quickly. And two, because things will finally start taking the shape of a house! I know the kids are especially excited to walk around in the house and explore all the nooks and crannies!
Funny story. Do you remember nine months ago when I made a major redesign to the main level? I was pleased with the change at the time and thought for sure I was done designing. Joke’s on me… apparently I wasn’t!
If you’ve been following along, you know that our building project has begun. We’ve cleared out trees, dealt with sewer issues, and the crew prepared the site. In fact, just this week the foundation for the house was poured! I will have an update on that over the next couple of weeks.
It’s all very exciting and welcomed progress, yet as soon as I saw the footings laid out on the site, I felt a nudge. You see, our site has some gorgeous views. It’s a gem of a property. And when I stood in the spot that would be our future living room, imagining the three large windows facing the beautiful woods, I couldn’t help but want to open up the view even more.
I looked at the 3D images that I had drawn, and thought. Was it possible?
Truth be told, I kept these thoughts to myself for a while. Surely my patient husband didn’t need the added stress of his wife redesigning a house that was currently being built. But I couldn’t shake the idea from my mind.
And then… a lightbulb moment
All along I had been holding onto the idea of our restored vintage cabinets, flanking a very formal front entry. But then I realized that this setup actually created quite a bit of rarely used square footage. Did we really want to allocate nearly a tenth of our main floor footprint to something that wouldn’t be needed on a daily basis? My simple answer was ‘no’.
main floor before
Taking the formal entryway out of the picture, the space absolutely opened up. I was able to maintain a small area by the front door for coat hooks and a small bench to be used by guests and visitors. The beautiful cabinets were then positioned to frame an opening to the kitchen.
main floor after
Speaking of the kitchen. I am SO in love with this new concept, which puts the amazing cast iron sink on center stage!
That large window will be sized to fit perfectly over our vintage sink.
Overall, the public parts of the main level are now open to one another and will be graced with ton of natural daylight. And, of course, the spectacular view is expanded.
Additional benefits of the redesign
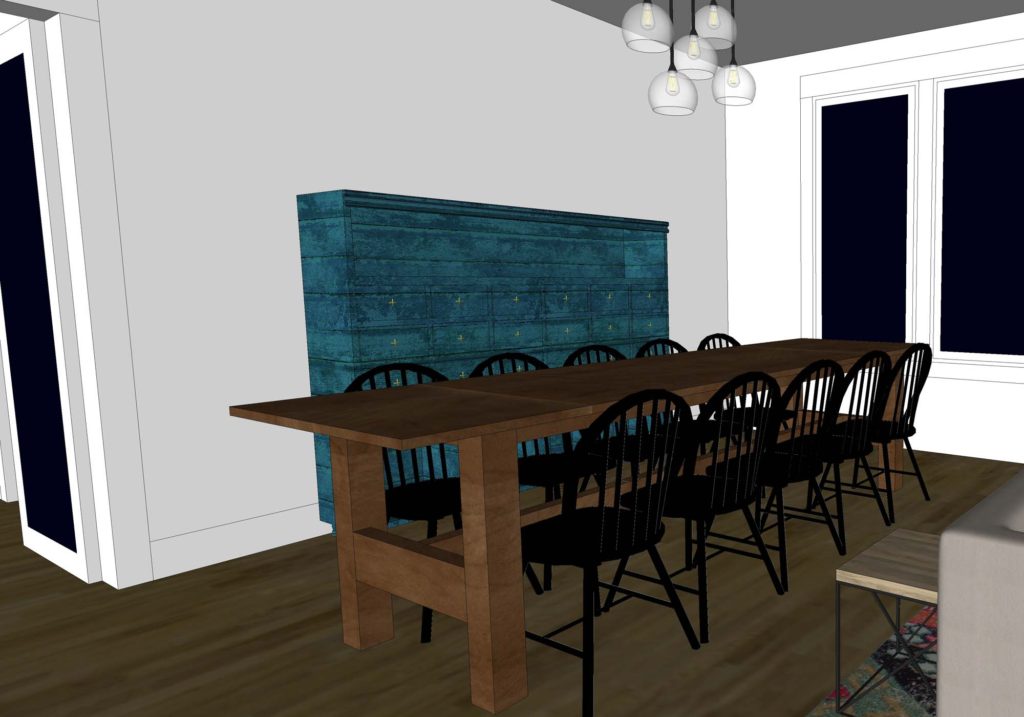
Apart from the increased view, this redesign has a couple other benefits. With a large space opened up, there is now room for an even larger dining room table. It has always been my dream to have a table that can seat at least ten. This space will accommodate a table that size, or even bigger! As a bonus, there will be room for an additional piece of furniture near the table.
Perhaps a china hutch, or a fun and interesting vintage piece such as an old apothecary cabinet.
In the kitchen, we can include a larger fridge. I had always thought we would use a counter depth model, until we found that they were quite a bit more expensive than the deeper versions. It seems silly to pay more for something that has less space, but that is just the way it is. Counter depths are considered an ‘upgrade’. Surely our growing family will fill up a standard depth fridge with no problem!
The home is also made more handicap accessible, should any of our family members find ourselves in a wheelchair at some point. There is a natural wide pseudo hallway running the entire distance of the open room, and the kitchen includes plenty of space to turn.
What the redesign entails
All of this seems to add up to a major change, but in reality it isn’t a big deal! It shouldn’t send our contractor or the crews scrambling around too much anyway! Essentially, we will need to purchase two additional windows for the house – a large one for above the sink, and another for the living room. Our front door will change, from one with sidelights to a door only.
The exterior will also look a bit different too, with the removal of the small gable dormer above the porch and the addition of a column set.
Though I’ll admit that I do like the exterior look of the original design a bit better, the revised version is a manageable trade-off for the increased function and livability inside. And, I am giddy at the thought of two planters!
So, there you have it. Our surprise redesign. I have said for years that I work best under pressure. Apparently that includes adding design tweaks mere weeks before the house needs to be built. A few of the construction document sheets will need to be re-printed. But it will be worth it.
I would love to know your thoughts on this last minute redesign. But, hey. If you have any additional improvement ideas- please keep them to yourself. There isn’t time to go back to the drawing board again after this! Ha!
Though not as glamorous as other portions of the project, site work is an important step in new home construction. Since we now have the okay to build, I plan to write an update every couple of weeks to document this process. I hope that you will follow along from wherever you are reading!
Update number three is all about the site work that has gone into preparing our land for a new home.
DEALING WITH THE TREES
As I mentioned previously, We had begun the site preparation ourselves by cutting down quite a few of the huge oak trees on our property. Craig’s parents were willing to help us with the tree removal in trade for firewood, which they use as a winter heat source.
We reserved quite a few of the straight log pieces. Asking around, we were able to find someone willing to mill them into lumber. With this lumber we hope to add some special accents to our home, including our dining room table.
The man who is going to do the milling for us collected the logs and brought them to his shop. We are hoping to have the kiln dried lumber from him by the end of the summer.
EROSION CONTROL MEASURES
With all the trees removed from the building area, the excavating crew set to work. First, the crew added some environmental protection measures. Our city has in place ordinances to prevent erosion during the construction process.
One measure is to add large gravel rocks to the portion of the driveway closest to the street. Because large trucks are in and out of a seemingly muddy construction site many times per day, these rocks help to loosen the mud before it is tracked onto the road.
Another way to prevent erosion is by adding a temporary silt fence around the portion of the site where the work will take place. In the event that sediment becomes loose on our building site, this fence will stop it from reaching the nearby pond. This will protect the pond’s water quality.
SCRAPING THE SITE
Approximately six inches of topsoil was scraped and pushed aside on the site, for future use. Because this topsoil contains quite a bit of organic material, it is not stable to build on top of. Small plants or brush might grow into the concrete foundation if the topsoil is not removed. In addition, topsoil holds in moisture. If pressed onto a concrete foundation, it may hinder it from curing properly.
This soil is, however, a wonderful material that will be spread back into place once the house is finished. It will be the perfect base in which to plant grass seed.
PLANNING THE EXACT HOUSE LOCATION
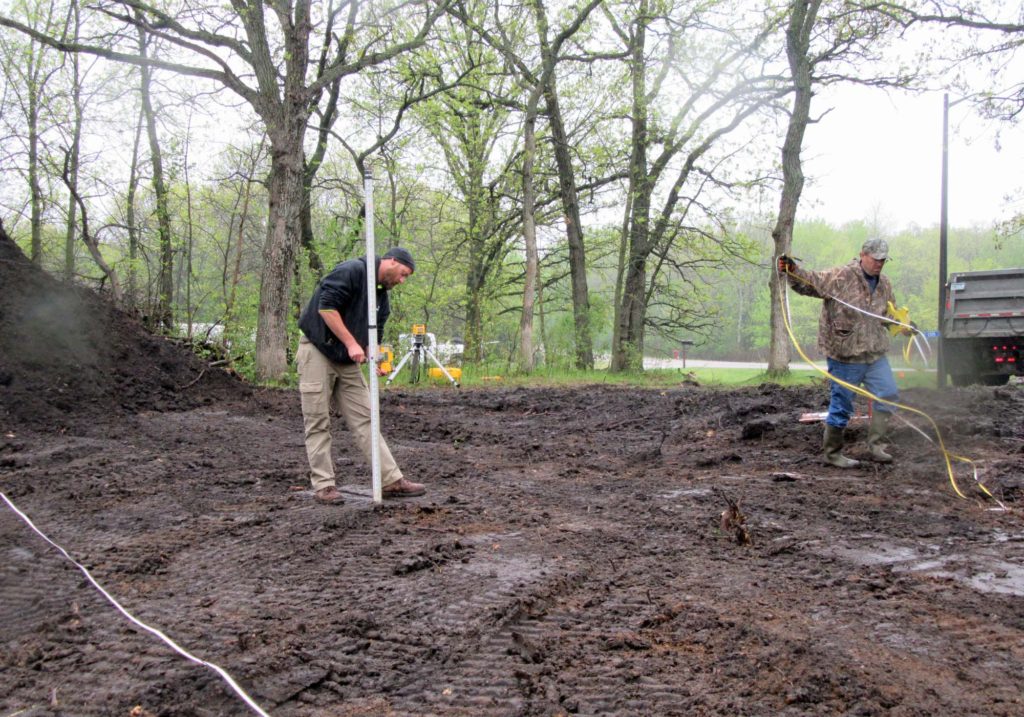
The excavation crew called me to the site to determine where exactly the house would be positioned. Although we had a basic idea of the location previously, the site looked a lot different with fewer trees. I have to say that, to date, this has been the most stressful part of the building process for me. It just seemed like the first real permanent decision. And that decision can’t be changed further on in the process if we are unhappy.
Our site is not a standard city lot where all houses are facing in the same direction toward the street. Because of this, we had quite a bit more flexibility on how to orient the house. Factors such as natural daylight, slope, views, and sight-lines all came into play and eventually we settled on what we think will be a good location.
Tape measures were run, laser levels were activated, and the crew was able to stake out the corners of the house and garage. I think it is pretty amazing how these modern day tools speed up the process.
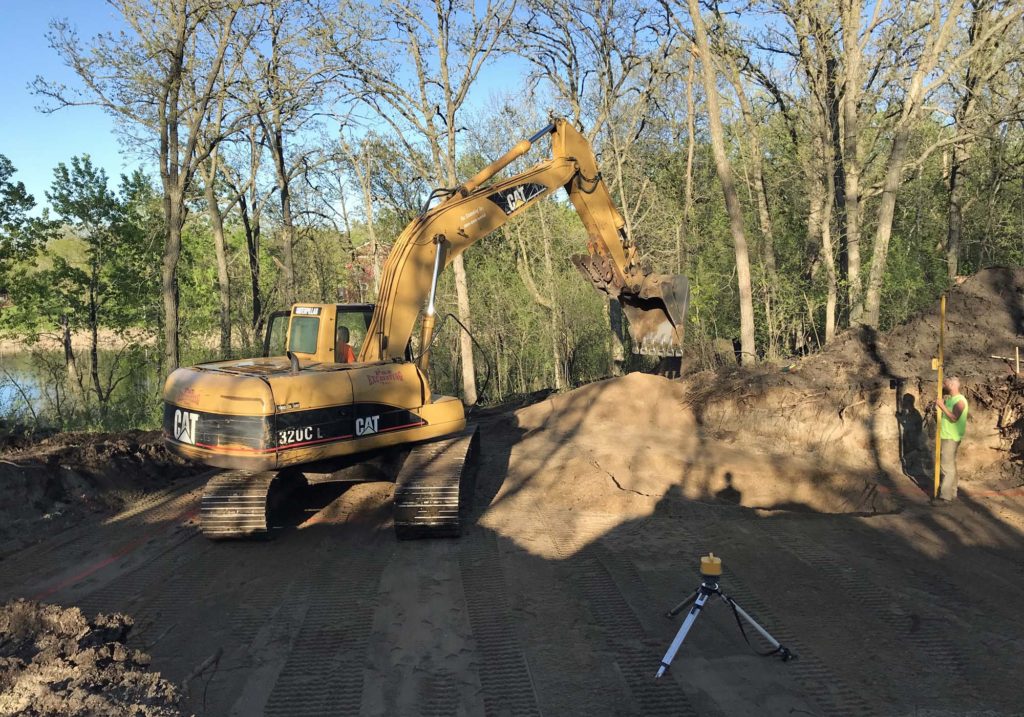
DIGGING THE HOLE
Finally, the entire site was prepared and the crew could begin digging the hole for the basement. Above all, this is the portion of site work that I was most looking forward to. Seeing the large machinery in action was truly incredible.
We found that our site has quite sandy soil, with a bit of gravel content. This is actually favorable for house building. It basically ensures that, as long as the ground is graded properly, we will never have water issues in our basement. Compacted sand also provides a great base to build upon.
A portion of the soil was taken off site. The rest was left, to fill in around the footings and foundation.
SITE WORK COMPLETE
After hours of digging, and packing down the soil, the site started to take shape. And oh was it ever exciting!
This picture shows the outline of the house, marked in orange. It will be easier to see once the footings and foundation are set up. We are really excited for that next step! I have heard that once the foundation is complete, the rest of the building process seems to go very quickly!
SITE WORK | HOUSE BUILDING UPDATE NO. 3
This video shows the crew working hard to prepare our site for construction!
It’s pretty excited to finally be seeing a bit more progress, and things will really start to go quickly once the foundation gets started. We hope to be able to share that update next! Be sure to subscribe to the Arrow Hill Cottage YouTube channel, where I will be posting an entire video series on our new house build.
It has been a whirlwind to say the least. In the last update I gave you, we were busy clearing trees from the property in the hopes that we would be able to build. We had to wait for our appraisal report, to find out if it would financially make sense to build at this moment in time.
Sorry to leave you hanging like that, but a lot has happened since that point – and I am ready to share all of that with you today!
A seasoned blogger might put their reader in suspense. Maybe make them scroll through the entire post to get to the news that they came for. Lucky for you, I’m not a seasoned blogger. I feel like sharing this news right away!
The answer is…YES!
We are going to be building our simple dream house!
To be honest, I doubted this many times over the past couple of weeks. I questioned our motives. Wondered if we were being foolish or greedy. It isn’t easy to take on a dream that has been in the back of your mind for so many years. You question why that dream came to be in the first place. Lose a bit of your resolve.
But, through many heart felt conversations with family and friends, and silent prayer seeking His truth, we felt hopeful. And just last week it was confirmed.
We signed on the dotted line, our intention to make this dream a reality. And we couldn’t be more excited (or nervous) about it.
If you think it has been all sunshine and roses since closing day though, think again. In fact there has been a whole lot of drama. Hence the title of today’s update post.
So much has happened in the past coupe of weeks, in fact, that it is hard to explain. I knew it would be much easier for me to sort it out in video format instead of typing every last word. Though the video is a bit long, I encourage you to watch through the entire sixteen minutes, to get up to speed to where we are at! Information given in the video may become relevant in future new home construction updates.
HOUSE BUILDING UPDATE NO.2
Whew! If you watched through the video you know that the roller coaster ride has just begun. We were aware that new home construction presented some drama, I think we just were surprised to see it happening so soon! I hope you will come along for the ride and share all the highs and lows with us!
At this point it is my plan to give house building updates at least once every couple of weeks, perhaps once per week if there is enough to share. I also hope to continue blogging about simple living tips and resources, as time allows.
Let’s be honest though, this summer is mainly going to be ALL about the house! Other posts regarding our new home construction can be found HERE.


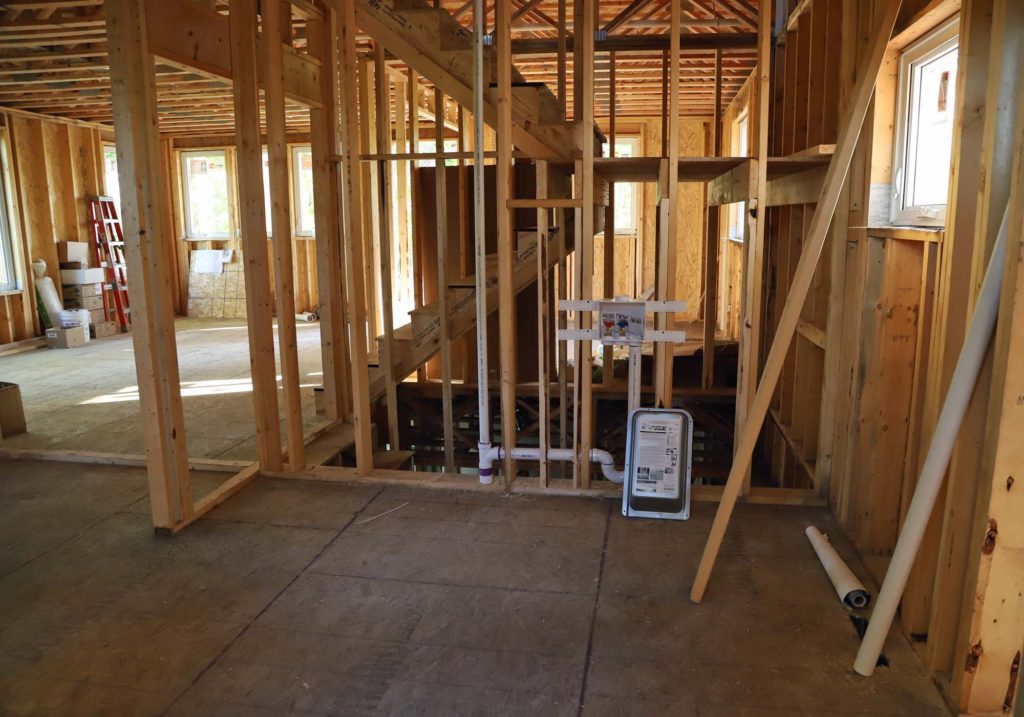
 Girls bedroom space