ENJOYING the first part of summer break! As soon as school was out, the kids had a bunch of fun activity ideas – including playing with shaving cream on the picnic table!
Some got a bit more into it than others!
{L} also started his summer with surgery. He had his tonsils and adenoids removed. And although the healing process was a bit tough, he is doing so well now and is sleeping great with NO snoring!
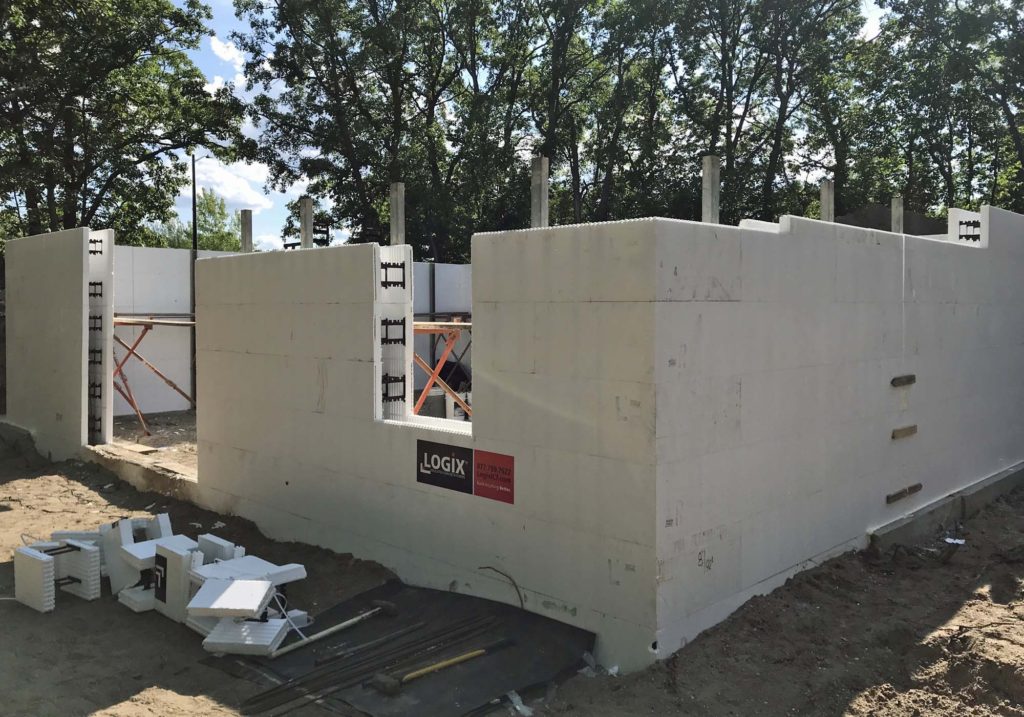
WATCHING our dreams come to life. The building of Arrow Hill Cottage is in full swing!
The crew has already poured the footings and foundations, and done some site grading.
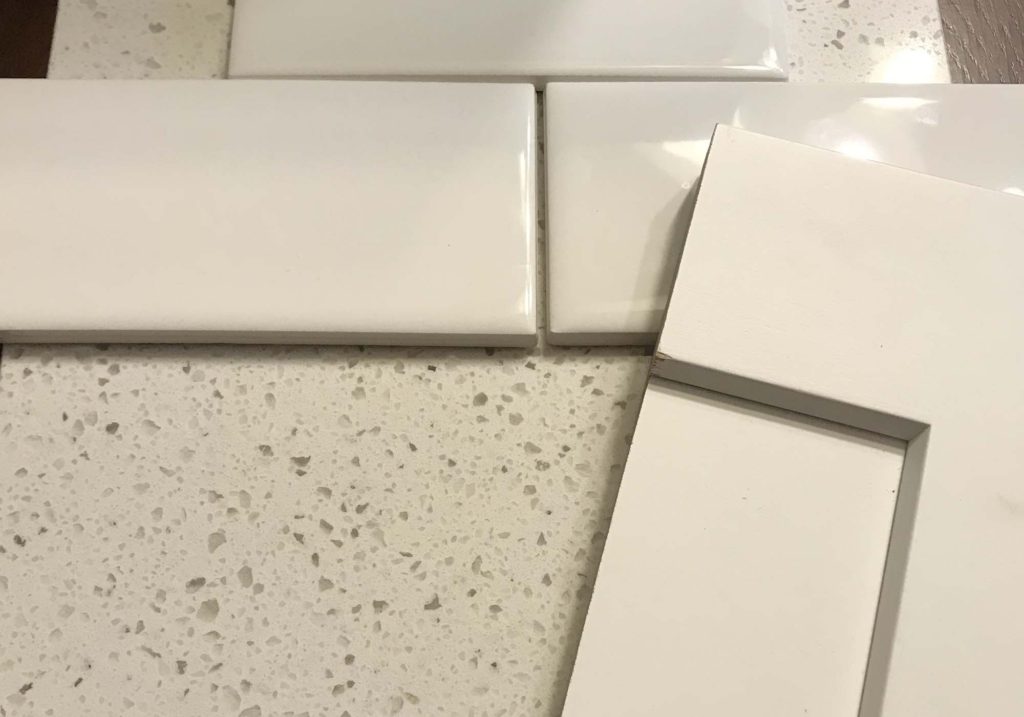
Meanwhile, we are working hard at making material selections. It is tough when faced with thousands of options!
We spend some time almost every single day out at the site, just enjoying the process – and feeling so blessed that we are embarking on this very special journey as a family.
You can read the latest house building update HERE.
TRYING new things. Summer is a time of exploration and discovery, especially for kids. It has been fun to see them try new things and learn from the experiences.
{I} took a three week beginner orchestra camp, learning how to play the violin. He enjoyed it and is excited to continue lessons during the school year.
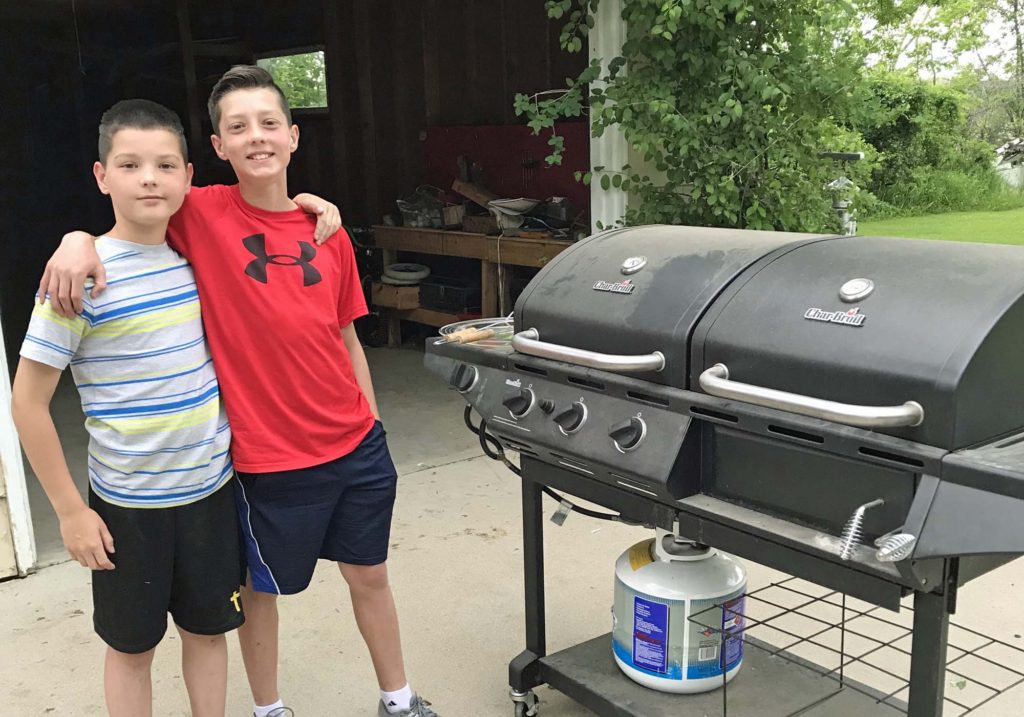
The older boys had their first experience using the grill. They were pretty proud of their ability to cook hot dogs without burning them.
And little {M} surprised us big time, by learning how to ride a bike! Her brothers were so attentive and encouraging, even borrowing her the same bike that they learned to ride on.
SHOWERING this guy with love and appreciation. This Father’s Day we continued the tradition of seeing if Craig could ‘bear the weight’ of all of his kids at once. He succeeded… but next year might be tricky!
This is just a glimpse at what our family has been up to. If you’d like a closer look, be sure to check out our weekly ‘mini vlogs’ on our family YouTube channel ARROW HILL FAMILY. Be well everyone!
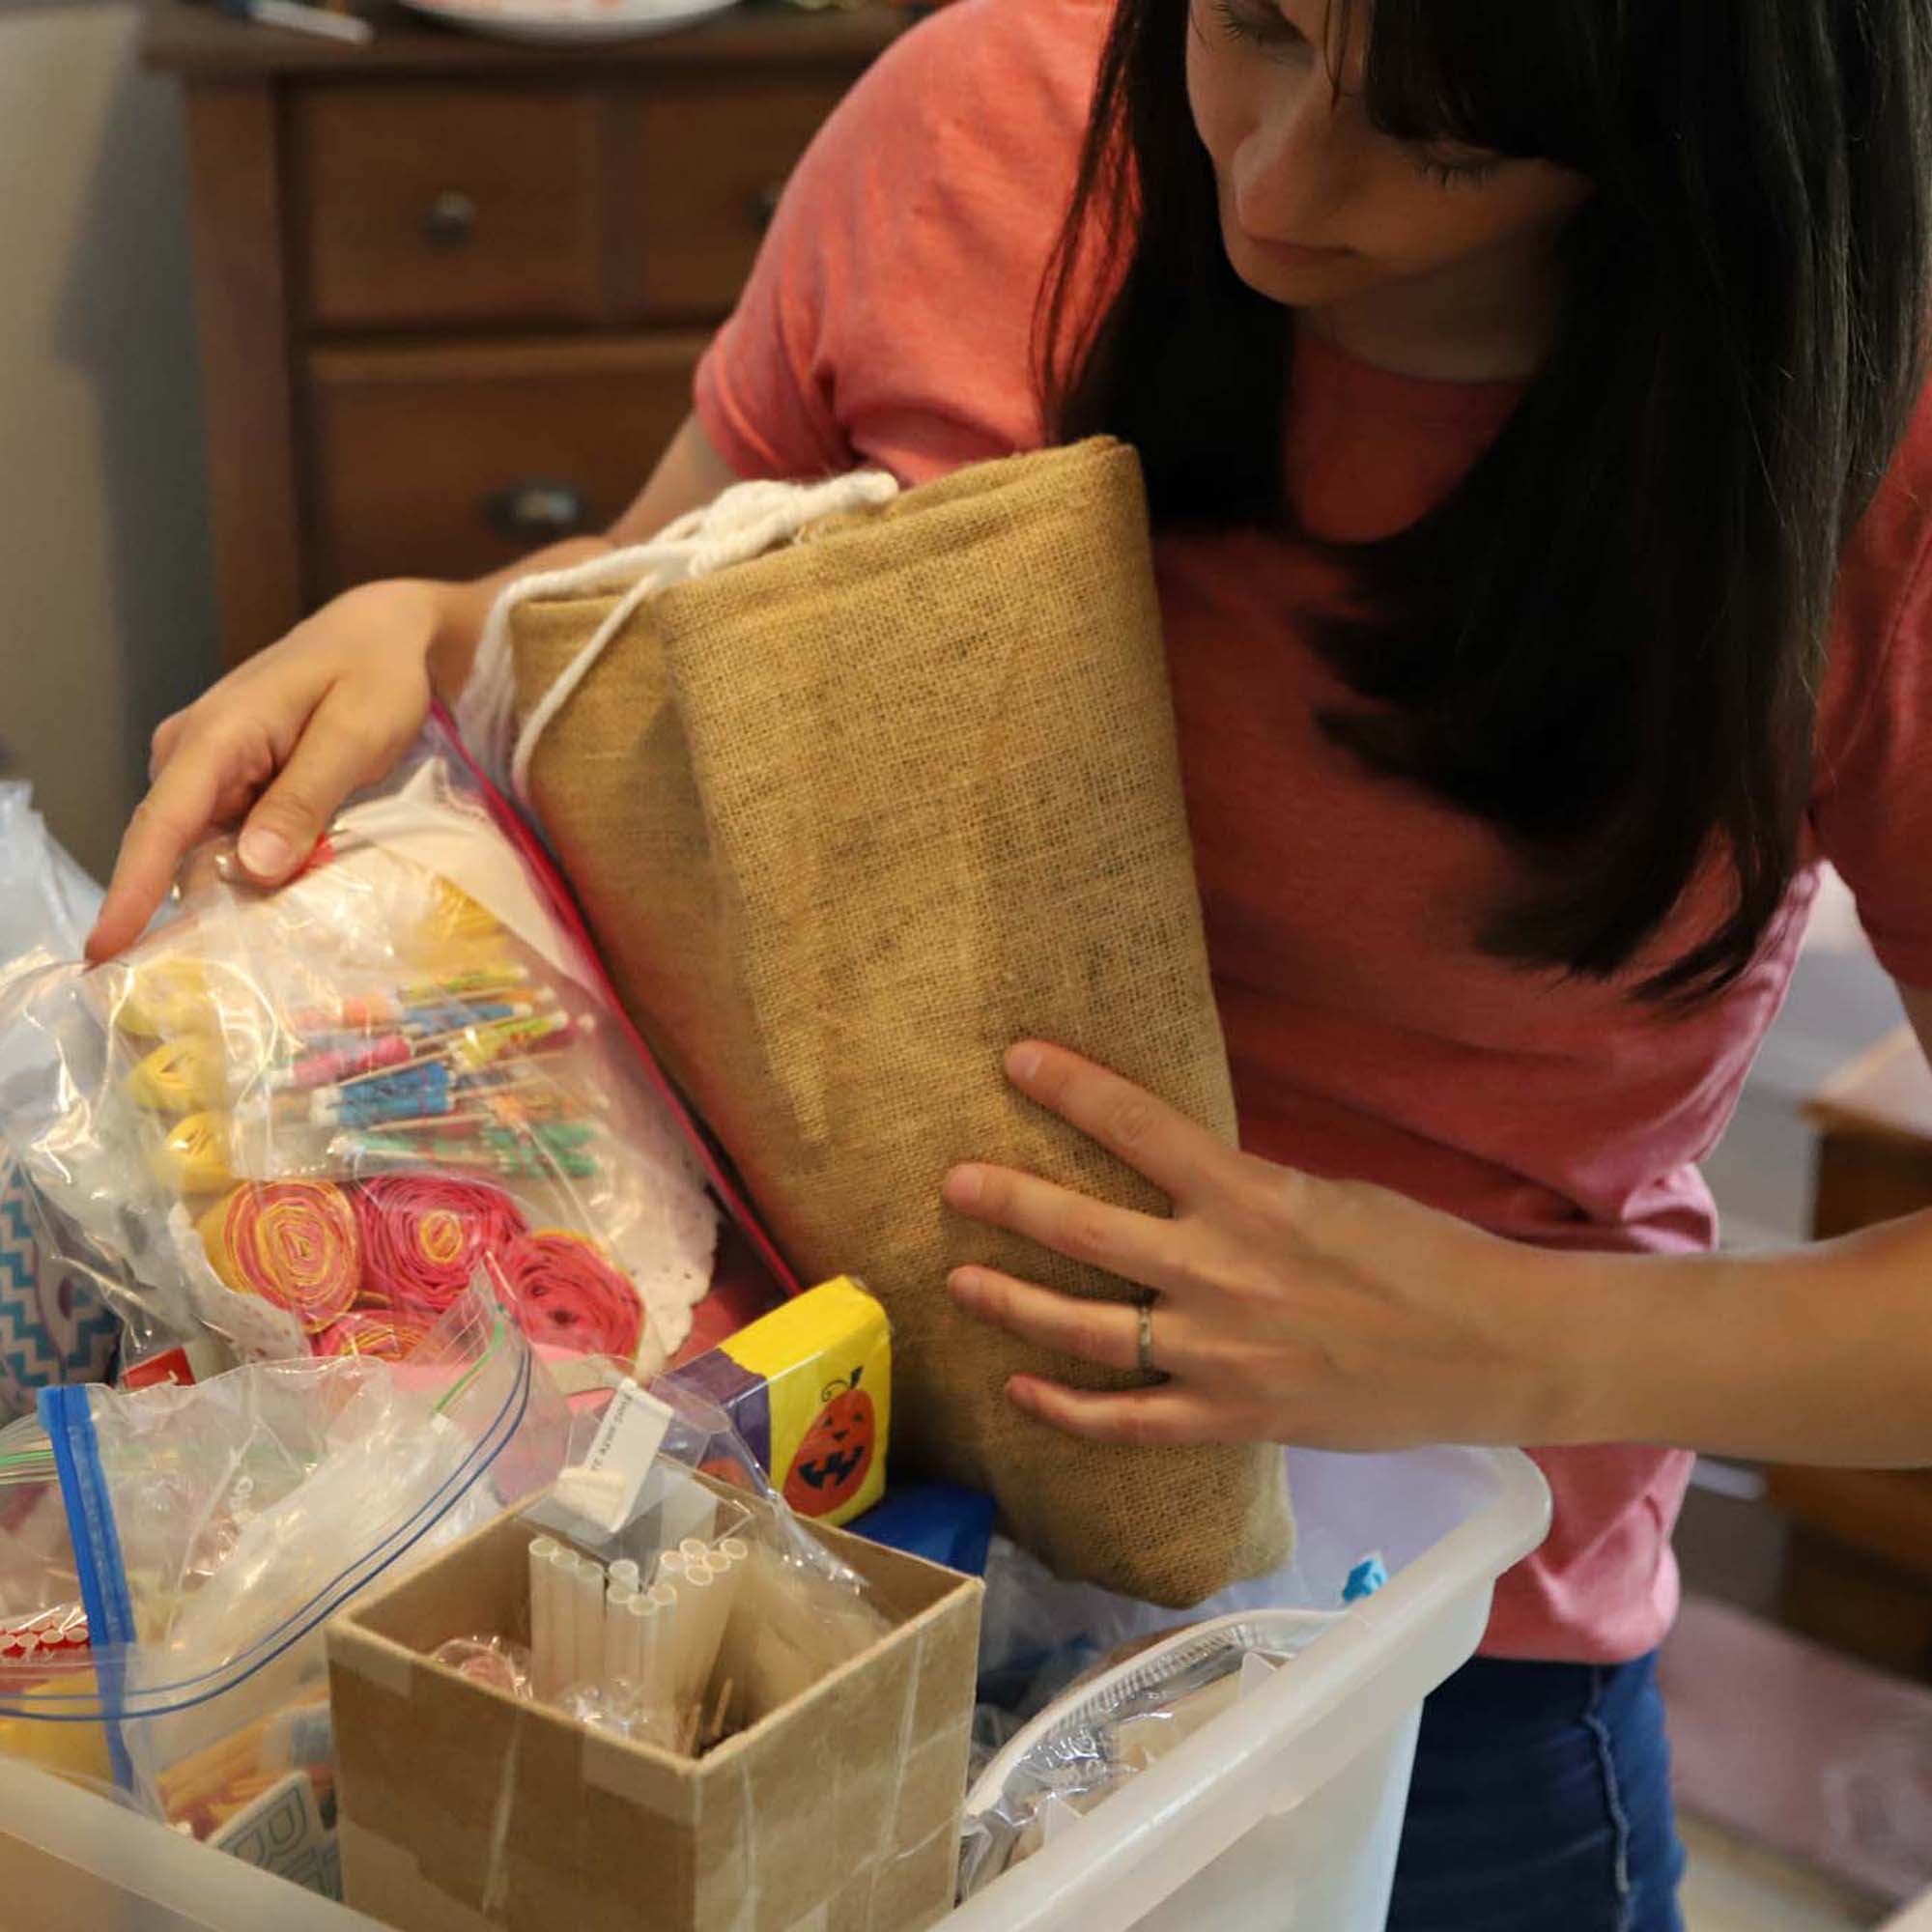
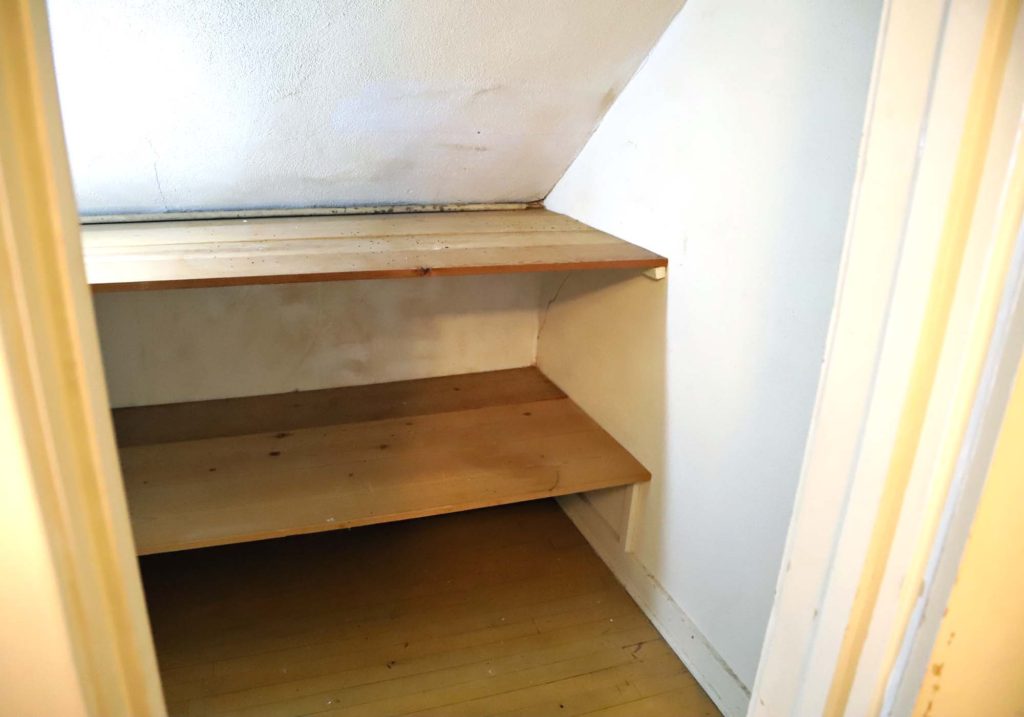
We are in the final stage of decluttering our rental farmhouse. Only a few areas and categories remain to be sorted through before our big move! This week I took on the storage closet declutter, and am happy to have it behind me!
Embarrassing as it is, all of these items were stuffed in our hall storage closet
STORAGE CLOSET DECLUTTER – OUR WHY
My husband and I have lived in three houses during our marriage. The first, for only a year. The second, for ten years. And our current rental farmhouse for the past four and a half years. Each time we have moved we were shocked to find the amount of boxes that were transported from house to house, without being opened. Because of this, we were determined to really SEE what we own before our next (and hopefully final) move.
The goal when sorting through this storage closet was to determine which items we plan to keep. There is no sense in moving the weight of extra items that we don’t need or want anymore. By doing the sorting before the move, we are more likely to be critical. In contrast, if the boxes were to come with us to the new house without being looked through, they likely would have found a spot in a closet there. And sat, again unopened, for who knows how long!
We actually designed our custom cottage home to have relatively little storage. Some people may be shocked to learn that our master bedroom has no walk in closet, and our kitchen doesn’t feature a pantry. This conscious decision was made because my husband and I both recognize that we have a tendency to fill large storage spaces with unnecessary items.
TIPS ON DECLUTTERING A CLOSET
Decluttering a storage closet is a big undertaking. From my own experience, I am offering tips to help you achieve the best results, without too much stress.
CLEAR OUT THE SPACE
The very first step when decluttering a closet is to remove everything. It will seem daunting, to be sure; But it is very important to see the closet completely emptied. Seeing open shelves and space on the floor will give you a better sense of just how much room you have to work with. It can also help you recognize the dark, tricky corners where items can easily be lost and forgotten.
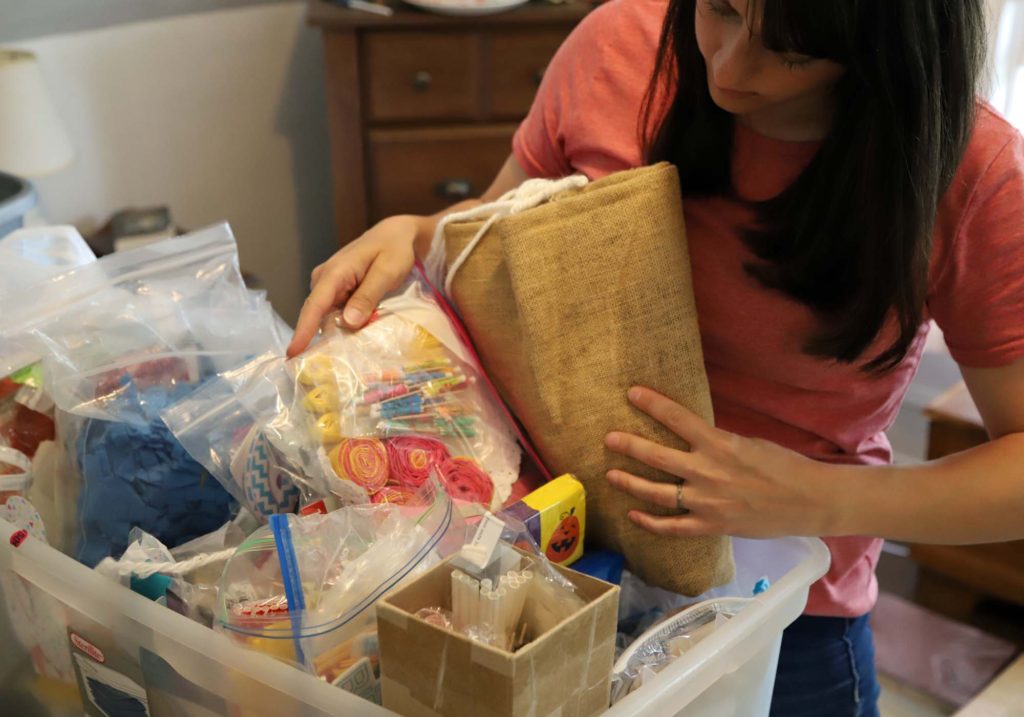
SORT ONE BOX AT A TIME
Tackling the clutter in bite sized pieces allows you to focus your mental energy without feeling overwhelmed. It can also help prevent decision fatigue. I suggest moving one or two bins/boxes into a separate room for sorting.
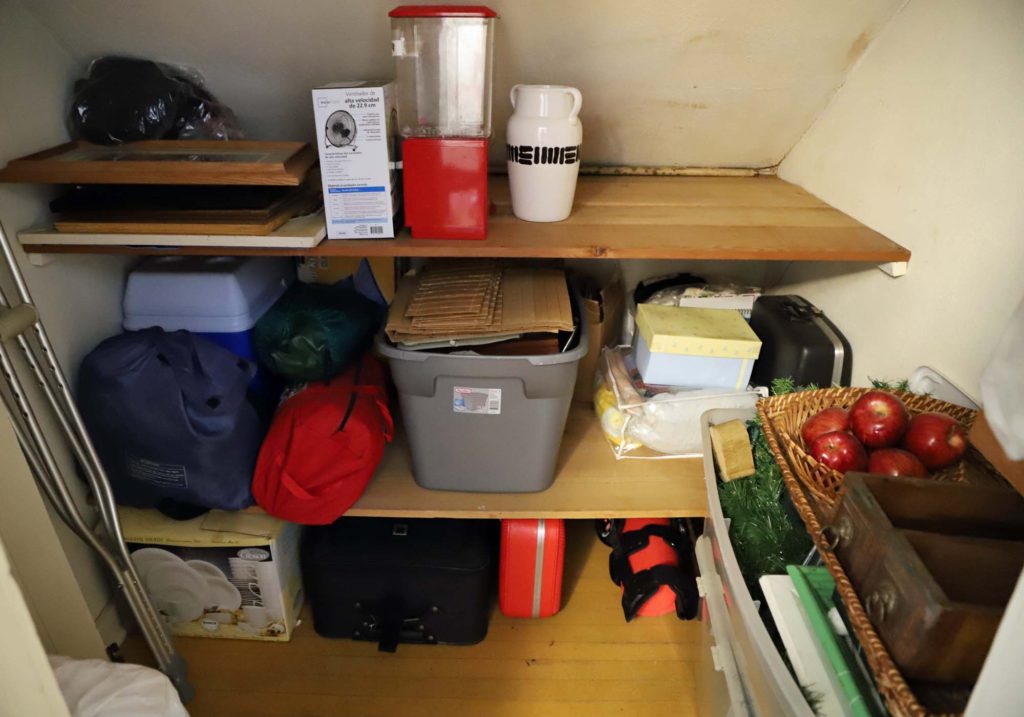
PUTTING ITEMS BACK IN
Think carefully about which items make their way back into your storage closet. Generally, it is best to store like-purposed items in the same space. If you must store many random types of things together in one closet, as we do, consider giving the closet ‘zones’. One shelf for camping gear, another as a spot to keep decorations, for example.
THE RESULT OF OUR STORAGE CLOSET DECLUTTER
I am happy to report that less than half of the items originally stuffed into our hall closet made their way back in. There is still a bit of randomness in there though. Camping gear, holiday decorations, DIY supplies. Quite a mix. We are hopeful that at Arrow Hill Cottage we will be able to be more intentional about where these items are stored. Camping gear will likely find a place in the garage, where it can be easily accessible, for example.
While sorting through the stored items, I found some real gems that we had completely forgotten about.
These adorable little shoes were worn by our oldest son, when he took his first steps.
And these chess pieces were hand painted by Craig’s mom, many years ago. Now that a couple of our kids have learned how to play, we plan to keep this set up and available for a game at any time.
As I was sorting, I made it a point to really think about these items. If they were things we wanted to keep, I needed to commit to finding a place for them at the new house – to give them prominence. Otherwise, we will be left with unopened storage boxes once again.
WATCH ME DECLUTTER
Need a little extra motivation to get started on your storage closet? Take a peek at what our closet looked like before. It was insanely stuffed. And watch me tackle it head-on. It took a lot of effort, but I am very happy with the result!
BONUS STORAGE CLOSET DECLUTTER TIPS
More great posts from other websites, offering you even more insight on how to approach these tricky spaces!
This four ingredient cheesy hashbrown casserole recipe is perfect for a quick and easy brunch. It’s sure to be a crowd pleaser that will have them coming back for more!
Do you ever find yourself scrambling for an easy meal to make? Perhaps it’s the weekend, and you have company. Or you are asked to bring a dish to share at a gathering. Whatever the reason, I encourage you to put this recipe in your list of go-to ideas.
CHEESY HASHBROWN CASSEROLE
I was first introduced to this dish after the birth of our first son. Friends had generously started a ‘meal-train’ of sorts, something that this brand new mommy was more than appreciative of! It came to me prepared, with baking instructions, so that I simply needed to pop it into the oven when I was ready for a hot, home cooked meal.
This cheesy hashbrown casserole has since become a dish that I can always count on. If someone is in need, or if we have company, I whip up a batch. And it turns out perfect. Every. Single. Time.
HOW TO MAKE CHEESY HASHBROWN CASSEROLE
Watch this quick step by step video for directions on how to make this delicious recipe, and read below for details on ingredients and instructions.
CASSEROLE INGREDIENTS
The combination of these four ingredients create a comfort food dish that you’ll be happy to share.
Ingredients
(16 oz) package frozen shredded hashbrowns
(8 oz) package cheddar cheese
1 can cream of potato soup
2 cups of cubed/diced ham*
*Tip: After preparing a large ham for a meal, cut up the remainder of meat into small pieces and freeze in two cup portions. These can then easily be defrosted to be used for recipes later on.
RECIPE INSTRUCTIONS
So simple, even your kids (or husband) can make it!
Preheat oven to 425 degrees
Grease a 9×13 baking dish
In the same dish, mix together frozen hashbrowns and soup
Fold in the cubed/diced ham pieces
Cover top of mixture with shredded cheese
Bake for 25 minutes
SERVE IT UP!
Our family has found this recipe to be even more perfect when served with cottage cheese and a side of fresh fruit. It is one of our favorite brunch ideas.
PRINT THIS CHEESY HASHBROWN CASSEROLE RECIPE
Cheesy Hashbrown Bake
This simple, four ingredient recipe is sure to be your go-to for Sunday brunch and last minute potluck invitations!
Add frozen hashbrowns to baking dish, then soup. Mix well
Dice ham pieces and add to baking dish. Continue mixing
Top with cheddar cheese
Bake for 25 minutes
Serve with cottage cheese and fresh fruit
PIN THIS RECIPE
Keep this cheesy hashbrown casserole recipe at the ready by pinning it to your Pinterest board. While you’re there, check out my other healthy and simple meal ideas!
Funny story. Do you remember nine months ago when I made a major redesign to the main level? I was pleased with the change at the time and thought for sure I was done designing. Joke’s on me… apparently I wasn’t!
If you’ve been following along, you know that our building project has begun. We’ve cleared out trees, dealt with sewer issues, and the crew prepared the site. In fact, just this week the foundation for the house was poured! I will have an update on that over the next couple of weeks.
It’s all very exciting and welcomed progress, yet as soon as I saw the footings laid out on the site, I felt a nudge. You see, our site has some gorgeous views. It’s a gem of a property. And when I stood in the spot that would be our future living room, imagining the three large windows facing the beautiful woods, I couldn’t help but want to open up the view even more.
I looked at the 3D images that I had drawn, and thought. Was it possible?
Truth be told, I kept these thoughts to myself for a while. Surely my patient husband didn’t need the added stress of his wife redesigning a house that was currently being built. But I couldn’t shake the idea from my mind.
And then… a lightbulb moment
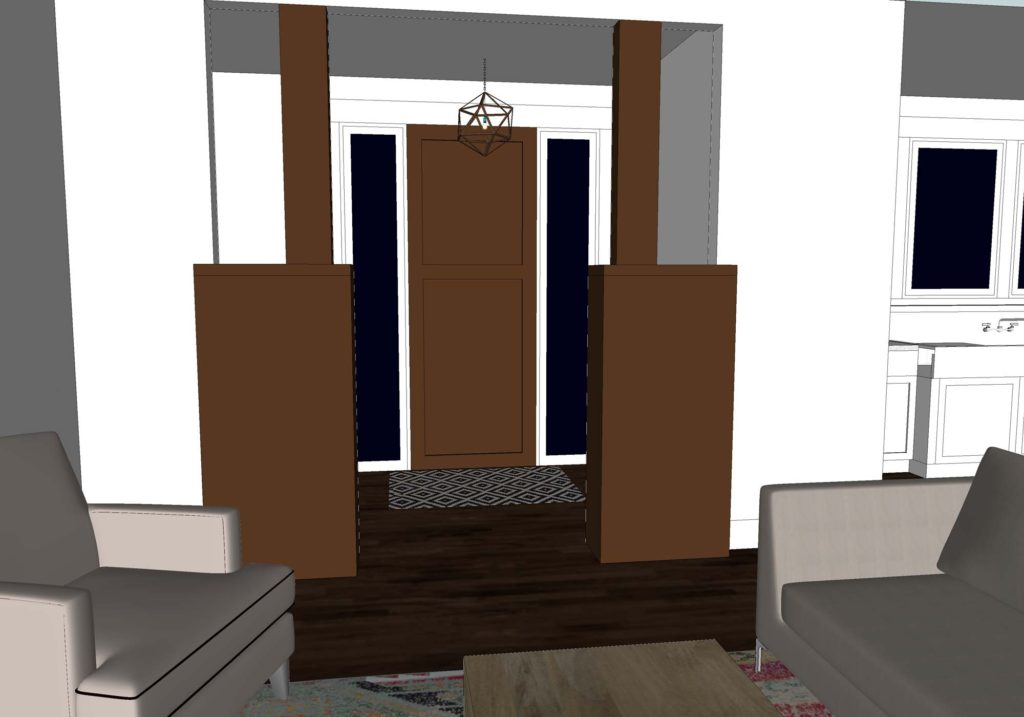
All along I had been holding onto the idea of our restored vintage cabinets, flanking a very formal front entry. But then I realized that this setup actually created quite a bit of rarely used square footage. Did we really want to allocate nearly a tenth of our main floor footprint to something that wouldn’t be needed on a daily basis? My simple answer was ‘no’.
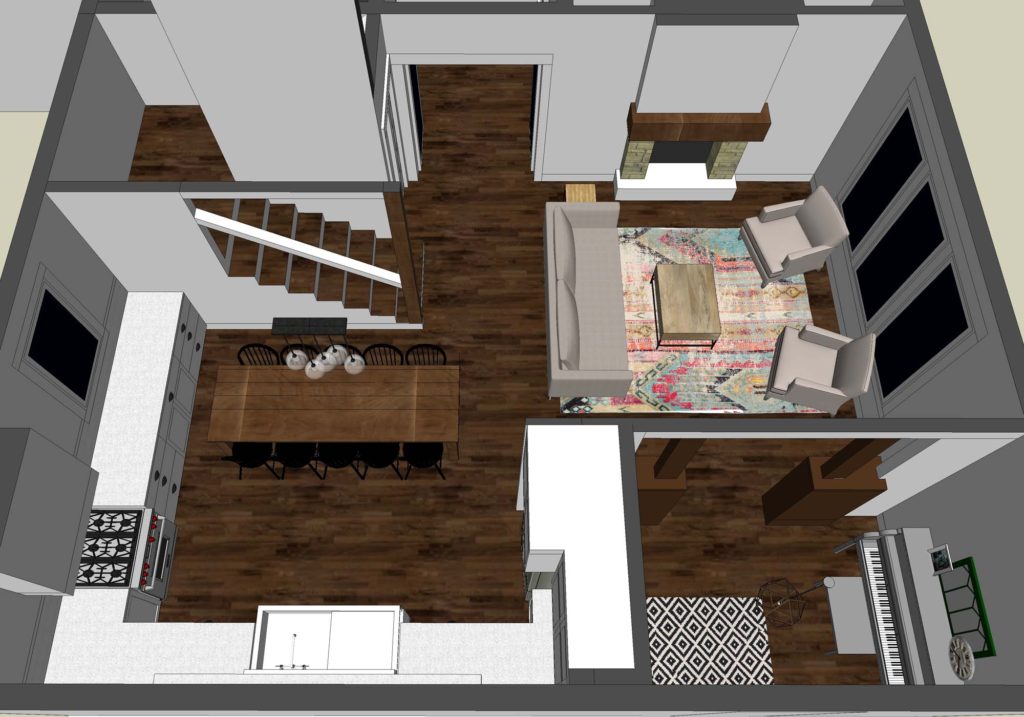
main floor before
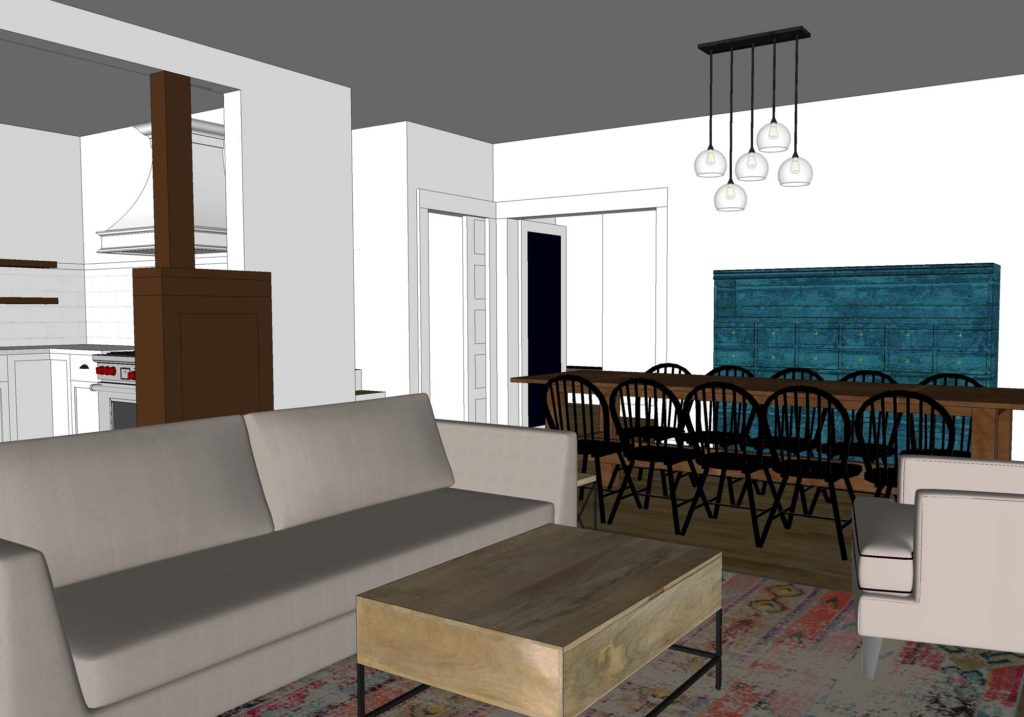
Taking the formal entryway out of the picture, the space absolutely opened up. I was able to maintain a small area by the front door for coat hooks and a small bench to be used by guests and visitors. The beautiful cabinets were then positioned to frame an opening to the kitchen.
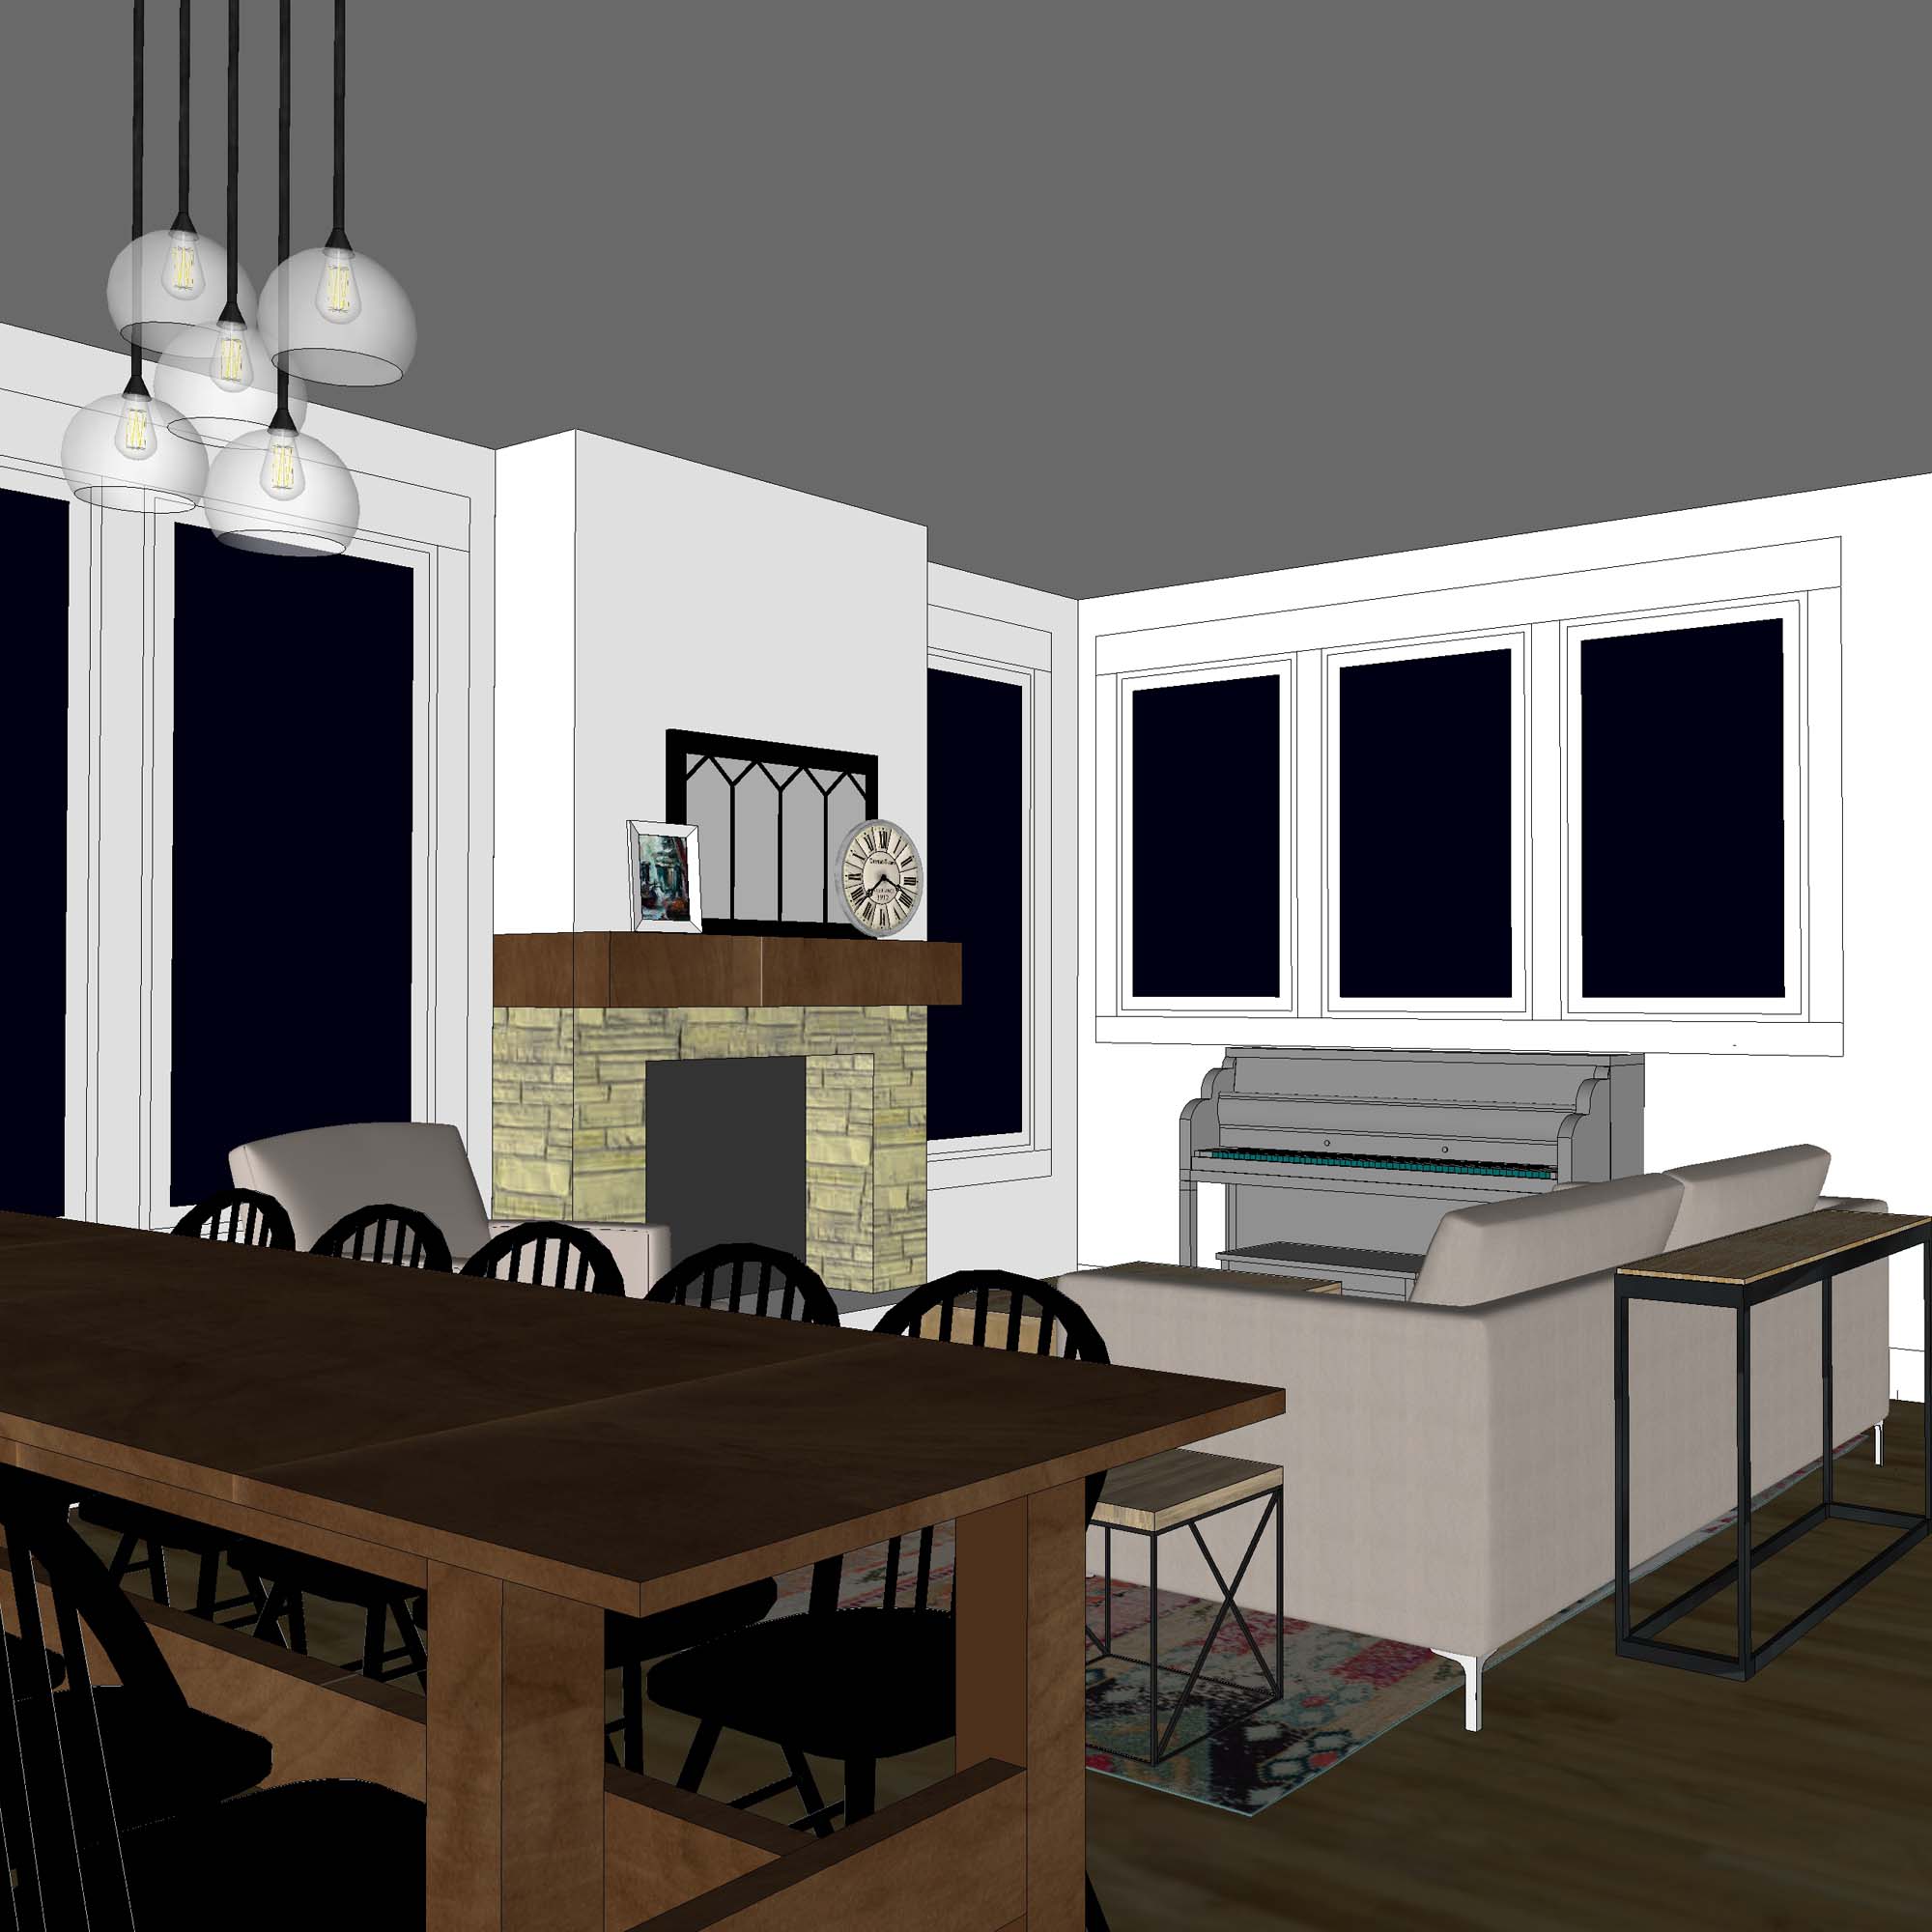
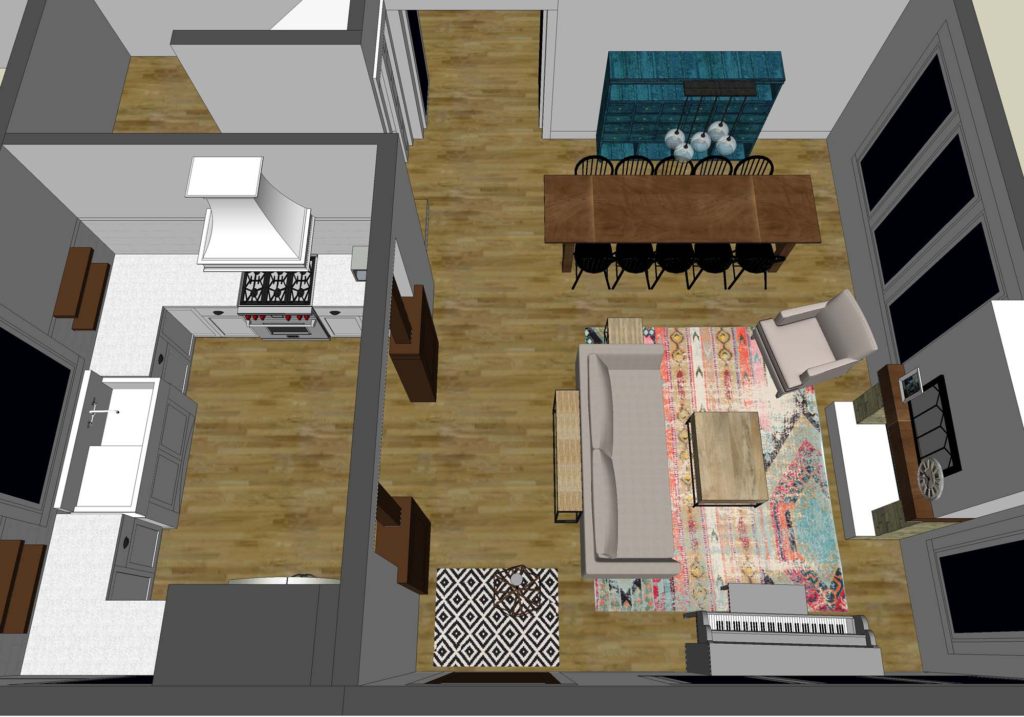
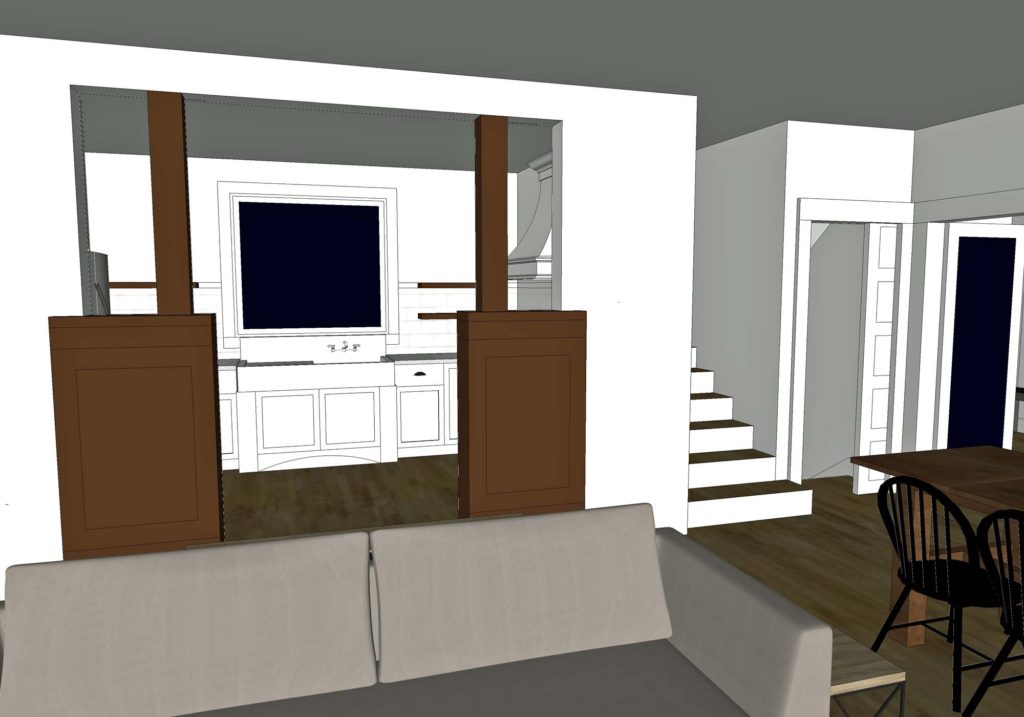
main floor after
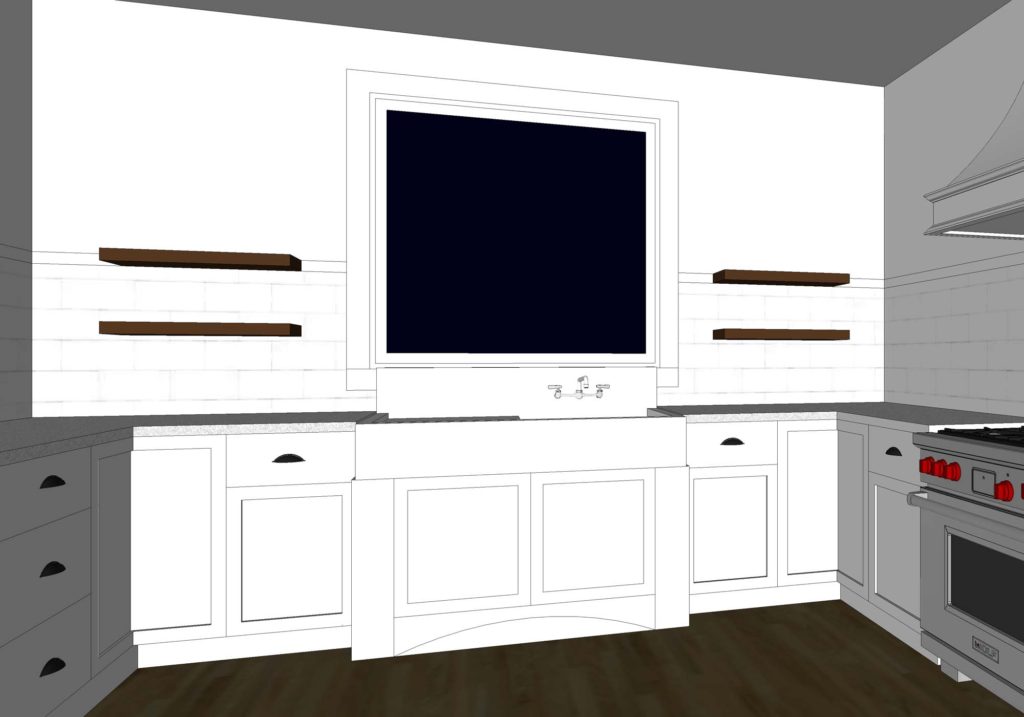
Speaking of the kitchen. I am SO in love with this new concept, which puts the amazing cast iron sink on center stage!
That large window will be sized to fit perfectly over our vintage sink.
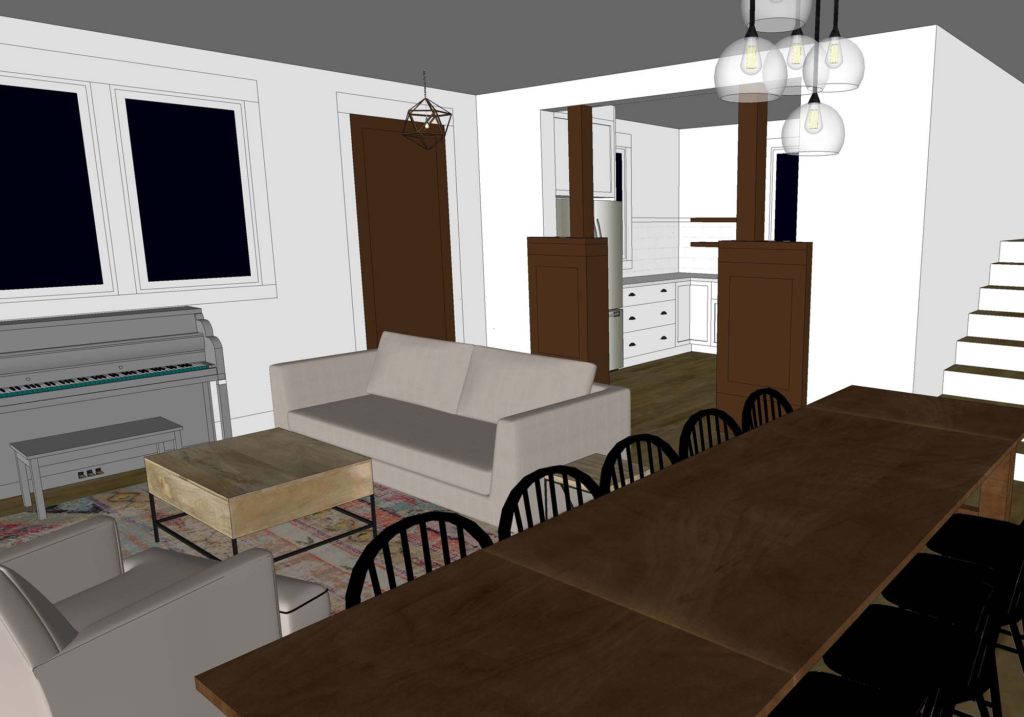
Overall, the public parts of the main level are now open to one another and will be graced with ton of natural daylight. And, of course, the spectacular view is expanded.
Additional benefits of the redesign
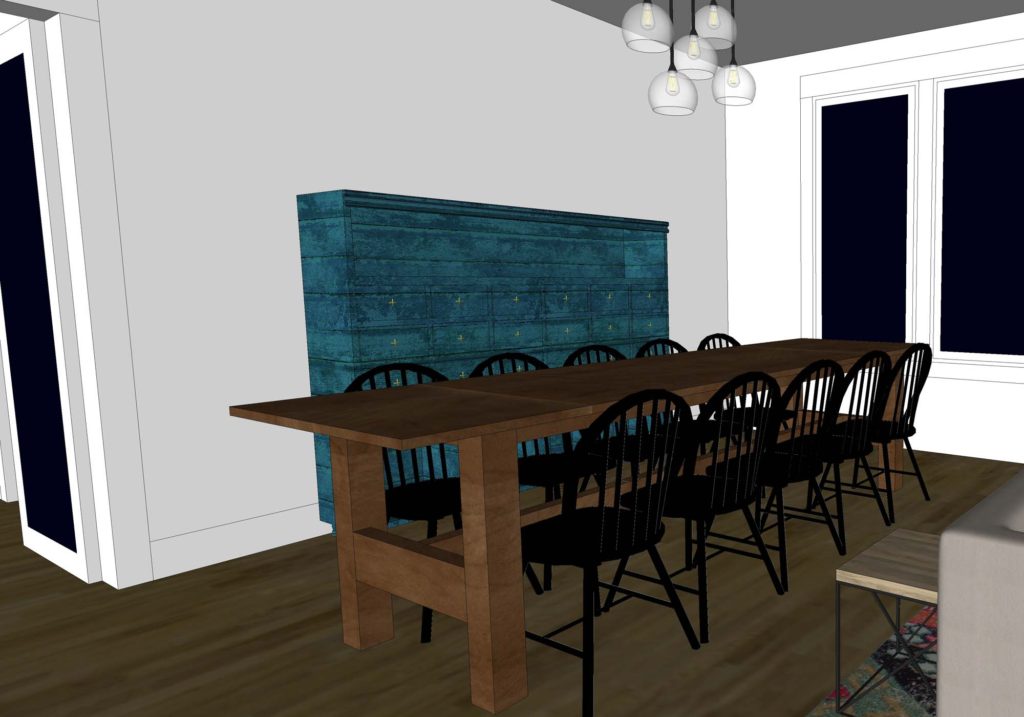
Apart from the increased view, this redesign has a couple other benefits. With a large space opened up, there is now room for an even larger dining room table. It has always been my dream to have a table that can seat at least ten. This space will accommodate a table that size, or even bigger! As a bonus, there will be room for an additional piece of furniture near the table.
Perhaps a china hutch, or a fun and interesting vintage piece such as an old apothecary cabinet.
In the kitchen, we can include a larger fridge. I had always thought we would use a counter depth model, until we found that they were quite a bit more expensive than the deeper versions. It seems silly to pay more for something that has less space, but that is just the way it is. Counter depths are considered an ‘upgrade’. Surely our growing family will fill up a standard depth fridge with no problem!
The home is also made more handicap accessible, should any of our family members find ourselves in a wheelchair at some point. There is a natural wide pseudo hallway running the entire distance of the open room, and the kitchen includes plenty of space to turn.
What the redesign entails
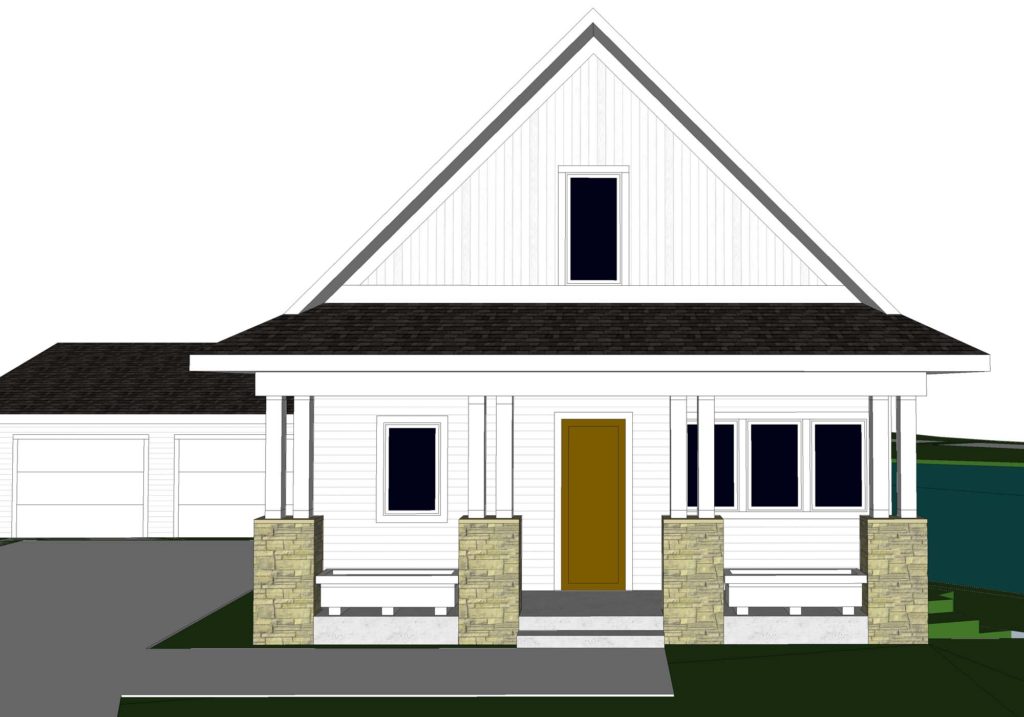
All of this seems to add up to a major change, but in reality it isn’t a big deal! It shouldn’t send our contractor or the crews scrambling around too much anyway! Essentially, we will need to purchase two additional windows for the house – a large one for above the sink, and another for the living room. Our front door will change, from one with sidelights to a door only.
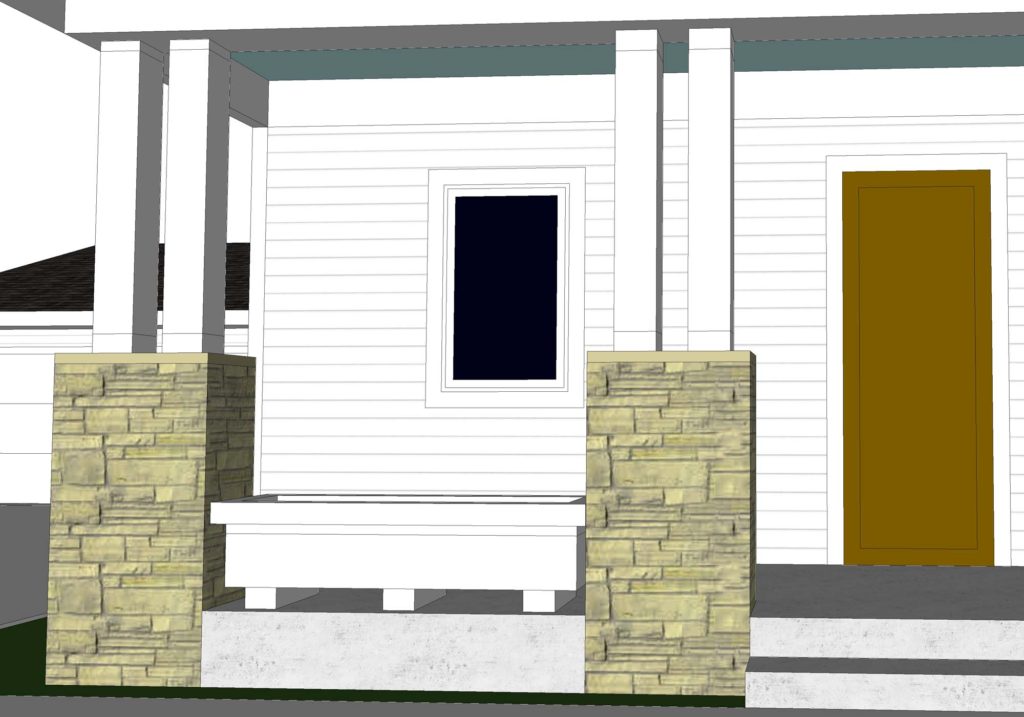
The exterior will also look a bit different too, with the removal of the small gable dormer above the porch and the addition of a column set.
Though I’ll admit that I do like the exterior look of the original design a bit better, the revised version is a manageable trade-off for the increased function and livability inside. And, I am giddy at the thought of two planters!
So, there you have it. Our surprise redesign. I have said for years that I work best under pressure. Apparently that includes adding design tweaks mere weeks before the house needs to be built. A few of the construction document sheets will need to be re-printed. But it will be worth it.
I would love to know your thoughts on this last minute redesign. But, hey. If you have any additional improvement ideas- please keep them to yourself. There isn’t time to go back to the drawing board again after this! Ha!
Though not as glamorous as other portions of the project, site work is an important step in new home construction. Since we now have the okay to build, I plan to write an update every couple of weeks to document this process. I hope that you will follow along from wherever you are reading!
Update number three is all about the site work that has gone into preparing our land for a new home.
DEALING WITH THE TREES
As I mentioned previously, We had begun the site preparation ourselves by cutting down quite a few of the huge oak trees on our property. Craig’s parents were willing to help us with the tree removal in trade for firewood, which they use as a winter heat source.
We reserved quite a few of the straight log pieces. Asking around, we were able to find someone willing to mill them into lumber. With this lumber we hope to add some special accents to our home, including our dining room table.
The man who is going to do the milling for us collected the logs and brought them to his shop. We are hoping to have the kiln dried lumber from him by the end of the summer.
EROSION CONTROL MEASURES
With all the trees removed from the building area, the excavating crew set to work. First, the crew added some environmental protection measures. Our city has in place ordinances to prevent erosion during the construction process.
One measure is to add large gravel rocks to the portion of the driveway closest to the street. Because large trucks are in and out of a seemingly muddy construction site many times per day, these rocks help to loosen the mud before it is tracked onto the road.
Another way to prevent erosion is by adding a temporary silt fence around the portion of the site where the work will take place. In the event that sediment becomes loose on our building site, this fence will stop it from reaching the nearby pond. This will protect the pond’s water quality.
SCRAPING THE SITE
Approximately six inches of topsoil was scraped and pushed aside on the site, for future use. Because this topsoil contains quite a bit of organic material, it is not stable to build on top of. Small plants or brush might grow into the concrete foundation if the topsoil is not removed. In addition, topsoil holds in moisture. If pressed onto a concrete foundation, it may hinder it from curing properly.
This soil is, however, a wonderful material that will be spread back into place once the house is finished. It will be the perfect base in which to plant grass seed.
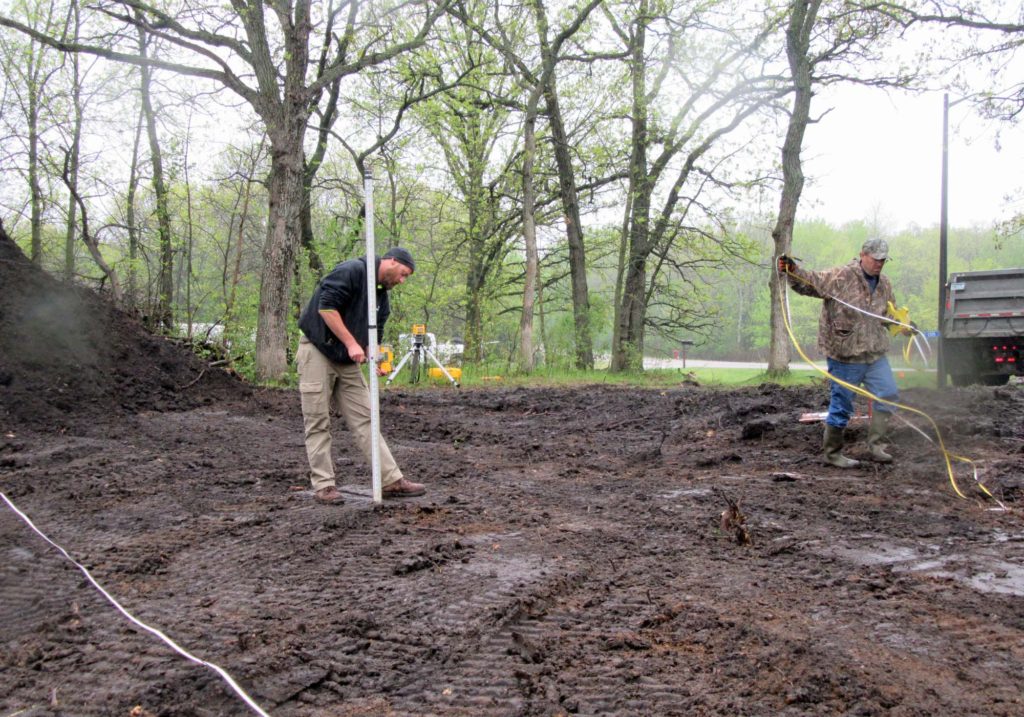
PLANNING THE EXACT HOUSE LOCATION
The excavation crew called me to the site to determine where exactly the house would be positioned. Although we had a basic idea of the location previously, the site looked a lot different with fewer trees. I have to say that, to date, this has been the most stressful part of the building process for me. It just seemed like the first real permanent decision. And that decision can’t be changed further on in the process if we are unhappy.
Our site is not a standard city lot where all houses are facing in the same direction toward the street. Because of this, we had quite a bit more flexibility on how to orient the house. Factors such as natural daylight, slope, views, and sight-lines all came into play and eventually we settled on what we think will be a good location.
Tape measures were run, laser levels were activated, and the crew was able to stake out the corners of the house and garage. I think it is pretty amazing how these modern day tools speed up the process.
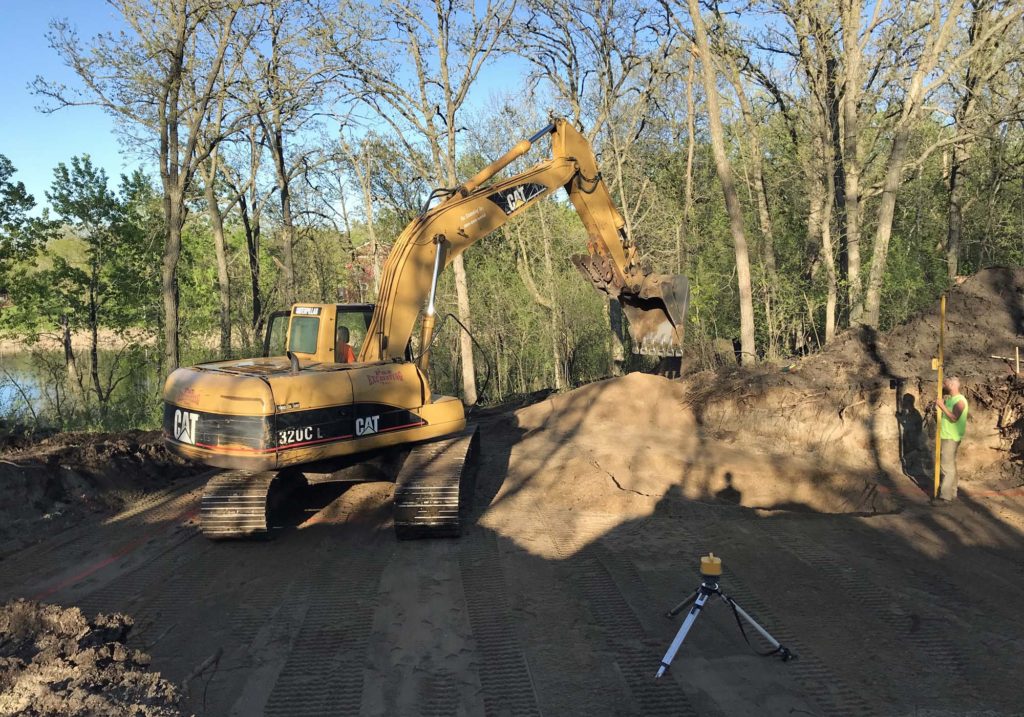
DIGGING THE HOLE
Finally, the entire site was prepared and the crew could begin digging the hole for the basement. Above all, this is the portion of site work that I was most looking forward to. Seeing the large machinery in action was truly incredible.
We found that our site has quite sandy soil, with a bit of gravel content. This is actually favorable for house building. It basically ensures that, as long as the ground is graded properly, we will never have water issues in our basement. Compacted sand also provides a great base to build upon.
A portion of the soil was taken off site. The rest was left, to fill in around the footings and foundation.
SITE WORK COMPLETE
After hours of digging, and packing down the soil, the site started to take shape. And oh was it ever exciting!
This picture shows the outline of the house, marked in orange. It will be easier to see once the footings and foundation are set up. We are really excited for that next step! I have heard that once the foundation is complete, the rest of the building process seems to go very quickly!
SITE WORK | HOUSE BUILDING UPDATE NO. 3
This video shows the crew working hard to prepare our site for construction!
It’s pretty excited to finally be seeing a bit more progress, and things will really start to go quickly once the foundation gets started. We hope to be able to share that update next! Be sure to subscribe to the Arrow Hill Cottage YouTube channel, where I will be posting an entire video series on our new house build.