Gather inspiration from these simple Fall decor ideas. They will have you ready to celebrate the season!
It’s officially Fall here in the Midwest! It honestly feels like there was a switch that turned the weather from warm and sunny to cold and rainy. The change just happened so suddenly!
Fall is probably my absolute favorite season of all, and I am genuinely bummed that I likely won’t be able to decorate this year. With the building of Arrow Hill Cottage nearing completion, our time is split between site visits, choosing finishes, and packing up the rental house. Add in school activities, and we essentially have no spare time anything for extra, including decorating!
But, if YOU have time to decorate, I have some ideas for you today! Though these ideas have been on the blog before, I thought they were worth another share. Click on the link below each picture to read more details about the decor.
SIMPLE FALL DECOR DIY
Looking to create something unique to decorate your home? Try one of these simple DIY ideas.
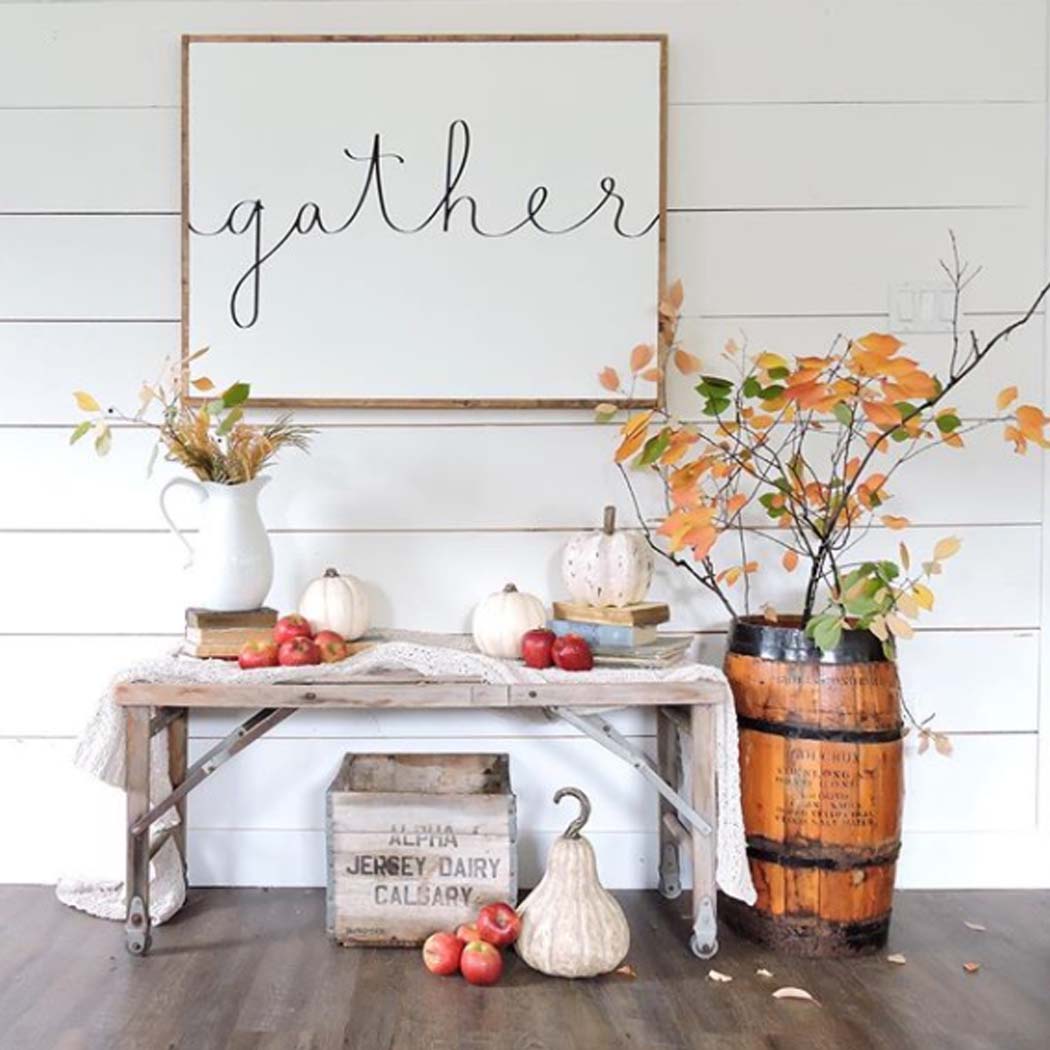
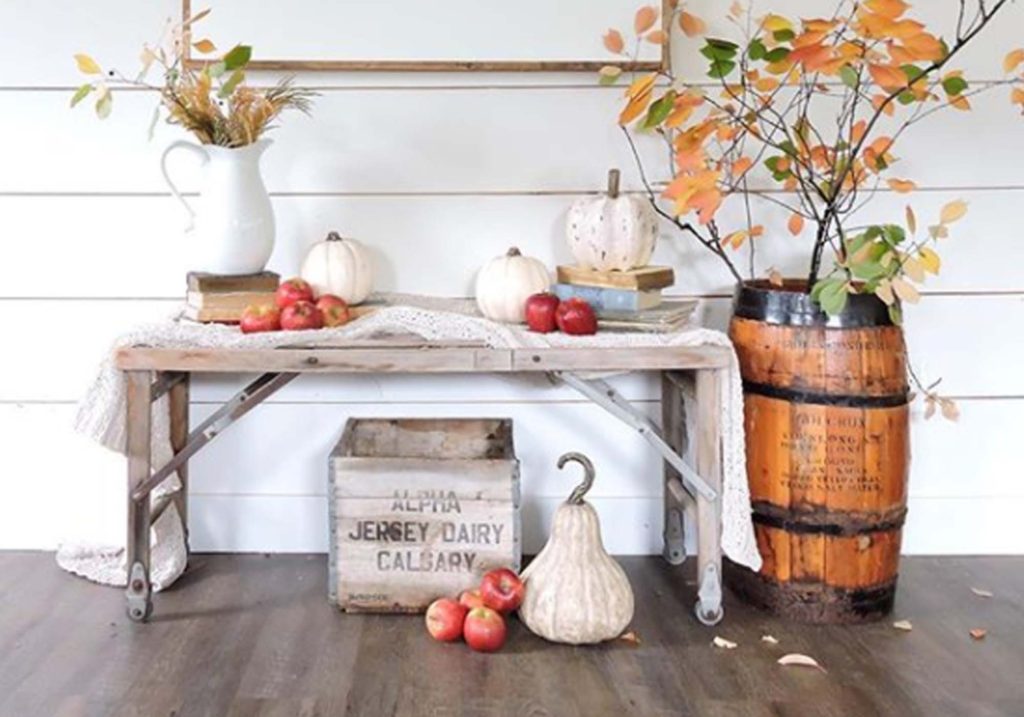
Natural Centerpieces
These natural Fall centerpieces would be the perfect accent to any tablescape, from now through Thanksgiving!
Even though it looks like a detailed and complicated piece, this pleated table runner can be made in just minutes. And for less than five dollars in material costs it is definitely worth a try.
The start of Fall means that Thanksgiving is right around the corner. One of the most simple ways to decorate this Fall might just be printing out this sign!
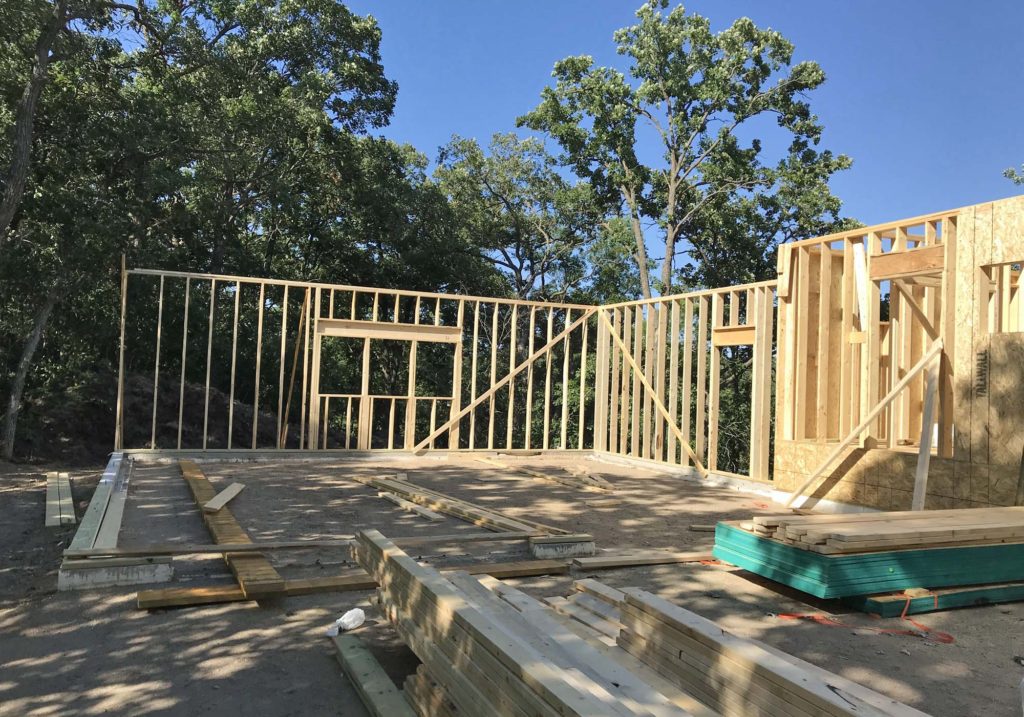
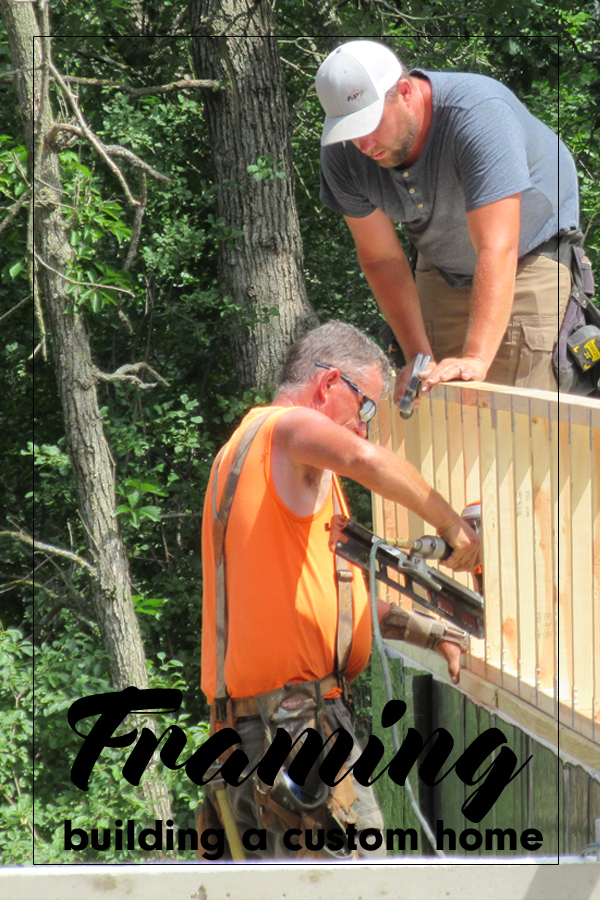
Time for another building update! In this week’s update I share all about the wood framing of our custom home build! Though I was hoping to share the entire framing process, things aren’t moving quite as quickly as we had hoped. This post will discuss the portion of framing that has been completed. And I will be sure to update again once the rest is finished.
At the end of Update No. 4 the foundation had just been completed. Essentially we had a very pretty looking hole in the ground, and were ready to begin the wood framing. I mentioned how excited we were for this step, when the building will start to take shape and begin to actually look like the house we had envisioned!
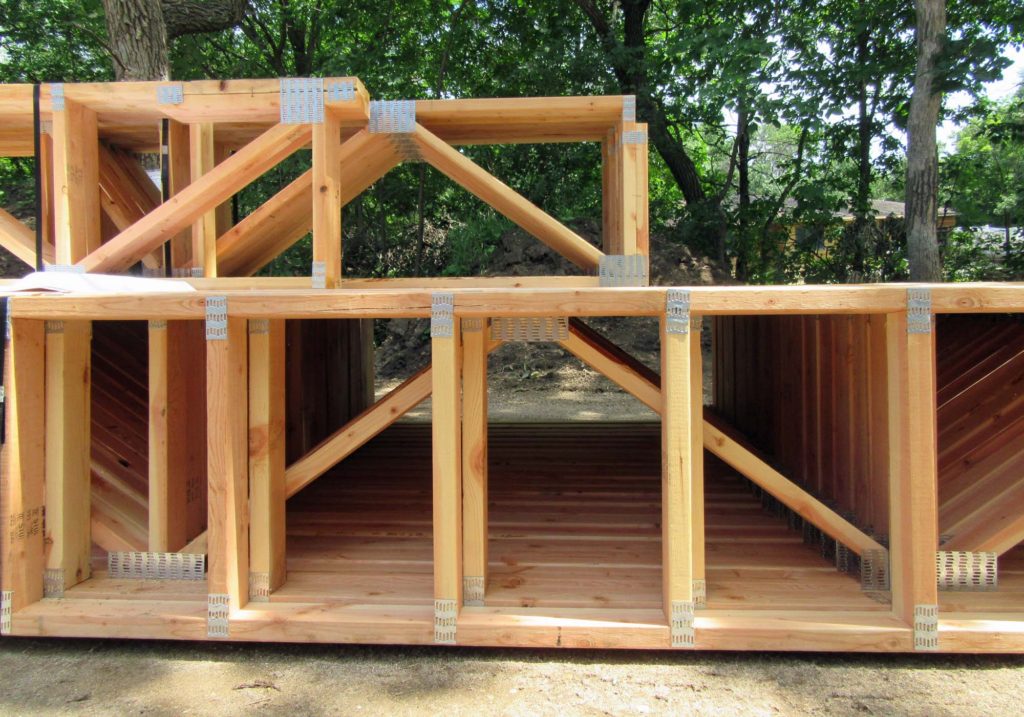
WOOD FRAMING STEP 1 | FLOOR TRUSSES
The first step in the wood framing process is to attach a wooden sill plate to the foundation. The sill plate is anchored to the concrete with large bolts and creates a base for the floor trusses to be tied to.
Floor trusses work essentially the same way as standard 1x member construction, with a few advantages. They allow for longer clear spans, as well as offering space for mechanical duct-work and plumbing. For these reasons, as well as the ease of installation, trusses are favored over traditional hand framing in residential construction today.
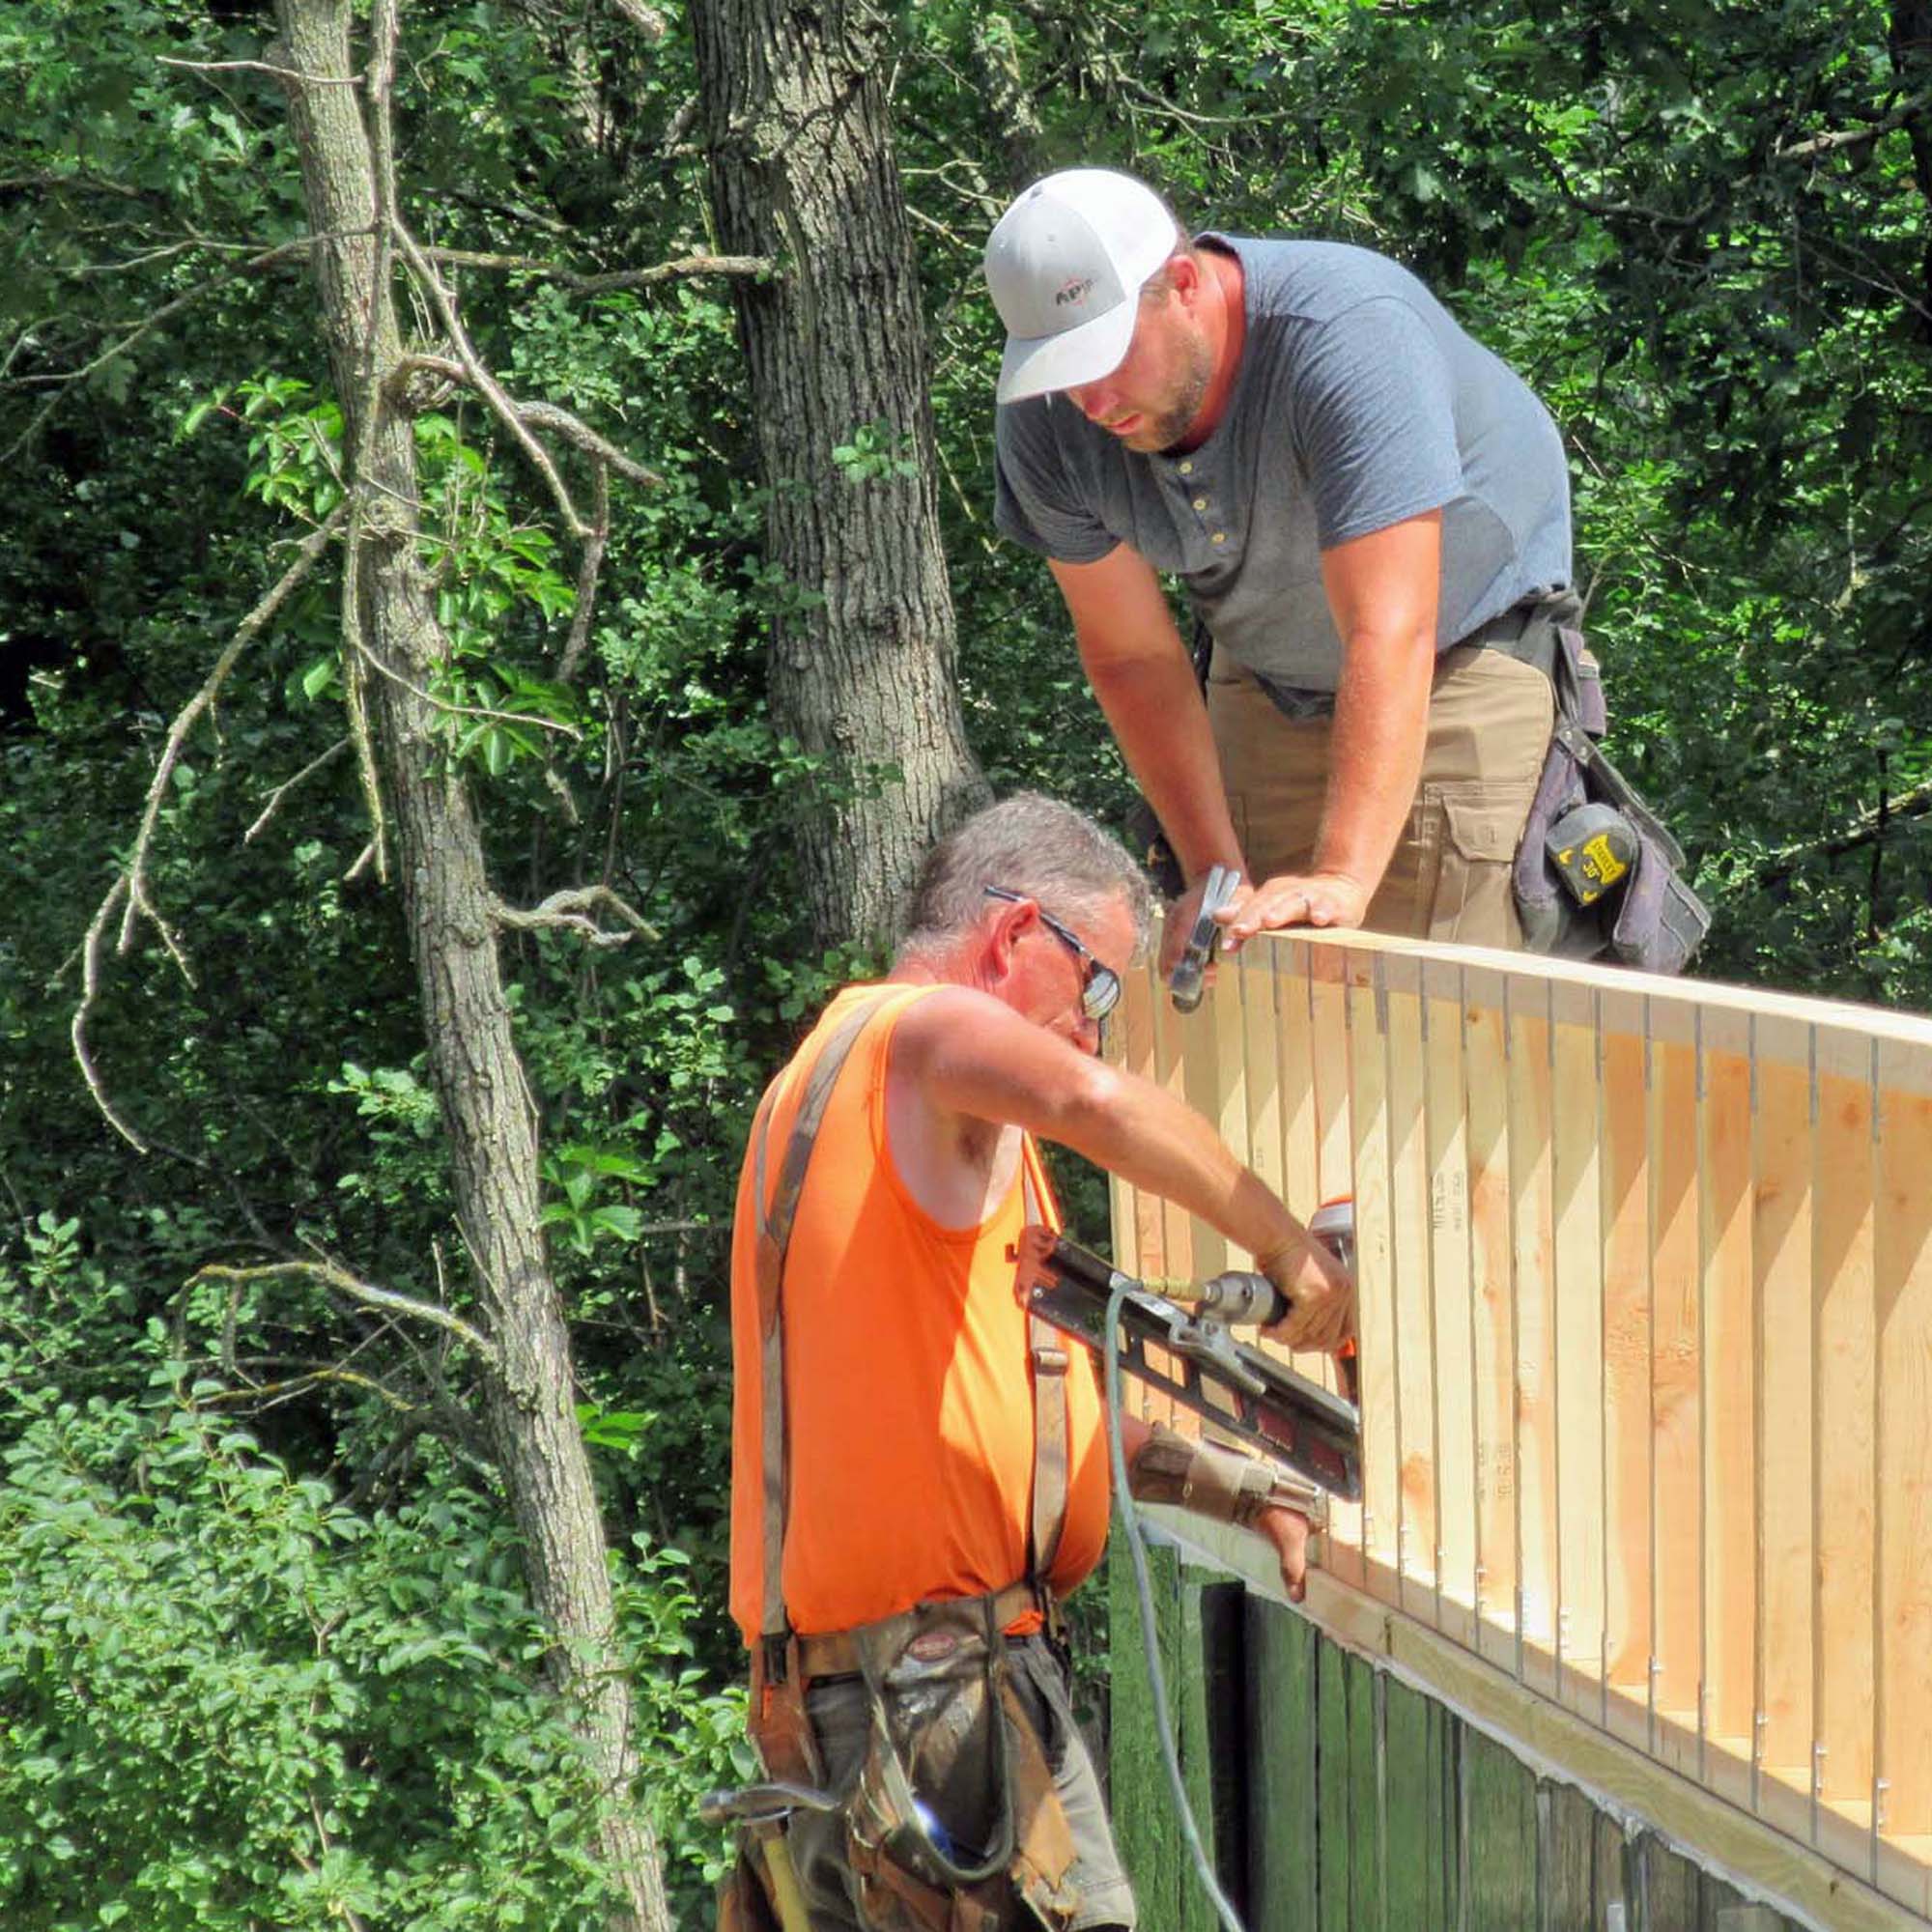
To install the floor trusses for our main level, the framers had to do some fancy footwork. The younger of the two was set with the task of almost ‘tightrope’ walking across the walk-out side wall. With a drop of over eight feet, it was a dangerous mission. He admitted to me later that it was a bit un-nerving! They did eventually get all the trusses in place.
For our family, it was fun to go into the basement and look up at all of the installed trusses since this was the first time that we had a mostly enclosed space to go into. Sensing the personal/ human scale of the project is very important and was something that we hadn’t yet been able to experience, having the spaces open to the great outdoors.
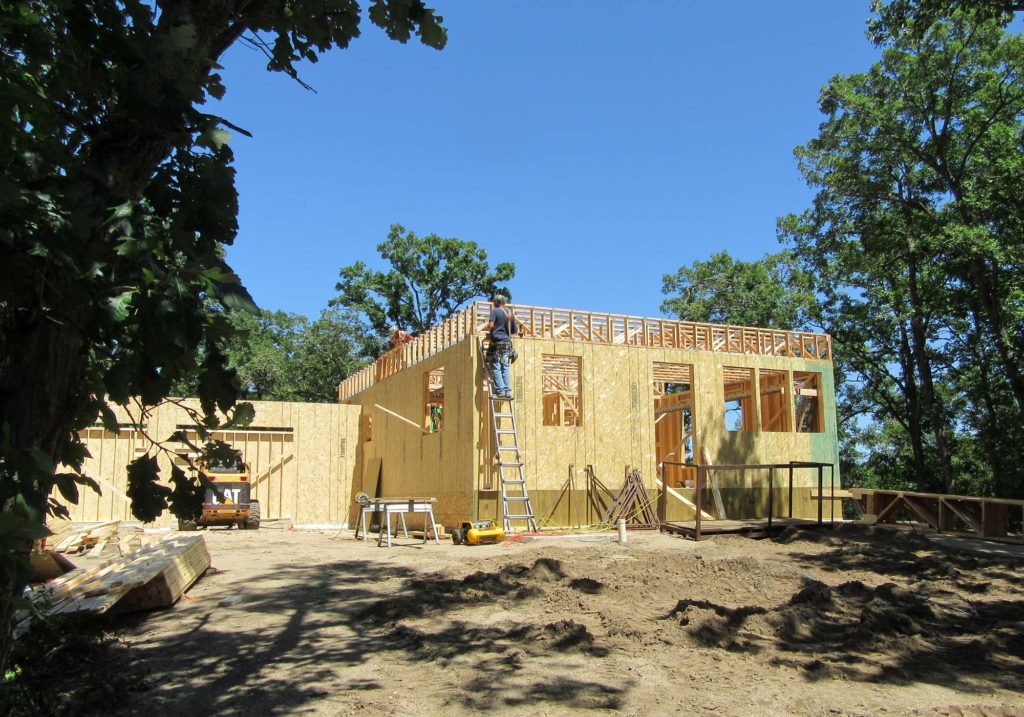
ADDING THE SHEATHING
The next step in the wood framing process was to add the sheathing on top of the installed trusses. Once installed, the sheathing plus trusses work as a monolithic system, providing superior stability.
We were sure to take advantage of walking on our main level for the very first time. In fact, we made an evening excursion of it by picking up food from Dairy Queen and having a picnic on the site of our future dining space. The night was ideal, and the first moments we spent at our house together is a memory I will cherish forever.
WOOD FRAMING THE WALLS
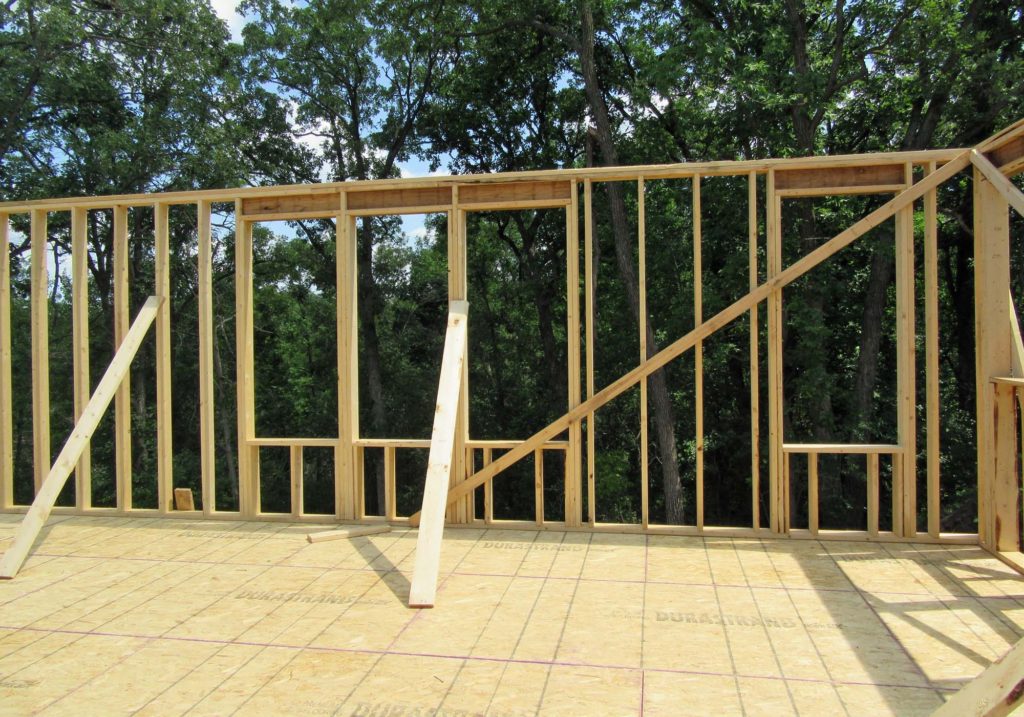
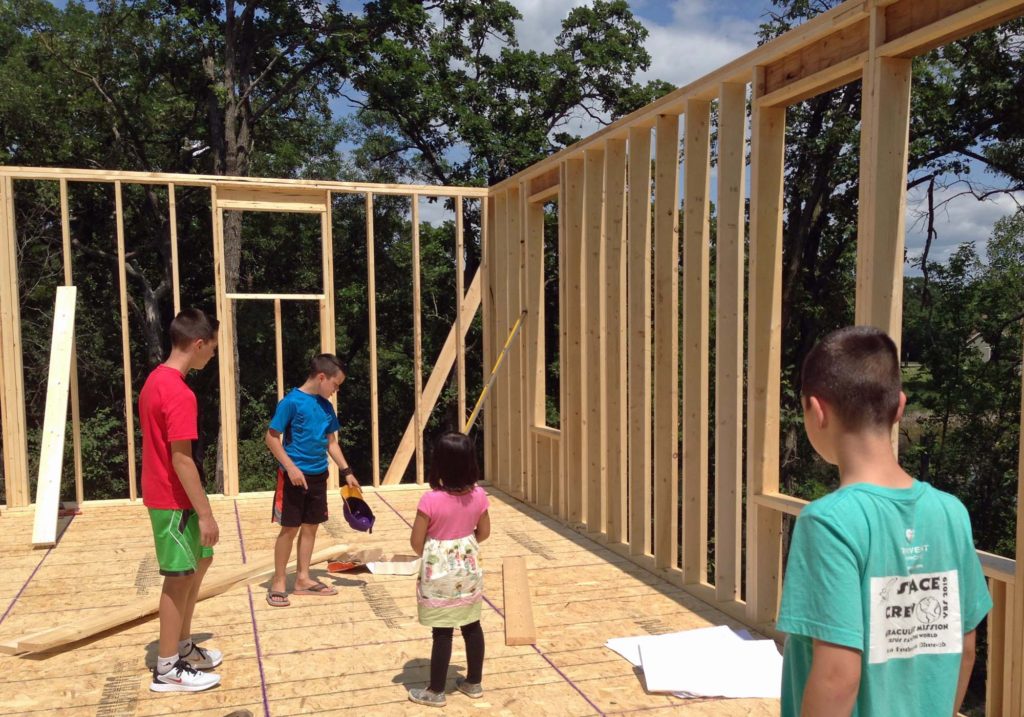
Up next came the main floor wall framing. With the window locations set up, it was exciting for us to finally be able to see what the views from each of the rooms will be.
It came as no big surprise that the most awesome view of all is from the open living/dining space, overlooking the woods and pond. The western facing kitchen window though displays a great sunset view, which we weren’t expecting.
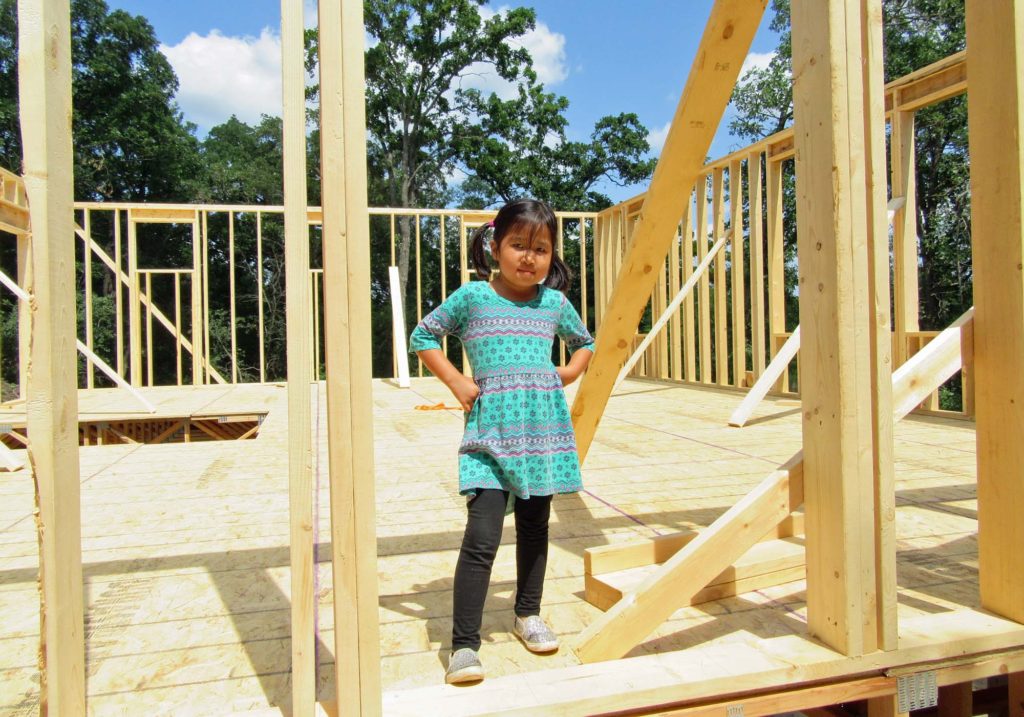
How cute is she, standing in the location of our future front door!
Walking through the shells of each room on the main level, I couldn’t help but imagine all of the memories that are about to be made here. We feel so blessed that we will soon be calling this place home.
Though I have given a bit of a mini walk through over on Instagram, I do plan to also film an entire ‘under construction’ house tour – once the wood framing is complete. Be watching for it!
CONSTRUCTION SITE VISITS
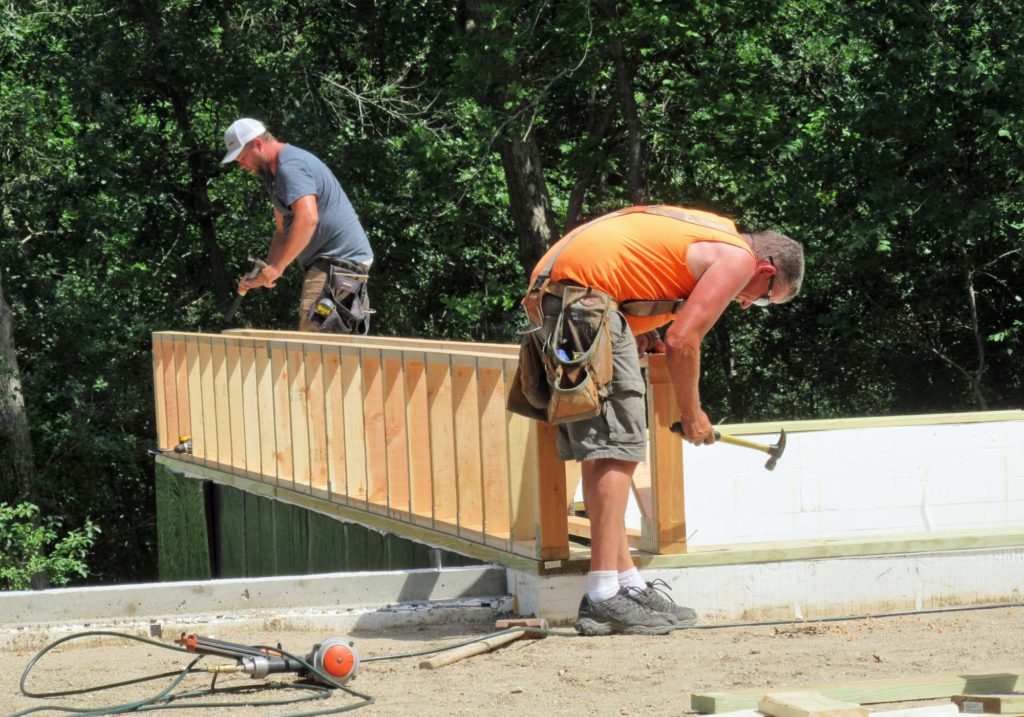
During the wood framing portion of the construction process, my husband and I settled into a nice site visit routine. I will typically stop by in the early afternoon, while out and about with the kiddos running errands. This is a chance for me to touch base with the crew, and answer any questions they may have. Craig will also swing by after he is done with work for the day. Typically the crew has left the site by that time, which allows him to take in the progress a bit more slowly. He generally takes a bunch of photos, then shares them with me.
These site visits help us to take in the day-to-day changes, as well as quickly catch any mistakes in the framing. One day Craig texted me a series of images and I discovered that the back three square windows weren’t centered properly. It’s something I hadn’t noticed earlier in the day, but from his pictures it was very obvious! The middle window should line up with a centered second story window, and it would have looked very goofy if the windows weren’t in alignment.
The center window should be centered on the back wall
And, though we are non-confrontational people, I contacted the framers right away to inform them of the mistake. Thankfully they acknowledged the problem and corrected it right away.
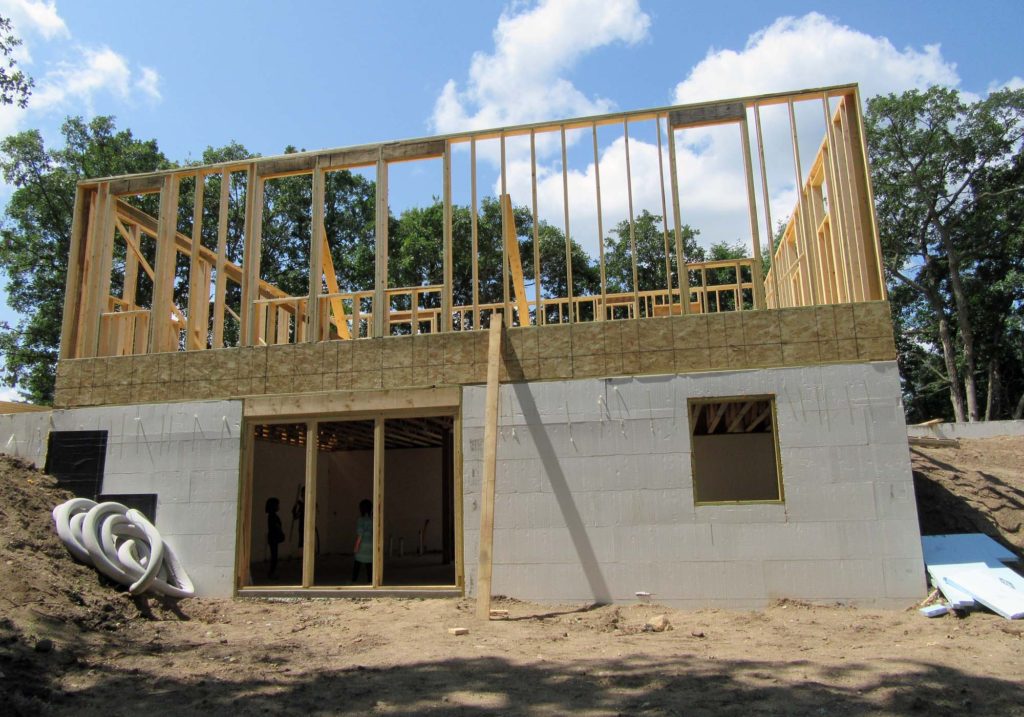
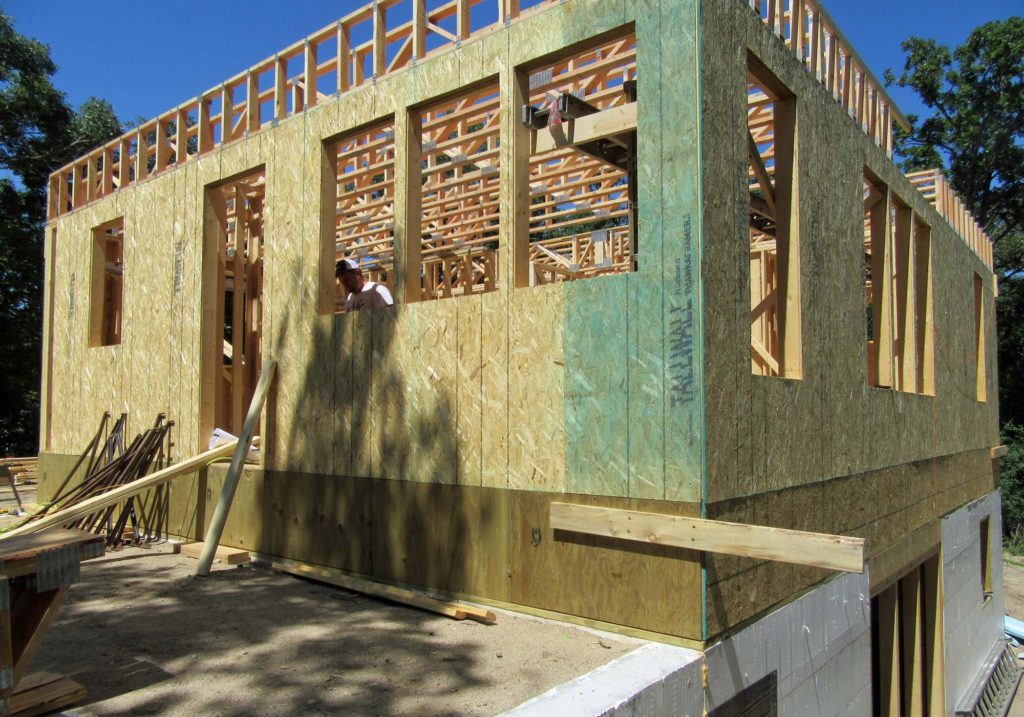
WALL SHEATHING + GARAGE
Next came the exterior wall sheathing. Covering the skeleton of wood studs really made the house shape come to life!
The garage framing was also put into place. During the construction of the garage we did make a couple of minor modifications. We raised the sidewall approximately six inches, which in turn created enough space for eight foot tall overhead garage doors. Previously we had seven foot tall doors, but figured the extra foot will come in handy if we ever decide to get a larger vehicle for our large family.
I am over the moon excited for my husband to finally have a fully functional garage, complete with good lighting, plenty of open floor space, and a proper tool bench. He has waited a very long time for this!
We are also anticipating that we will love having an attached garage during the bitterly cold Minnesota winters! Our oldest daughter, who has mobility issues, will be especially appreciative. The icy winter morning walks to our current detached garage have been full of anxiety and frustration!
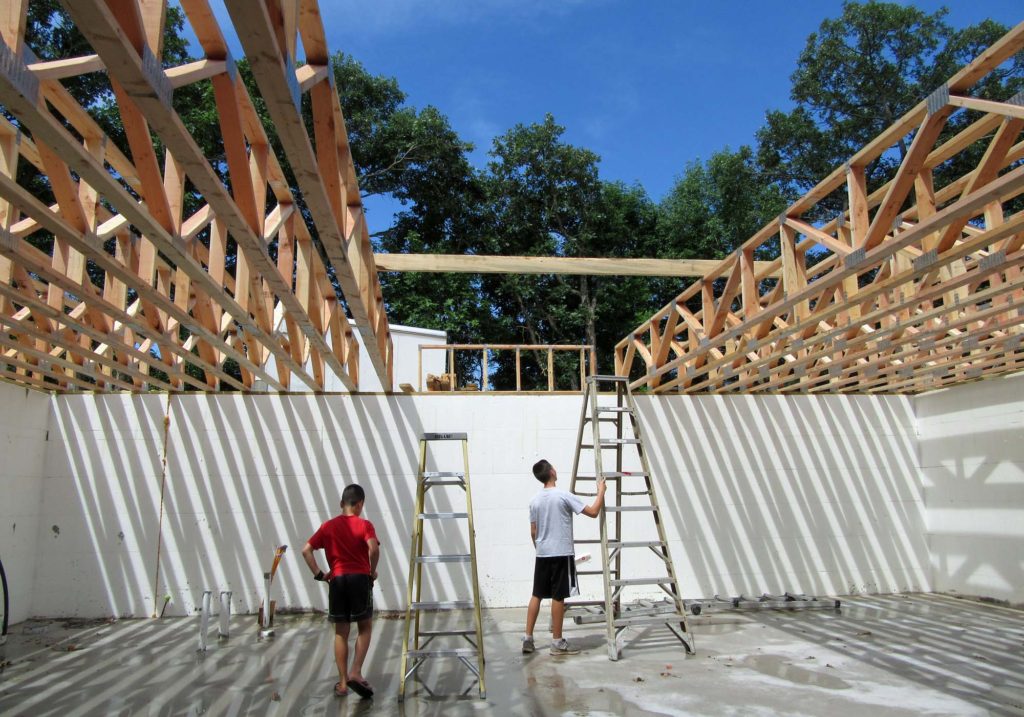
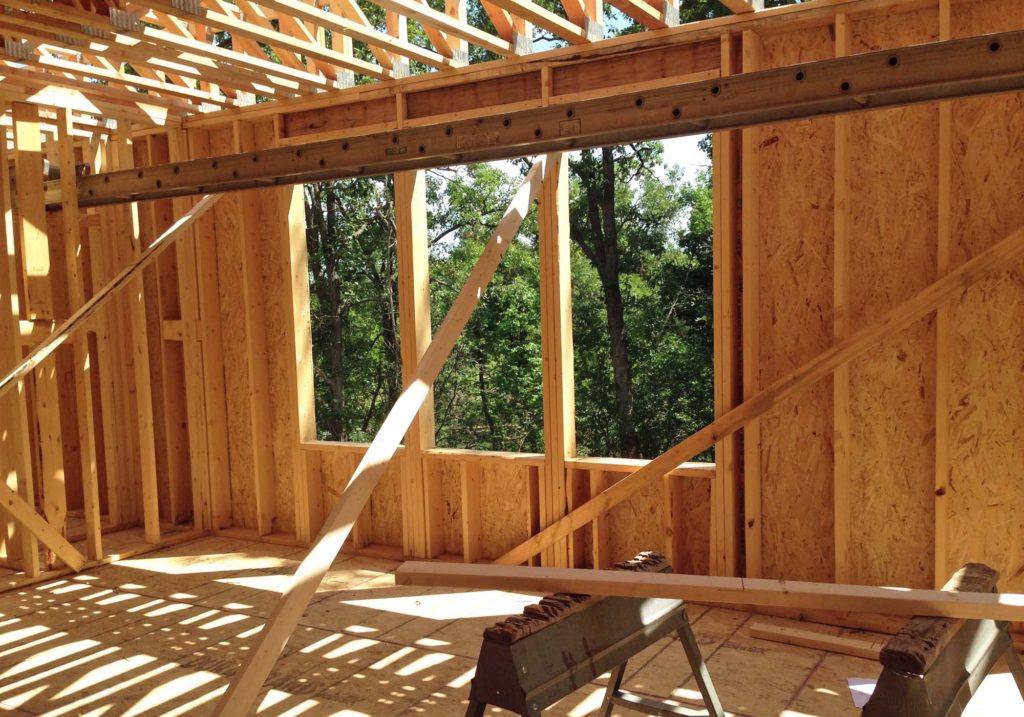
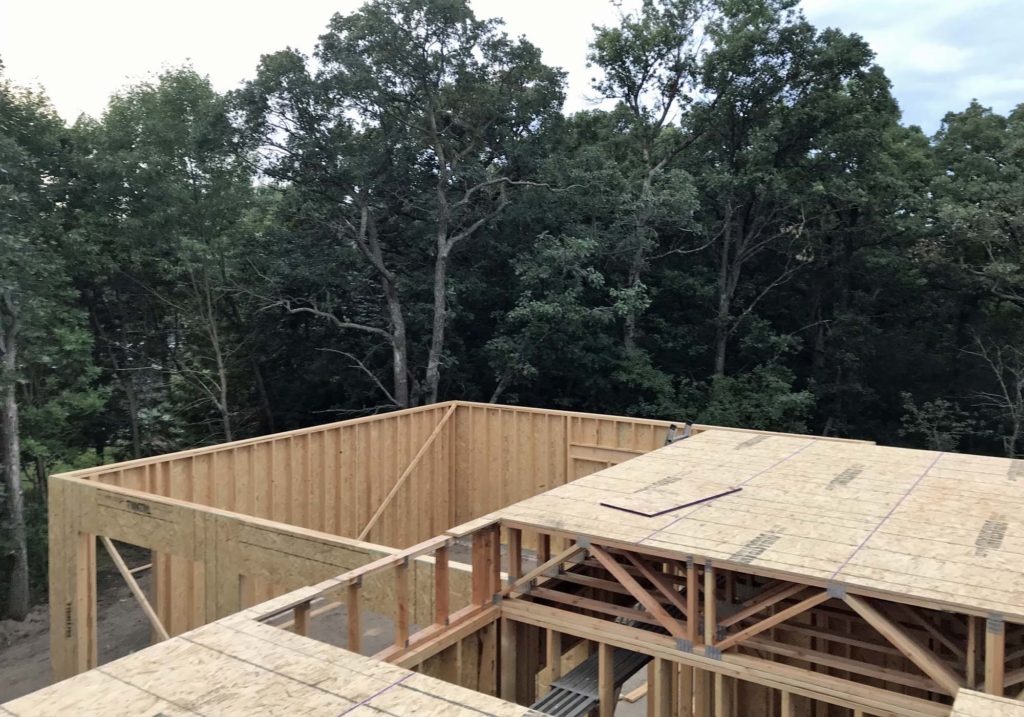
The wood framing continued with the setting of the second floor trusses plus sheathing. Because we were so anxious to see the view from upstairs, one night we took a ladder and climbed up. Without any walls for protection, it felt like we were standing on top of a mountain! It was a mighty sight!
Of course, the view won’t be quite as expansive once the walls are up. There are only two windows upstairs. One in the boys bedroom, which faces the street. And one for the girls, with a spectacular view of the woods.
WOOD FRAMING | NEXT STEPS
This week we had a bit of a standstill on the site. The concrete guy was supposed to be back to form up the porch stoop and have it poured – so that the roof trusses for the house and porch could be set at the same time. Unfortunately, the roof trusses were delivered a day too early. This meant that there wasn’t enough space on the site for a concrete mixer truck to come in and pour.
The new game plan is to install the roof trusses for the house and garage first, starting early next week, then come back to finish the porch and get the roof on that portion.
I am beyond giddy for the roof to go up, and to see the house shape in it’s completion! However, that will have to wait for the next update.
Be sure to stick around to see this little house of ours come to life! Thanks for checking in today!
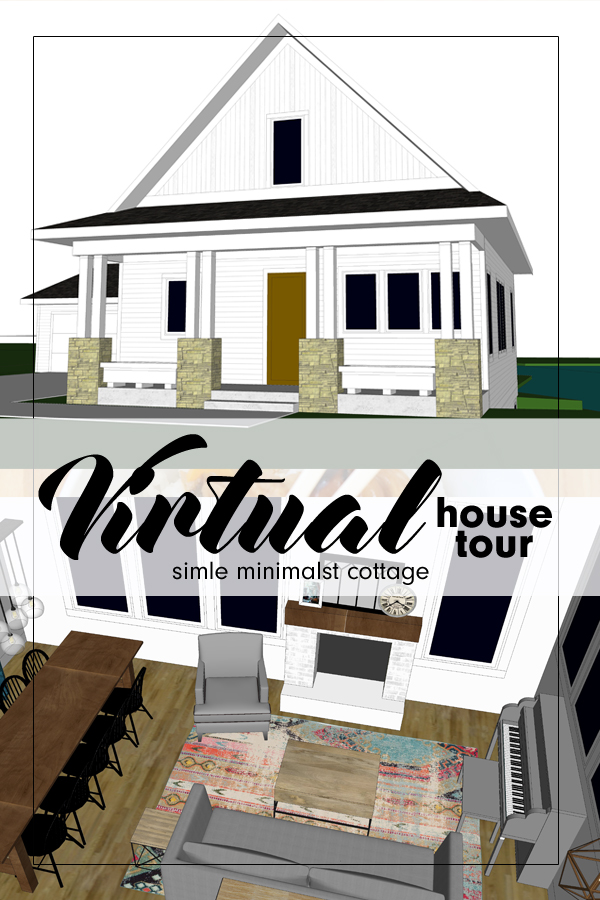
Join me today as I give a virtual tour of our minimalist cottage! This is the home we hope to spend the rest of our lives in, and we have worked diligently to design it to meet all of our needs, now and in the future.
With framing in full swing, I thought it might be a good idea to do a quick virtual tour. This could prove helpful for anyone following along with our real life progress updates. I share day to day on Instagram Stories. And also give detailed updates every couple weeks on Youtube. It will be fun to look back and see how close to the original design intent the house ends up.
When this blog was originally started, about two years ago, we were under the impression that the house would be built within the first year. But, as you know, that wasn’t the case. And, though the delays were frustrating, I am able to look back with gratefulness for the extra design time.
DESIGN CHANGES
For reference, THIS is my very first post regarding the design of the house. It was quite a bit larger then. We realized fairly early on that we needed to make major square footage cuts to keep the budget in check.
In fact, it seemed that as time went on we continued to simplify the design MORE and MORE. But with each revision we became increasingly satisfied with the house. There hasn’t been a single change, or simplification, that we have regretted – including THIS surprise last minute revision that created a more open concept main level. Every single change has led us to where we are today.
And where exactly are we? Home. A structure so perfectly suited for our family of seven that I hesitate to call it a house. It genuinely already feels like home, and we can’t wait to move in!
OUR MINIMALIST COTTAGE
The design of Arrow Hill Cottage has forced us to look closely at the way our family lives. And to explore our spacial needs both now and in the future. We realized during this process that, in many ways, we are quite minimal. It is more important for us to have time together within the same spaces, rather than retreat to our own rooms. And the storing of rarely used items is not a priority for us either.
We were able to settle on a comfortable floor plan that is just over 2,000 finished square feet. This includes the basement, main and upper levels. It should meet our needs now, with five growing children, and also accommodate my husband and I with main floor living, as we age. There is even potential, when all the kids are grown and moved out, to rent out the lower level for additional income.
TAKE THE VIRTUAL TOUR
I encourage you to watch the video of our cottage. It is quite a bit longer than the typical video I put out, but there is a ton of information! And, I think it gives great insight into why certain design decisions were made. I hope you enjoy!
Be sure to keep checking back for more house progress updates in the near future!
Funny story. Do you remember nine months ago when I made a major redesign to the main level? I was pleased with the change at the time and thought for sure I was done designing. Joke’s on me… apparently I wasn’t!
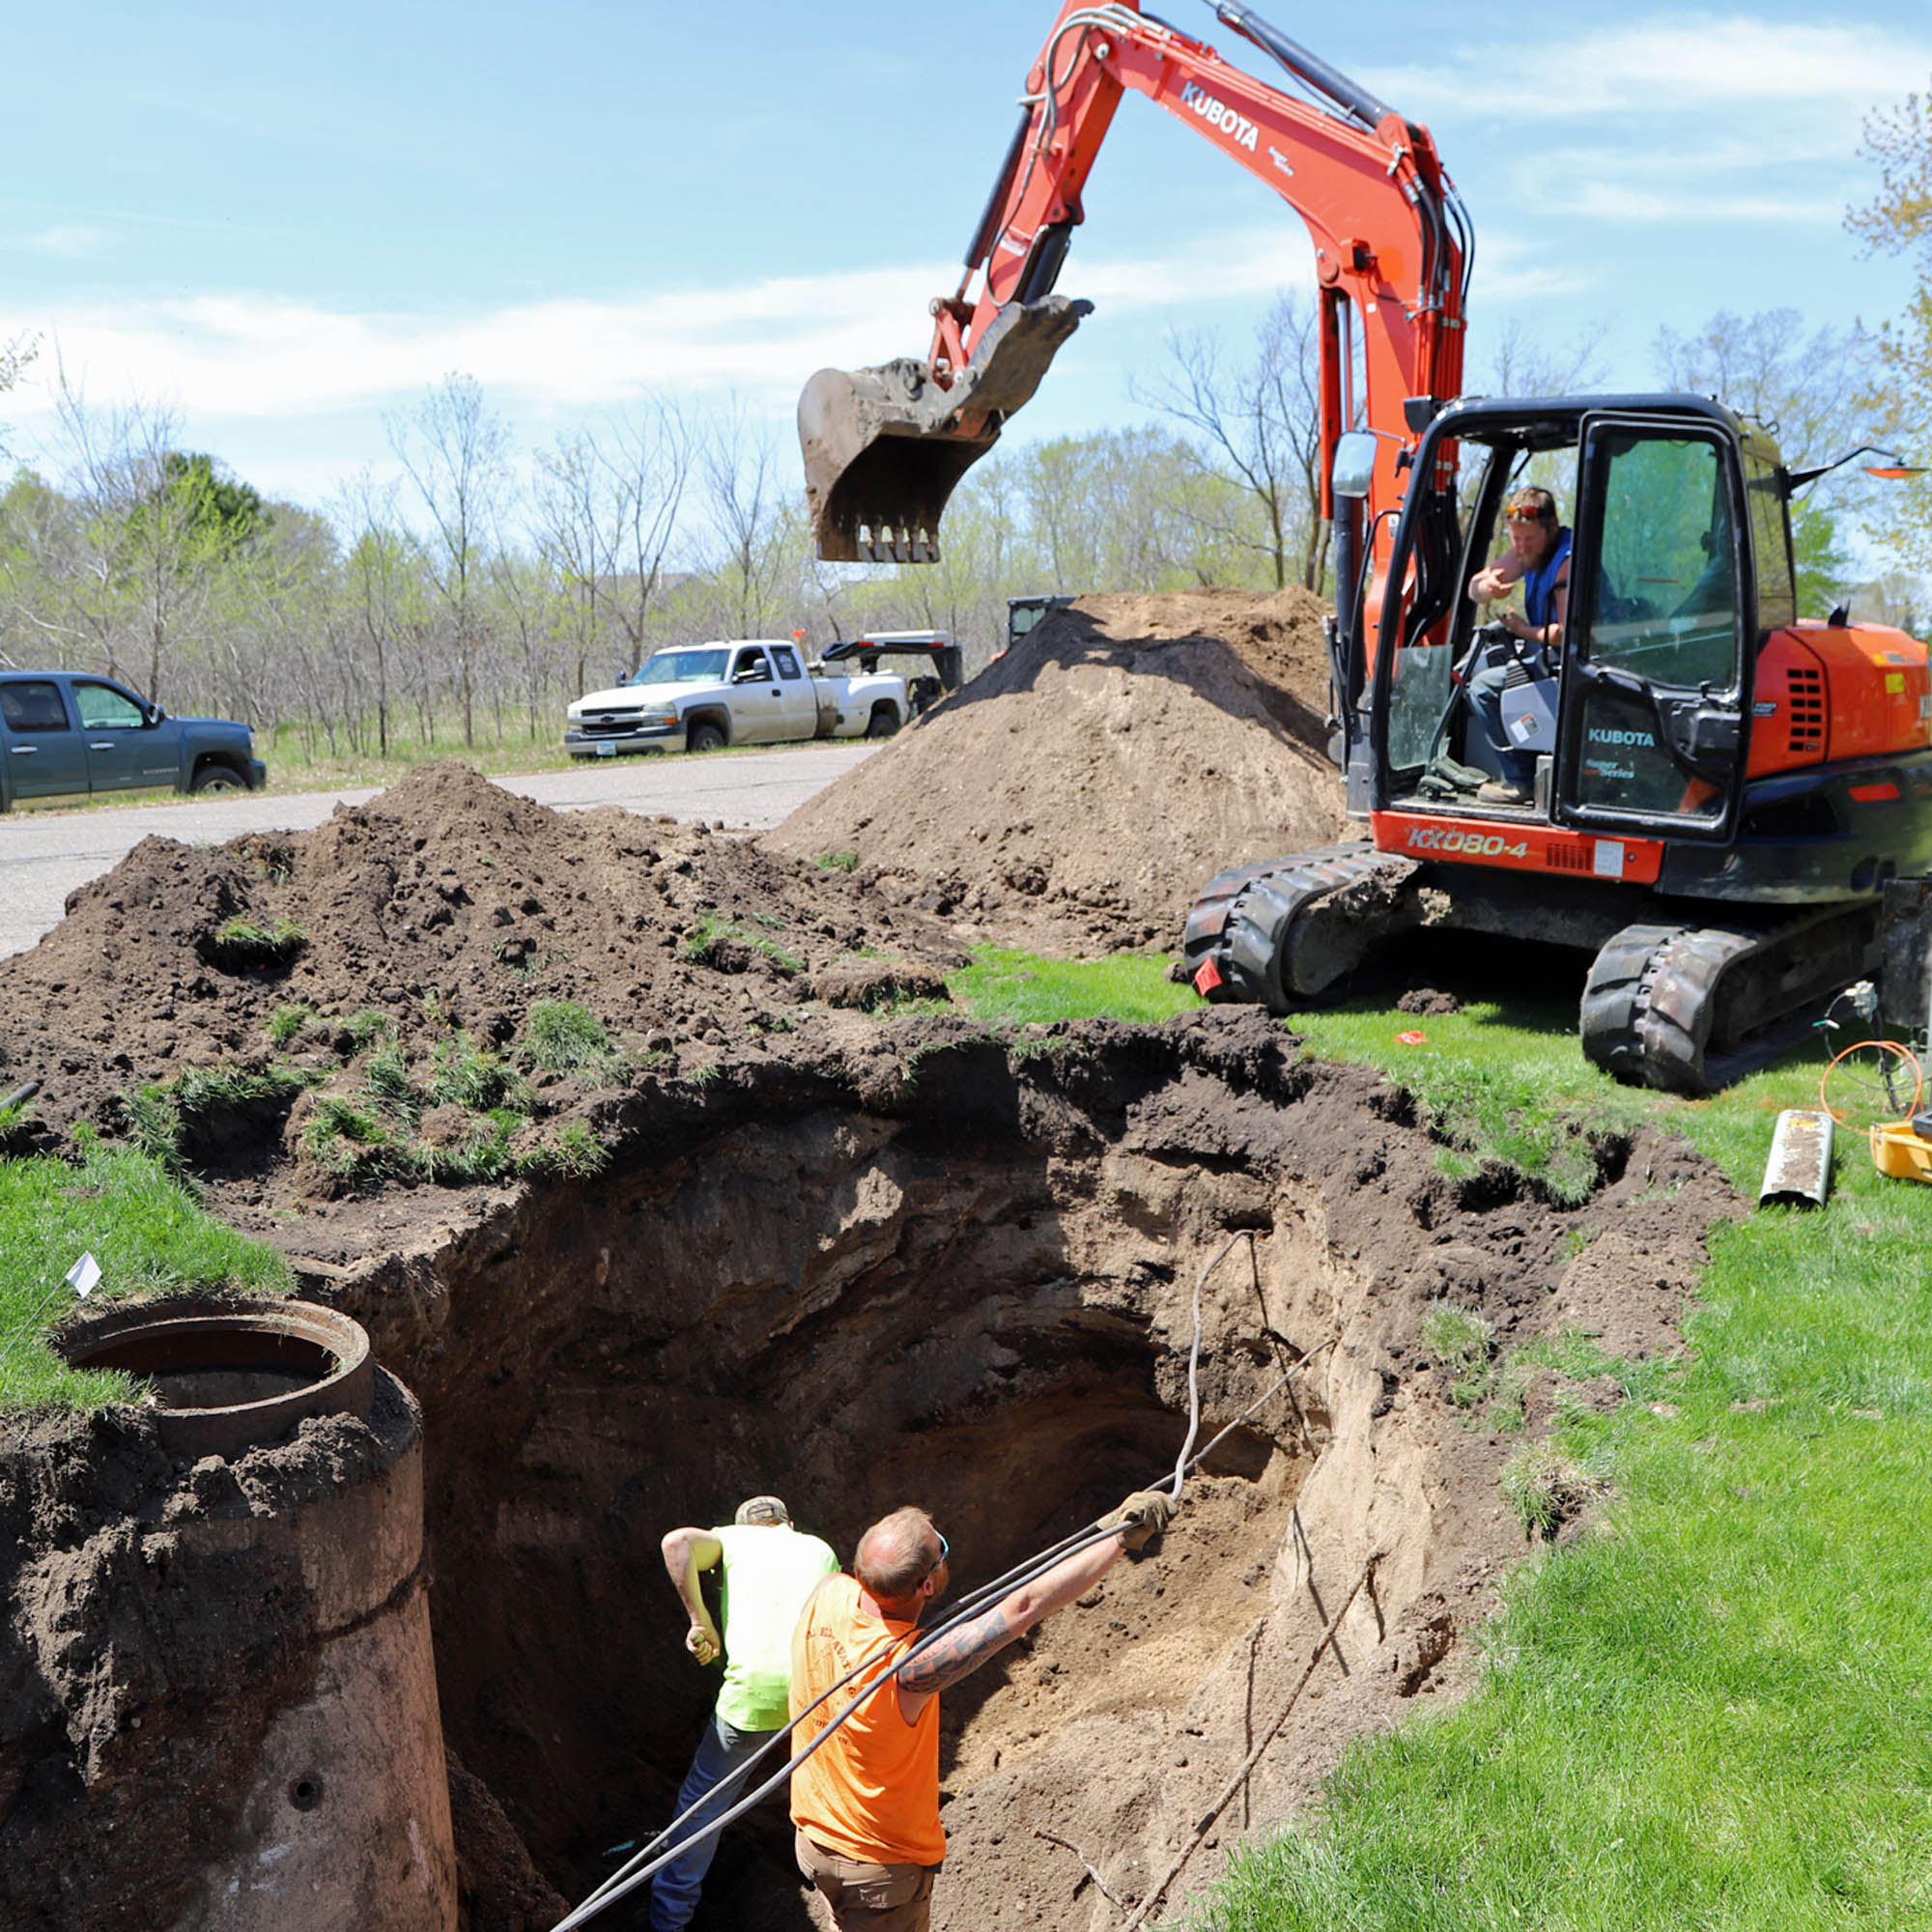
If you’ve been following along, you know that our building project has begun. We’ve cleared out trees, dealt with sewer issues, and the crew prepared the site. In fact, just this week the foundation for the house was poured! I will have an update on that over the next couple of weeks.
It’s all very exciting and welcomed progress, yet as soon as I saw the footings laid out on the site, I felt a nudge. You see, our site has some gorgeous views. It’s a gem of a property. And when I stood in the spot that would be our future living room, imagining the three large windows facing the beautiful woods, I couldn’t help but want to open up the view even more.
I looked at the 3D images that I had drawn, and thought. Was it possible?
Truth be told, I kept these thoughts to myself for a while. Surely my patient husband didn’t need the added stress of his wife redesigning a house that was currently being built. But I couldn’t shake the idea from my mind.
And then… a lightbulb moment
All along I had been holding onto the idea of our restored vintage cabinets, flanking a very formal front entry. But then I realized that this setup actually created quite a bit of rarely used square footage. Did we really want to allocate nearly a tenth of our main floor footprint to something that wouldn’t be needed on a daily basis? My simple answer was ‘no’.
main floor before
Taking the formal entryway out of the picture, the space absolutely opened up. I was able to maintain a small area by the front door for coat hooks and a small bench to be used by guests and visitors. The beautiful cabinets were then positioned to frame an opening to the kitchen.
main floor after
Speaking of the kitchen. I am SO in love with this new concept, which puts the amazing cast iron sink on center stage!
That large window will be sized to fit perfectly over our vintage sink.
Overall, the public parts of the main level are now open to one another and will be graced with ton of natural daylight. And, of course, the spectacular view is expanded.
Additional benefits of the redesign
Apart from the increased view, this redesign has a couple other benefits. With a large space opened up, there is now room for an even larger dining room table. It has always been my dream to have a table that can seat at least ten. This space will accommodate a table that size, or even bigger! As a bonus, there will be room for an additional piece of furniture near the table.
Perhaps a china hutch, or a fun and interesting vintage piece such as an old apothecary cabinet.
In the kitchen, we can include a larger fridge. I had always thought we would use a counter depth model, until we found that they were quite a bit more expensive than the deeper versions. It seems silly to pay more for something that has less space, but that is just the way it is. Counter depths are considered an ‘upgrade’. Surely our growing family will fill up a standard depth fridge with no problem!
The home is also made more handicap accessible, should any of our family members find ourselves in a wheelchair at some point. There is a natural wide pseudo hallway running the entire distance of the open room, and the kitchen includes plenty of space to turn.
What the redesign entails
All of this seems to add up to a major change, but in reality it isn’t a big deal! It shouldn’t send our contractor or the crews scrambling around too much anyway! Essentially, we will need to purchase two additional windows for the house – a large one for above the sink, and another for the living room. Our front door will change, from one with sidelights to a door only.
The exterior will also look a bit different too, with the removal of the small gable dormer above the porch and the addition of a column set.
Though I’ll admit that I do like the exterior look of the original design a bit better, the revised version is a manageable trade-off for the increased function and livability inside. And, I am giddy at the thought of two planters!
So, there you have it. Our surprise redesign. I have said for years that I work best under pressure. Apparently that includes adding design tweaks mere weeks before the house needs to be built. A few of the construction document sheets will need to be re-printed. But it will be worth it.
I would love to know your thoughts on this last minute redesign. But, hey. If you have any additional improvement ideas- please keep them to yourself. There isn’t time to go back to the drawing board again after this! Ha!
It has been a whirlwind to say the least. In the last update I gave you, we were busy clearing trees from the property in the hopes that we would be able to build. We had to wait for our appraisal report, to find out if it would financially make sense to build at this moment in time.
Sorry to leave you hanging like that, but a lot has happened since that point – and I am ready to share all of that with you today!
A seasoned blogger might put their reader in suspense. Maybe make them scroll through the entire post to get to the news that they came for. Lucky for you, I’m not a seasoned blogger. I feel like sharing this news right away!
The answer is…YES!
We are going to be building our simple dream house!
To be honest, I doubted this many times over the past couple of weeks. I questioned our motives. Wondered if we were being foolish or greedy. It isn’t easy to take on a dream that has been in the back of your mind for so many years. You question why that dream came to be in the first place. Lose a bit of your resolve.
But, through many heart felt conversations with family and friends, and silent prayer seeking His truth, we felt hopeful. And just last week it was confirmed.
We signed on the dotted line, our intention to make this dream a reality. And we couldn’t be more excited (or nervous) about it.
If you think it has been all sunshine and roses since closing day though, think again. In fact there has been a whole lot of drama. Hence the title of today’s update post.
So much has happened in the past coupe of weeks, in fact, that it is hard to explain. I knew it would be much easier for me to sort it out in video format instead of typing every last word. Though the video is a bit long, I encourage you to watch through the entire sixteen minutes, to get up to speed to where we are at! Information given in the video may become relevant in future new home construction updates.
HOUSE BUILDING UPDATE NO.2
Whew! If you watched through the video you know that the roller coaster ride has just begun. We were aware that new home construction presented some drama, I think we just were surprised to see it happening so soon! I hope you will come along for the ride and share all the highs and lows with us!
At this point it is my plan to give house building updates at least once every couple of weeks, perhaps once per week if there is enough to share. I also hope to continue blogging about simple living tips and resources, as time allows.
Let’s be honest though, this summer is mainly going to be ALL about the house! Other posts regarding our new home construction can be found HERE.
Today I am going to share how I tackled a seriously stuffed hall closet and turned it into a simple and organized linen closet – in less than 30 minutes!
*This post contains affiliate links. As an Amazon associate, I earn from qualifying purchases. See my full disclosure here**
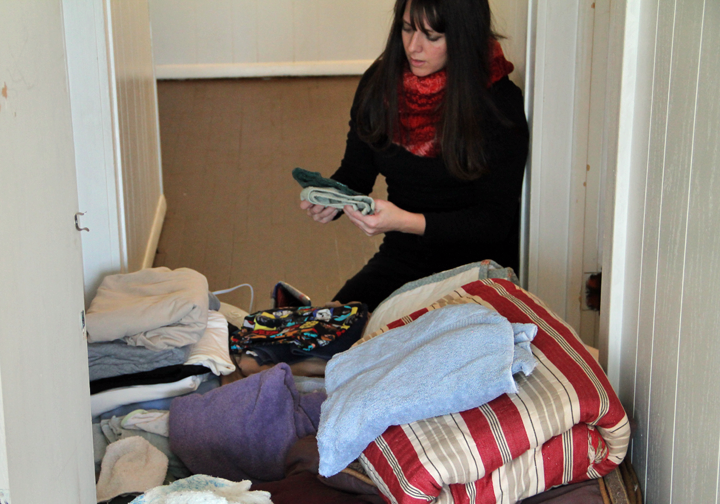
In this decluttering journey, I have to admit that this space was one I was not looking forward to. Our linen closet had become one of those places in our house that was just out of sight, and out of mind. I knew what was lurking behind those doors – and knew it wasn’t pretty. But I didn’t really want to acknowledge the task at hand.
Faced with the lofty New Year’s goal of finishing our rental house declutter before we break ground on Arrow Hill Cottage in the spring, I knew that there was no more holding back. It was time.
LINEN CLOSET BEFORE
We moved into this rental house four years ago. In our previous home we did not have a linen closet, and so we saw this as a bit of a luxury upgrade. We piled all of our bedding, towels, and extra pillows into the closet and called it good. Except, it wasn’t good.
Here’s the situation. I wash laundry only once per week. I like this system, especially since it gives me a sense of finalization, at least for one day. The towels we use daily are stored in our bathrooms. They make their way into the laundry baskets throughout the week, and on Sunday get a thorough washing. That means that every towel behind this closed linen closet door are ‘extras’, and are rarely used. They are brought out primarily when we have guests stay in our home.
Bedding is similar. After I wash the sheets, they go right back on the beds. Again, as the above photo illustrates, we had saved plenty of extras.
DECLUTTERING THE LINEN CLOSET
Starting this declutter was by far the most difficult part. I think I was a bit overcome by just how MUCH we had stored away in this small closet. Once I began to take it all out though, a weight started to lift.
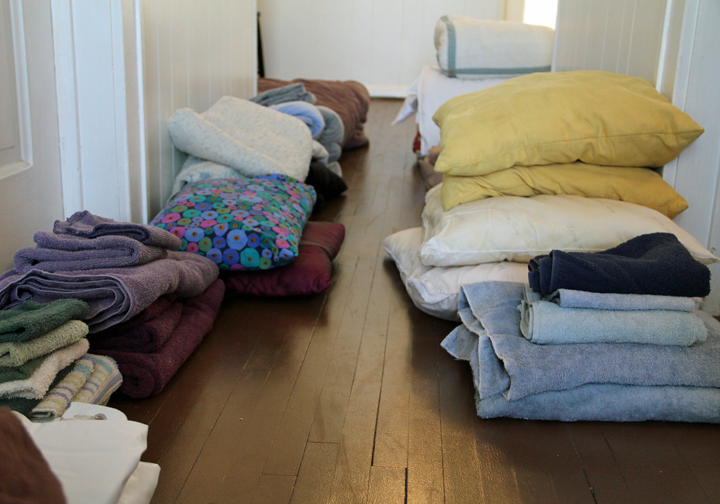
Our linen closet is located at the end of a long hallway upstairs. As I removed the items from the closet, I grouped like category items together. This made it easy to see the quantity of each type of item. Noticing the amount of duplicates made it easier to make decisions regarding what should stay and what should go.
Sorting through the piles, I placed items that I thought we should keep on the right side of the hallway, and those that we could donate or sell on the left.
FINDING TREASURES
One of the biggest surprises during this declutter project was finding a special quilt I had made years ago. It was presented to my husband at the groom’s supper, the night before our wedding. I clearly remember the months leading up to our marriage. Craig was doing a mechanical engineering internship near Chicago, and I was in North Dakota, at college. Those months apart were long and difficult, and I spent many hours working on the quilt and dreaming about married life.
Honestly, this quilt means more to me than my wedding dress. So why was it stuffed in the bottom of the closet, completely forgotten? When I first saw it, I felt really sad that it had been so neglected. Now I am ever more committed to this process, and discovering which items bring us joy.
This quilt will serve as a reminder of how easily items you cherish can be crowded out by other, less important, belongings. It will be going to the dry cleaners, and a more prominent spot will be found for it in our new home.
THINGS TO CONSIDER
When decluttering and creating an organized linen closet, there are a few important questions you should ask yourself:
Is this a convenient location for these items? Linen closets were very popular in older homes, but have fallen out of favor somewhat in recent years. I believe the reason is that more people now place items closer to where they will be used, instead of grouped together in a central location. For example, the bed sheets may be stored in the bedroom closets, and the extra toilet paper in the bathroom.
Really think about what works best for you and your family. Where some might find a central linen closet the prime location to store towels and bedding, others may find that a hall linen closet in their home is better suited to store cleaning supplies, small appliances, or even toys.
How many of _____ do we need? In our household, whenever a new set of towels was purchased we continued to hold onto the old set. Just in case, we said. If we have company, we thought. The truth of the matter is that if we chose to buy new towels, our old ones had more than likely finished their purposeful life for our family.
I encourage you to determine how many towels, bed linens, etc. your family really needs. Any more than those items used on a weekly basis will likely be stored. Don’t let them multiply behind closed doors like we did!
ORGANIZED LINEN CLOSET
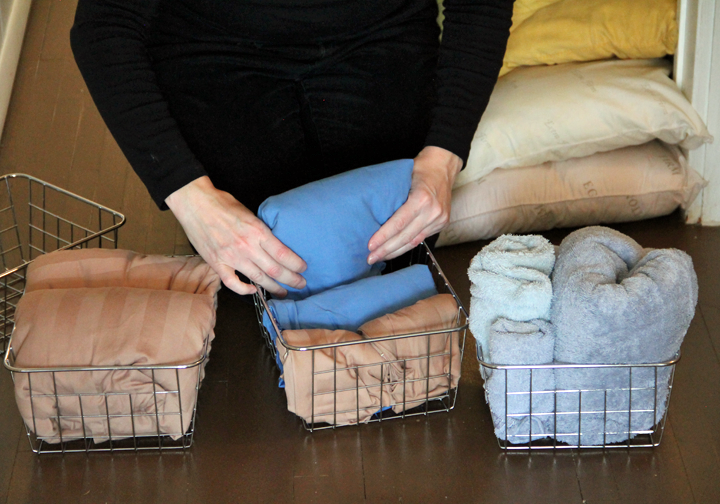
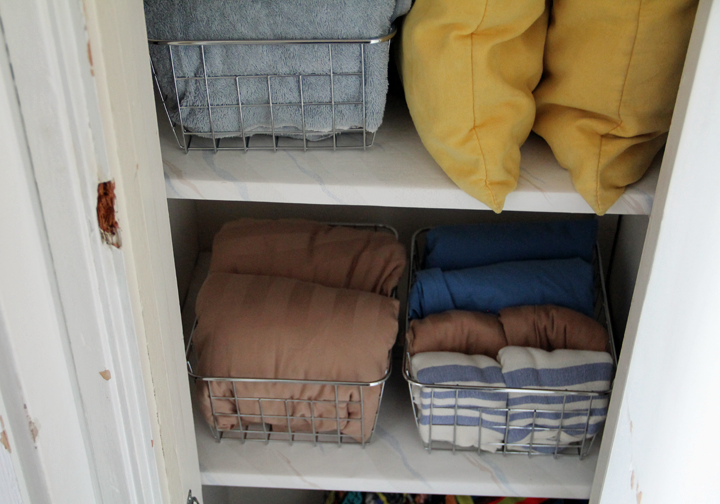
Like a lot of people, I have been watching ‘Tidying up’ on Netflix. One of the tips I have learned from watching the show is the idea of placing like items into smaller baskets for storage. I have mentioned before that I have a love for baskets. In fact, I have a stash of them in our storage closet, just waiting to be used.
These chrome wire baskets were the perfect size to hold the items I had chosen to keep.
Though I don’t have quite the ‘magic’ of Marie Kondo, I did try her method of folding into thirds and storing them upright. I have to say that it really did save space! An entire set of towels (two bath towels, one hand towel and one wash cloth), was able to fit into a single basket, for example.
When putting the linens back into the closet, I made sure to put the items that will be used more frequently on the eye level shelves. The large blankets were placed on the highest shelf, since it is likely they will be accessed by the adults only. The extra pillows are now within reach for the kids to use for camp-outs and movie nights.
It is important to note that we are living in a rental house. Because of this, we aren’t able to modify the spacing between shelves. If you have a closet with adjustable shelves, customizing your storage should be much more efficient!
BENEFITS OF AN ORGANIZED LINEN CLOSET
Now that our linen closet is organized, I definitely want it to stay that way! The following benefits will help me keep the clutter from coming back.
Items are easily found. One glance in, and you can see how things are organized, by category. This makes it much faster to find that towel when you need to clean up a spill, or retrieve a clean set of bedsheets for a child who had a middle of the night accident.
Linens have room to breathe. With the linen closet stuffed to the max, there was little air circulation. Stored in this way for too long, and you could be dealing with musty towels and bedding. That’s just not pleasant. In your organized linen closet, you may consider adding an open box of baking soda. It will help cut down on moisture and will keep things smelling fresh and clean.
WATCH ME ORGANIZE MY LINEN CLOSET
See the process of of decluttering my personal linen closet. I am still shocked to see the drastic change!
A front entrance for guests is a great feature to add to any home. It doesn’t need to be a large space, but having it laid out well is important. Today I am sharing the front entryway design ideas I have for Arrow Hill Cottage.
Although our home will have an attached garage, and our family is most likely to enter and leave in that direction, I wanted to make sure to include a straightforward front entrance – where we expect visitors to enter. I’m not sure about you, but our garage has a tendency to become cluttered and dirty far faster than any other space we own – and we don’t want our visitors to experience our day to day.
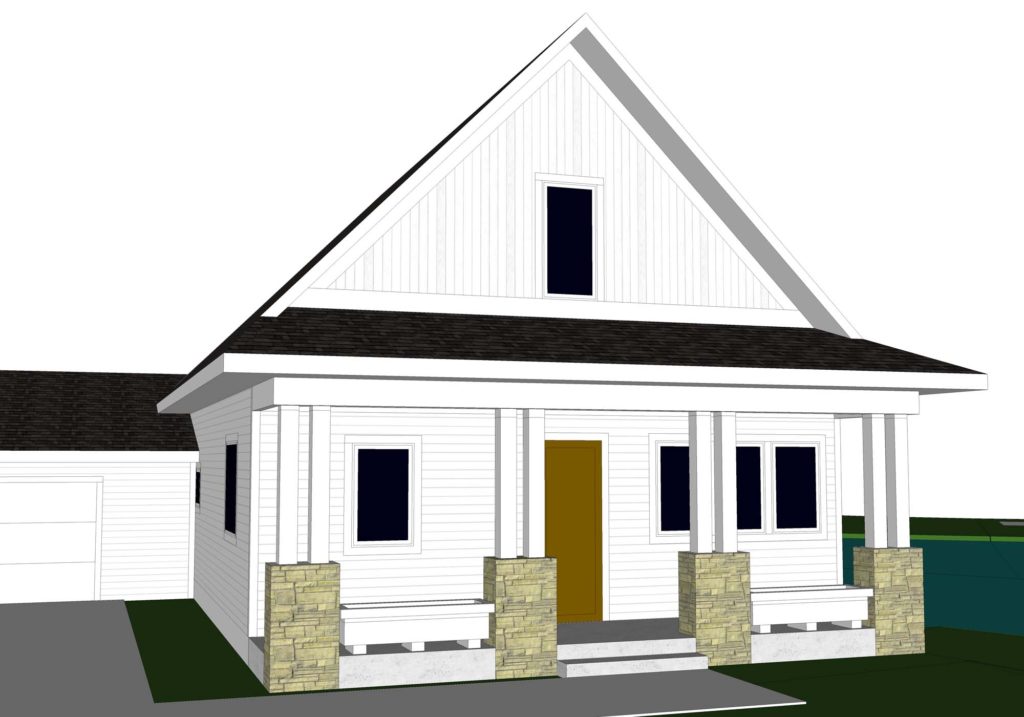
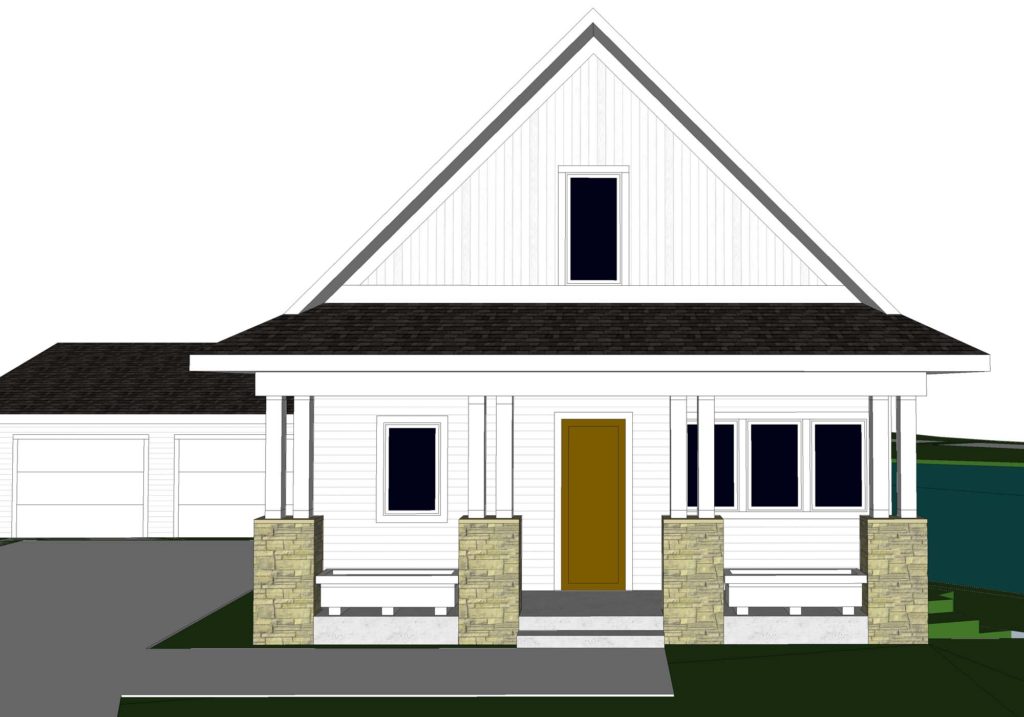
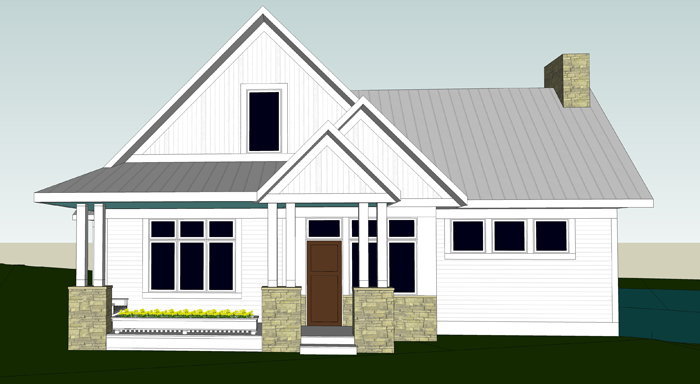
ENTERING FROM OUTSIDE
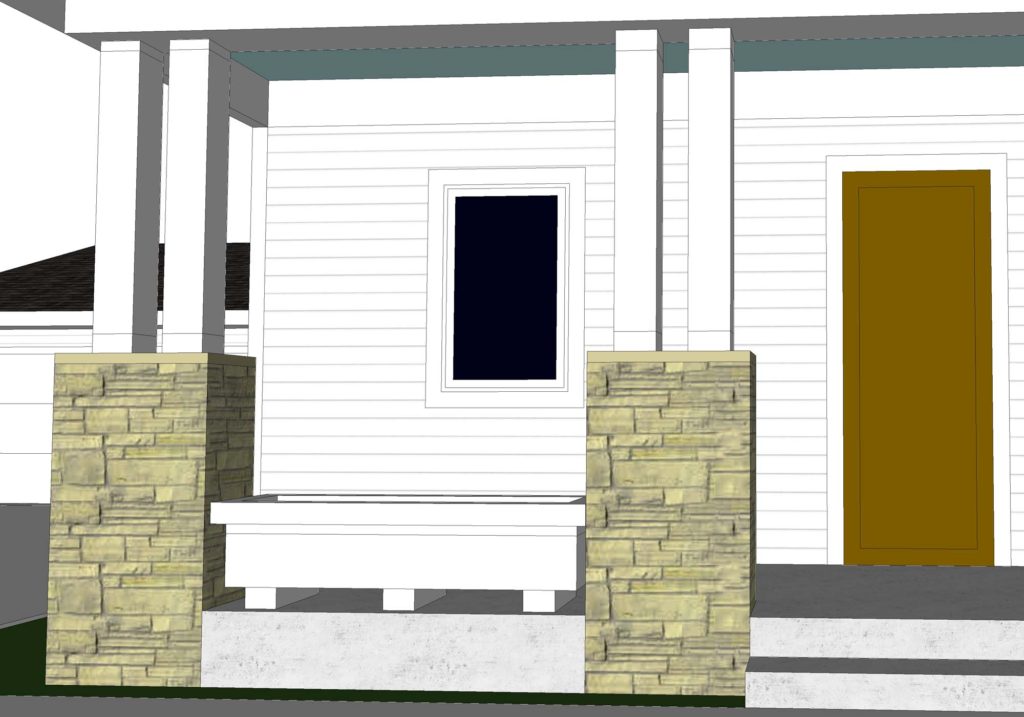
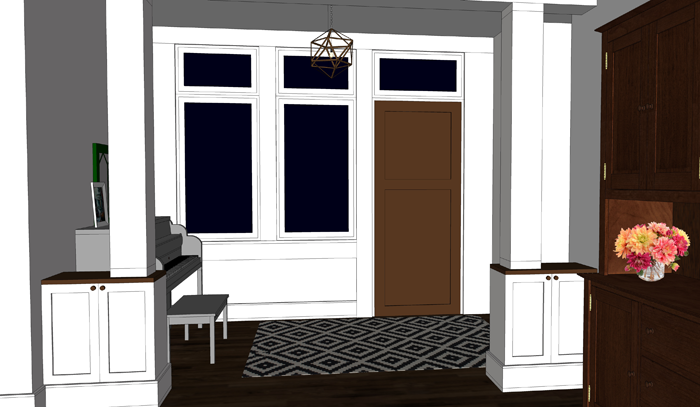
As you can see in this image, the front door will have a prominent position. Although the house is not symmetrical, your eye is drawn to the small gable above the door.
In case you noticed… yes, I am still #teamplanter, and it remains as part of the design, at least for now. If you have no idea what I’m talking about – go ahead and visit THIS POST to learn all about the debate.
The large stone pillars and double columns frame the view. I’m sure there will be some sort of feature light fixture here also, but I haven’t made any decisions on that yet. And yes, I am dreaming of a light blue bead-board ceiling for the porch. Love.
I have chosen a solid wood door. Because there will be windows directly next to and above it (transom), I felt that including a smaller pane of glass within the door itself would complicate the arrangement. The windows should provide plenty of natural light (this wall will be south-west facing)
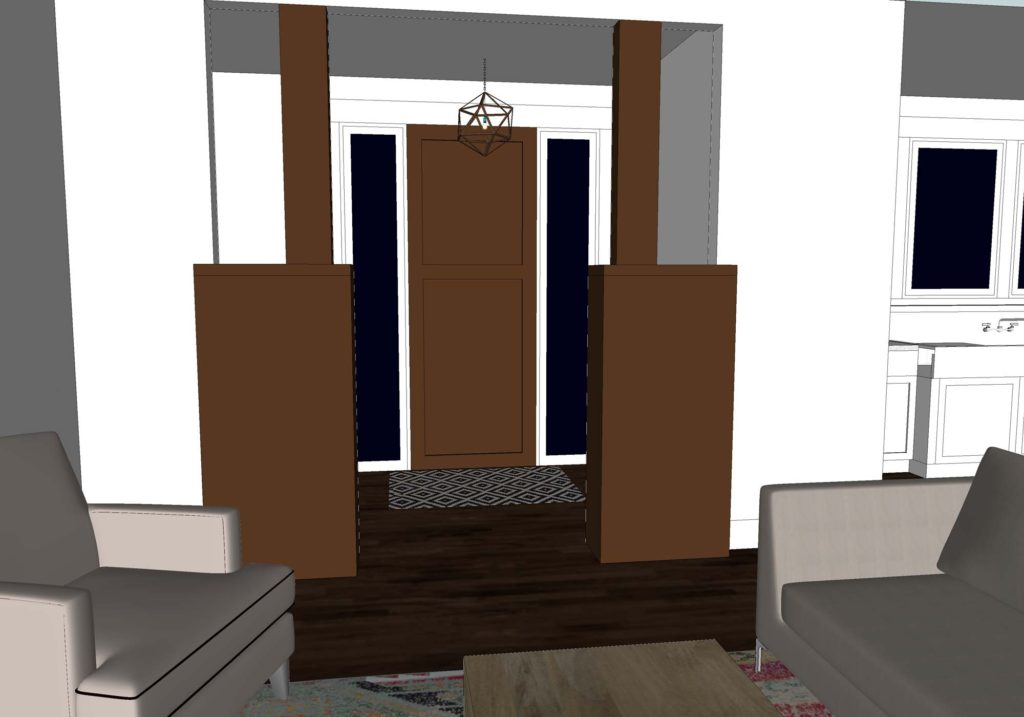
INSIDE THE ENTRYWAY
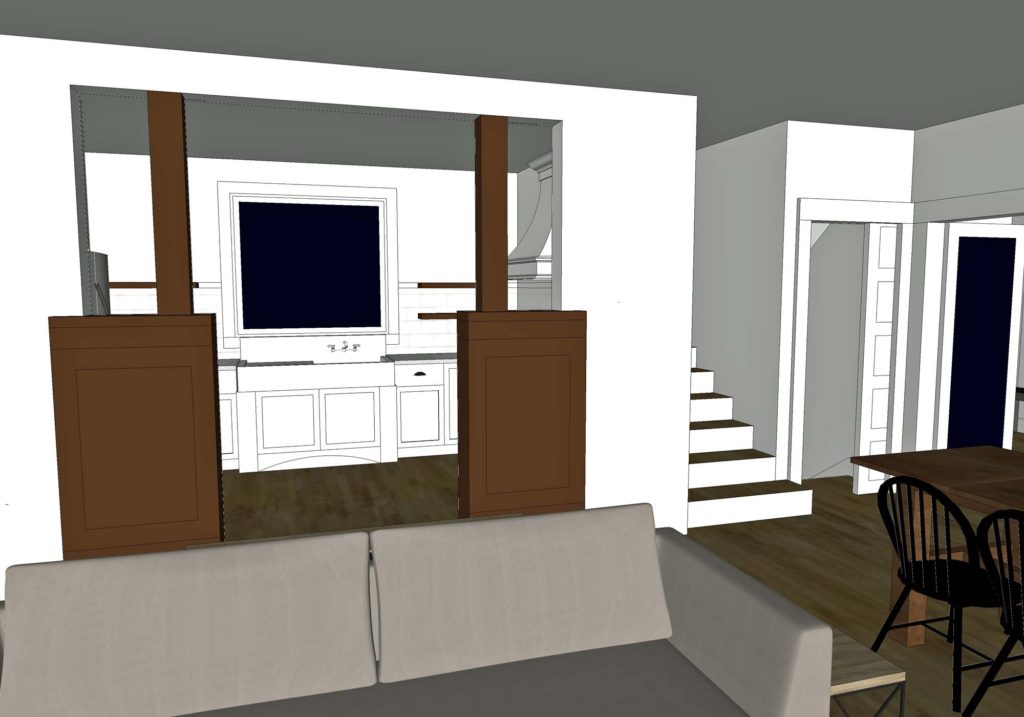
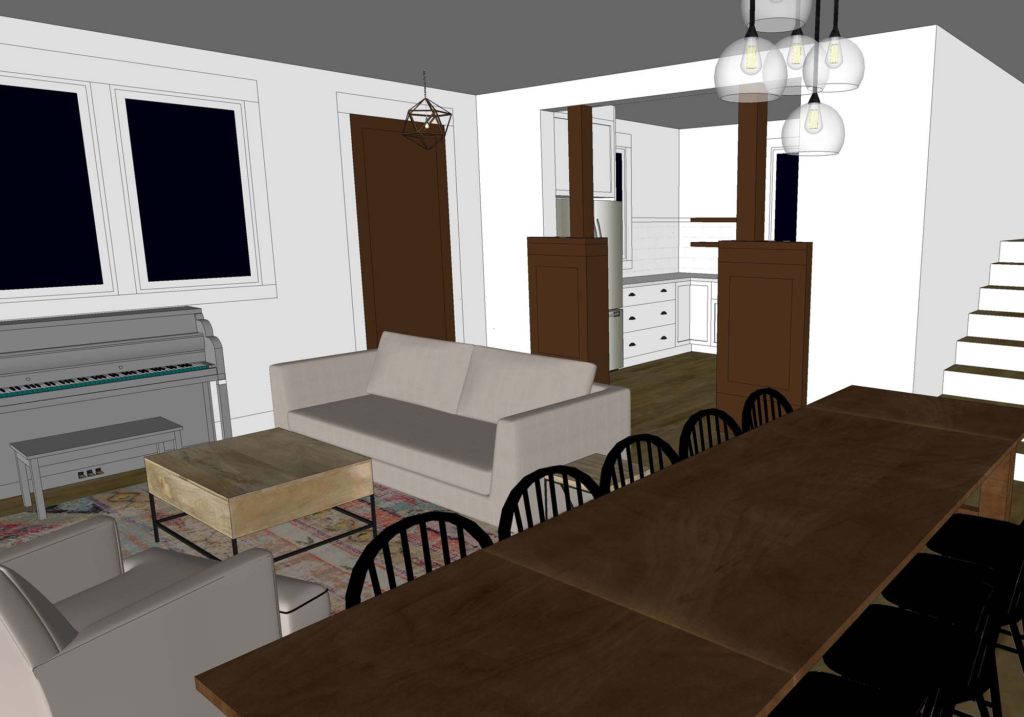
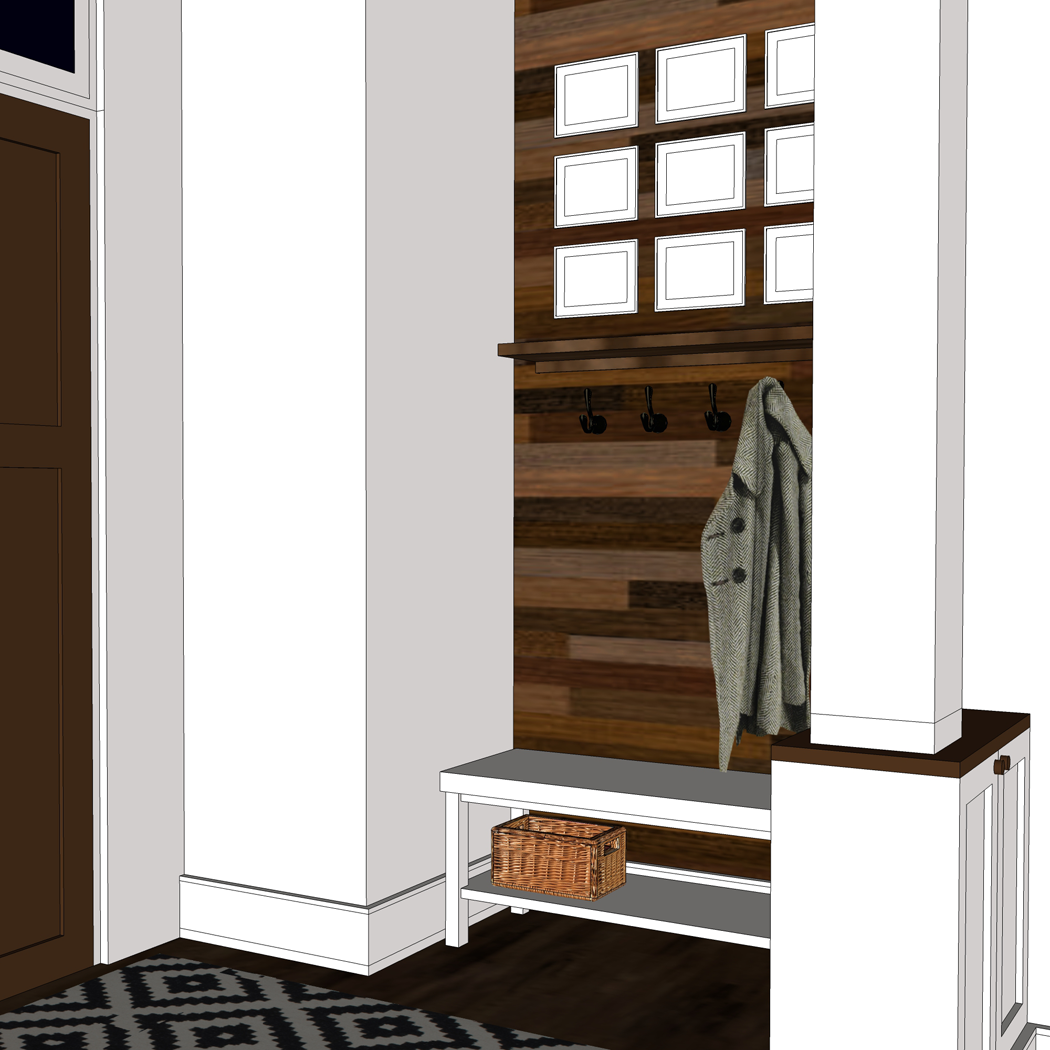
Stepping through the door, you are welcomed with a space approximately 6 feet deep by 12 feet wide. The room is partitioned from the dining room by a pair of built-in cabinets and columns.
We will likely have our builder or cabinet maker create these cabinets and columns, but This Old House wrote a fantastic post about how you can make this a DIY project. I purposely chose to offset the built-in slightly from the alcove since the wall finish and the cabinet finish will be different. This will help eliminate a clumsy transition from cabinet to wall. The baseboard trim will help to tie everything together.
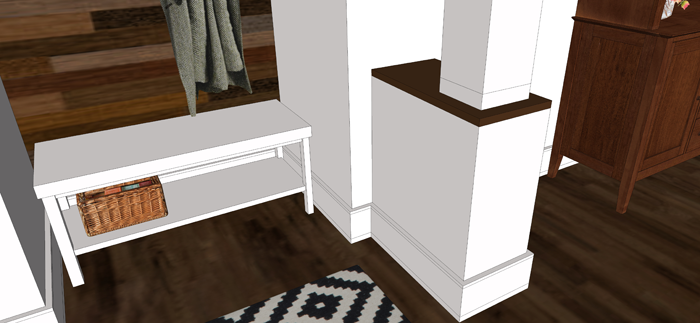
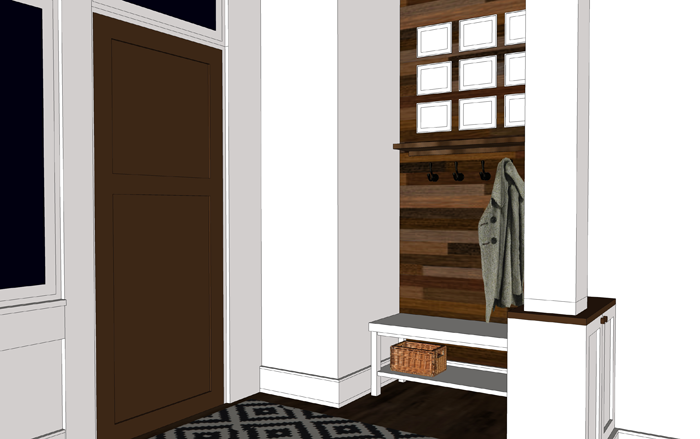
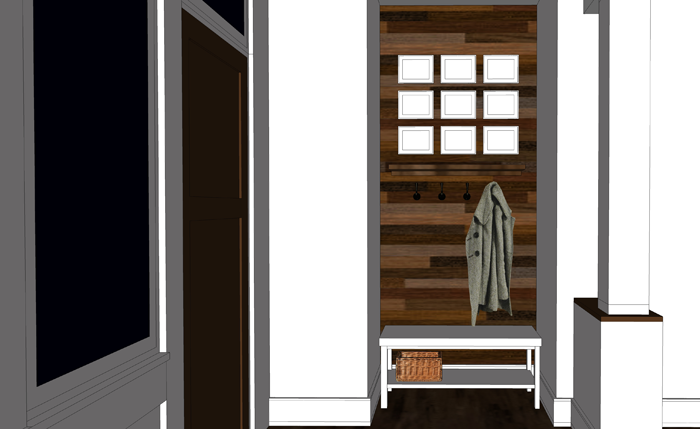
As I mentioned in this post, we have found that with fewer closets we are less likely to hold onto items we don’t need. This entry is indeed the perfect opportunity to live that theory. Because most of our family’s shoes, coats and bags will be coming in through the back entry / mudroom, we won’t need much for storage near the front entry. Instead of using the recessed space as a closet, I am opting to leave the alcove open and instead will incorporate a bench with simple hooks and a shelf above.
This alcove also lends itself to the inclusion of a feature wall. At the moment, I am thinking that beautiful rustic barn wood would serve as the perfect surprise. The feature wall will serve as a backdrop for a family photo gallery.
This post, from the blog Ivory Lane , has given me a ton of inspiration for the entryway gallery. I love the simple nature of the metallic frames, white picture mats, and black and white images.
ACCESSORIES + DETAILS
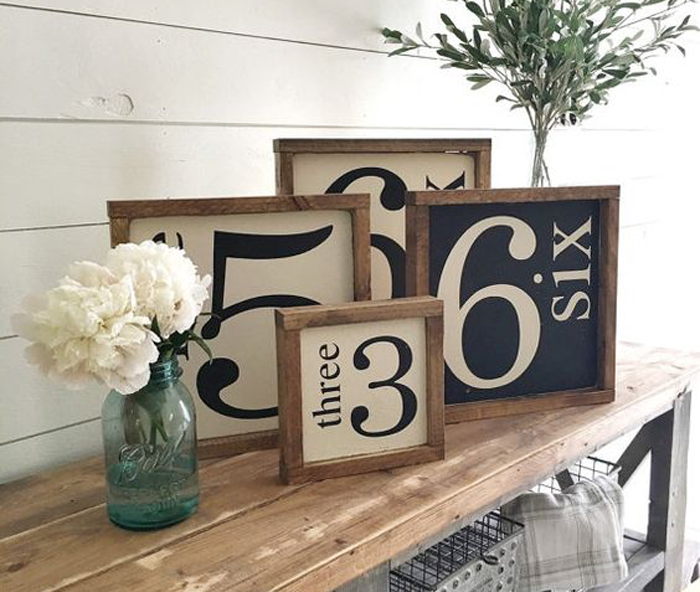
On top of the small shelf above the coat hooks, I envision some cute artwork that represents our family. These number squares are amazing.
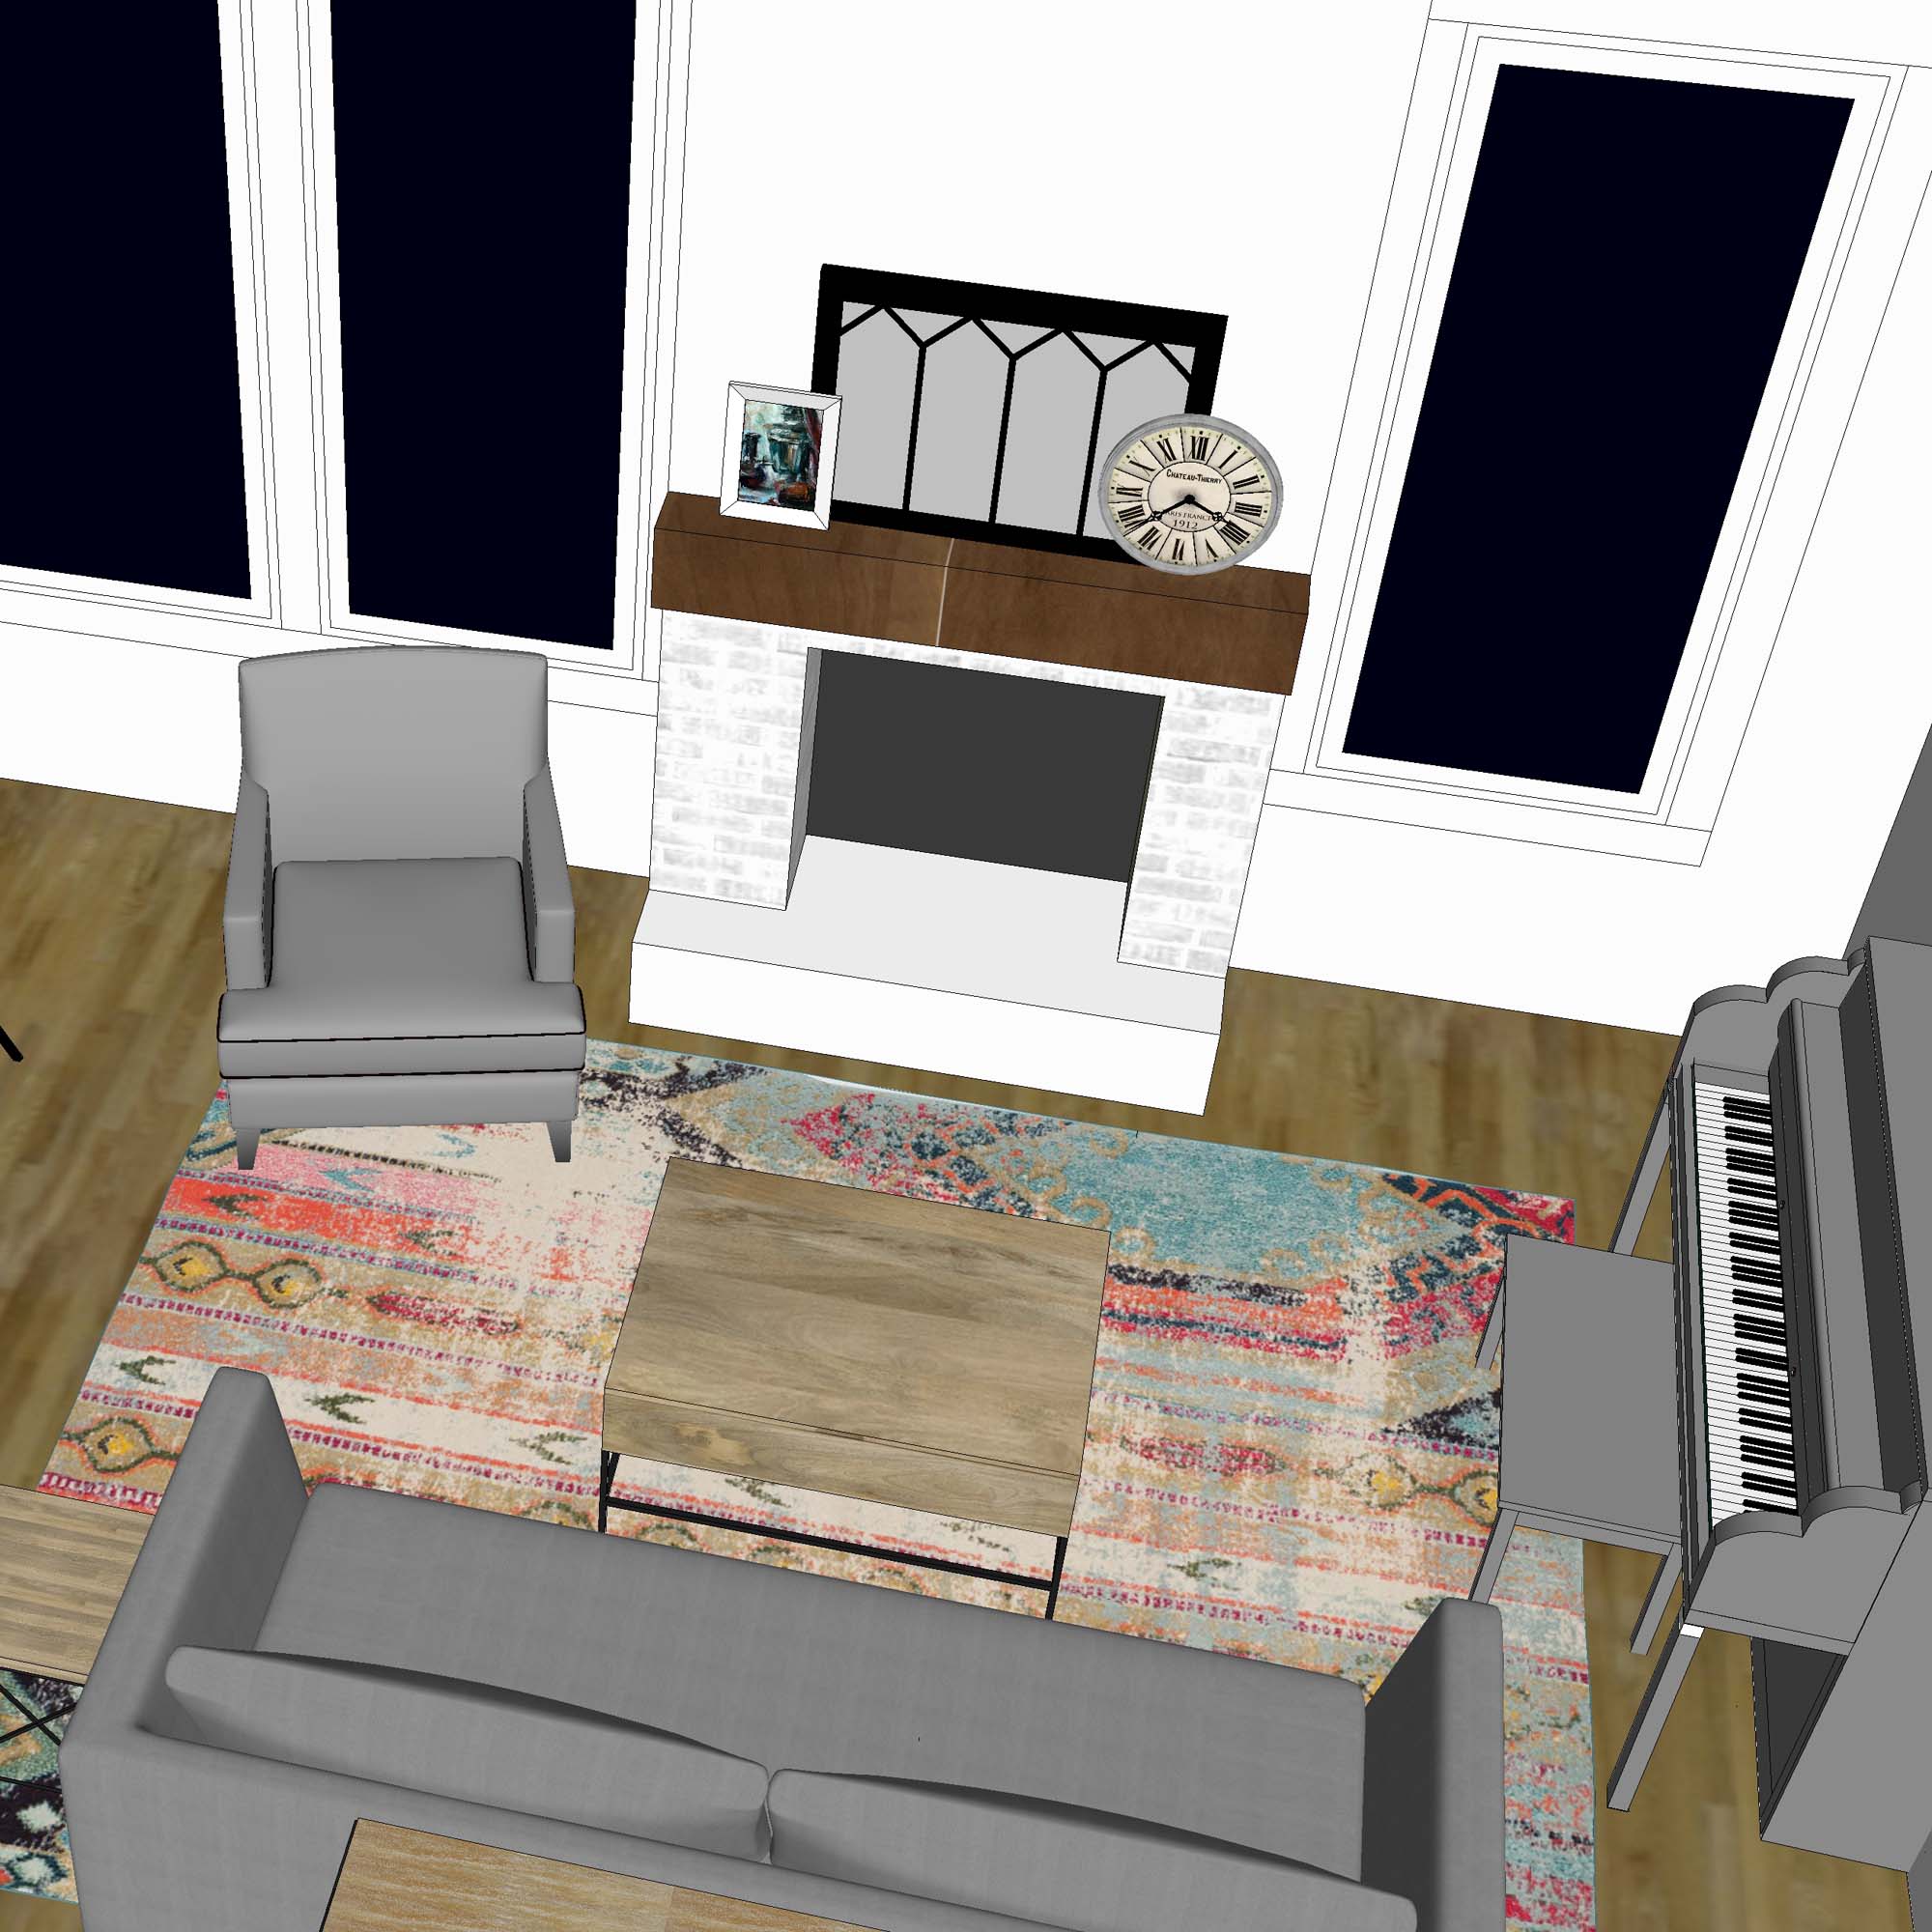
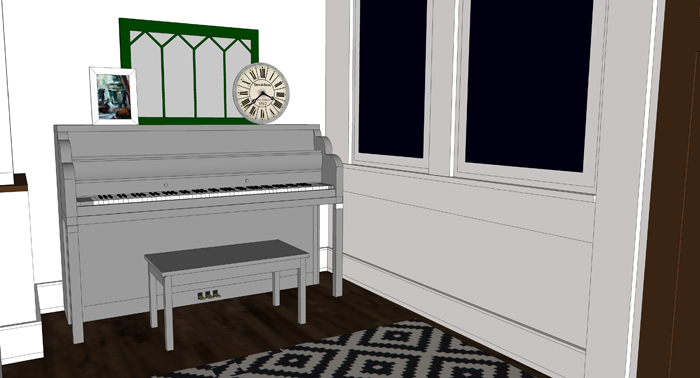
Opposite the bench area is where I envision our piano being placed. We own a low grade piano that is natural wood and wood grain veneer at the moment. I would love to paint it a soft gray color and decorate it with special accessories – such as the vintage green cottage window that I recently purchased at an antique store. I know there is some debate about painting pianos, but they make it look so easy on Pinterest, and I am really intrigued by the results.
Nobody in our family is a concert pianist, but we do enjoy having a piano to tinker around on. In this location it is available, but set aside so that it isn’t in the way of other daily activities.
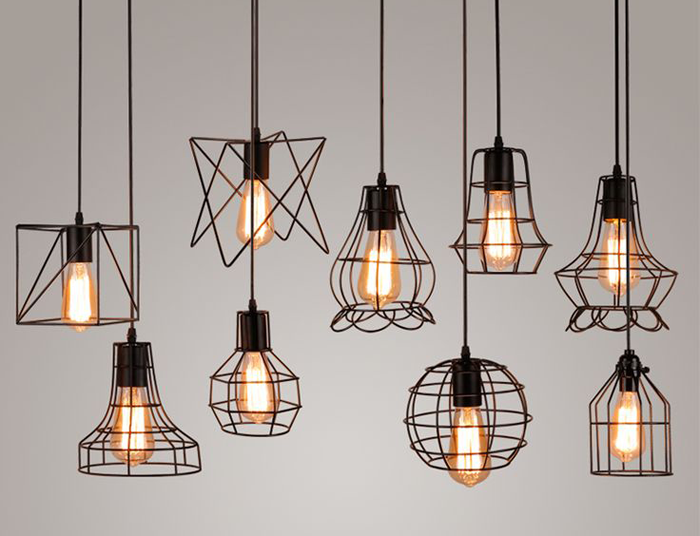
For the center of the room I would like to find a special light fixture. I am thinking something with a metallic finish, probably a hanging pendant.
Perhaps something from this collection would work well.
The floor will require some sort of durable rug that will mostly protect the wood floors. I love the idea of a black and white patterned rug.
This website seems to have a wonderful selection of rugs to choose from.
ADDITIONAL ENTRYWAY VIEWS
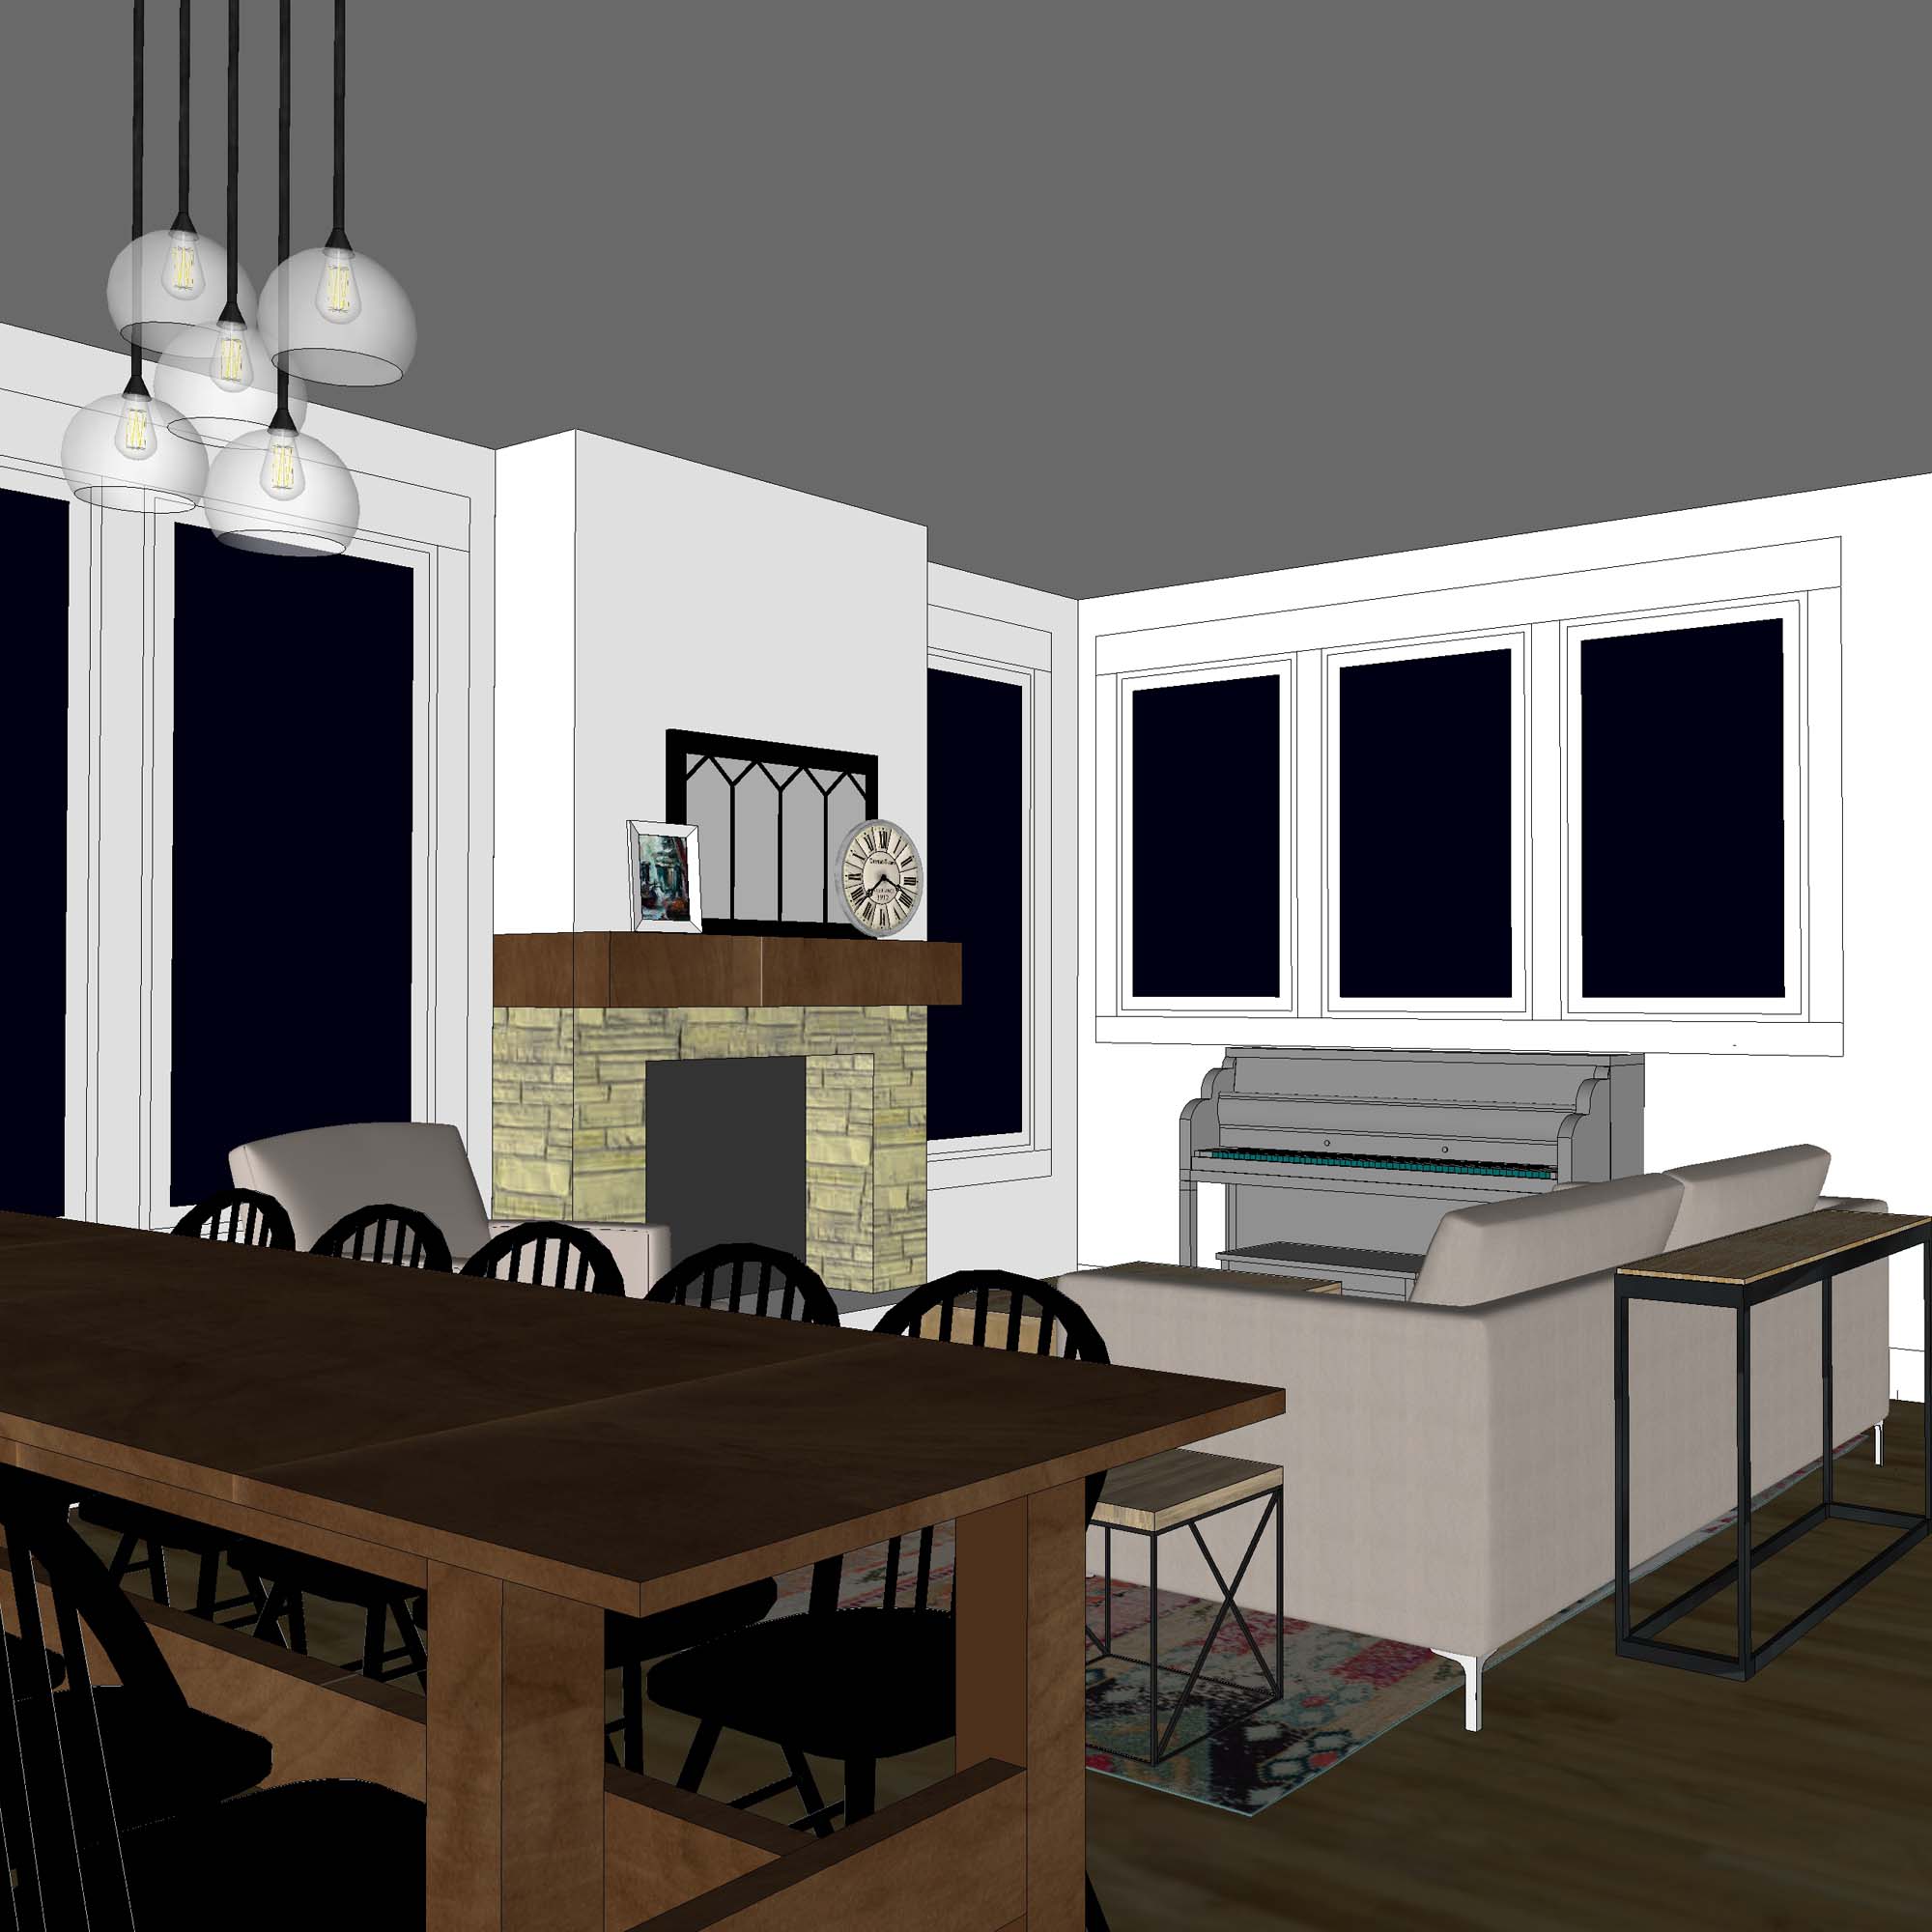
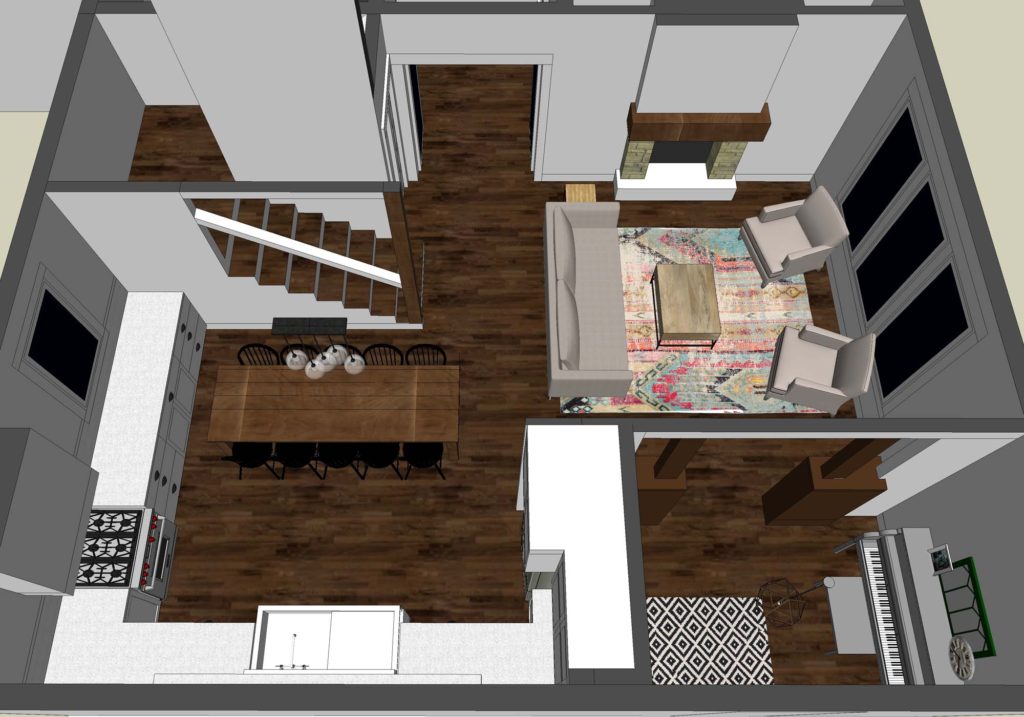
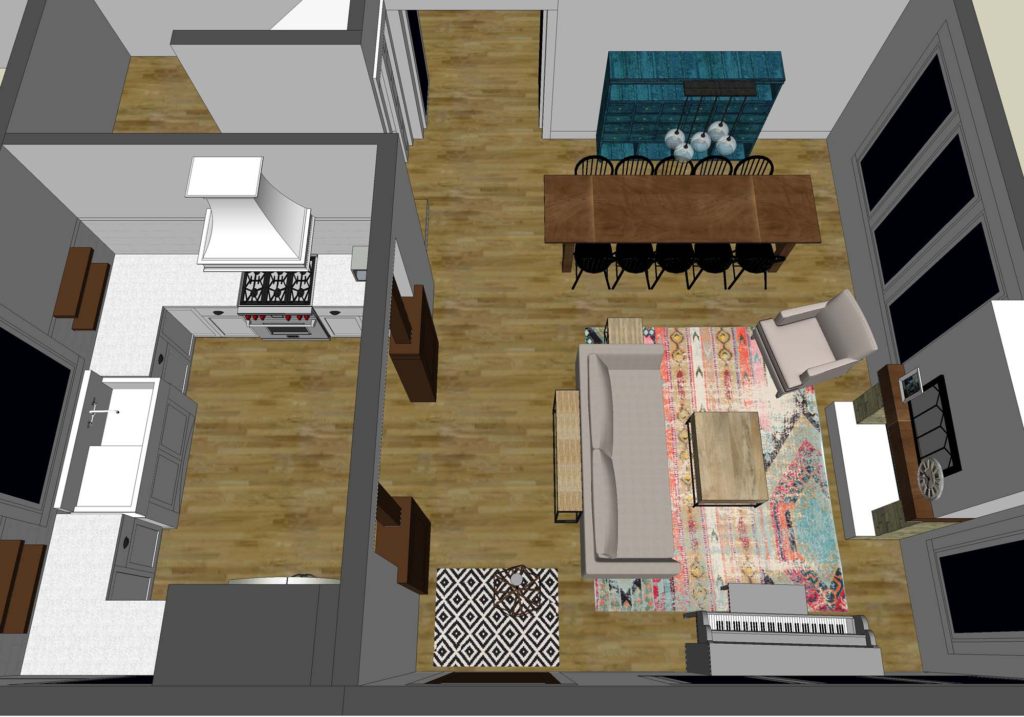
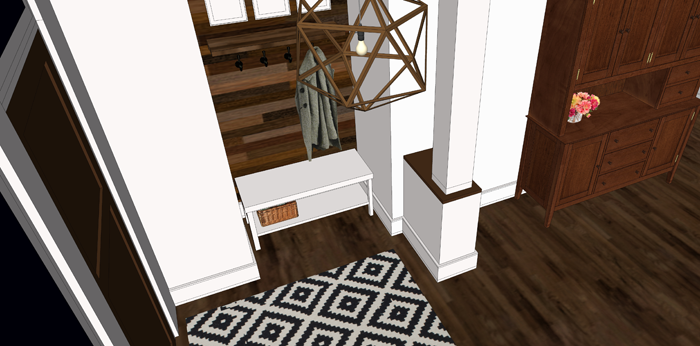
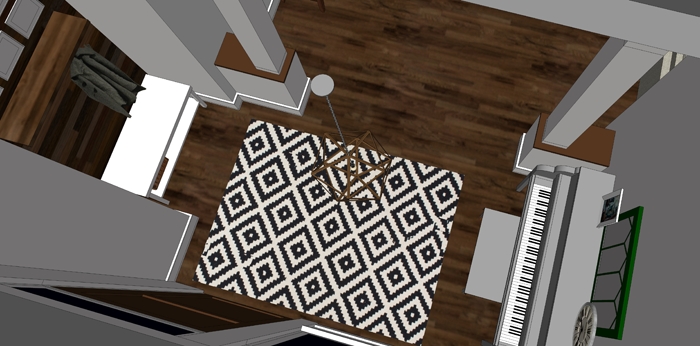
And now for a few more views of the entryway. First, a view from above – one that nobody will ever experience in real life. It shows the overall space well.
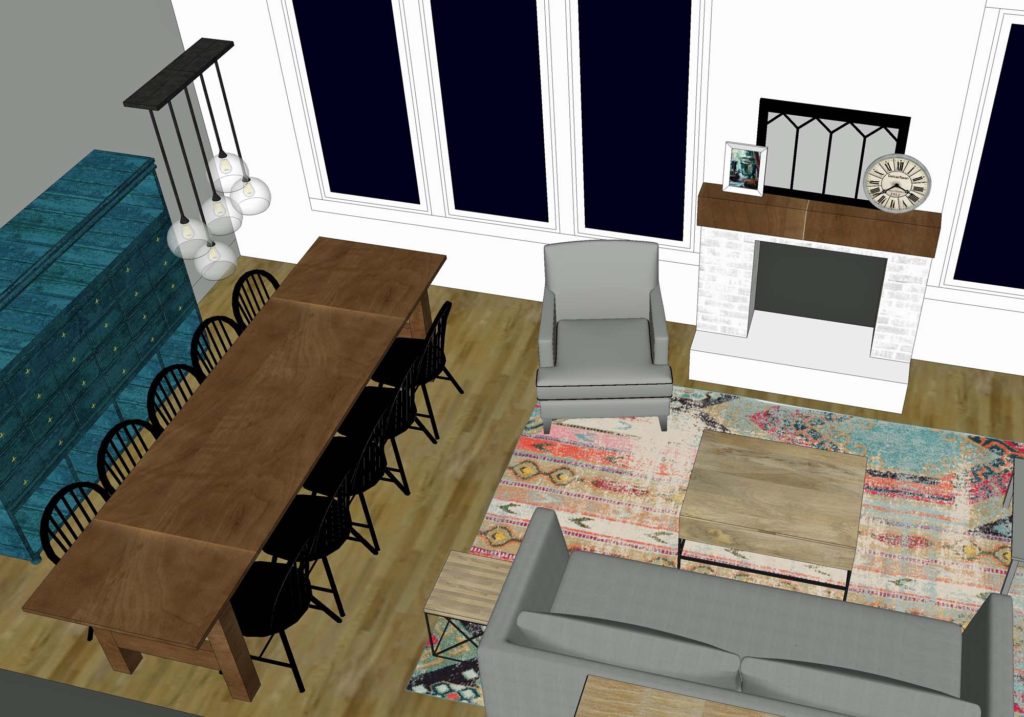
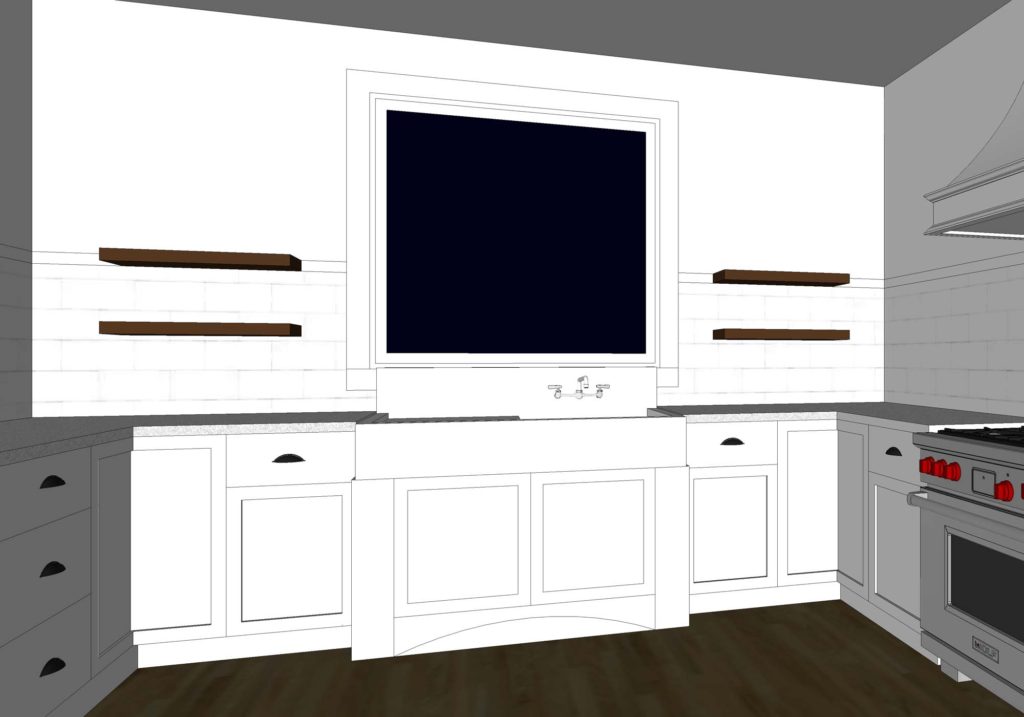
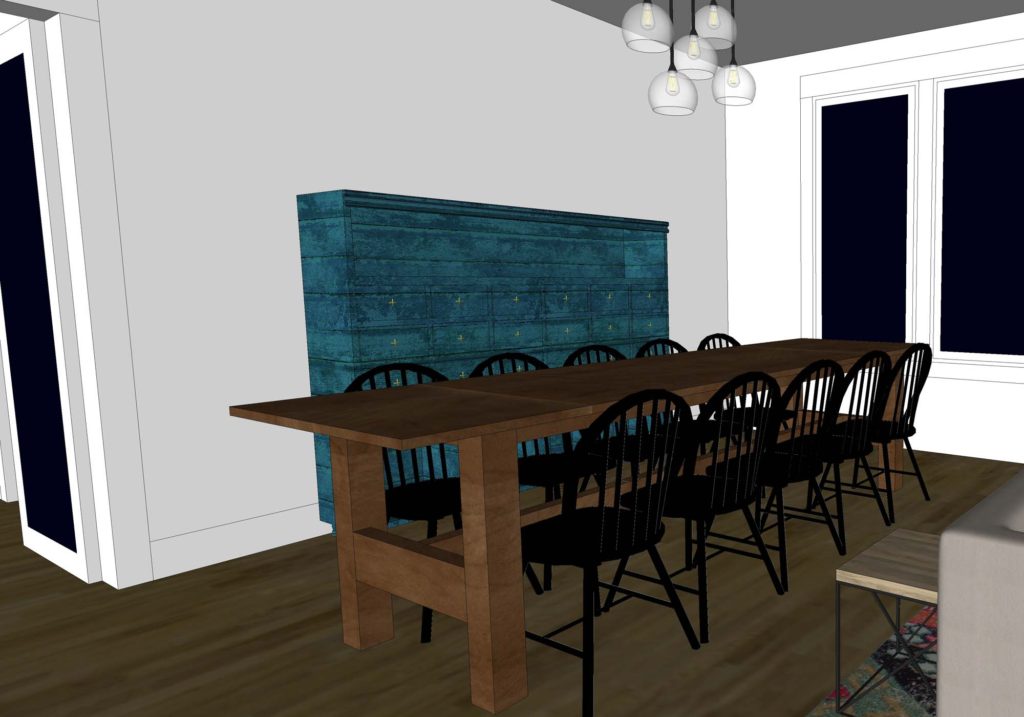
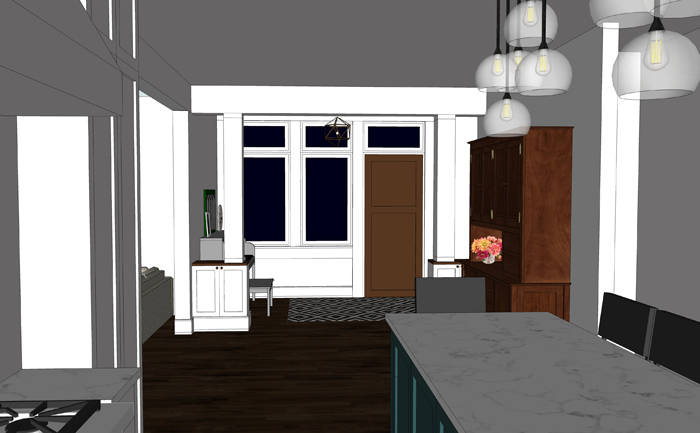
A view from the kitchen (standing near the stove) looking toward the entry. You can see the kitchen design in this post. The space between is the dining room, of which I am still working on designing. The only thing I know for sure is that I want to include some sort of antique hutch on the long wall.
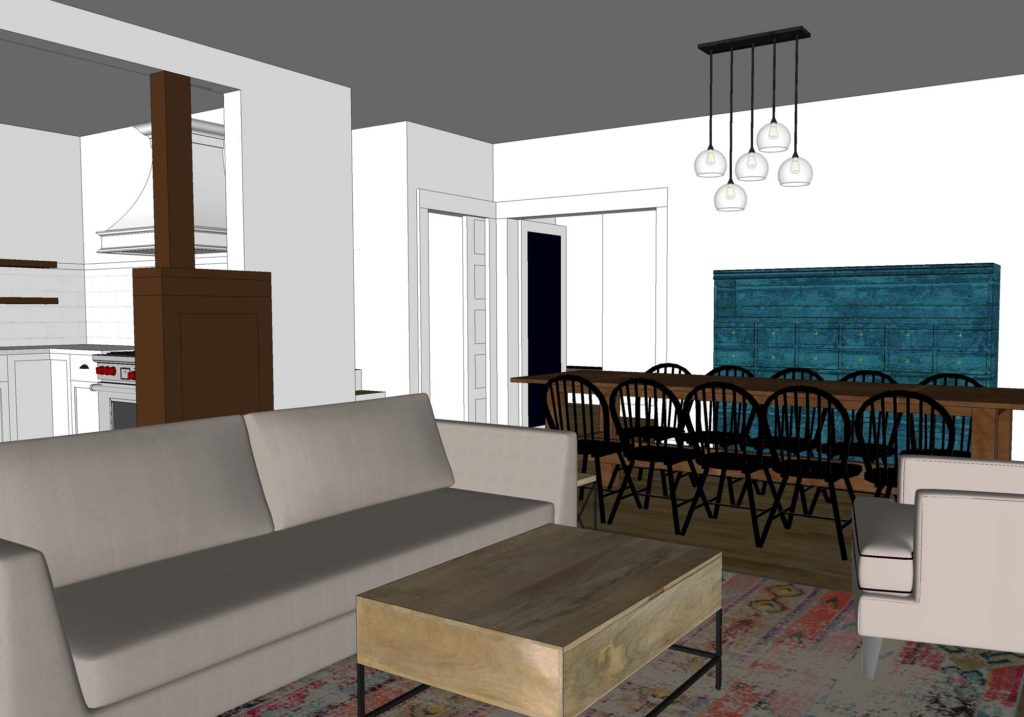
Another room that is still a blank slate is the living room. Besides knowing that I want to include a large sectional sofa for our large family, there are still a lot of decisions to be made here. This is a view of the entryway as seen from the living room. Again, that large open space will eventually house our dining table.
I am really loving how the main level is laid out. The flow seems like it will work well for our family. In this image you can see the stairs leading to the bedrooms (up) and the family room (down). That blank spot at the landing is where the largest window of the house will be positioned. I’m excited to see the design of the stairs come together.
Maybe I will work on that next!
UPDATE: Our floorplans changed quite a bit since this was originally posted. You can see our revised design HERE.
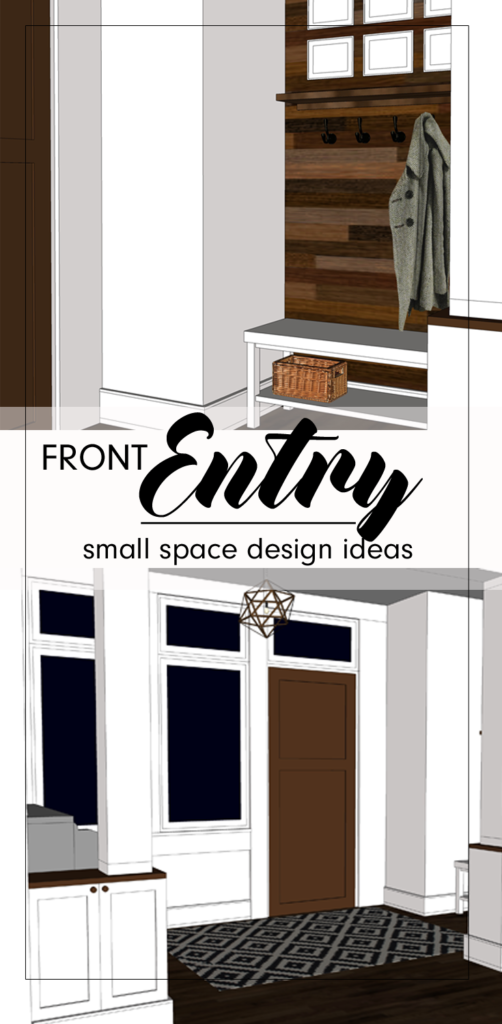
PIN THESE ENTRYWAY DESIGN IDEAS
feeling inspired? Be sure to save this post for later!
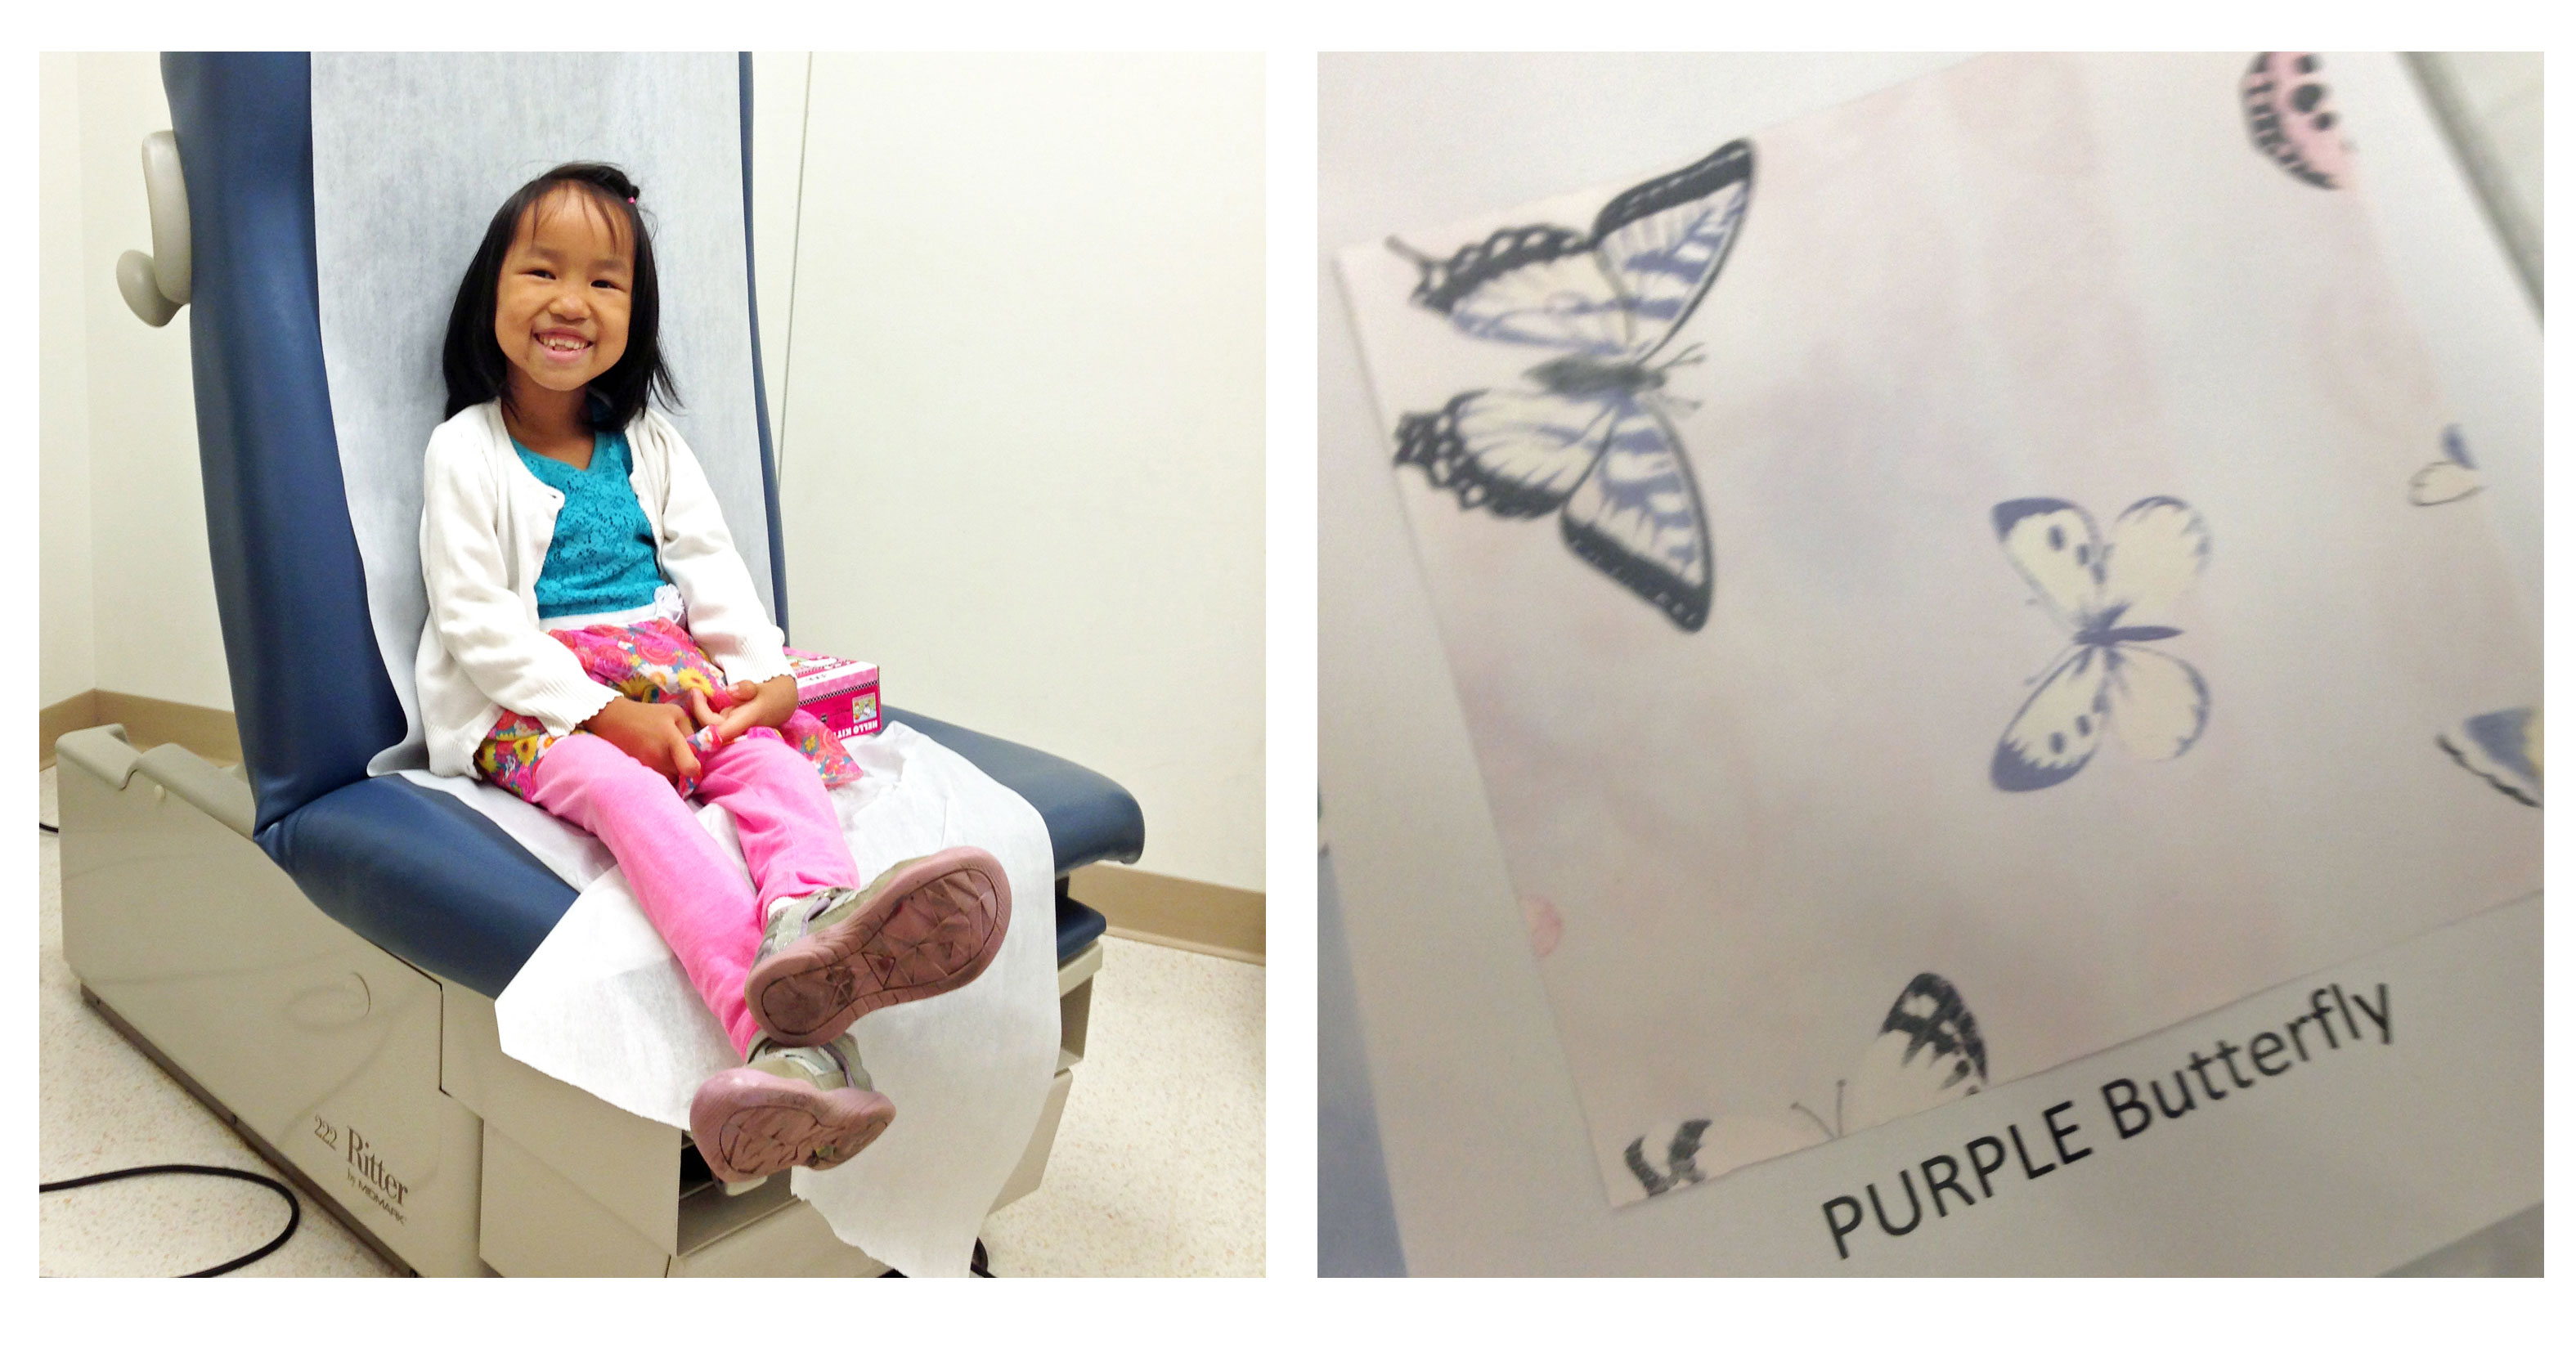
Last week we began a lifelong journey. Our girl, home three months, had her first evaluation in the United States to begin a specialized treatment plan for her arthrogryposis. We visited the Shriner’s Hospital closest to our home, about 2 1/2 hours away. Shriner’s is a leading expert on orthopedic conditions , and specifically treat children from birth to age 18. We had heard great things about them preceding our visit, and all were justified. This place is amazing!
It was wonderful to sit down and talk with doctors who are familiar with this condition. Because it is fairly rare, many doctors have never treated someone who has arthrogryposis. They knew just what questions to ask, what x-rays to take. They taught us what to keep an eye out for, and what to stop worrying about.
Generally speaking, all of the experts were in agreement. Our daughter is amazing. Through her six years, she has developed many techniques that work best for her own body. She has adapted beautifully. Considering she had essentially NO treatment for the first 5 years of her life (typically babies born with AMC will begin casting and intervention just a few weeks after birth), and the fact that she has been walking for less than a year, they were quite pleased with her range of motion and muscle strength.
There were a few surprises too, however. It appears {K} has a slight bit of curve in her upper spine, the start of scoliosis perhaps. The pediatric orthopedist mentioned that nearly 25% of arthrogryposis patients will develop scoliosis over time, simply because of the way their bodies compensate for alignment differences. It is possible that this curve developed for {K} before she had her hip surgeries, and perhaps now that her hips are in alignment her spine will remain stable. We are following a wait and see approach.
She was able to pick a toy for being so patient during X-rays. It was no surprise that she chose something Hello Kitty related – girl loves her some Hello Kitty! The puzzle was a great distraction for her while waiting. Win-win!
The specialists also noted that her left wrist may merit some intervention. It is currently mostly locked in a downward position, but she has amazing grip with that hand. They feel that by unlocking that wrist she would have an easier time with self care tasks, such as dressing and grooming. They sent us home with a hand brace/splint that they recommended she wear at night and for short periods during the day, to help stretch the wrist ligaments. On our next visit, six months from now, we will meet with a hand specialist who will talk us through some options for the future.
{K} was fitted for some new AFOs (ankle foot orthotics) since her feet are growing and her toes are creeping over the edge of her old set. She was pumped that they let her pick out her own color and pattern for the new set, and chose a butterfly option. We will go back in a few weeks, once they are made, to try them on and do a final fitting before bringing them home.
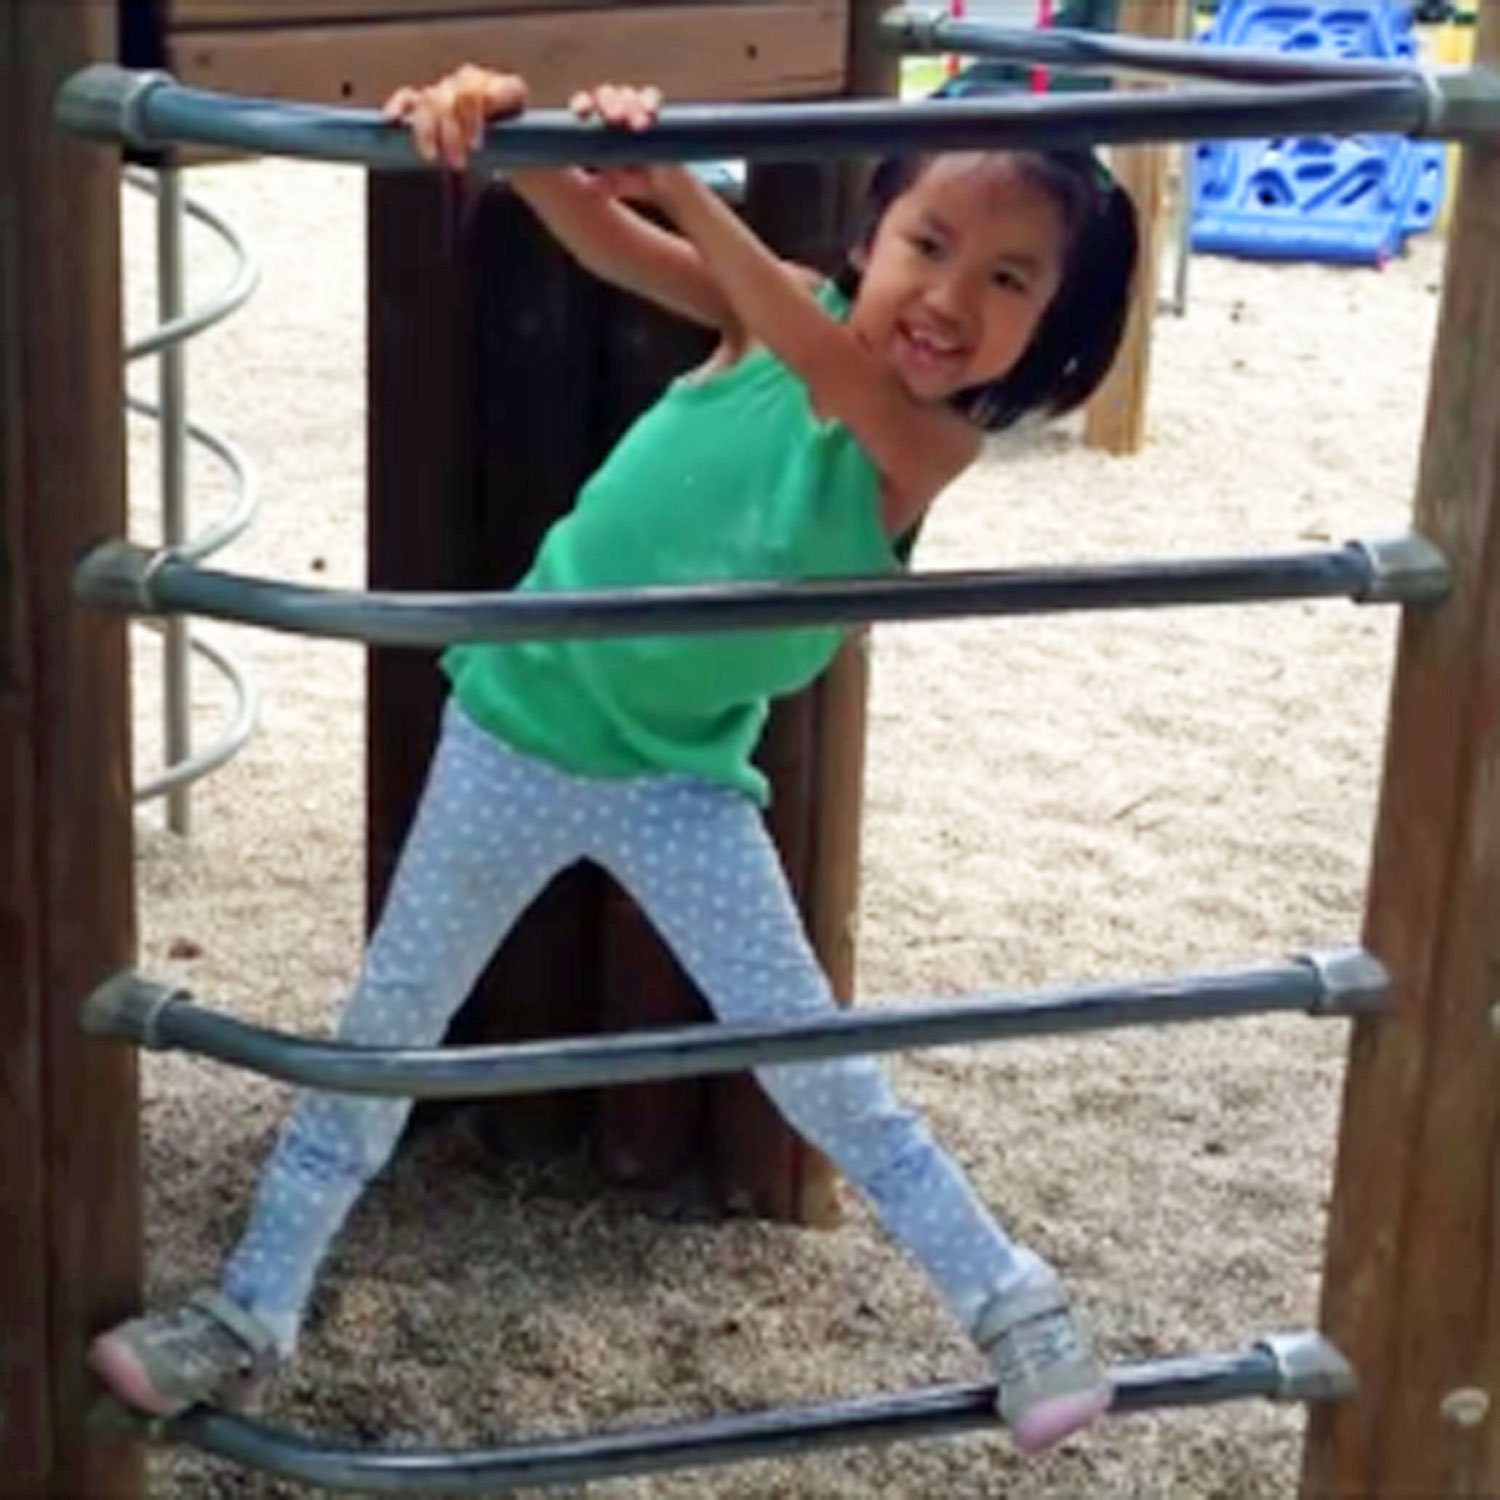
Most of all we are just so, so happy that {K} will be able to start school this Fall with no limitations and no surgeries on the horizon. A chance to be just like all the other little kids in her kindergarten class. The ability to have fun and play at recess, just like everyone else. She has already mastered the ladder/slide combo!
>
Again with the amazing grip – am I right?!? The hanging on the bar before going down the slide? All her idea. This girl will move mountains!
If at first you don’t succeed – try and try again. That’s the mantra anyway.
In architecture we call this stage ‘Preliminary Design’. We know that it might not be quite right, just yet; But eventually the pieces will all come together.
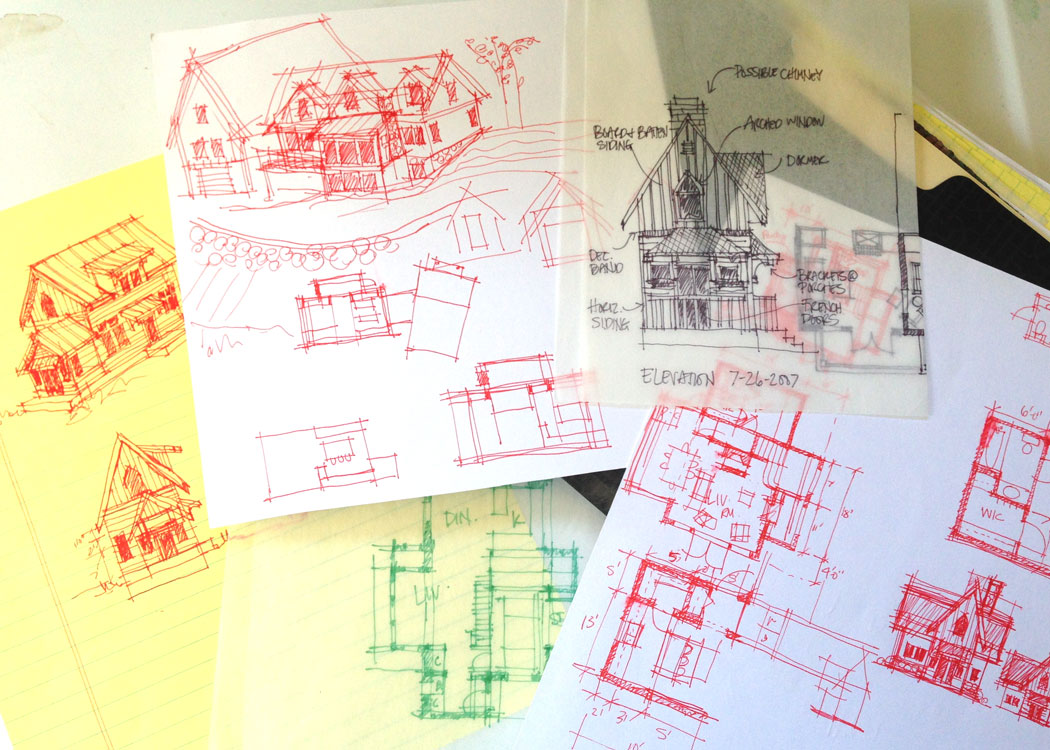
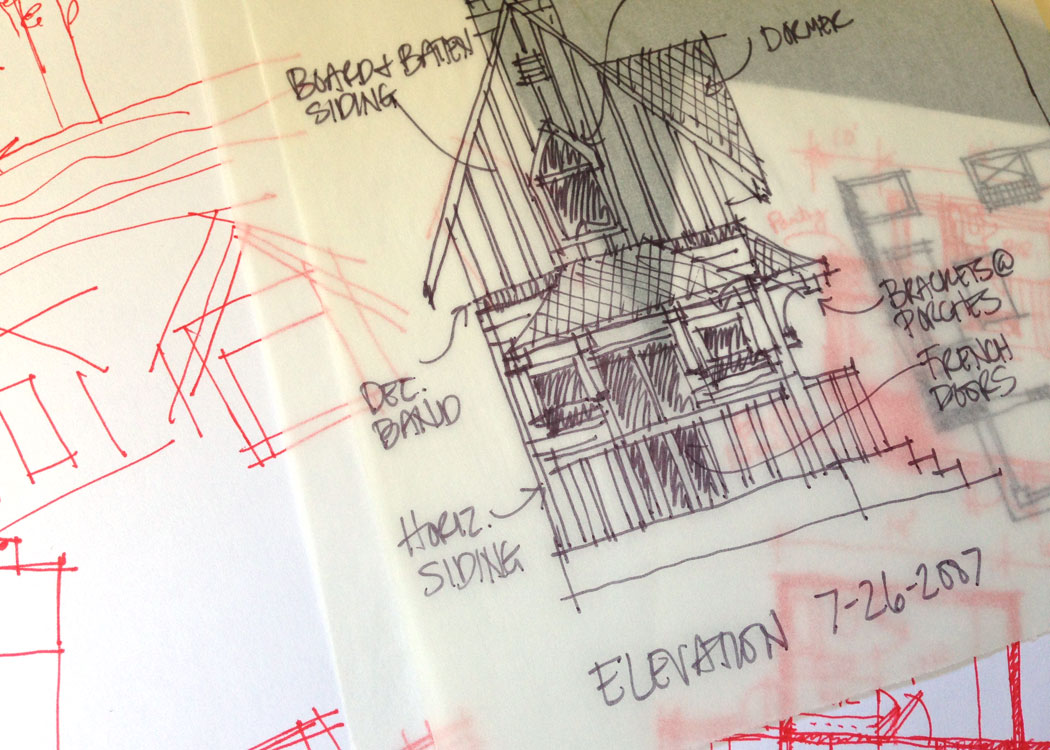
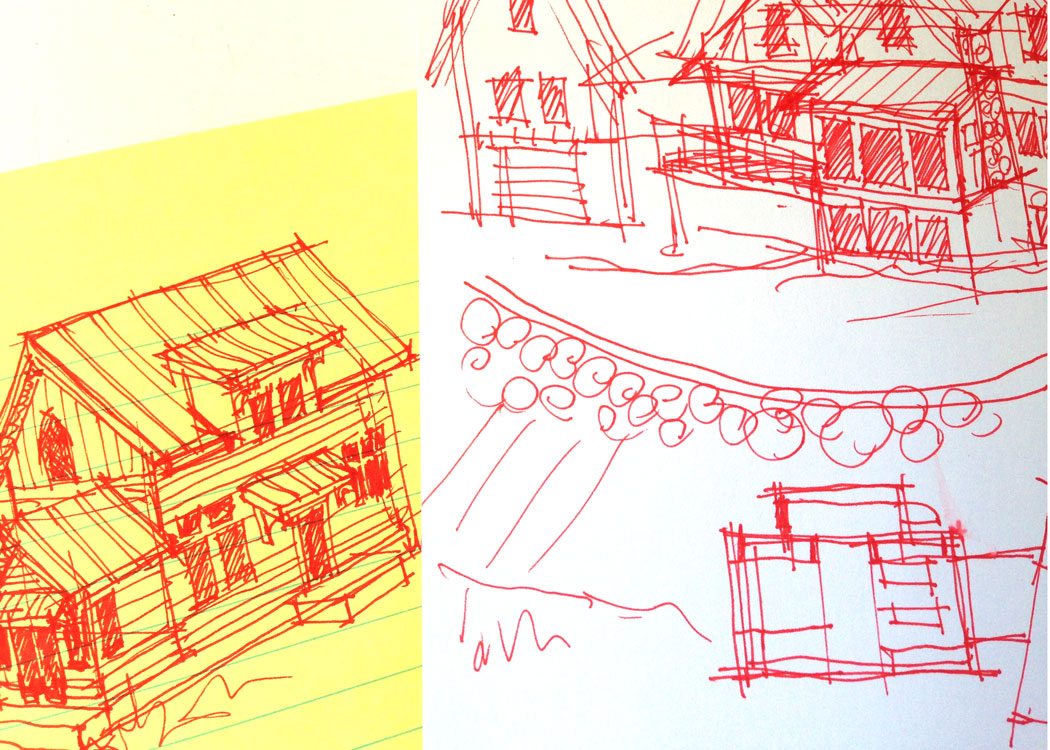
If any of you reading this blog have mistakenly thought that we came up with the design for our future cottage overnight, let me put your minds at ease. It’s been a labor of love for years. YEARS! Let today’s sketchbook installation serve as proof. This sketch was done almost 10 years ago to the day!
I have an entire folder full of proof, in fact. Sketches done on little scraps of paper. In pencil and in ink. Sketches of floor plan ideas and exterior details. Sketch upon sketch upon sketch. And although I am not a fan of clutter, I don’t think I will ever have the heart to throw them. They are a sacred collection.
Though they informed the design choices that eventually led us to that perfect layout we were looking for, each sketch has merit of it’s own. And someday I would love to revisit each idea and come up with a set of simple plan books based on them.
My dream of designing and building a home for my future family goes back as long as I can remember. As a young girl I would approach my two sisters as ‘clients’ and ask them questions such as “How many bedrooms would you like?” and “Are you thinking a hot tub would be nice in your bathroom?” With their criteria in mind, I would then use my favorite 1980’s toy – pipeworks – to build them a house/fort.
Near the beginning of architecture school I was taught that one of the most important aspects of a building design is choosing the site it will sit upon. To achieve a harmonious design, the site and building must evolve in unison. Sadly, site selection is greatly overlooked in today’s home building market. It is not uncommon to see neighborhoods of ‘cookie cutter’ houses – identical buildings lining the streets, with each lot being modified to accommodate the building and not the other way around.
Craig and I were married after my third year of architecture school, and I have to admit that I daydreamed much more about future house ideas than I did about that perfect wedding. Being college students though, we were in no way ready to choose a site. We weren’t even sure what city our future jobs would land us in. We needed to be patient. Eventually we graduated and purchased a small 1900’s farmhouse about 30 miles from Craig’s home town – where we both had secured employment. We lived there for only one year before realizing that the commute was not for us. We transitioned to a historic neighborhood in our city of employment, where we purchased our 1904 Foursquare. It was there we became parents and began growing our family. After our second son was born our thoughts once again turned toward site selection.
In our minds eye, our perfect site included plenty of mature trees – woods that our boys could play in. We also knew that we did not want to build a large home and though the site didn’t have to be very large, acreage would be a bonus if we could afford it. We scoured online listings and drove around to the prospects, creating a list of pros and cons for each. One Fall day as we were driving, we stumbled upon a nearly hidden property. From the street it didn’t look like much, but we decided to park and check it out anyway. I will never forget the emotions of the moment when we stepped out of our vehicle and onto the site. There were mature oak and maple trees as far as we could see, their dried leaves slowly falling to the ground with a breeze from the crisp air. The land sloped fairly steeply toward a large pond. It felt like magic. It felt like home.
The next few days were a whirlwind of working through logistics. Could we really afford this? How far of a drive is this property from the fire station (per department rules, we need to live within an 8 minute drive from the station). What were the building restrictions for the site? What were the specifics on the lot size? (we later found out that the site was larger than we first expected, 4 1/2 acres total: 2 acres of pond and 2 1/2 of land) As it turns out, all the details fell into place. We purchased our little slice of the universe at the very end of 2009.
These are pictures from our first family outing on the property. You can see from these photos how much the land slopes toward the pond.
This was just one of many exciting and happy memories we hope to make there. We are looking at this as our forever home, a lifetime property where Craig and I want to grow old together. We have told our kids that we wish to keep the house and land in our family for generations to come; and thought that naming the property would be the perfect way to add some significance and permanence. We all sat down and brainstormed name ideas, taking cues from the land, and eventually decided on ‘Arrow Hill.’
As you can see from this image, the site is a pie/ arrow shape, with the ‘point’ facing North; And, as I have already mentioned, it is mostly a hill. If you look at the elevation markers you will see that it slopes from 1395.5 at the top/ road level down to 1370 at pond level. That’s a 25 1/2 foot drop over approximately 104 feet, for a slope of 14 degrees (25 %)! Note: The contour lines that have dash marks indicate ‘wetlands’ /non buildable land.
One additional unique aspect of this lot is that it has many bordering neighbors: 6 across the pond, 1 to the south, and 7 to the west. Amazingly, it still feels remarkably secluded thanks in part to the woods and the topography.
We are so happy to have found our perfect site and can’t wait to build our little cottage on it!


 As you can see from this image, the site is a pie/ arrow shape, with the ‘point’ facing North; And, as I have already mentioned, it is mostly a hill. If you look at the elevation markers you will see that it slopes from 1395.5 at the top/ road level down to 1370 at pond level. That’s a 25 1/2 foot drop over approximately 104 feet, for a slope of 14 degrees (25 %)! Note: The contour lines that have dash marks indicate ‘wetlands’ /non buildable land.