Surprise! Super last minute redesign

Funny story. Do you remember nine months ago when I made a major redesign to the main level? I was pleased with the change at the time and thought for sure I was done designing. Joke’s on me… apparently I wasn’t!

If you’ve been following along, you know that our building project has begun. We’ve cleared out trees, dealt with sewer issues, and the crew prepared the site. In fact, just this week the foundation for the house was poured! I will have an update on that over the next couple of weeks.

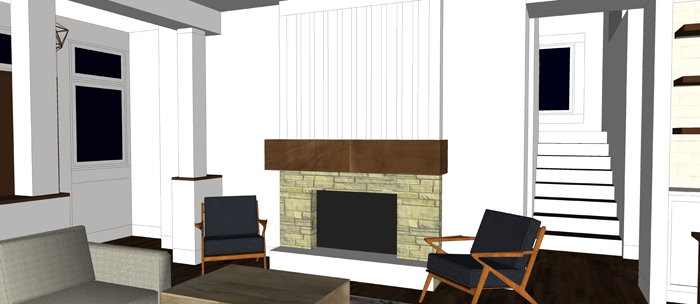
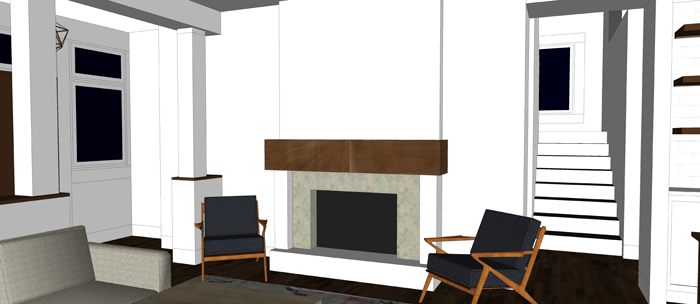
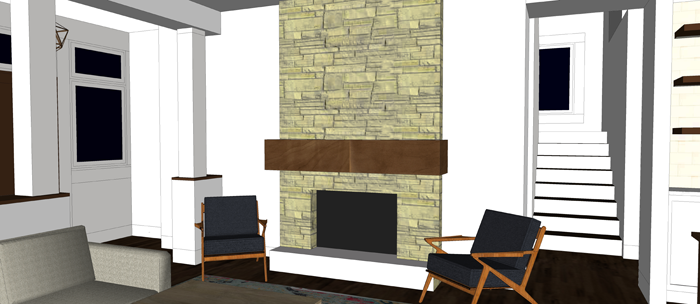
It’s all very exciting and welcomed progress, yet as soon as I saw the footings laid out on the site, I felt a nudge. You see, our site has some gorgeous views. It’s a gem of a property. And when I stood in the spot that would be our future living room, imagining the three large windows facing the beautiful woods, I couldn’t help but want to open up the view even more.

I looked at the 3D images that I had drawn, and thought. Was it possible?

existing living room windows

Truth be told, I kept these thoughts to myself for a while. Surely my patient husband didn’t need the added stress of his wife redesigning a house that was currently being built. But I couldn’t shake the idea from my mind.


And then… a lightbulb moment

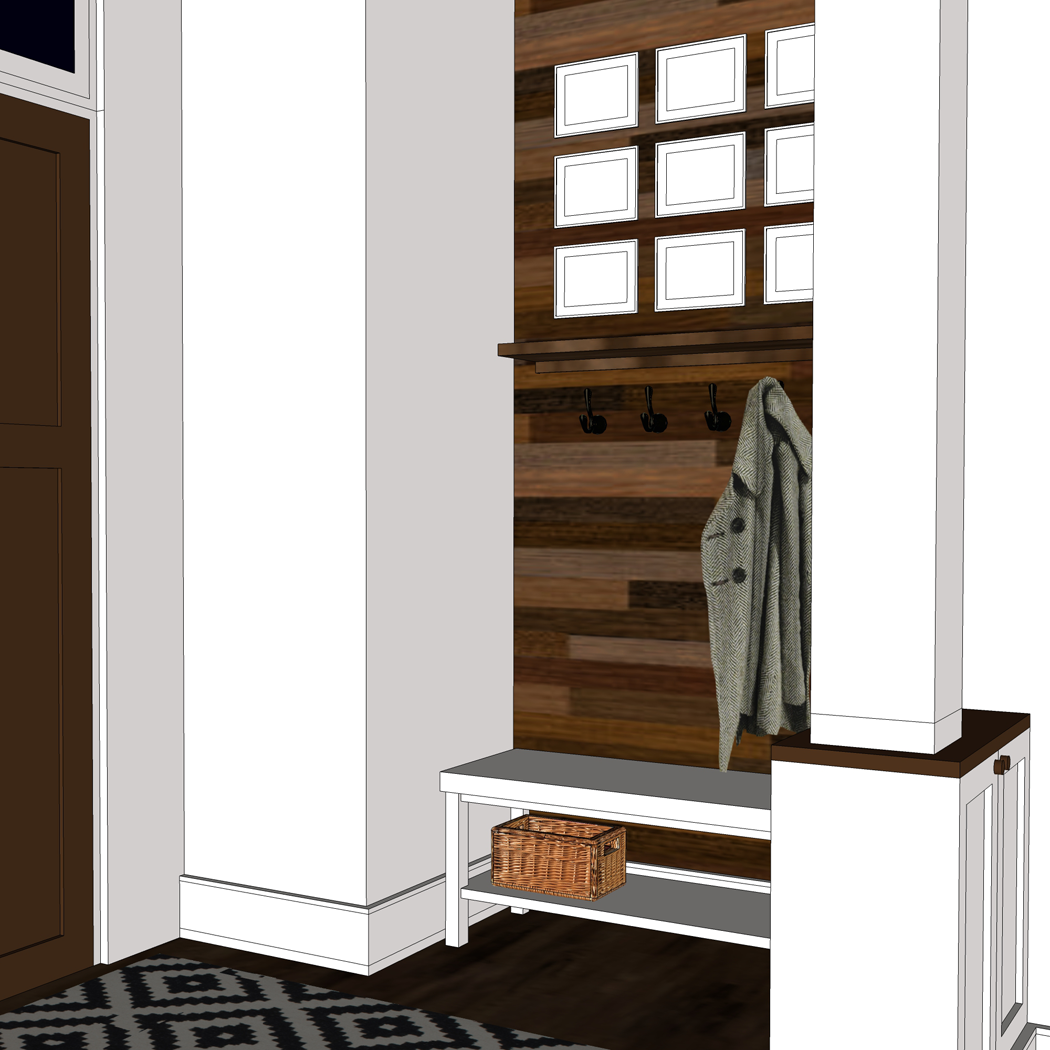
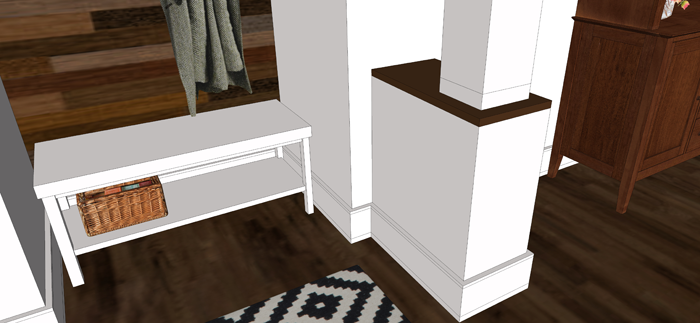
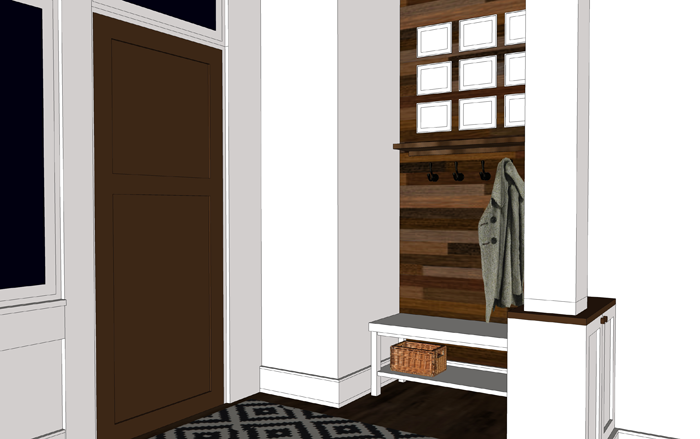
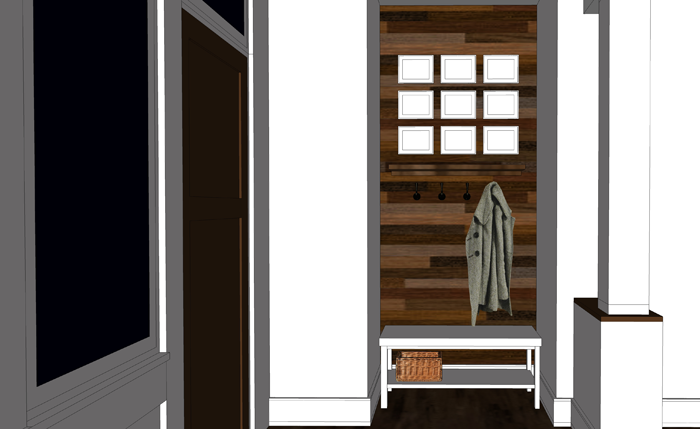
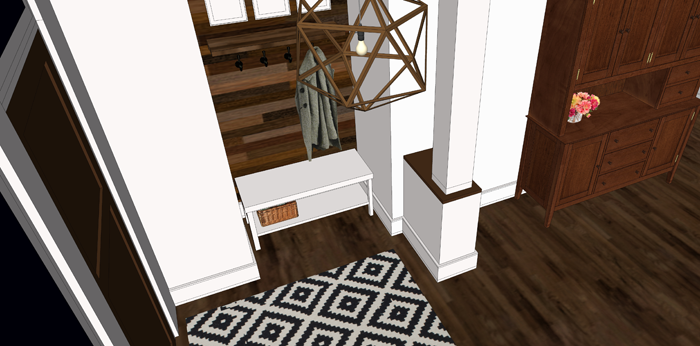
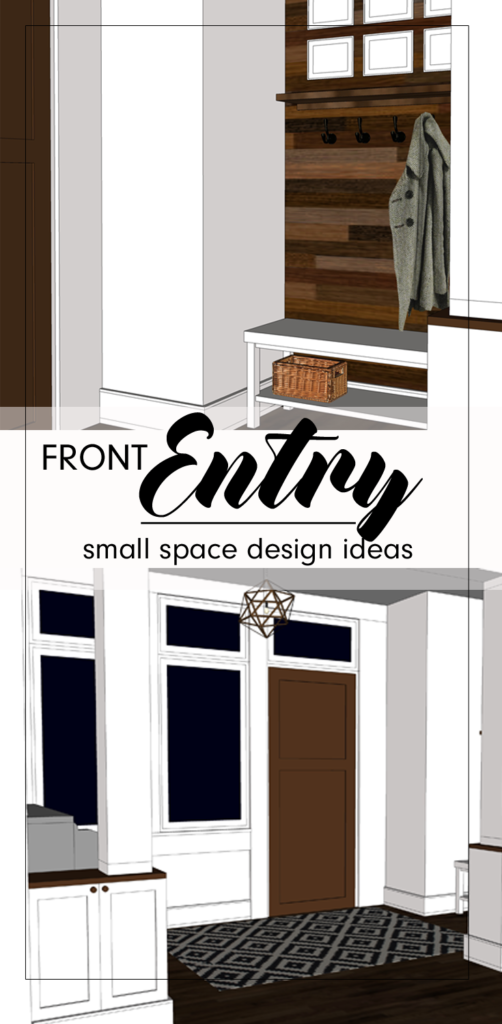
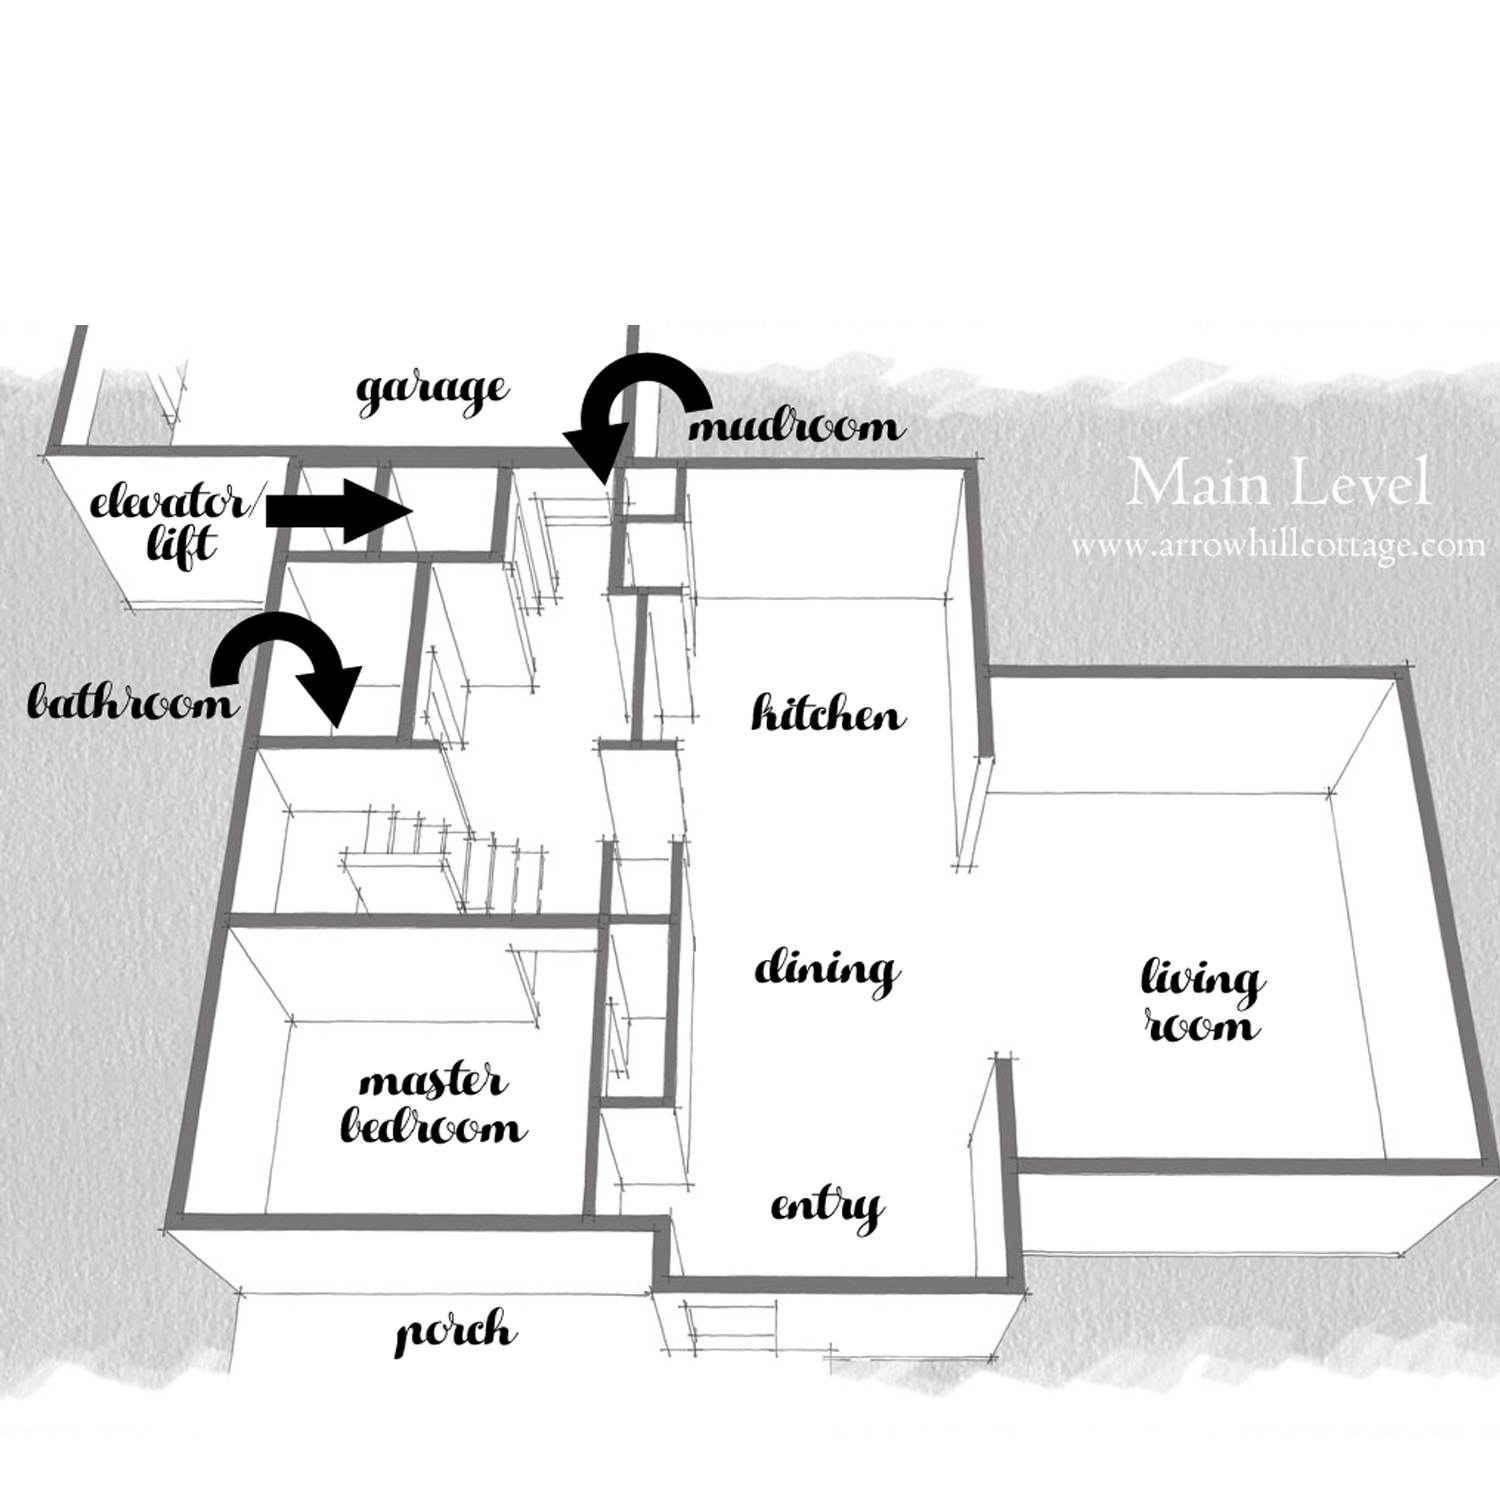
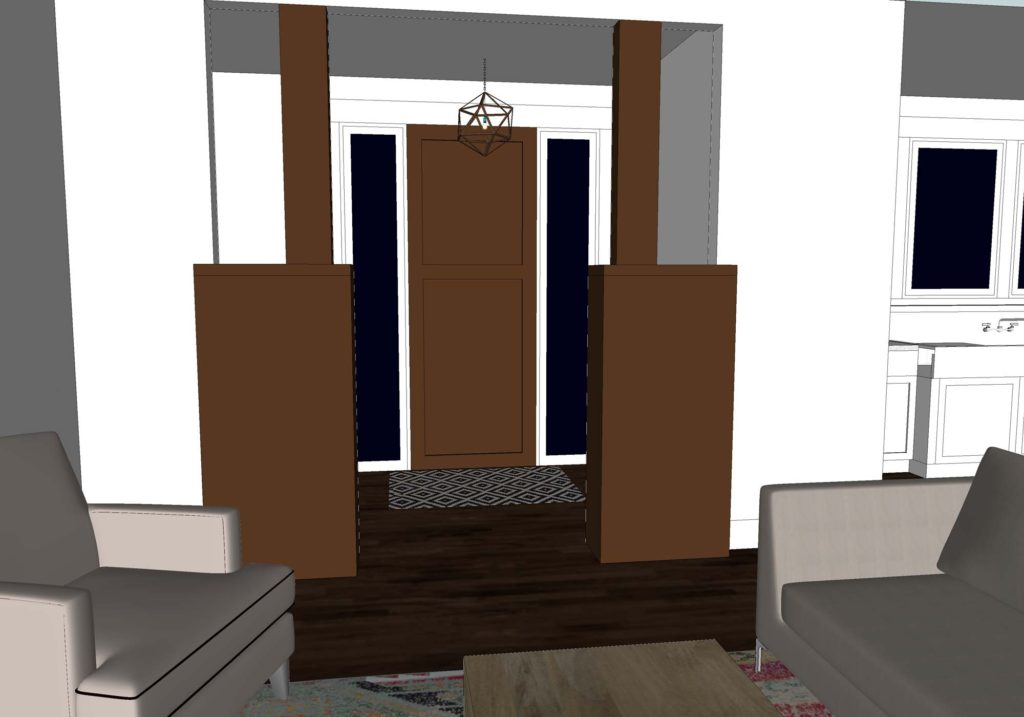
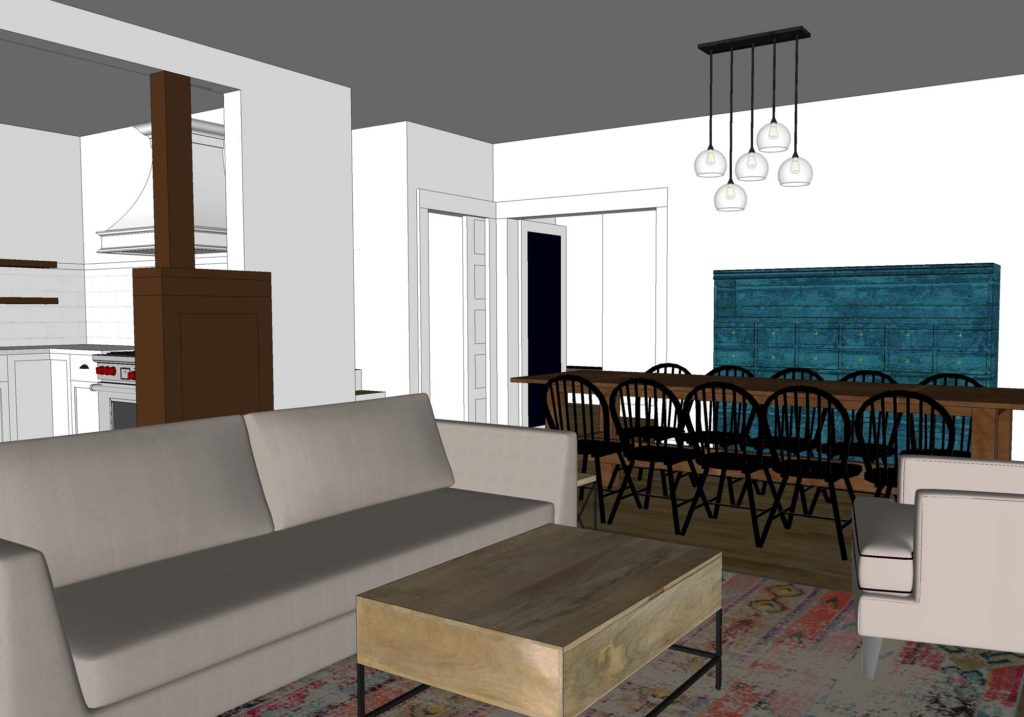
All along I had been holding onto the idea of our restored vintage cabinets, flanking a very formal front entry. But then I realized that this setup actually created quite a bit of rarely used square footage. Did we really want to allocate nearly a tenth of our main floor footprint to something that wouldn’t be needed on a daily basis? My simple answer was ‘no’.
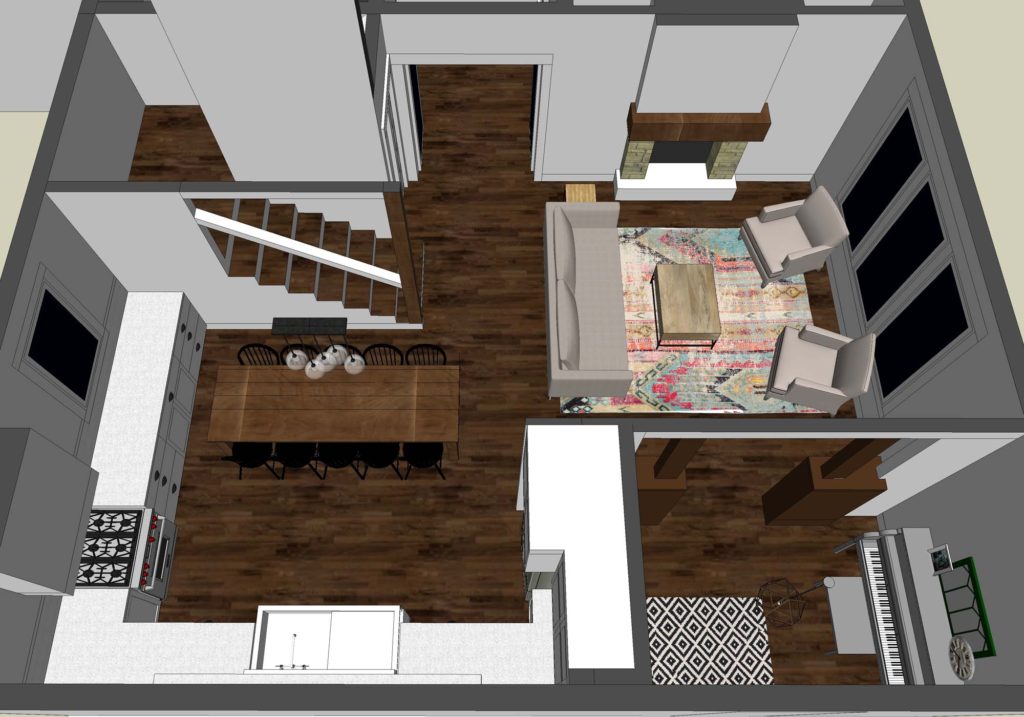
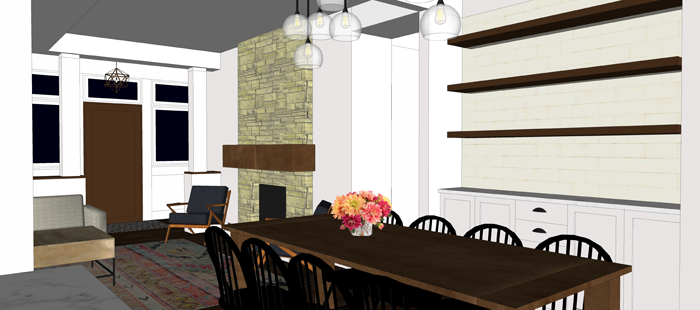
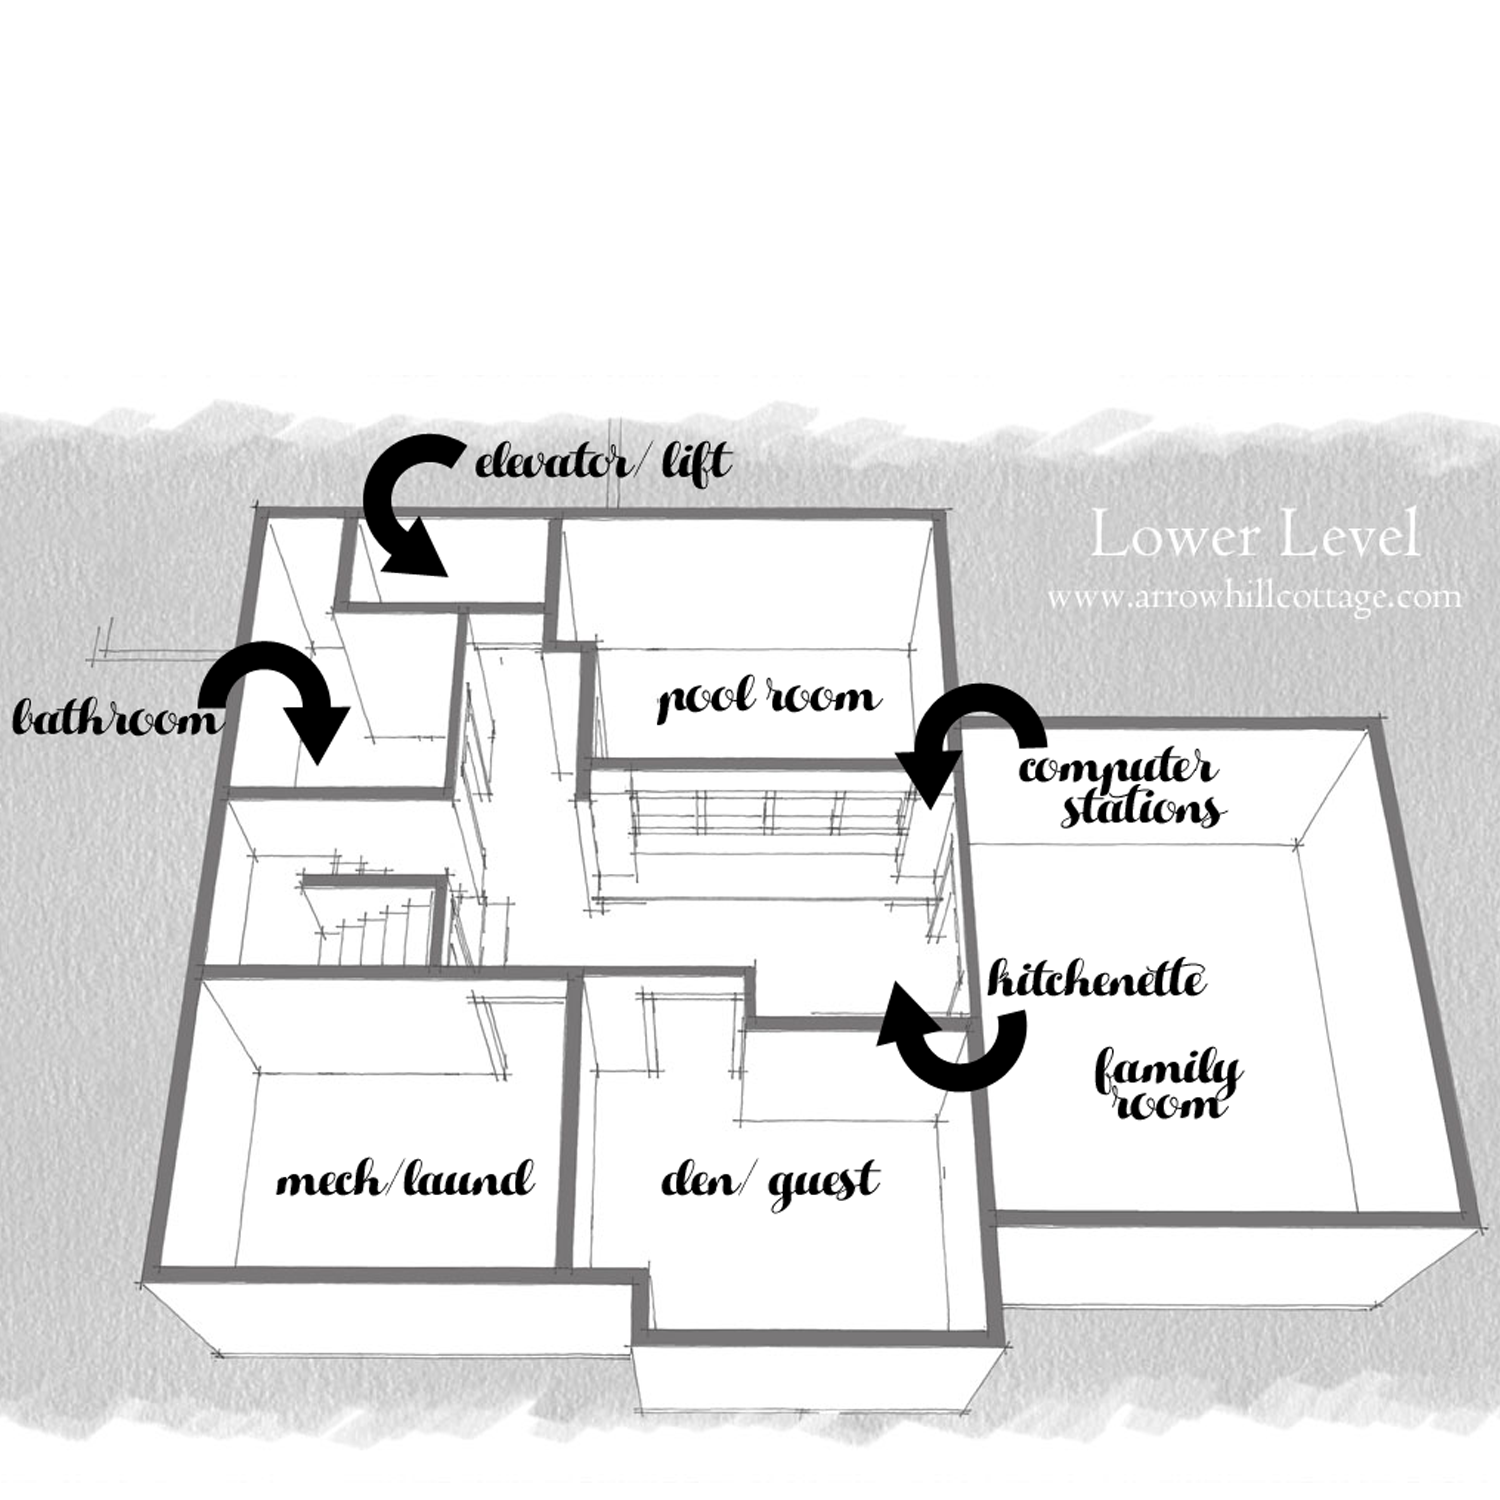
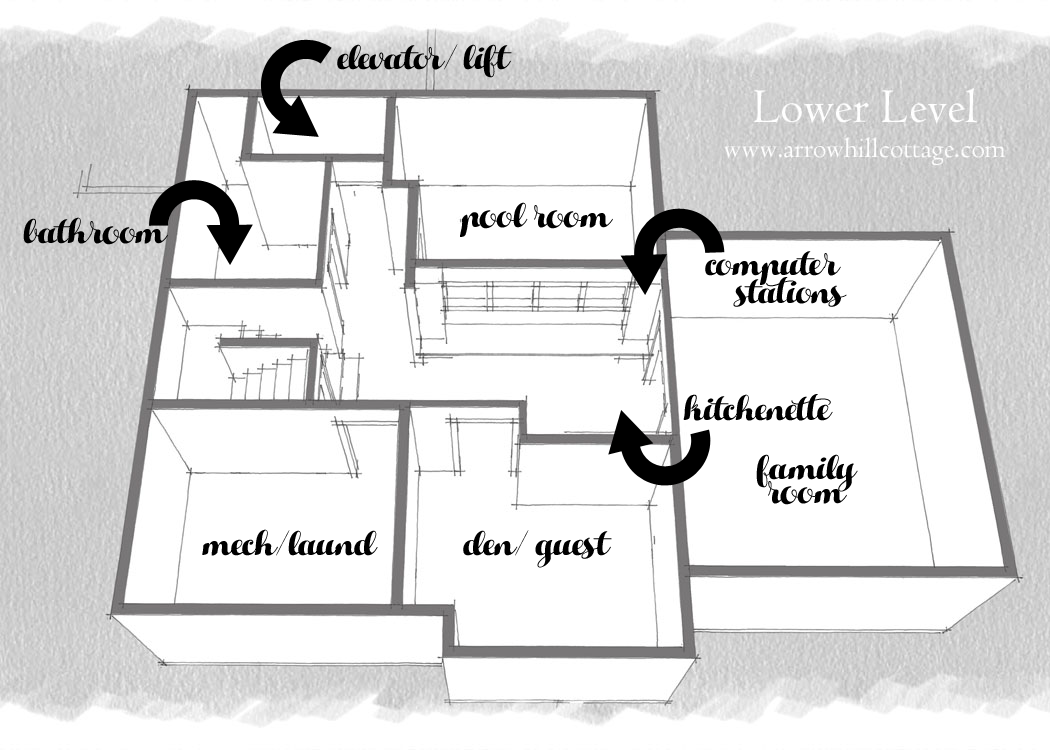
with separate entry before

main floor before


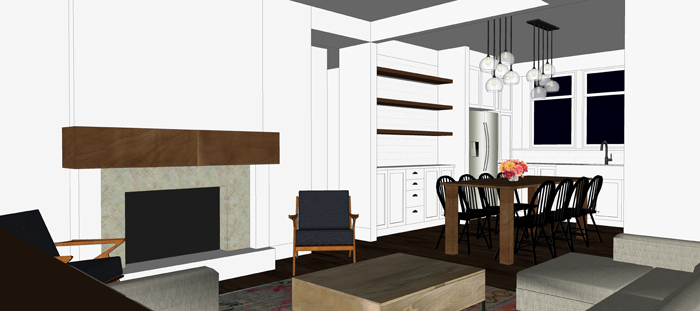
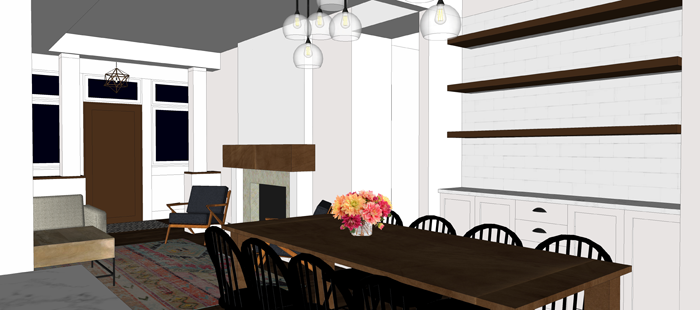
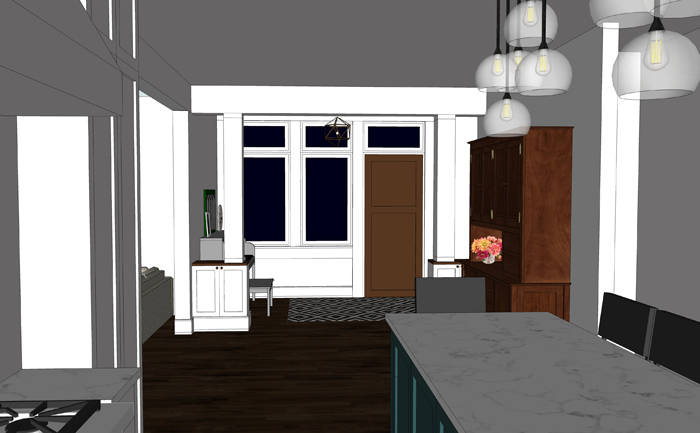
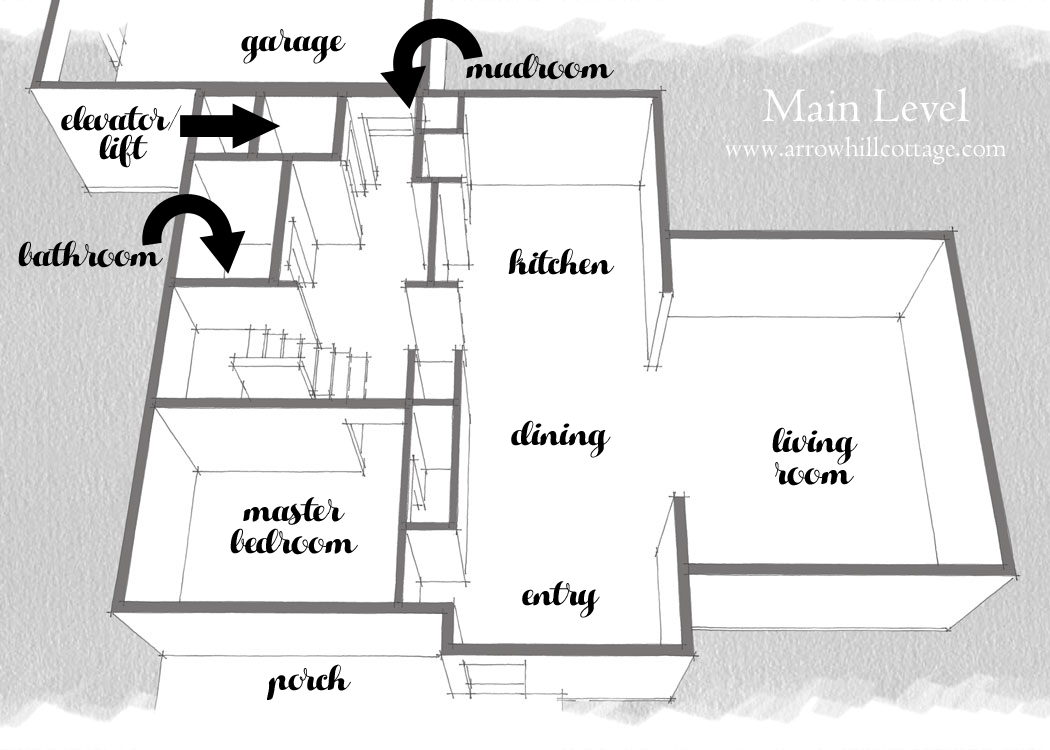
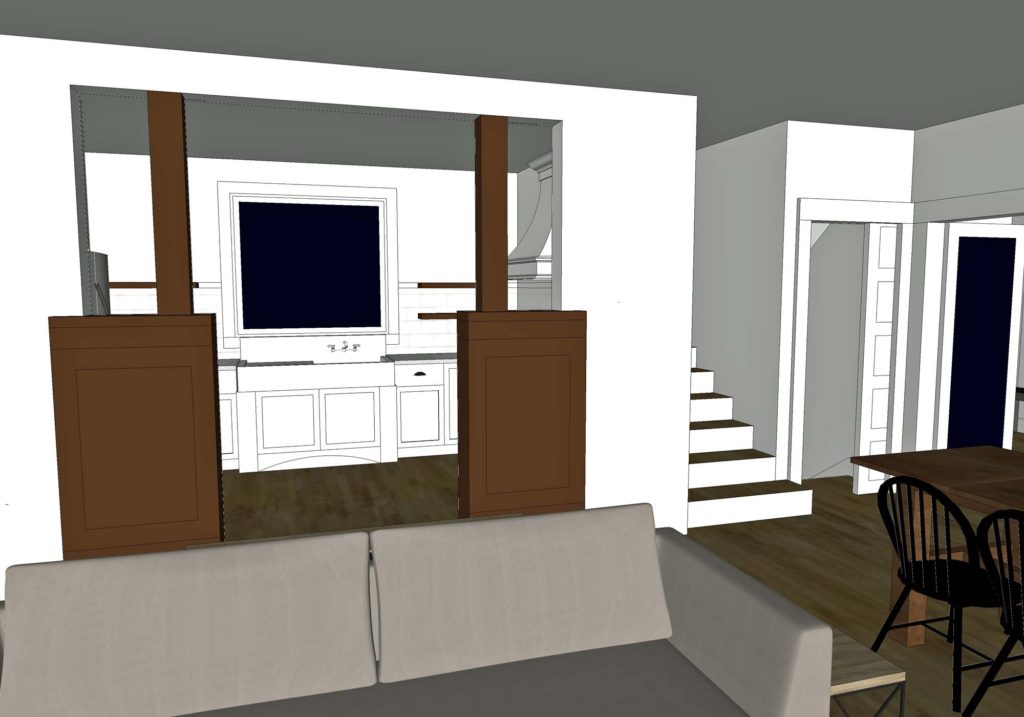
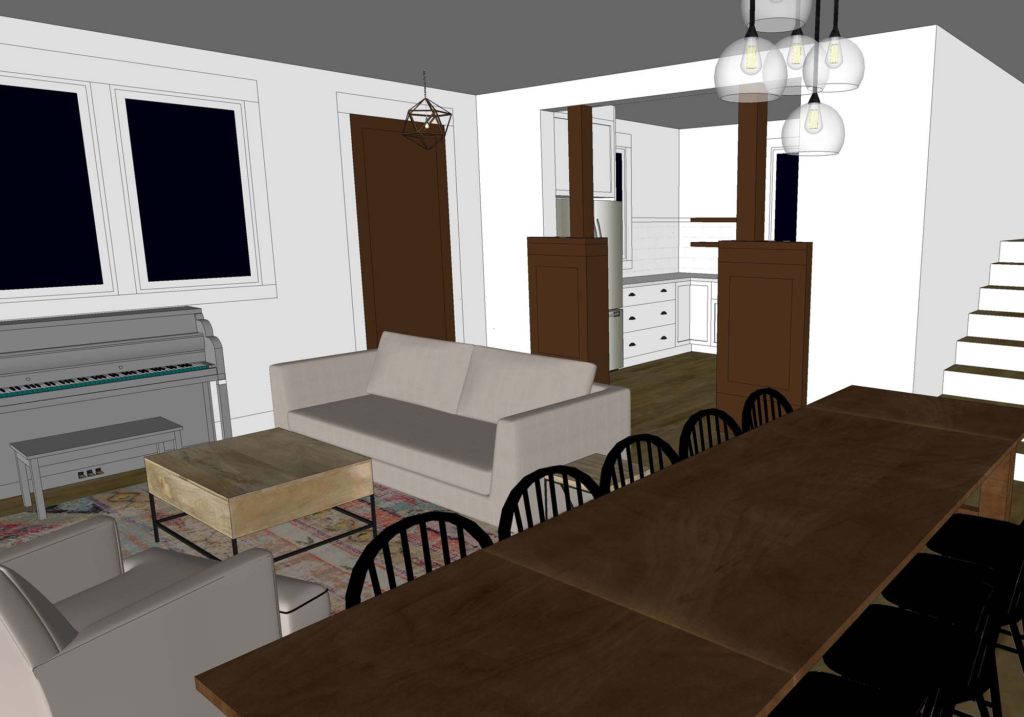
Taking the formal entryway out of the picture, the space absolutely opened up. I was able to maintain a small area by the front door for coat hooks and a small bench to be used by guests and visitors. The beautiful cabinets were then positioned to frame an opening to the kitchen.
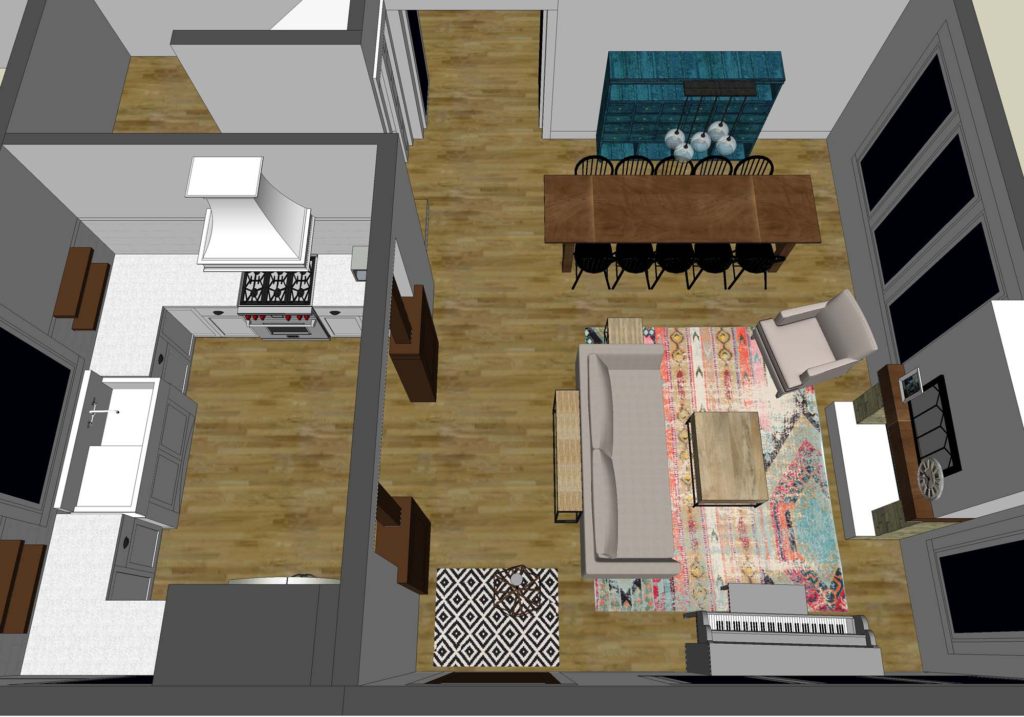
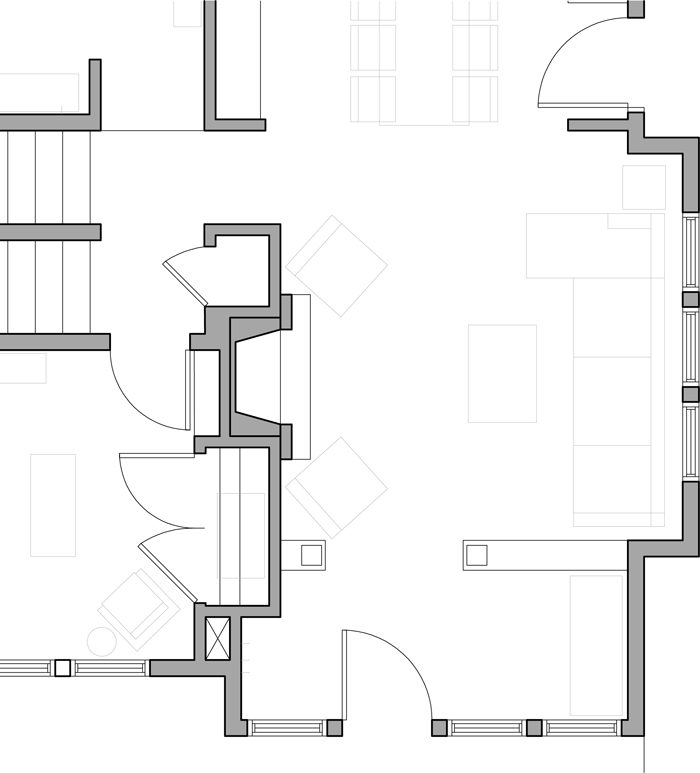
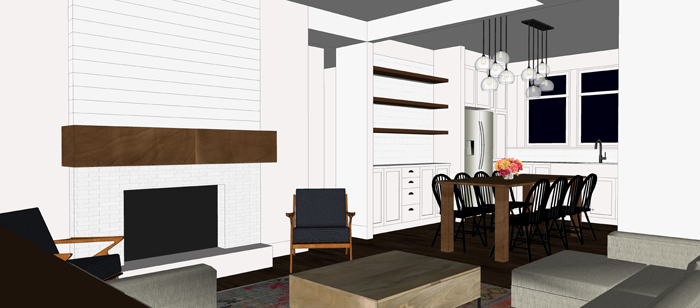
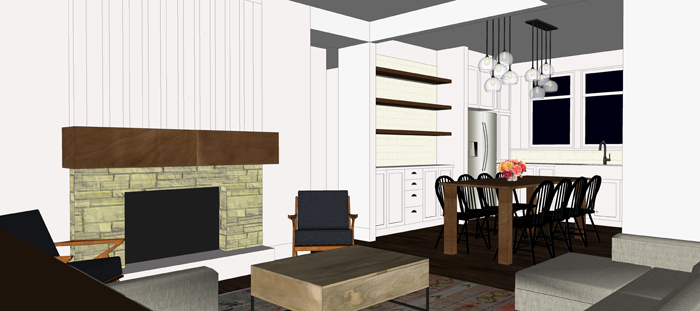
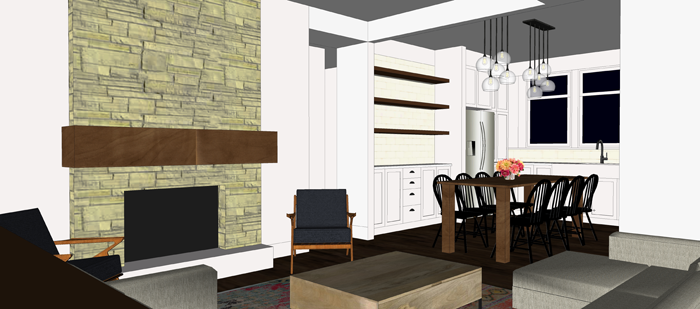
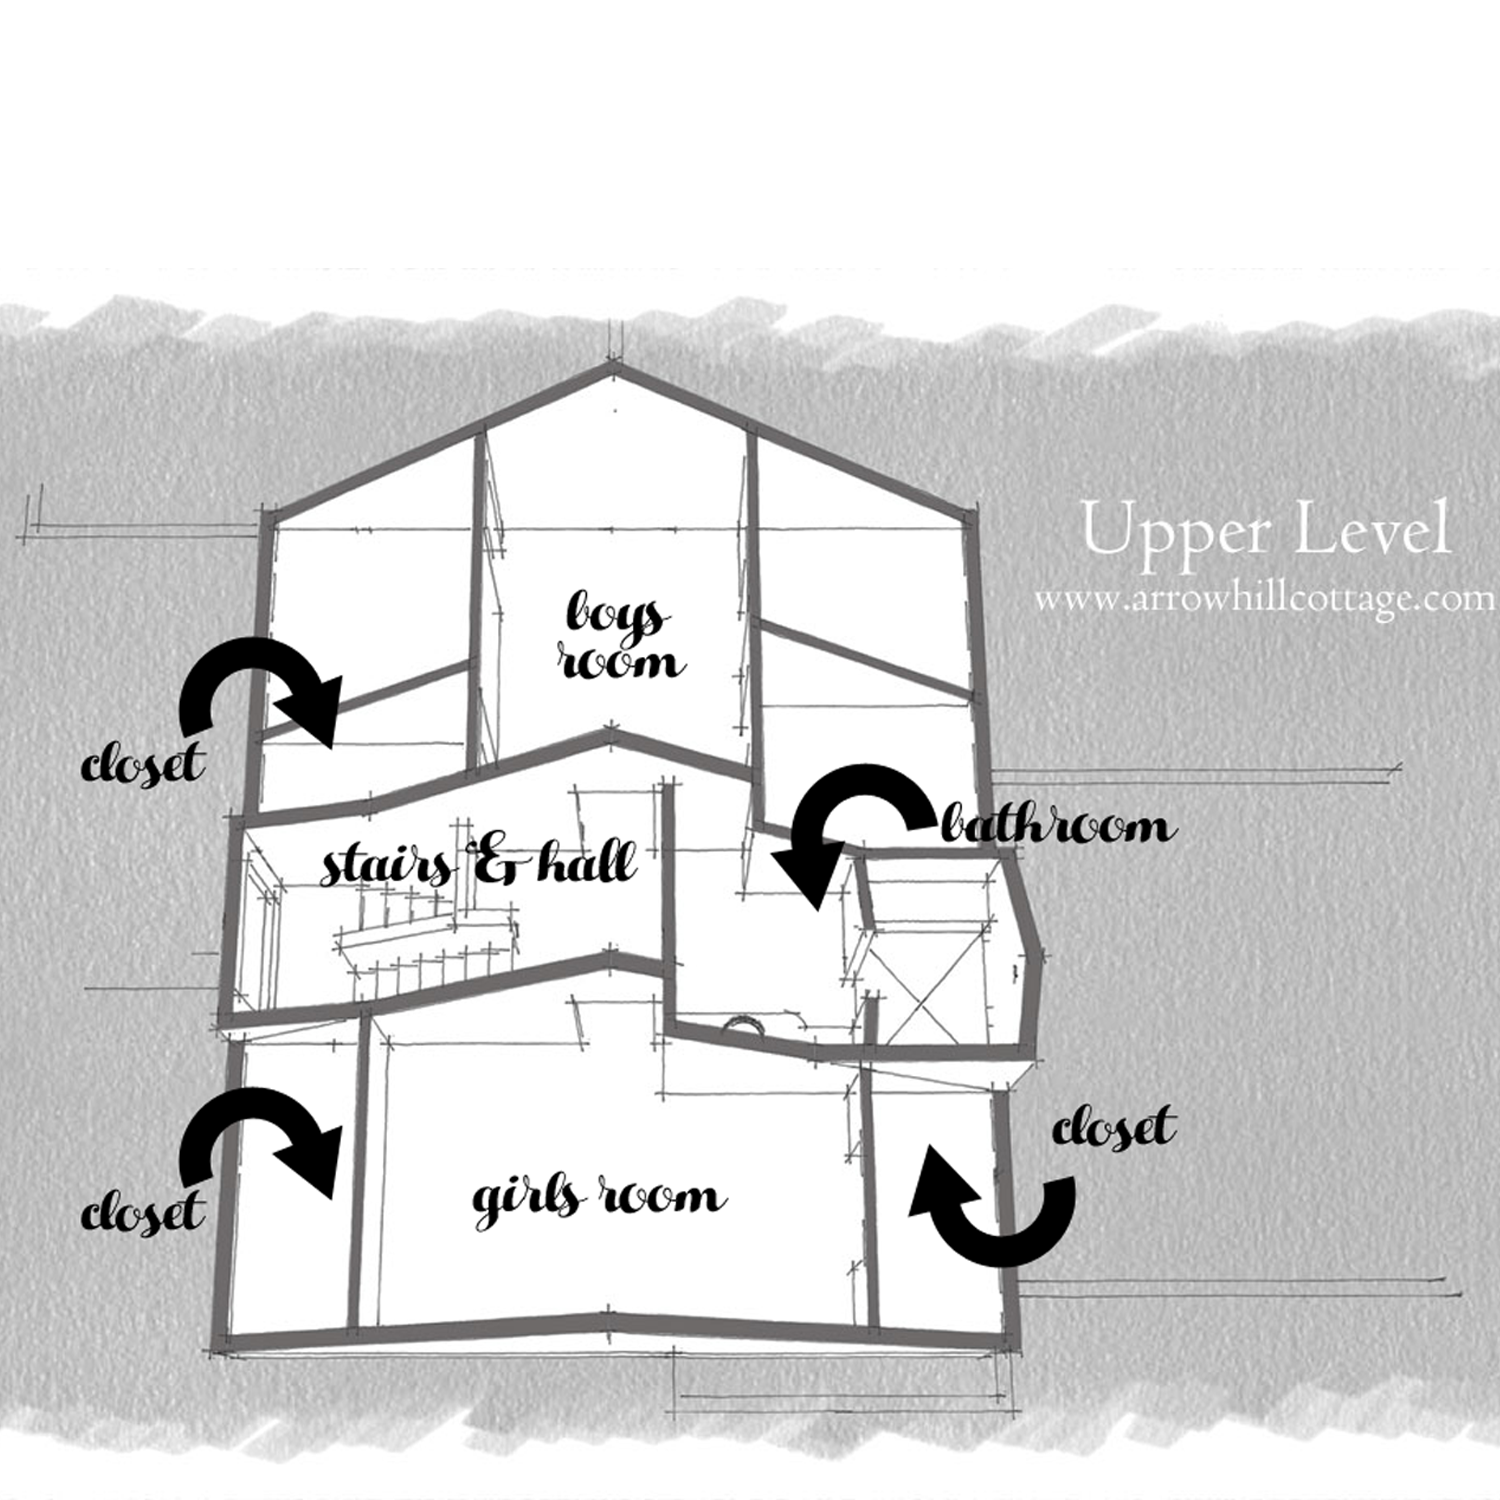
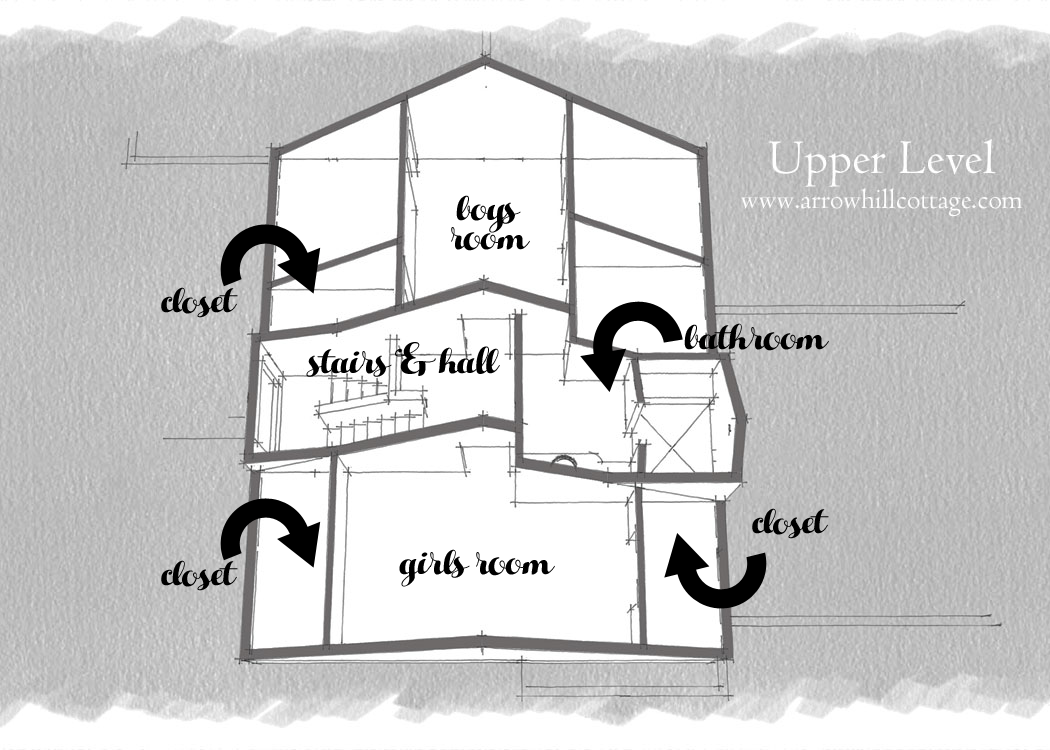
open concept floor plan | redesign

main floor after


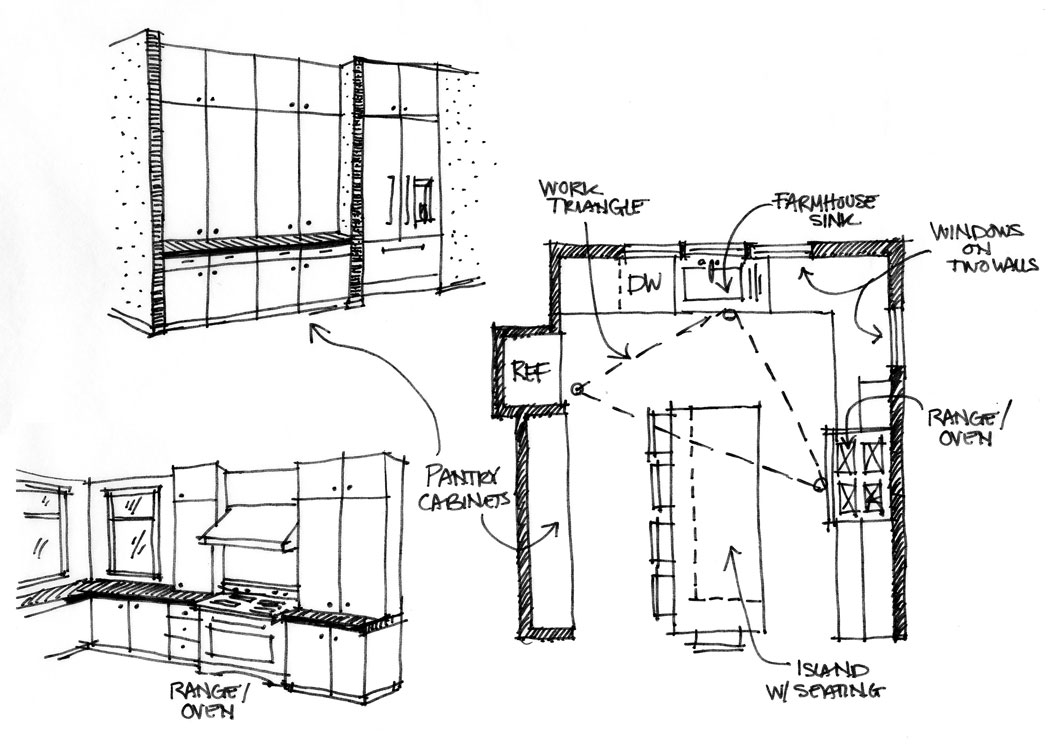
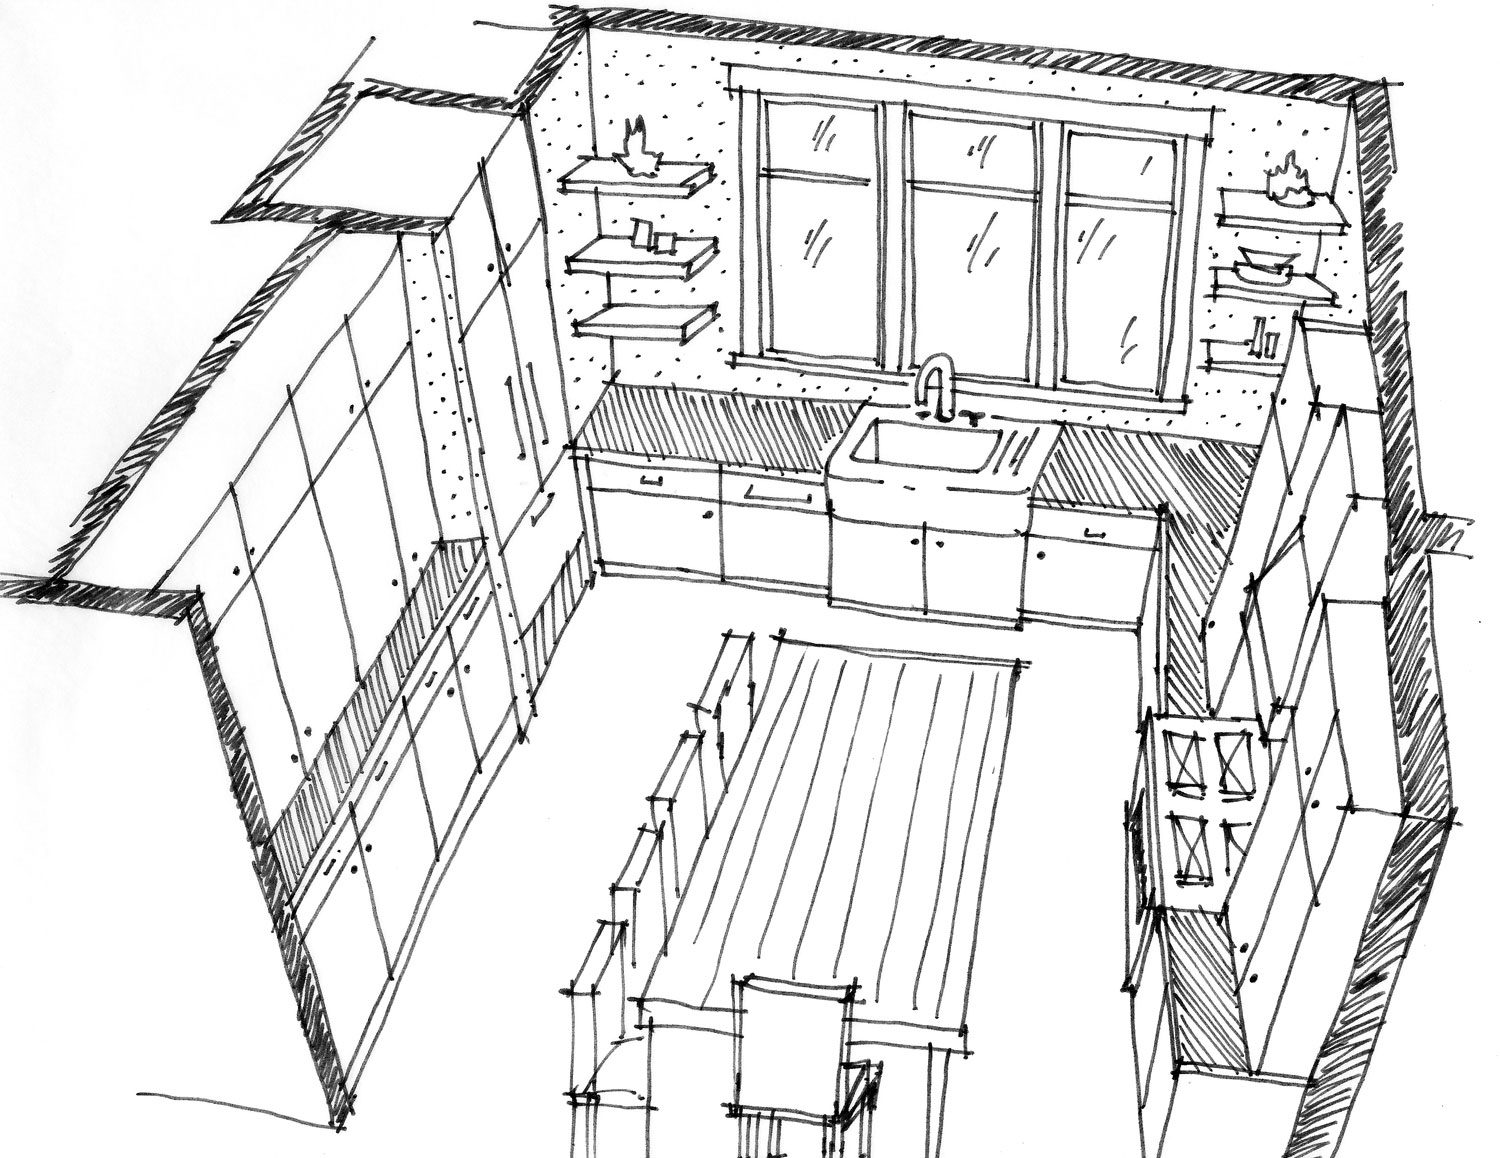
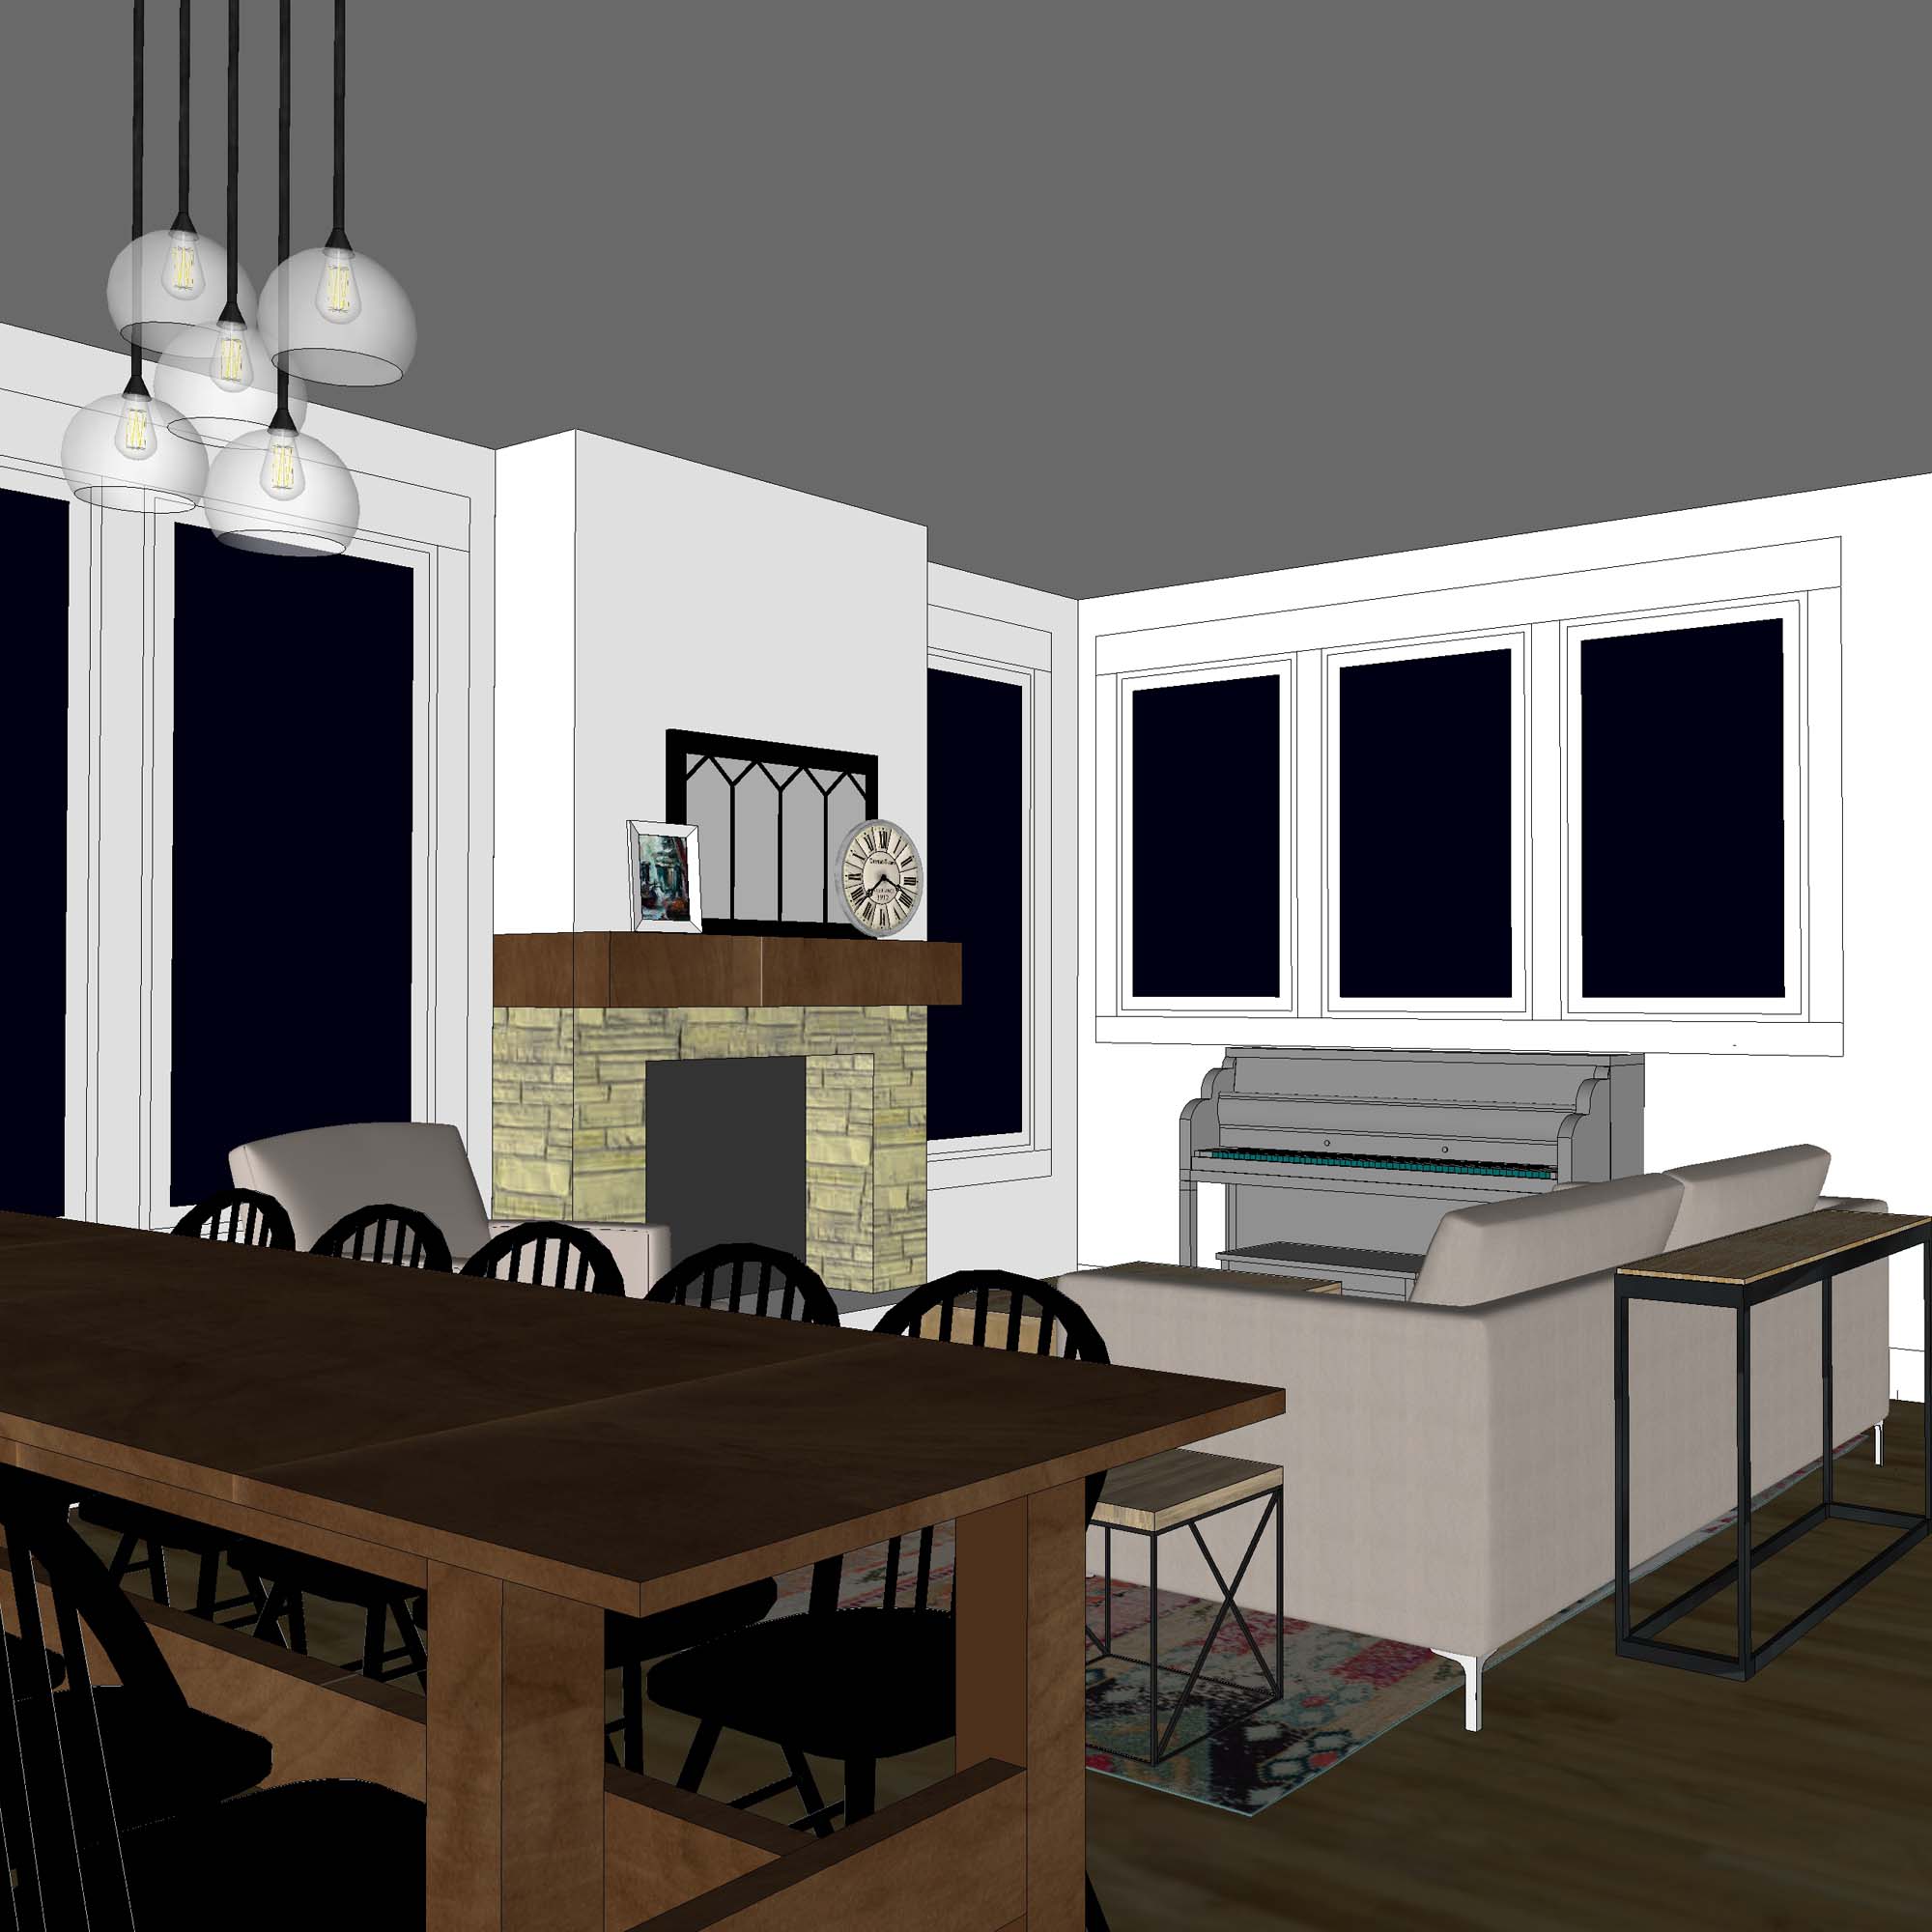
Speaking of the kitchen. I am SO in love with this new concept, which puts the amazing cast iron sink on center stage!

looking into the kitchen space | last minute redesign


white kitchen design

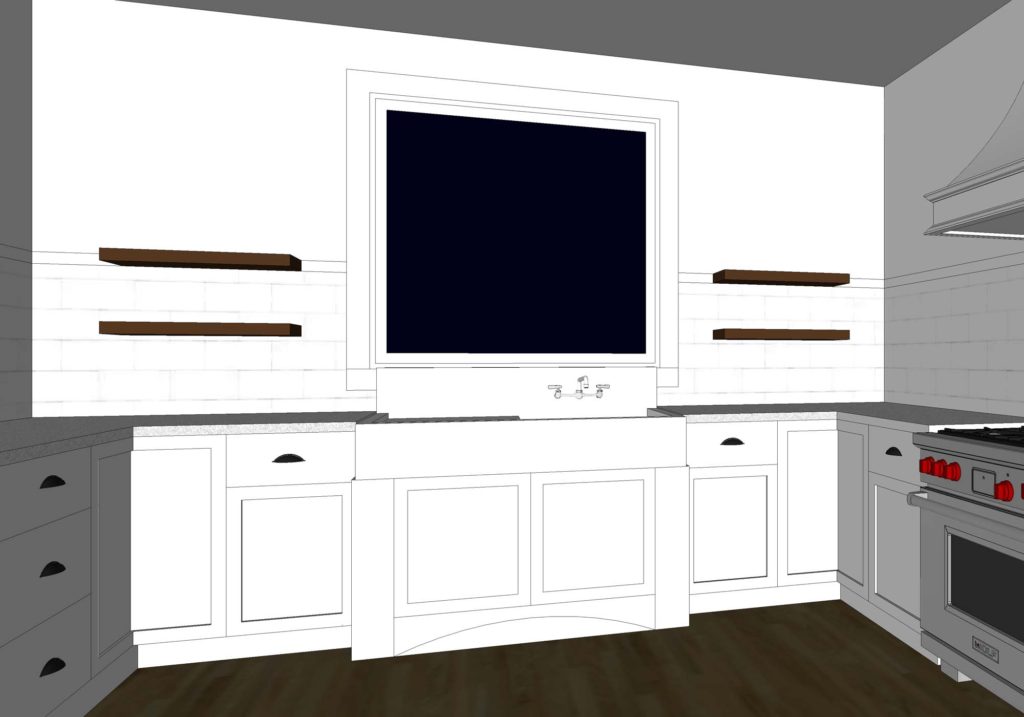
That large window will be sized to fit perfectly over our vintage sink.


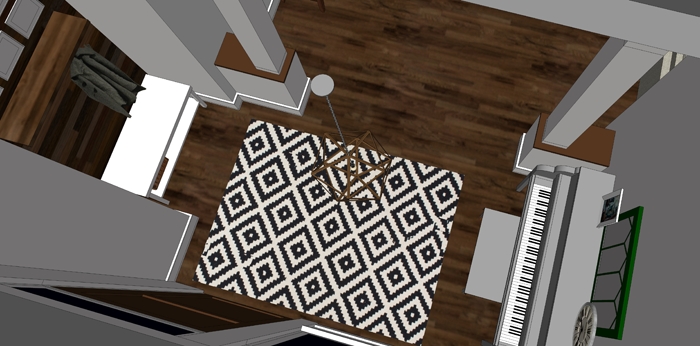
Overall, the public parts of the main level are now open to one another and will be graced with ton of natural daylight. And, of course, the spectacular view is expanded.

great views from living space

redesign of living and dining space

open concept living dining space

Additional benefits of the redesign

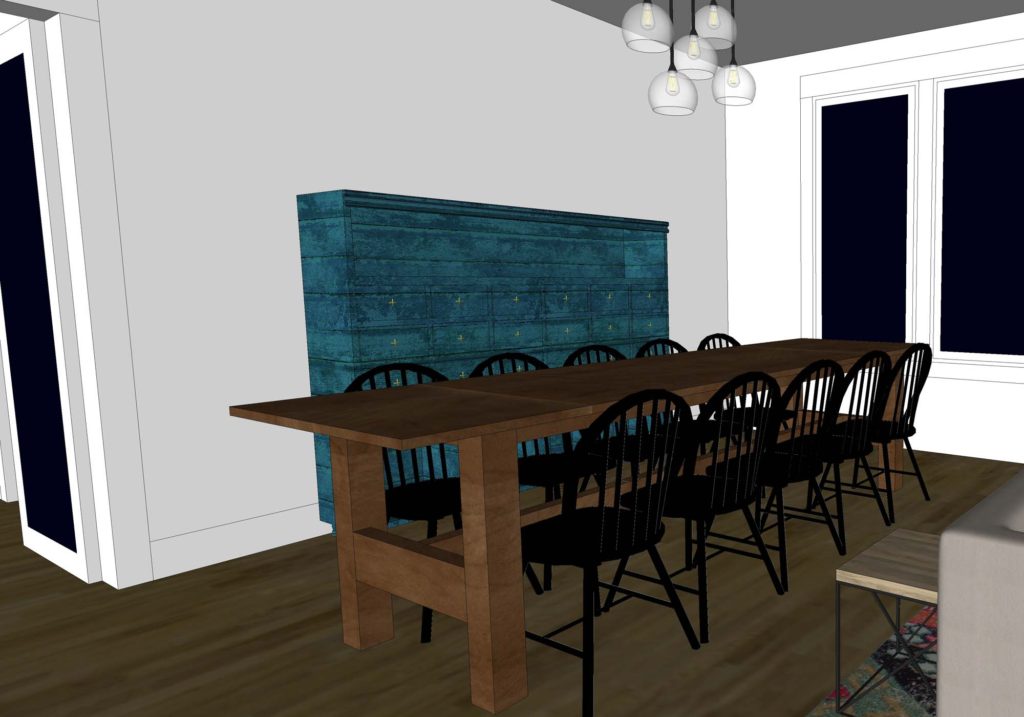
Apart from the increased view, this redesign has a couple other benefits. With a large space opened up, there is now room for an even larger dining room table. It has always been my dream to have a table that can seat at least ten. This space will accommodate a table that size, or even bigger! As a bonus, there will be room for an additional piece of furniture near the table.

Perhaps a china hutch, or a fun and interesting vintage piece such as an old apothecary cabinet.

huge dining table as part of redesign

In the kitchen, we can include a larger fridge. I had always thought we would use a counter depth model, until we found that they were quite a bit more expensive than the deeper versions. It seems silly to pay more for something that has less space, but that is just the way it is. Counter depths are considered an ‘upgrade’. Surely our growing family will fill up a standard depth fridge with no problem!

The home is also made more handicap accessible, should any of our family members find ourselves in a wheelchair at some point. There is a natural wide pseudo hallway running the entire distance of the open room, and the kitchen includes plenty of space to turn.


What the redesign entails

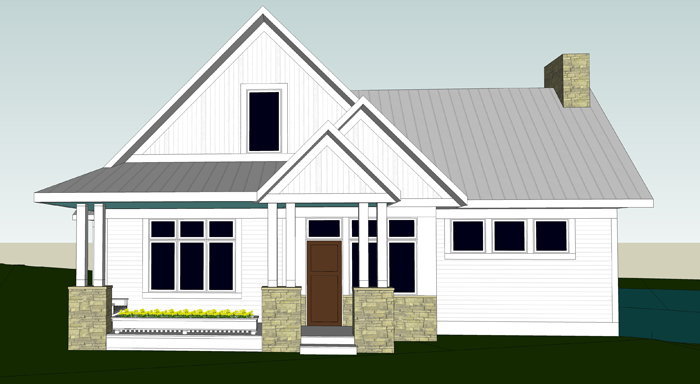
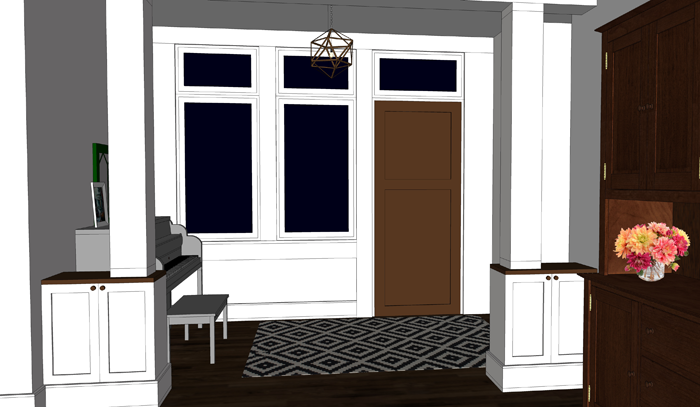
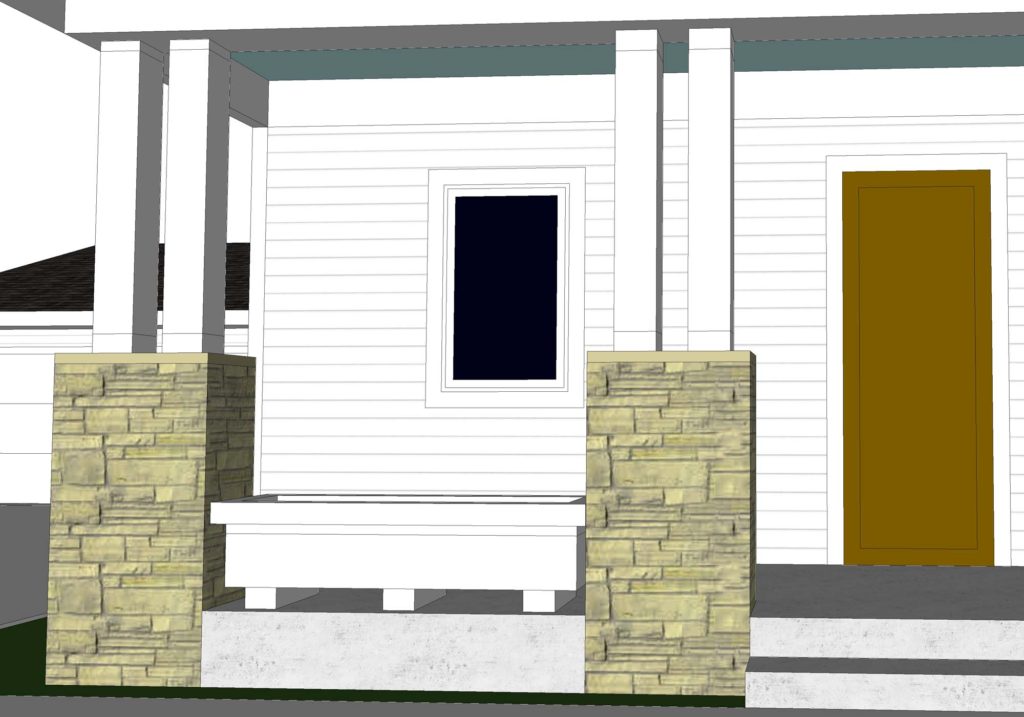
All of this seems to add up to a major change, but in reality it isn’t a big deal! It shouldn’t send our contractor or the crews scrambling around too much anyway!  Essentially, we will need to purchase two additional windows for the house – a large one for above the sink, and another for the living room. Our front door will change, from one with sidelights to a door only.

The exterior will also look a bit different too, with the removal of the small gable dormer above the porch and the addition of a column set.

simple white cottage exterior | redesign of cottage

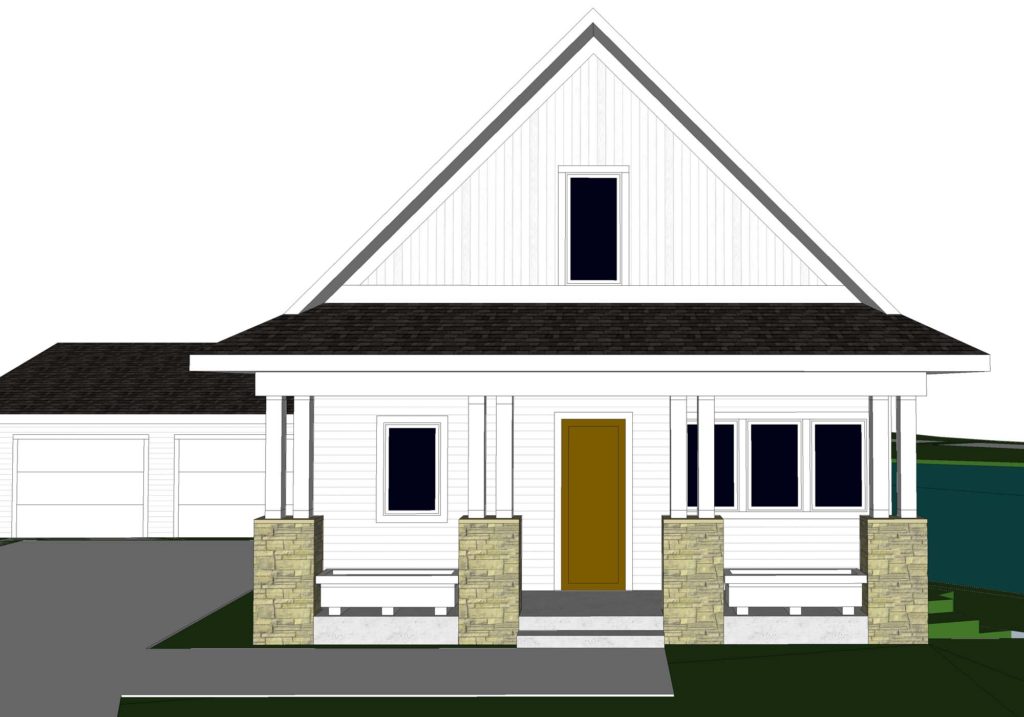
Though I’ll admit that I do like the exterior look of the original design a bit better, the revised version is a manageable trade-off for the increased function and livability inside. And, I am giddy at the thought of two planters!

planter boxes on porch


So, there you have it. Our surprise redesign. I have said for years that I work best under pressure. Apparently that includes adding design tweaks mere weeks before the house needs to be built. A few of the construction document sheets will need to be re-printed. But it will be worth it.

I would love to know your thoughts on this last minute redesign. But, hey. If you have any additional improvement ideas- please keep them to yourself. There isn’t time to go back to the drawing board again after this! Ha!


SATURDAY SKETCHBOOK: FIREPLACE IDEAS


My husband and I have lived in 3 old houses over the course of our marriage – a 1905 farmhouse, a 1904 American Foursquare, and a 1920’s farmhouse. And although each of these houses have had their own share of character items, not a single one has had a fireplace.

We love the ambiance that a fireplace can add to the spaces it serves, and so for Arrow Hill Cottage we are working one into the design. For ease and safety reasons we are going to be utilizing a gas insert unit. I’m thinking something simple and not too large – maybe a model similar to this.

I have a feeling the firebox insert will be the easy decision to make. The more complicated endeavor will be determining what the fireplace surround should look like! Initially, I had designed in bookcases on either side of the fireplace; but ultimately decided that a larger bedroom closet, and a broom closet were more important for the function of the house; And so the fireplace itself will be positioned on a wall in our living room and serve as a stand-alone feature piece.

I have been tinkering around in Sketchup with a few different options of how to finish the surround, and thought it might be fun to share with you today and take a poll about which is everyone’s favorite. All four options include a chunky wood mantle, which we hope to have milled out of a tree that will need to be removed from our property for the construction of the house. I’ve intentionally left the top of the mantle bare, so that your eye can focus on the fireplace itself – but you’d better believe I will have a TON of fun changing out the decorations to dress it up!

I am sharing multiple images of each fireplace option, so that you can see how it relates to the spaces around it.


OPTION 1: WHITE BRICK + SIMPLE SHIPLAP


This is a really clean look, and pretty straightforward. It is also probably the most cost effective of all the options. If I have one concern about this option, it would be that it may be TOO white – and wouldn’t stand out enough as a focal point in a room that has all white walls and a white ceiling.


OPTION 2: STONE WITH BOARD AND BATTEN


The exterior of the cottage utilizes a bit of cultured stone on the porch column bases, as well as board and batten siding on the gable ends. I thought it might be nice to connect these element to the interior by using the same stone and paneling technique on the fireplace.


OPTION 3: CLASSIC WITH TILE


This is the fireplace finish that first comes to mind when I think about a historic home. It is clean, simple, and stately without much fuss. We have friends who had their tile laid in a herringbone pattern, which gave their fireplace a more contemporary feel and looks great! The portion above the mantle could be accented with a different color of paint, perhaps a bright pop of something dramatic.


OPTION 4: ALL STONE


This option has me a bit worried about the budget – as stone is not cheap! I do like the ‘cottage feel’ that it seems to give the space though! And it definitely draws your eye toward the fireplace as a focal point.


What do you think? Which fireplace option is your favorite? If you have any real-life personal experience about fireplaces – whether it is something not to do, or something you have done and love – please let us know by commenting to this post or on one of our social media locations!

Have a great Saturday everyone!


FRONT ENTRYWAY DESIGN IDEAS

A front entrance for guests is a great feature to add to any home. It doesn’t need to be a large space, but having it laid out well is important. Today I am sharing the front entryway design ideas I have for Arrow Hill Cottage.

Although our home will have an attached garage, and our family is most likely to enter and leave in that direction, I wanted to make sure to include a straightforward front entrance – where we expect visitors to enter. I’m not sure about you, but our garage has a tendency to become cluttered and dirty far faster than any other space we own – and we don’t want our visitors to experience our day to day.


ENTERING FROM OUTSIDE

As you can see in this image, the front door will have a prominent position. Although the house is not symmetrical, your eye is drawn to the small gable above the door.

creating a charming front entryway

In case you noticed… yes, I am still #teamplanter, and it remains as part of the design, at least for now. If you have no idea what I’m talking about – go ahead and visit THIS POST to learn all about the debate.

The large stone pillars and double columns frame the view.  I’m sure there will be some sort of feature light fixture here also, but I haven’t made any decisions on that yet. And yes, I am dreaming of a light blue bead-board ceiling for the porch. Love.


cottage front entrance. Covered porch with sweet and simple front entry

I have chosen a solid wood door. Because there will be windows directly next to and above it (transom), I felt that including a smaller pane of glass within the door itself would complicate the arrangement. The windows should provide plenty of natural light (this wall will be south-west facing)


INSIDE THE ENTRYWAY

Stepping through the door, you are welcomed with a space approximately 6 feet deep by 12 feet wide. The room is partitioned from the dining room by a pair of built-in cabinets and columns.

front entryway with custom built ins and columns used to divide space

We will likely have our builder or cabinet maker create these cabinets and columns, but This Old House wrote a fantastic post about how you can make this a DIY project. I purposely chose to offset the built-in slightly from the alcove since the wall finish and the cabinet finish will be different. This will help eliminate a clumsy transition from cabinet to wall. The baseboard trim will help to tie everything together.

front entryway design ideas for our new home. Simple white bench in front entryway

As I mentioned in this post, we have found that with fewer closets we are less likely to hold onto items we don’t need. This entry is indeed the perfect opportunity to live that theory. Because most of our family’s shoes, coats and bags will be coming in through the back entry / mudroom, we won’t need much for storage near the front entry. Instead of using the recessed space as a closet, I am opting to leave the alcove open and instead will incorporate a bench with simple hooks and a shelf above.

simple front entryway design ideas

This alcove also lends itself to the inclusion of a feature wall. At the moment, I am thinking that beautiful rustic barn wood would serve as the perfect surprise. The feature wall will serve as a backdrop for a family photo gallery.

gallery photo wall in front entryway. front entryway design ideas for our new cottage

This post, from the blog Ivory Lane , has given me a ton of inspiration for the entryway gallery. I love the simple nature of the metallic frames, white picture mats, and black and white images.


ACCESSORIES + DETAILS

On top of the small shelf above the coat hooks, I envision some cute artwork that represents our family. These number squares are amazing.

cute front entryway decorations

image source


I also love sentimental signs and would love to work something like this into the entryway space.

front entryway sign idea. This simple phrase is beautiful and would be perfect in the front entryway of a home

image source


Opposite the bench area is where I envision our piano being placed. We own a low grade piano that is natural wood and wood grain veneer at the moment. I would love to paint it a soft gray color and decorate it with special accessories – such as the vintage green cottage window that I recently purchased at an antique store. I know there is some debate about painting pianos, but they make it look so easy on Pinterest, and I am really intrigued by the results.

piano positioned in front entryway

Nobody in our family is a concert pianist, but we do enjoy having a piano to tinker around on. In this location it is available, but set aside so that it isn’t in the way of other daily activities.

For the center of the room I would like to find a special light fixture. I am thinking something with a metallic finish, probably a hanging pendant.

front entryway design ideas. new home design

Perhaps something from this collection would work well.

wire framed pendant light fixtures for the front entryway. Front entryway design ideas for our new home

image source

The floor will require some sort of durable rug that will mostly protect the wood floors. I love the idea of a black and white patterned rug.

view of small and simple front entryway

This website seems to have a wonderful selection of rugs to choose from.


decorative features for our front entryway


ADDITIONAL ENTRYWAY VIEWS

And now for a few more views of the entryway. First, a view from above – one that nobody will ever experience in real life. It shows the overall space well.

front entryway floor plan layout


A view from the kitchen (standing near the stove) looking toward the entry. You can see the kitchen design in this post. The space between is the dining room, of which I am still working on designing. The only thing I know for sure is that I want to include some sort of antique hutch on the long wall.

view of front entryway from the kitchen


Another room that is still a blank slate is the living room. Besides knowing that I want to include a large sectional sofa for our large family, there are still a lot of decisions to be made here. This is a view of the entryway as seen from the living room. Again, that large open space will eventually house our dining table.

front entryway design ideas. open concept floorplan layout

I am really loving how the main level is laid out. The flow seems like it will work well for our family. In this image you can see the stairs leading to the bedrooms (up) and the family room (down). That blank spot at the landing is where the largest window of the house will be positioned. I’m excited to see the design of the stairs come together.

Maybe I will work on that next!

UPDATE: Our floorplans changed quite a bit since this was originally posted. You can see our revised design HERE.


PIN THESE ENTRYWAY DESIGN IDEAS

feeling inspired? Be sure to save this post for later!

front entryway design ideas. small space design solutions for your home. How to create a simple, small entryway design for your home

SATURDAY SKETCHBOOK: THE KITCHEN

With all of the posts lately regarding food, I have been dreaming of a bright beautiful kitchen to cook in!  So today I sat down and sketched out some ideas.  They are by no means refined, but hopefully they can help you all visualize what we are planning.

First, a quick floor plan.  As discussed in THIS post,  the kitchen is located in a very convenient spot on the main level.  It has direct access to the dining room and is just a short walk from the mudroom which will connect to an attached garage.  It also is within view from the front entry – which means I will need to be extra diligent about making sure it stays clean!  And in order to keep it clean and organized, the layout and function of the kitchen itself will need to be spot on.

Here is what we have so far

From the front entry you would be looking into the kitchen from the bottom of this floor plan sketch, and would see the three large windows above the sink as a focal point.  That sink is something that we are all SUPER excited about – a cast iron original farmhouse sink that was taken out of the farmhouse we are currently living in years and years ago, salvaged from the woods by us, and stored in Craig’s parents shed.  It is a ‘one basin’ design with a built in dish drain, and refinished it will look SO great!

The three main stations (oven, fridge, and sink) are arranged in a triangular fashion – a technique referred to as the ‘work triangle’.  I can imagine that corner of the island that falls within the triangle will be a great drop zone to bridge the gap between the three zones.  I am playing around with the idea of using a microwave drawer on that end of the island as well, but haven’t fully decided on that.

Near the fridge I am planning an entire row of pantry cabinets, with the upper cabinets stretching all the way to the counter.  I want to keep the look really clean, and was thinking that the large doors could be telescoping (slide in and out of the way) to reveal a spot for a coffee machine and toaster.

On the other main wall will be the range/oven station.  Again, I am playing around with the idea of bringing the cabinets straight down tot he counter to keep things clean.  The left cabinet I can imagine housing spices and cooking oils, and the right cabinet might be the perfect spot for the dishes to be stored.

In the middle of all the action will sit the crowning jewel of the kitchen, the island.  It may have a different finish than the rest of the cabinets and perhaps a butcher block island.  I haven’t thought through all of the details yet, but I do know that at 3’0″ wide x 7’0″ long it will be large enough for all five kids to sit at!

Just for fun, I made another sketch of the kitchen – kind of looking at it from above.  I think it shows the layout pretty well.

If you want a better idea of what types of colors and finishes (and organization tips) we are considering utilizing in our kitchen, go check out the Pinterest board HERE!


COTTAGE ROOM DESCRIPTIONS {LOWER LEVEL}

It’s time to describe the final level of our future cottage/home!  If you missed the other levels, go ahead and click the links below to get caught up.

MAIN LEVEL

UPPER LEVEL

As I mentioned in THIS post, our building site is quite sloped.  Therefore, it was the perfect candidate for a walkout basement.  We are super thrilled about that prospect!  Not only will we have great connection to the outdoors, we will also have a basement with decent lighting – which is the stuff dreams are made of.  I’m pretty sure that natural daylight is one of my love languages.

Below is the layout of the lower level.  Use it as a guide while you read through the descriptions, and take a look at our Pinterest boards (which are linked at the end of each room description).  They show some inspiration images we have found for each space.  And here comes the disclaimer…* As mentioned before, these floor plans are currently not showing any real detail – I will be working on adding detail for future posts.

Generally speaking, the lower level is laid out in a fairly straightforward way.  The bathroom is stacked under the main level bathroom, with the mechanical space nearby – to cut down on plumbing costs.  All of the rooms situated on this level, besides the mechanical room of course, are ‘extras’ – meaning that they are not as important for the day to day function of our family.  If money runs short while we are building the house, they can be left unfinished and DIY’d or hired out at a later date.

{ELEVATOR / LIFT} Let’s get straight to the obvious. This is not a typical feature in most houses, but we felt that it was an important addition for our family.  First off, we want to be able to live in this home for as long as we can – and there is always the potential that stairs may become difficult or even impossible at some point.  Secondly, our oldest daughter {K} has arthrogryposis and even now stairs give her some troubles – we want to make sure that the entire house is comfortable and useful for her.  We have dreams that she will one day live independently, but if that is not possible, the lower level can become her apartment. Lastly, if in the future either of our set of parents live with us, we want to provide accessibility for them. Essentially, the elevator/lift will allow us to plan for multiple scenarios – and ensures that all the awesome features of the lower level are not limited to only some inhabitants and visitors.

{BATHROOM} Probably the best feature of this room is it’s location.  Located near the stairs and the lift space, it will definitely be a go-to room when the main level bathroom is occupied.  It also is across from the pool room.  Handy. This will be the largest of the three bathrooms in the house, and will feature both a tiled shower and a separate jetted soaking tub. (PINTEREST)

{POOL ROOM} We aren’t talking about a room that houses a pool table.  No, this room will feature a pool pool, the kind you swim in. Something from Endless Pools perhaps – where the water jet provides a current to swim against. It is the one surprise luxury that we are having in our house, and it’s a useful one. Our daughter {K} will be able to do her pool physical therapy at home and the rest of our family will be able to get some good exercise as well.  There will be plenty of natural light coming in through large windows and a glass door that leads out to a lower level patio. (PINTEREST)

{MECHANICAL / LAUNDRY} This space is definitely still in the idea phase.  Essentially, right now it is just a large open space where all of the mechanical equipment will be housed.  It is also where the washer & dryer will be located. When I was first designing the house, the laundry was for SURE going to be located on the main level.  But, because we decided on a smaller footprint, some concessions had to be made.  Essentially we took the space that could have been used for the laundry equipment on the main level and replaced it with the lift/elevator space.  Don’t worry though, I have a back up plan if it gets to annoying to haul laundry up and down the stairs or if we need a second set of appliances.  There is a large ‘broom closet’ on the main level that will be fitted with water hookups, just in case a stack-able washer/dryer is it’s final destiny. (PINTEREST)

{DEN / GUEST} Craig has been dreaming of this space for such a long time.  On a day to day basis it will be used as his ‘man land’ – a place to watch a football game in private, read a book, or work on some computer programming in peace & quiet.  I imagine the vibe in here to be pretty laid back and cozy.  The room will have a couple of small closets and a pull out couch to accommodate guests.  (PINTEREST)

{HALL} Rule number one of small house design is to eliminate hallways – and such, this ‘hall’ is more than just a walking space.  It is essentially a connecting room.  It will house some pretty important features.  On the wall that connects to the pool room, we will design some nice computer/ homework niches for the kids.  There will be high windows in this location, to allow the natural daylight from the pool area to spill in.  A kitchenette will be placed on the opposite wall.  Again, planning for all sorts of situations, the kitchenette will have a fridge, small sink, microwave and possibly a small cook top.  Day to day it will be a place the kids and their friends can go for snacks. The hall space inspiration images are included in the family room Pinterest board, linked below.

{FAMILY ROOM} We are imagining this room as a great space for our family to kick back and hang out together.  I envision lots of comfy seating and a large TV for family movie nights.  In one corner I would love to have a table that can be used for arts & crafts projects, and also as a place to gather and play games.  There is a set of multi-pane glass french doors in our current farmhouse that we are hoping to remove and install in the cottage.  As of right now, we imagine the family room being the perfect spot for the doors.  When closed, they would create a nice separate room that could double as a guest space when we have visitors.  The family room will also have great access to the outdoor patio space through a set of sliding glass doors.  (PINTEREST)

{PATIO} This will be located, as I mentioned, right off of the family room and the pool room.  If you look at the above graphic, it will fit in the little ‘L’ shape adjoining the two. As of right now, I don’t have a separate Pinterest board for this space alone, but thought I could share the outdoor board which has a few photos of what I am imagining. (PINTEREST)

And there you have it!  The entire house layout / floor plans!  My next step will be to take you inside each room and add details, colors, and even furniture.  I’m hoping to have the computer video recorder up and working next week to share a video.  Now… which shall I detail  first?!


COTTAGE ROOM DESCRIPTIONS {UPPER LEVEL}

As promised, I’m back today to describe the upper level rooms.  If you missed part 1 of the series, the main level, you can find it HERE.

Generally speaking, the second level is made up of only 3 main spaces + a hall to connect them:  the boys room, the girls room, and the kid bathroom.  We debated having a second level at all, but in the end decided that we would rather have a smaller house footprint, which will allow us to use and enjoy more of the land, than to have all rooms on one level with a larger footprint.  That meant we were going to be building a muli-level house.

Below is the layout of the upper level.  Use it as a guide while you read through the descriptions, and take a look at our Pinterest boards (which are linked at the end of each room description).  They show some inspiration images I have found for each space.  * As mentioned before, these floor plans are currently not showing any real detail – will be working on adding detail for future posts.

{STAIRS/HALL} Because the upper level is going to be fairly small, we wanted to provide a bit of ‘unexpected’ space.  Therefore, the hallway will be fairly large and will feature a small nook for a desk or a chair. The hall will serve as access to each of the rooms, circulation space really, but we want to make sure it also feels like a place where a person or two can stay a while.  The stair landing will provide a ton of natural light with a large window facing west. Depending on space, we may try to incorporate some bookcases and/or a window bench there as well. (PINTEREST)

{BATHROOM} We went through SO many different ideas for the upstairs bathroom situation.  Two smaller bathrooms, one for the boys and one for the girls, accessed only through the bedrooms to make them more private. A Jack and Jill scenario where they can share through doors entering each of the bedrooms.  No bathroom upstairs. Ultimately, we decided that because we have children of both gender, we wanted the bathroom to be accessed by a single door for privacy purposes and accessed through the hall space so that it was available to everyone (including people visiting when the main level bathroom is occupied). This room will have some varied ceiling heights due to the slope of the roof-line, but generally speaking no portion of the room should have head height less than 5′.  The shower will tuck in under the portion of the roof that provides cover for the main level living room (there is no second level above that room).  Looks wise we want the bathroom to be classy, yet kid friendly for now.  Those kids are eventually going to be grown ups who visit with their own families, and we want to make sure that the bathroom is accommodating for all types of scenarios. (PINTEREST)

{GIRLS BEDROOM} This is a room that I have had in my mind for years and years, long before {M} ever joined our family.  I had a vision of two matching beds flanking a single window, with a night stand in between.  I’m not sure that exact furniture arrangement will be what we go with – but the room is set up in such a way that it is a possibility. The decor will be light, bright and airy – with a vaulted ceiling – and there will be two closets under the roof eaves (with sloping ceilings as well) – one on each side of the room.  We may turn one of them into a little hideaway space for the girls to play in. (PINTEREST)

{BOYS BEDROOM} We also debated back and forth about this room.  A LOT.  We were initially thinking that we would have 3 bedrooms on this level, with the smallest going to the oldest child living at home; But carving space for 3 bedrooms meant that each bedroom was really quite small, and maybe not as functional as we would like.  Taking some cues from {D}’s small bedroom that he occupies right now at the farmhouse, we realized that a small space for sleeping is actually quite cozy and serves as a nice private getaway.  He loves it.  Therefore, we decided that we would have one large bedroom for all three of the boys, with a shared common space to include the closet, dressers, books, toys, chairs for reading, music, etc – and three smaller sleeping nooks that surround it.  They are not labeled on the image above, because we have not yet decided who will get which nook.  I’m really looking forward to designing these little sleeping spaces, and I know each boy is excited to make it his own. Oh, and did i mention that this room will have vaulted ceilings as well and there is potential for a small loft/ fort space for the shared part of the bedroom? Yeah. (PINTEREST)

There you have it – the basic Upper Level floor plan.  I’ll be back next week to describe the final layout of the home, the lower level!

In the meantime, check out ALL of Arrow Hill Cottage’s Pins!


COTTAGE ROOM DESCRIPTIONS {MAIN LEVEL}

It seems that this blog has been taking on a bit of a mixture – some family, some DIY, and probably not enough of the future cottage!  I thought it would be helpful to explain a little more about each level of the cottage and how the rooms are positioned + why we decided to have certain features (such as a pool!).  My fantastic IT team (aka: Craig, my husband) is working on getting me some software that will allow real-time video recording while I design with my computer programs.  That’s going to be really fun to work with in the future, but it isn’t quite ready  yet – so for now I will give you the text + graphics version.

I’m going to start out the series today with the Main Level of the cottage (*Keep in mind that for now these are shown as just basic spaces without detail/colors added… in fact, no windows are being shown yet either.  The details will come, I promise!) Use the image below as a guide as you read through the descriptions, and take a look at our Pinterest boards (which are linked at the end of each room description).  They show some inspiration images I have found for each space.

{FRONT PORCH}  (This is likely to be one of my favorite spaces).  My vision for the porch is complete serenity – a place to sit and read, listen to nature.  I also want it to have a fun vibe – with pops of color.  It will be the main point of entry for guests, and probably at times for our family as well.  (PINTEREST)

{ENTRY}  Entering through the front door, to the left is a space for a small bench and some coat hooks overhead.  I’m thinking of incorporating some special artwork, maybe some family photos.  I would love for this space to be a glimpse of the life of our family.  The piano will probably also be in this space, along the other wall. (PINTEREST)

{DINING ROOM} I am dreaming of some partial height walls between the Entry and Dining spaces, perhaps built in cabinets for books or special collections.  Our table will need to be large, obviously, maybe a rectangular farmhouse style?  I definitely want to find a cute antique hutch to place along the wall.  Filling it with amazing glassware would make me SO happy!  (PINTEREST)

{LIVING ROOM} As mentioned in this post, the living room will be the place of gathering in our home.  It will be given the most detail attention for sure.  There will be vaulted ceilings, a fireplace, and TONS of windows.  The windows facing the backyard/ wooded area will be accented by a lovely window bench, something I have been dreaming of for years.  The window bench will be made of two slip covered twin sized mattresses (maybe tufted?!) and will serve as extra sleeping space for guests (and also probably naps for us! yay naps!) (PINTEREST)

{KITCHEN} Open to the dining room and right around the corner from the mudroom, the Kitchen is in a prime location.  Right now I envision it as an all white/ mostly white space, with maybe a colored tile back splash.  It will have a large center island – eeeee!!! – and a entire wall of pantry cabinets.  I have been finding all sorts of fun storage ideas on (PINTEREST)

{GARAGE} This will be the very first attached garage that our family has ever experienced.  I personally have seen so many examples where the garage overtakes the look of the house, and when planning began I was thinking that the cottage would surely have a detached garage.  However, soon after bringing {K} home, we realized that it made the most sense for her sake that the garage have direct access to the home.  And so, with a little more designing, I was able to come up with a solution that kept the garage somewhat ‘hidden’ from view – though it will cause more expense for a longer driveway.  Worth it I think! (PINTEREST)

{MUDROOM} Since our marriage 15 years ago, Craig and I have lived in three different houses and not one of them has had a proper mudroom.  This space is more important than ever now that we have a large family.  As described in this post, I dream of a well organized space with lots of storage and functionality. (PINTEREST)

{MAIN BATHROOM} I am probably way more excited about the location of this bathroom than I should be.  The thought that we will be able to just walk in from outdoors and use the bathroom or wash our hands without having to track through the entire house just makes me giddy!  It will be a 3 piece (toilet, sink(s), shower) bathroom and will also serve as the bathroom for the main floor bedroom. (PINTEREST)

{MAIN BEDROOM} We hesitate to call this the ‘master’ bedroom because that label evokes the idea of a very large space with an attached walk in closet and bathroom.  It will be our bedroom, but won’t have all the bells and whistles that are considered the standard these days.  We decided to make this room a little smaller so that more square footage could be devoted to the common living spaces (kitchen, dining, living room).  Despite it’s small size though, it will still have plenty of style.  See our inspiration for this space by clicking on the link! (PINTEREST)

That’s it!  7 rooms + the garage and front porch.  Simple!  I’ll be back next week to describe the second level!

In the meantime, check out ALL of Arrow Hill Cottage’s Pins!