SATURDAY SKETCHBOOK: BOYS BEDROOM

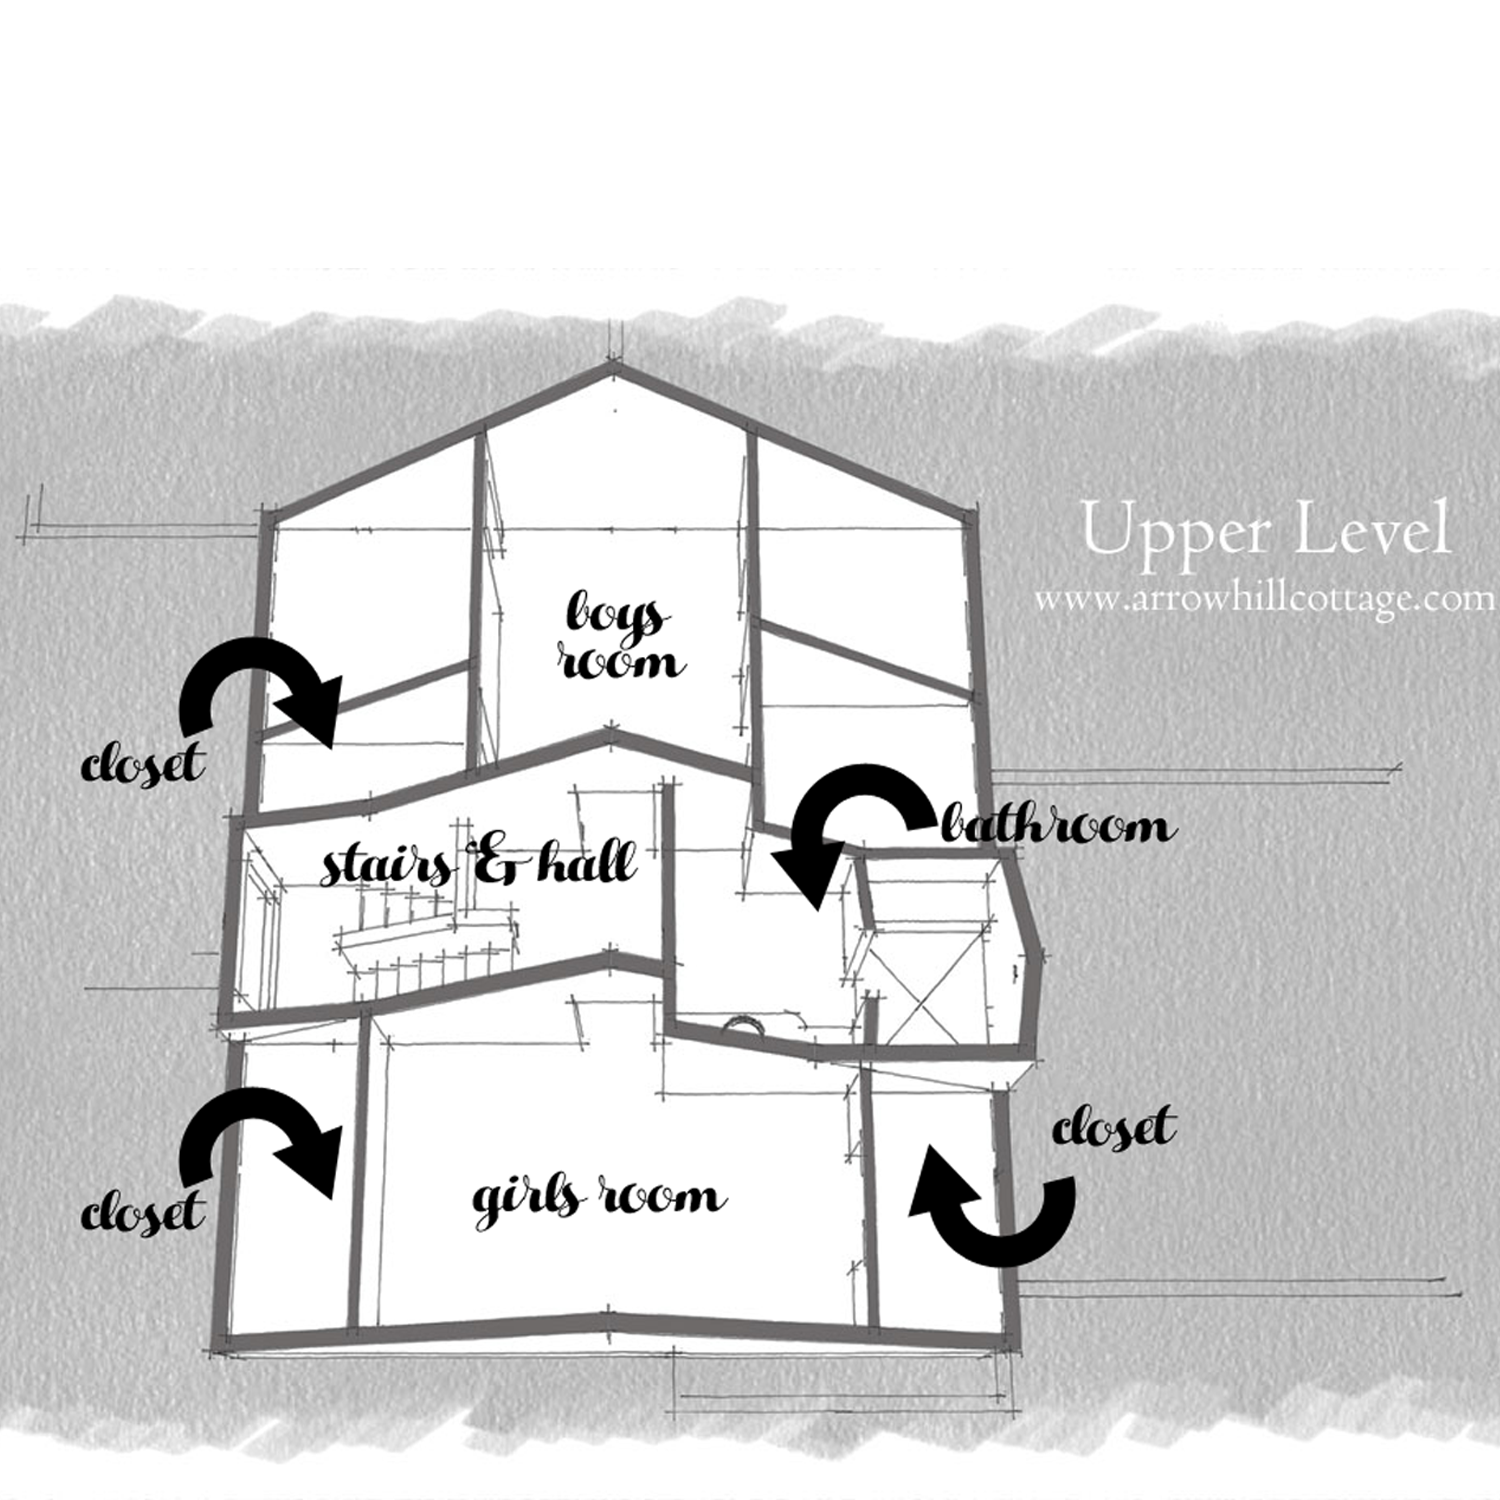
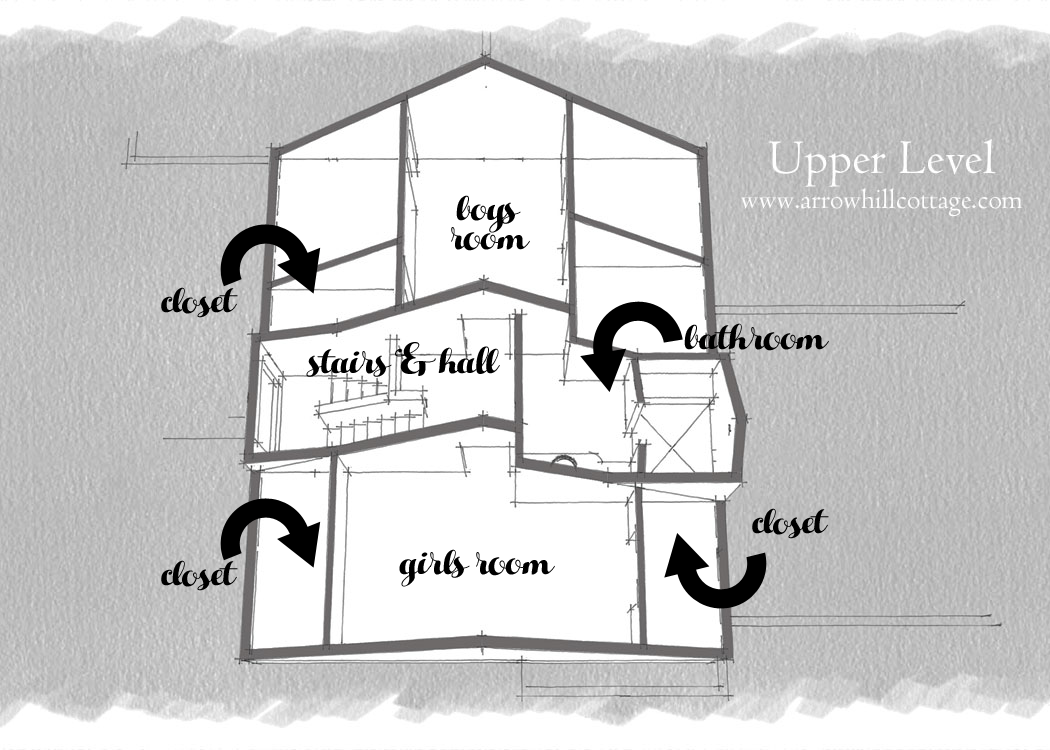
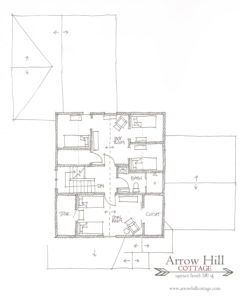
Recently, I posted about {D}’s small BEDROOM.  I also mentioned in THIS post that we will be utilizing some of these same concepts in our new house.  All three of our boys will share a room, but each will have a smaller private sleeping nook off of the larger shared ‘communal’ portion.

I wanted to jump in today with a quick sketch of how this space looks in my head at the moment.  It might be easier for some of you to visualize 3D drawings than floor plans.

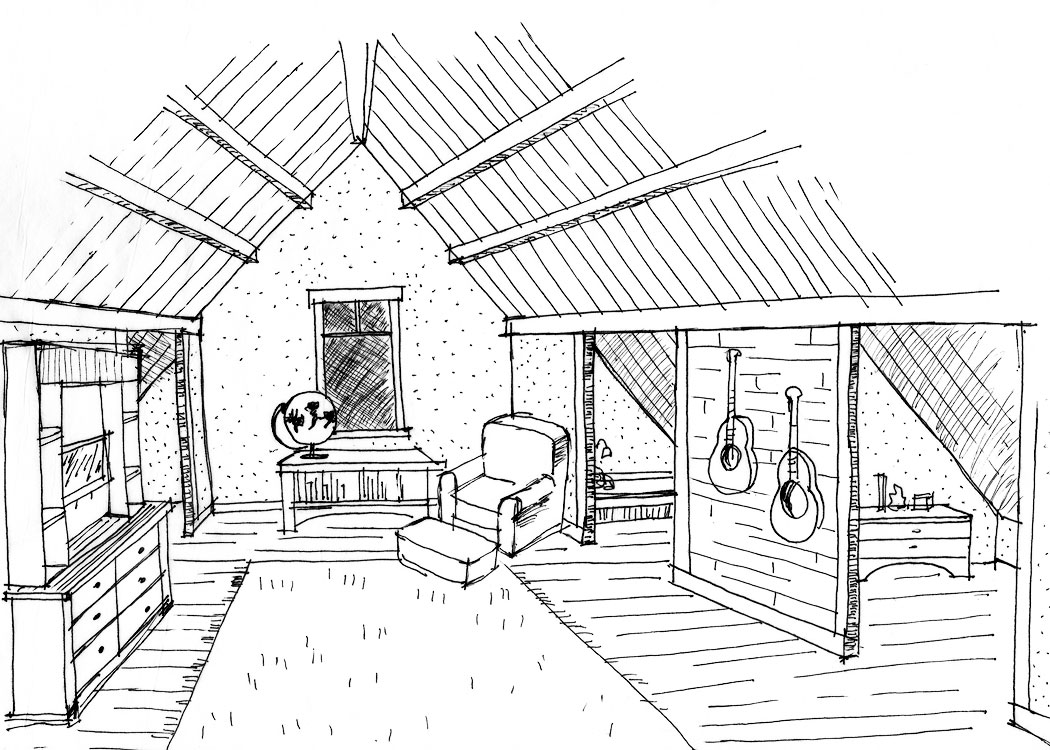
You can see from this sketch that the shared space is a good size.  It is roughly 9’6″ x 12’0″and should provide plenty of space for the boys to enjoy the things that they love to do.  A corner chair and low bookcase for reading.  A pallet accent wall to house guitars when they aren’t being used (So far, two of our boys are taking guitar lessons.  You can see a recent video of {D} practicing HERE).  There is enough room in the shared area for a large dresser with a hutch, which could house clothing & toys.  Pretty sure there will be a TV in there somewhere too… they like to spend time together playing the PlayStation on occasion.

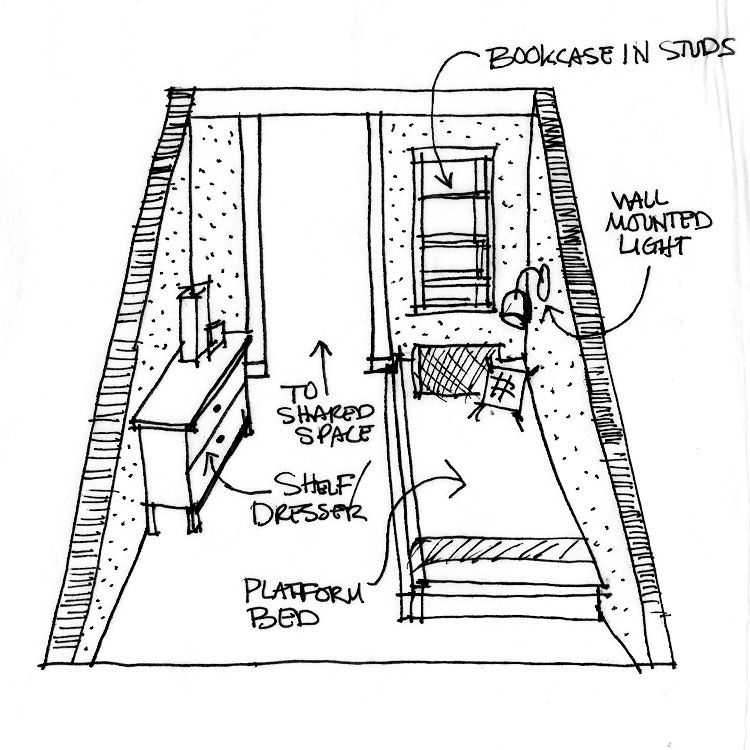
See those three little doorway openings on the outer walls of the room?  They lead into the sleeping nooks.  One for each boy.  They are each around 7’0″ x 8’6″ – with sloping ceilings that go from about 7′ high at the highest point down to the floor at it’s lowest – so, not huge at all.  But they should get the job done nicely.  Their beds will be on low platforms with the ‘head’ of the beds toward the higher sloping portion of the ceiling.  If I can figure out a way to create some sliding trundle drawers under the bed frame, that will be great.

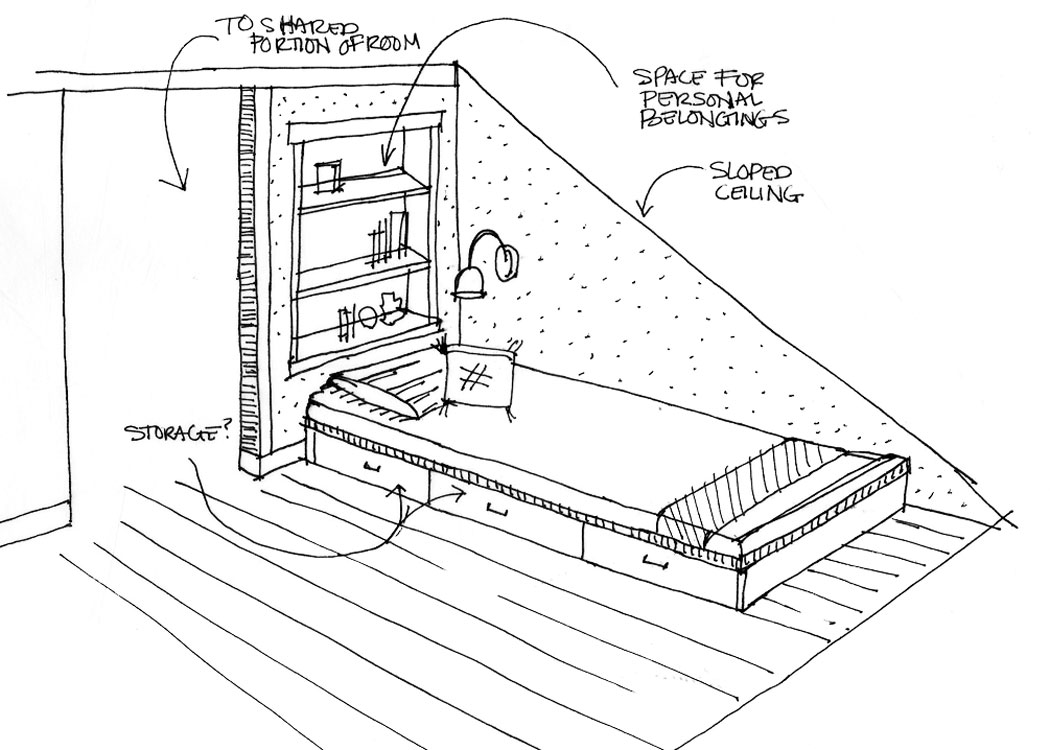
Each nook will have shelves built into the studs of the wall and a mounted/ hard wired light for reading.  On the opposite wall from the bed, there is space for a small dresser or shelf to house some personal belongings.  The wood floors from the main part of the bedroom will flow into the sleeping nooks, to keep things somewhat consistent – but each boy will be allowed to personalize their space with bedding, rugs, posters, and their collections.

The boys will likely be ages 12, 10 and 8 when we move into the cottage – and just about at that age when they will begin to crave more privacy.  We are hopeful that this solution will give them the best of both worlds – sharing a room with each other, as they have always done, and maintaining some separation.  They were crowded around my shoulder today as I drew these sketches and as of right now they have given me the stamp of approval on this concept.  Here’s hoping they don’t change their minds in the next couple of years!

Happy Saturday everyone!

COTTAGE ROOM DESCRIPTIONS {UPPER LEVEL}

As promised, I’m back today to describe the upper level rooms.  If you missed part 1 of the series, the main level, you can find it HERE.

Generally speaking, the second level is made up of only 3 main spaces + a hall to connect them:  the boys room, the girls room, and the kid bathroom.  We debated having a second level at all, but in the end decided that we would rather have a smaller house footprint, which will allow us to use and enjoy more of the land, than to have all rooms on one level with a larger footprint.  That meant we were going to be building a muli-level house.

Below is the layout of the upper level.  Use it as a guide while you read through the descriptions, and take a look at our Pinterest boards (which are linked at the end of each room description).  They show some inspiration images I have found for each space.  * As mentioned before, these floor plans are currently not showing any real detail – will be working on adding detail for future posts.

{STAIRS/HALL} Because the upper level is going to be fairly small, we wanted to provide a bit of ‘unexpected’ space.  Therefore, the hallway will be fairly large and will feature a small nook for a desk or a chair. The hall will serve as access to each of the rooms, circulation space really, but we want to make sure it also feels like a place where a person or two can stay a while.  The stair landing will provide a ton of natural light with a large window facing west. Depending on space, we may try to incorporate some bookcases and/or a window bench there as well. (PINTEREST)

{BATHROOM} We went through SO many different ideas for the upstairs bathroom situation.  Two smaller bathrooms, one for the boys and one for the girls, accessed only through the bedrooms to make them more private. A Jack and Jill scenario where they can share through doors entering each of the bedrooms.  No bathroom upstairs. Ultimately, we decided that because we have children of both gender, we wanted the bathroom to be accessed by a single door for privacy purposes and accessed through the hall space so that it was available to everyone (including people visiting when the main level bathroom is occupied). This room will have some varied ceiling heights due to the slope of the roof-line, but generally speaking no portion of the room should have head height less than 5′.  The shower will tuck in under the portion of the roof that provides cover for the main level living room (there is no second level above that room).  Looks wise we want the bathroom to be classy, yet kid friendly for now.  Those kids are eventually going to be grown ups who visit with their own families, and we want to make sure that the bathroom is accommodating for all types of scenarios. (PINTEREST)

{GIRLS BEDROOM} This is a room that I have had in my mind for years and years, long before {M} ever joined our family.  I had a vision of two matching beds flanking a single window, with a night stand in between.  I’m not sure that exact furniture arrangement will be what we go with – but the room is set up in such a way that it is a possibility. The decor will be light, bright and airy – with a vaulted ceiling – and there will be two closets under the roof eaves (with sloping ceilings as well) – one on each side of the room.  We may turn one of them into a little hideaway space for the girls to play in. (PINTEREST)

{BOYS BEDROOM} We also debated back and forth about this room.  A LOT.  We were initially thinking that we would have 3 bedrooms on this level, with the smallest going to the oldest child living at home; But carving space for 3 bedrooms meant that each bedroom was really quite small, and maybe not as functional as we would like.  Taking some cues from {D}’s small bedroom that he occupies right now at the farmhouse, we realized that a small space for sleeping is actually quite cozy and serves as a nice private getaway.  He loves it.  Therefore, we decided that we would have one large bedroom for all three of the boys, with a shared common space to include the closet, dressers, books, toys, chairs for reading, music, etc – and three smaller sleeping nooks that surround it.  They are not labeled on the image above, because we have not yet decided who will get which nook.  I’m really looking forward to designing these little sleeping spaces, and I know each boy is excited to make it his own. Oh, and did i mention that this room will have vaulted ceilings as well and there is potential for a small loft/ fort space for the shared part of the bedroom? Yeah. (PINTEREST)

There you have it – the basic Upper Level floor plan.  I’ll be back next week to describe the final layout of the home, the lower level!

In the meantime, check out ALL of Arrow Hill Cottage’s Pins!


SATURDAY SKETCHBOOK: PRELIMINARY DESIGN

If at first you don’t succeed – try and try again.  That’s the mantra anyway.

In architecture we call this stage ‘Preliminary Design’.  We know that it might not be quite right, just yet; But eventually the pieces will all come together.

If any of you reading this blog have mistakenly thought that we came up with the design for our future cottage overnight, let me put your minds at ease.  It’s been a labor of love for years.  YEARS!  Let today’s sketchbook installation serve as proof.  This sketch was done almost 10 years ago to the day!

I have an entire folder full of proof, in fact.  Sketches done on little scraps of paper.  In pencil and in ink.  Sketches of floor plan ideas and exterior details.  Sketch upon sketch upon sketch. And although I am not a fan of clutter, I don’t think I will ever have the heart to throw them.  They are a sacred collection.

Though they informed the design choices that eventually led us to that perfect layout we were looking for, each sketch has merit of it’s own.  And someday I would love to revisit each idea and come up with a set of simple plan books based on them.

Someday

COTTAGE ROOM DESCRIPTIONS {MAIN LEVEL}

It seems that this blog has been taking on a bit of a mixture – some family, some DIY, and probably not enough of the future cottage!  I thought it would be helpful to explain a little more about each level of the cottage and how the rooms are positioned + why we decided to have certain features (such as a pool!).  My fantastic IT team (aka: Craig, my husband) is working on getting me some software that will allow real-time video recording while I design with my computer programs.  That’s going to be really fun to work with in the future, but it isn’t quite ready  yet – so for now I will give you the text + graphics version.

I’m going to start out the series today with the Main Level of the cottage (*Keep in mind that for now these are shown as just basic spaces without detail/colors added… in fact, no windows are being shown yet either.  The details will come, I promise!) Use the image below as a guide as you read through the descriptions, and take a look at our Pinterest boards (which are linked at the end of each room description).  They show some inspiration images I have found for each space.

{FRONT PORCH}  (This is likely to be one of my favorite spaces).  My vision for the porch is complete serenity – a place to sit and read, listen to nature.  I also want it to have a fun vibe – with pops of color.  It will be the main point of entry for guests, and probably at times for our family as well.  (PINTEREST)

{ENTRY}  Entering through the front door, to the left is a space for a small bench and some coat hooks overhead.  I’m thinking of incorporating some special artwork, maybe some family photos.  I would love for this space to be a glimpse of the life of our family.  The piano will probably also be in this space, along the other wall. (PINTEREST)

{DINING ROOM} I am dreaming of some partial height walls between the Entry and Dining spaces, perhaps built in cabinets for books or special collections.  Our table will need to be large, obviously, maybe a rectangular farmhouse style?  I definitely want to find a cute antique hutch to place along the wall.  Filling it with amazing glassware would make me SO happy!  (PINTEREST)

{LIVING ROOM} As mentioned in this post, the living room will be the place of gathering in our home.  It will be given the most detail attention for sure.  There will be vaulted ceilings, a fireplace, and TONS of windows.  The windows facing the backyard/ wooded area will be accented by a lovely window bench, something I have been dreaming of for years.  The window bench will be made of two slip covered twin sized mattresses (maybe tufted?!) and will serve as extra sleeping space for guests (and also probably naps for us! yay naps!) (PINTEREST)

{KITCHEN} Open to the dining room and right around the corner from the mudroom, the Kitchen is in a prime location.  Right now I envision it as an all white/ mostly white space, with maybe a colored tile back splash.  It will have a large center island – eeeee!!! – and a entire wall of pantry cabinets.  I have been finding all sorts of fun storage ideas on (PINTEREST)

{GARAGE} This will be the very first attached garage that our family has ever experienced.  I personally have seen so many examples where the garage overtakes the look of the house, and when planning began I was thinking that the cottage would surely have a detached garage.  However, soon after bringing {K} home, we realized that it made the most sense for her sake that the garage have direct access to the home.  And so, with a little more designing, I was able to come up with a solution that kept the garage somewhat ‘hidden’ from view – though it will cause more expense for a longer driveway.  Worth it I think! (PINTEREST)

{MUDROOM} Since our marriage 15 years ago, Craig and I have lived in three different houses and not one of them has had a proper mudroom.  This space is more important than ever now that we have a large family.  As described in this post, I dream of a well organized space with lots of storage and functionality. (PINTEREST)

{MAIN BATHROOM} I am probably way more excited about the location of this bathroom than I should be.  The thought that we will be able to just walk in from outdoors and use the bathroom or wash our hands without having to track through the entire house just makes me giddy!  It will be a 3 piece (toilet, sink(s), shower) bathroom and will also serve as the bathroom for the main floor bedroom. (PINTEREST)

{MAIN BEDROOM} We hesitate to call this the ‘master’ bedroom because that label evokes the idea of a very large space with an attached walk in closet and bathroom.  It will be our bedroom, but won’t have all the bells and whistles that are considered the standard these days.  We decided to make this room a little smaller so that more square footage could be devoted to the common living spaces (kitchen, dining, living room).  Despite it’s small size though, it will still have plenty of style.  See our inspiration for this space by clicking on the link! (PINTEREST)

That’s it!  7 rooms + the garage and front porch.  Simple!  I’ll be back next week to describe the second level!

In the meantime, check out ALL of Arrow Hill Cottage’s Pins!


SATURDAY SKETCHBOOK: MUDROOM DREAMS

The last part of this week our boys have been at grandpa and grandma’s house.  It has been a yearly pilgrimage and something the boys really look forward to.  I also anticipate the stay, and use it as the prime opportunity to go through clutter, toss out/donate unnecessary items and just get more organized all around.  I tackled many spots around the house over the last few days, and will share some of the big transformations in future posts.

Today though, I wanted to give a little glimpse into our farmhouse mudroom.  It is quite literally just that – a room of mud.  There were mud hand prints on the walls, I kid you not! I have put off doing any sort of organizing in this space for a long time with the excuse ‘It’s just going to get messed up right away – what’s the point?’  But alas, it had to be dealt with.  It’s not perfect, it’s not pretty, but it is about 85% more functional than it was before – a place for everything.  I tidied up, stood back and admired my work, then promptly took this photo as proof that for one moment of time it was, in fact, clean.

For the cottage I envision a super functional mud room where everything has it’s place.  It will be the first time in our adult lives that we have EVER had an attached garage, which will be monumental.  I fought that decision (more on that later), but now realize that an attached garage is for the greater good.  A hallmark of a well organized mudroom is it’s connection to other spaces.  Ours will have connection directly to the garage, of course, plus direct access to the kitchen and the main level bath – both rooms that are most likely to be needed when coming in from the great outdoors.

Other key features of the mudroom include a command center – complete with charging station, a bench for removing shoes, a broom closet, a small seasonal closet, and my all time favorite – a series of five cubbies/ lockers – one for each child.  I daydreamed about them in more detail today as part of the Saturday Sketchbook installation.  Hope you enjoy the doodles!

SATURDAY SKETCHBOOK: CHALK ART

Today’s installation of Saturday Sketchbook is a perfect example of how this busy mom gets in some relaxing art time while hanging out with her kids.

It was a cloudy and cold afternoon yesterday and the kids were all outside coloring on the driveway.  It seemed a good opportunity to do some sketching myself and I was about to head outside with my sketchbook in hand.  Then I thought ‘why not sketch with chalk?’  So I sat down beside my 5 little munchkins and set to work.  As I continued on, they began throwing out some outrageous complements such as “That is the coolest thing I have ever seen!” and “You could sell that drawing for ten thousand dollars!”  They asked questions like “How did you learn to do that?” and “Can you teach me how to draw?”  I witnessed them bringing to life their own personal creations which included a large butterfly, a wagon wheel, and a robot guy.  And, most of all, we were able to spend time together.

The sketch isn’t nearly as important in comparison – but here it is anyway…. daydreaming of our future front porch.  I can about imagine sitting on that porch swing reading a book and grabbing a cold lemonade from the yellow side table – maybe doing some sketching there someday as well.

And my all time favorite photo of the sketch – surrounded by all the doodles from the kids.  Love!

SATURDAY SKETCHBOOK: THE PLANS

I would like to formally introduce you to a new weekly blog feature that I am calling ‘Saturday Sketchbook.  You can look forward to weekly sketches of what is currently on my mind.  It will vary from a new art piece, a quote that has grabbed my attention, and possibly most of all – house design snippets.

Today my sketchbook is showcasing the floor plans of the cottage.  These plans are literally the investment of years of designing.  In many ways, I believe laying out the plans is one of my most favorite aspects of designing.  I see it as a puzzle of sorts – the pieces eventually are combined in the right way and everything just fits.

If anyone is wondering ‘How can she continue this blog for another 2 years if she already is finished designing the house?’ Let me tell you, this is far from over!  Though the plans are mostly set and the exterior has a basic framework, there are so many more details that need to be worked out!  Built-in/cabinet design, wall colors choices, appliance selection, well…you get the idea!  It is going to be so much fun to see these plain white plans and exterior images come to life!

I will explain more about our plan choices in future posts.  Some of you may be thinking ‘She forgot to add a master bath!’ or ‘What?!  a pool in the basement?’  – I’ll explain, I promise.

And remember, as details are added, I will be updating the galleries on the Cottage Design page – be sure to be checking there often!


ABOUT ARROW HILL

My dream of designing and building a home for my future family goes back as long as I can remember. As a young girl I would approach my two sisters as ‘clients’ and ask them questions such as “How many bedrooms would you like?” and  “Are you thinking a hot tub would be nice in your bathroom?” With their criteria in mind, I would then use my favorite 1980’s toy – pipeworks – to build them a house/fort.

Near the beginning of architecture school I was taught that one of the most important aspects of a building design is choosing the site it will sit upon.  To achieve a harmonious design, the site and building must evolve in unison.  Sadly, site selection is greatly overlooked in today’s home building market.  It is not uncommon to see neighborhoods of ‘cookie cutter’ houses – identical buildings lining the streets, with each lot being modified to accommodate the building and not the other way around.

Craig and I were married after my third year of architecture school, and I have to admit that I daydreamed much more about future house ideas than I did about that perfect wedding. Being college students though, we were in no way ready to choose a site.  We weren’t even sure what city our future jobs would land us in.  We needed to be patient.  Eventually we graduated and purchased a small 1900’s farmhouse about 30 miles from Craig’s home town – where we both had secured employment.   We lived there for only one year before realizing that the commute was not for us.  We transitioned to a historic neighborhood in our city of employment, where we purchased our 1904 Foursquare.  It was there we became parents and began growing our family.  After our second son was born our thoughts once again turned toward site selection.

In our minds eye, our perfect site included plenty of mature trees – woods that our boys could play in.  We also knew that we did not want to build a large home and though the site didn’t have to be very large, acreage would be a bonus if we could afford it.  We scoured online listings and drove around to the prospects, creating a list of pros and cons for each.  One Fall day as we were driving, we stumbled upon a nearly hidden property.  From the street it didn’t look like much, but we decided to park and check it out anyway.  I will never forget the emotions of the moment when we stepped out of our vehicle and onto the site.  There were mature oak and maple trees as far as we could see, their dried leaves slowly falling to the ground with a breeze from the crisp air.  The land sloped fairly steeply toward a large pond.  It felt like magic.  It felt like home.

The next few days were a whirlwind of working through logistics.  Could we really afford this?  How far of a drive is this property from the fire station (per department rules, we need to live within an 8 minute drive from the station).  What were the building restrictions for the site? What were the specifics on the lot size? (we later found out that the site was larger than we first expected,  4 1/2 acres total:  2 acres of pond and 2 1/2 of land)  As it turns out, all the details fell into place.  We purchased our little slice of the universe at the very end of 2009.

These are pictures from our first family outing on the property.  You can see from these photos how much the land slopes toward the pond.

This was just one of many exciting and happy memories we hope to make there. We are looking at this as our forever home, a lifetime property where Craig and I want to grow old together.  We have told our kids that we wish to keep the house and land in our family for generations to come; and thought that naming the property would be the perfect way to add some significance and permanence.  We all sat down and brainstormed name ideas, taking cues from the land, and eventually decided on ‘Arrow Hill.’

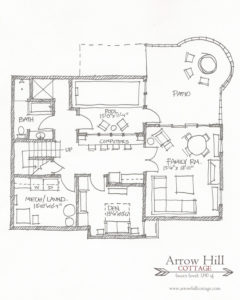
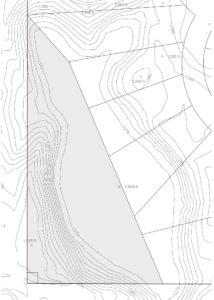
As you can see from this image, the site is a pie/ arrow shape, with the ‘point’ facing North; And, as I have already mentioned, it is mostly a hill.  If you look at the elevation markers you will see that it slopes from 1395.5 at the top/ road level down to 1370 at pond level.  That’s a 25 1/2 foot drop over approximately 104 feet, for a slope of 14 degrees (25 %)! Note: The contour lines that have dash marks indicate ‘wetlands’ /non buildable land.

One additional unique aspect of this lot is that it has many bordering neighbors:  6 across the pond, 1 to the south, and 7 to the west.  Amazingly, it still feels remarkably secluded thanks in part to the woods and the topography.

We are so happy to have found our perfect site and can’t wait to build our little cottage on it!