CELEBRATING {I} and his 9th birthday! It seems like just yesterday this little man entered our lives. He is a kind, gentle and committed friend, a brother who is always willing to lend a helping hand. He is our little inventor and has a very mechanical mind – spending large amounts of time taking things apart and putting them back together.
We love watching the story that God is writing in his life!
ENJOYING what will hopefully be the last portion of winter. We finally got a big snowfall at the end of the month. Those 11 or so inches gave us more accumulation than we have seen all winter long! The kids are now able to do a bit of sledding and snow fort building, and they are thrilled.
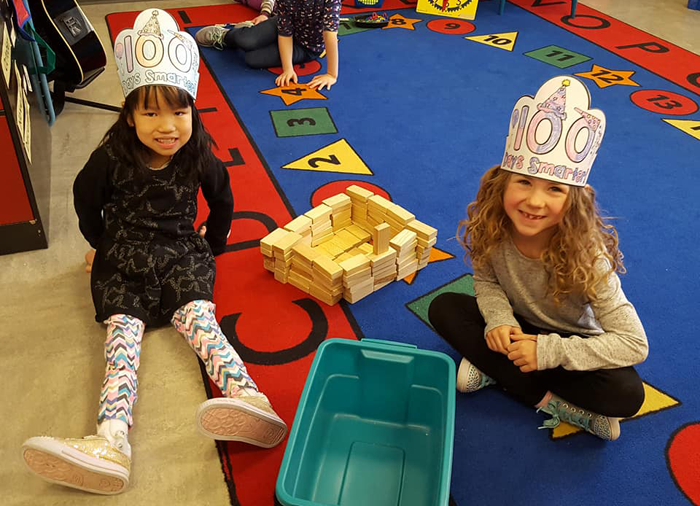
WORKING hard at school. In February, the kids celebrated their 100th day with some fun activities. They continue to bring home colorful art projects, and good grades. We have parent / teacher conferences soon and are excited to hear how they each have grown academically over the school year. It’s hard to believe that there are only about 12 weeks left until summer vacation!
FINISHING up the basketball season. It has been a lot of fun to watch {D} progress through the games. He has gone from looking confused on the court, to taking initiative and making plays. He really shines on defense and is able to out-hustle his opponents regularly. When the weather warms up this spring and summer, I am sure we will see him and his brothers honing their skills with the garage basketball hoop.
DESIGNING Arrow Hill Cottage, our future house. We made a big jump this month and began talking to a banker about loan options and visiting with a contractor about pricing. We are getting the house design buttoned up so that we can get some accurate cost estimates and see if it is at all possible to break ground this spring! We have been thinking all along that we would build the spring of 2019, so this would get us into our new house a year earlier than planned if it all works out. We are excited about that prospect, but are also willing to be patient another year if the timing (and pricing) isn’t right. You can follow along with our home design here.
This is just a glimpse at what our family has been up to. If you’d like a closer look, be sure to check out our weekly ‘mini vlogs’ on our YouTube channel ARROW HILL FAMILY. Be well everyone!
The Makeover Takeover series focuses on helping my readers with bits of their own homes that are giving them challenges. Whether it is a room that they want guidance on styling, a floor plan that needs re-configuring, or they are stumbling with choosing an exterior color palette, I am happy to help. I offer solutions through virtual design and source links.
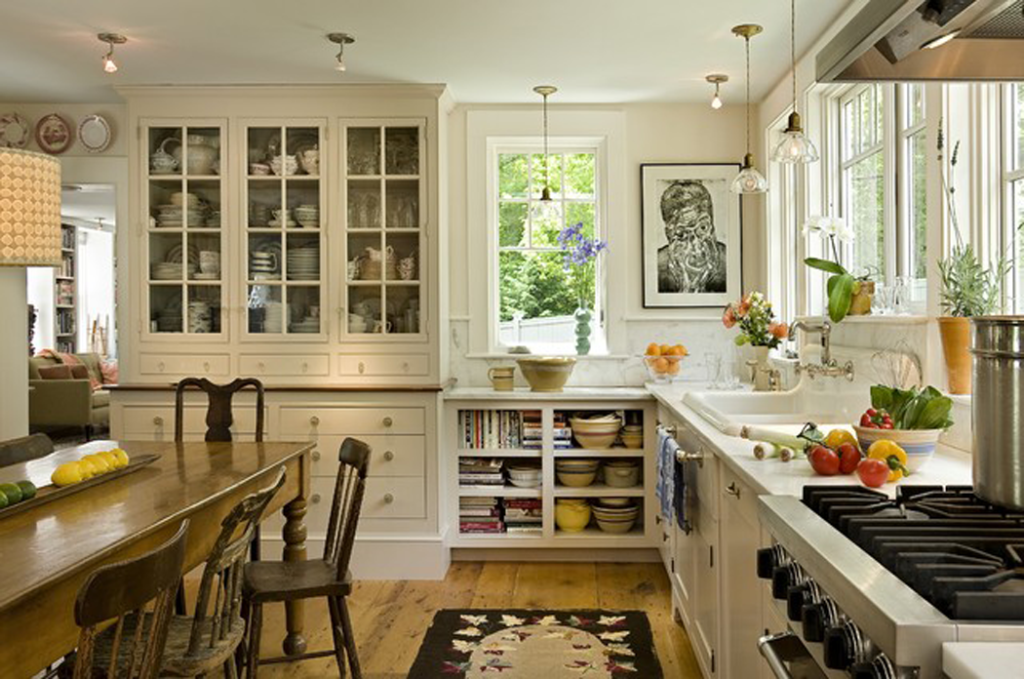
Today’s Takeover brings us to a working family ranch, one that is busy all the time. Josh and Tara built their house a couple of years ago. At that time, they made the decision to hold off on adding built in organization cabinetry for their mudroom and laundry, for budgetary reasons. Now, with two young children and a baby on the way – they are realizing that it is time to make these spaces more functional.
Because this is a newly built home, no walls will be moved, and no existing finishes changed. My plan was simply to offer organization solutions that could make these rooms efficient and ultra useful for this young family.
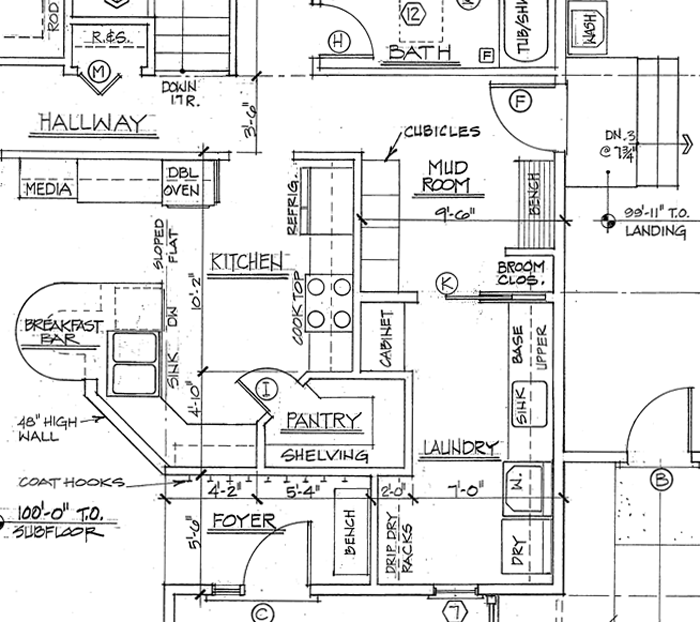
THE MUDROOM TODAY
The great news is that the space layout is wonderful and there is plenty of square footage to work with. Though the plan shows locations of cabinetry and built-ins, none of these items were built during the construction phase.
PROPOSED CHANGES
Organization, organization, organization. The space is here, but they need some family friendly techniques to make the space run efficiently. Tara mentioned that though she loves the look of white cabinetry and subway tile -they simply would not hold up at the ranch. They need durable finishes that will wear well and can be easily kept clean.
The family sees this as their forever home, and as such they asked for a timeless look – with finishes, colors, and cabinetry styles that aren’t too trendy.
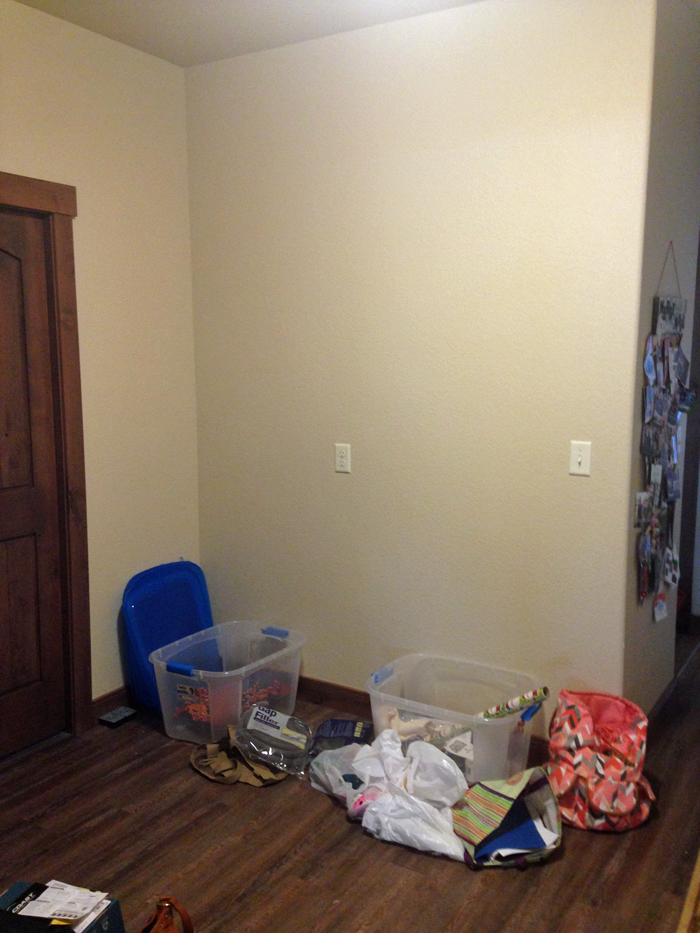
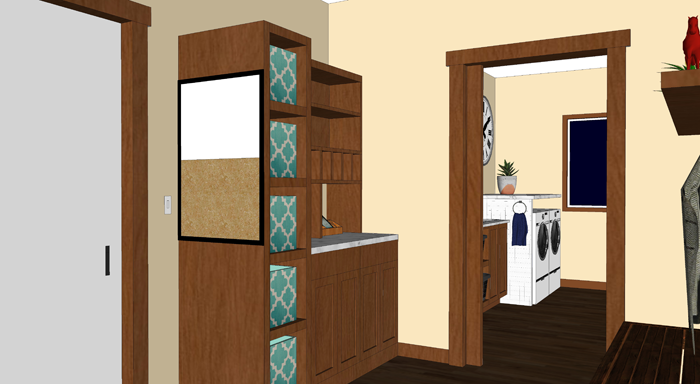
This is the view the family sees when entering their home through the garage door. Tara admits that it has become a bit of a drop zone for items that don’t have a proper storage spot. I want to make this view welcoming – one that says ‘come in and relax… you’re home’.
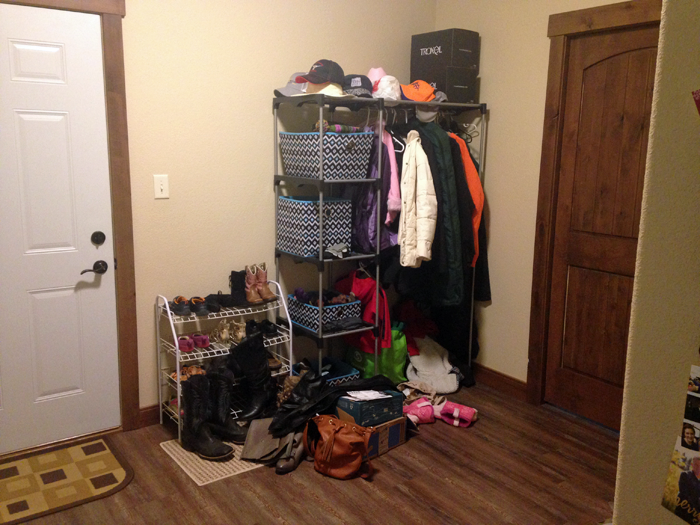
Swinging around to face the door, you can see that the family has attempted some temporary organization solutions. They prefer not to have a traditional coat closet, and instead choose to hang their coats so that they are readily available. My plan was to transform this corner into a command center of sorts. A place where all the mail can be set and sorted, where phones and devices can be charged. The pocket door in the right of this photo leads into the laundry room.
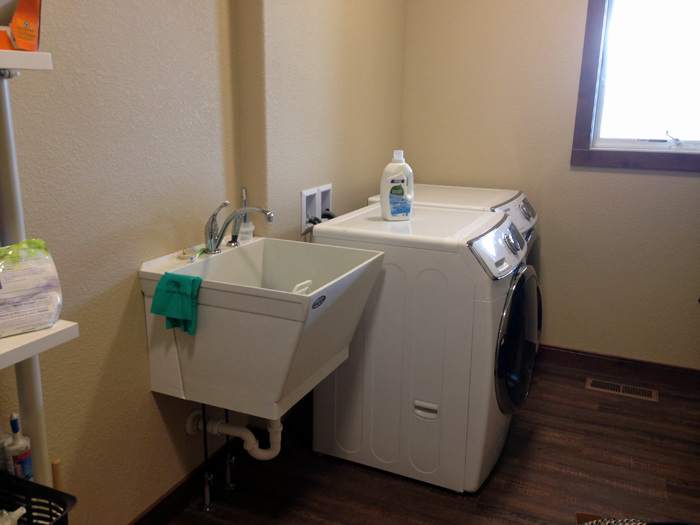
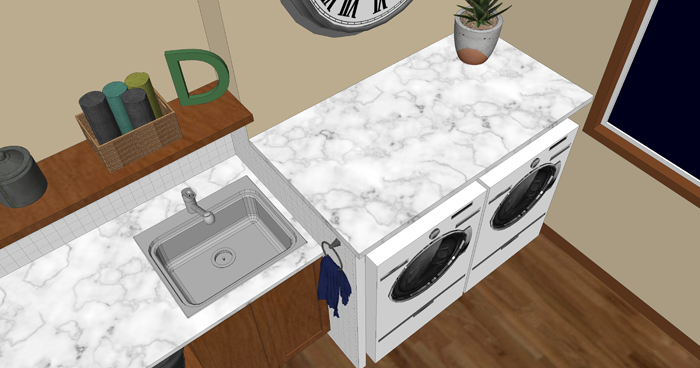
This is the view as you enter the laundry room. The oversized washer and dryer seem to dominate the space, as does the large laundry sink. My goal with this room was to streamline the look and to scale down the appliances by adding additional elements, such as a folding center and shelving.
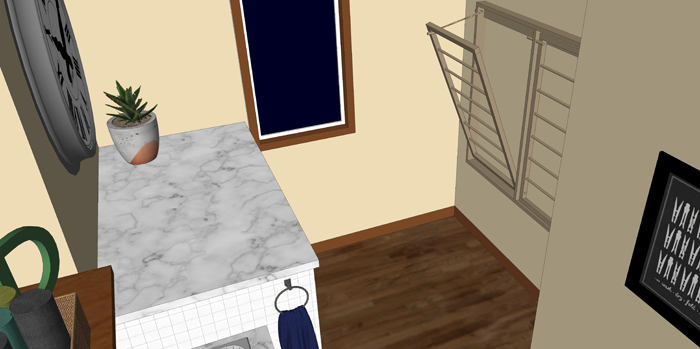
Across from the washer and dryer is a large alcove that the family currently uses as a place to hang clothing to dry. Tara requested that a more permanent drip dry station be positioned here, as the location functions well for this purpose.
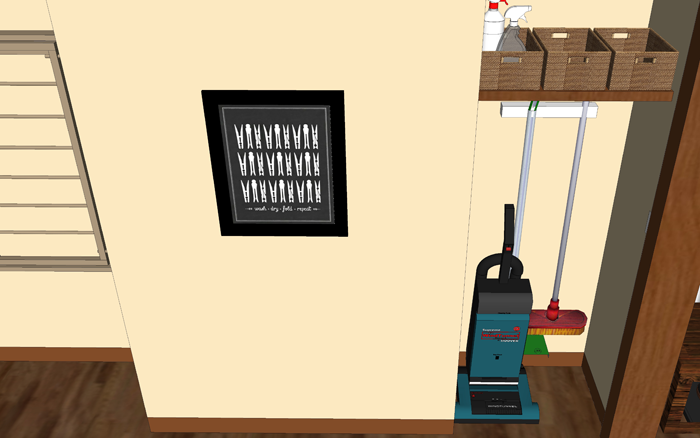
There is also a smaller alcove close to the door. I imagined that this could make for a convenient spot for the brooms, vacuum cleaner and cleaning supplies.
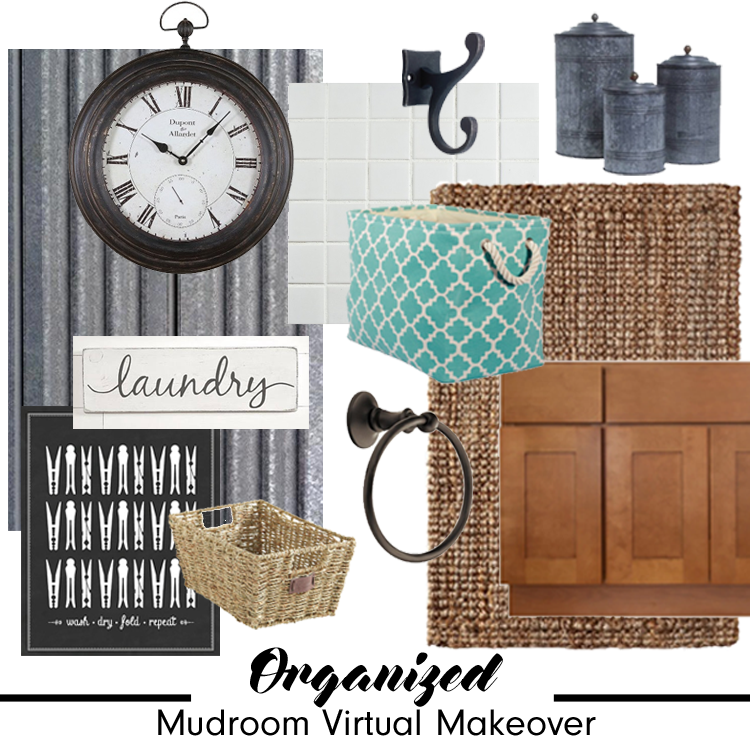
FINISH INSPIRATION
With durability and timelessness in mind, I searched out materials and products to finish off the rooms.
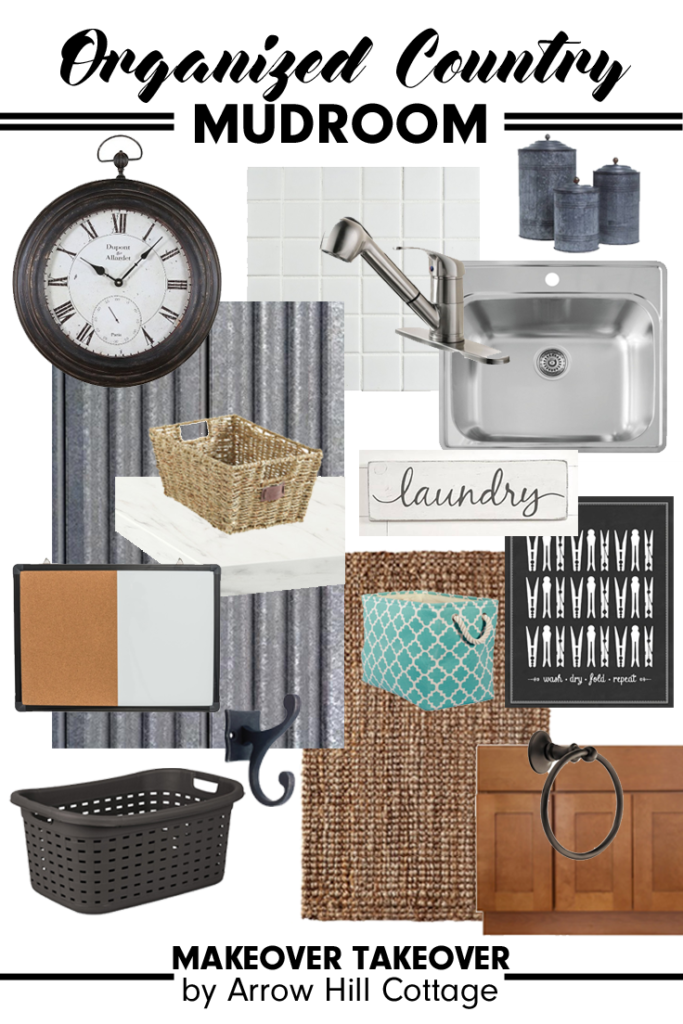
Each of the products below combined will form a very efficient working mudroom. You can learn more about each product by clicking on the titles below.
SINK: A more shallow, stainless steel bowl is more in scale with the space and can be mounted into a counter space.
FAUCET: The spray nozzle can be detached with a hose, to easily spray down clothes in the sink.
COUNTER TOP MATERIAL: Faux marble finish in white – bringing a bit of brightness and luxury into the space.
TILES: The clean lines of these simple square tiles detracts the eye from the unevenness of the surfaces they connect.
CABINET FINISH: To match existing trim and door colors and wood species.
WALL CLOCK: This large element serves to bring your eye upward. It is also beautiful!
LAUNDRY ART: This simple yet timeless sign is another little accent that brings life to the utilitarian space.
WICKER BASKETS: Used to store cleaning supplies or extra towels.
MOP AND BROOM HOLDER: Attached to the wall right inside of the pocket door, the brooms and mop will be easily accessible.
COLORED BINS: One bin in the ‘command center’ for each family member.
COAT HOOKS: The gunmetal finish adds another rustic touch
RUG: Jute material is the perfect durable choice for this space.
BOOT TRAY: Set under a handmade pine bench, the boot trays offer easy cleanup and practicality.
DRY ERASE/CORK BOARD: As part of the command center – the perfect spot to write notes or pin up important reminders.
CHARGING STATION: Every modern family has quite a few devices. This charging station offers a clutter free alternative.
AND NOW FOR THE BIG REVEAL!
I am very happy with how all of the elements came together! Because of the home’s location on a ranch – I wanted to offer a few subtle rustic touches. I also made sure to keep durability and organization in mind. Let’s take a little photo tour, shall we?
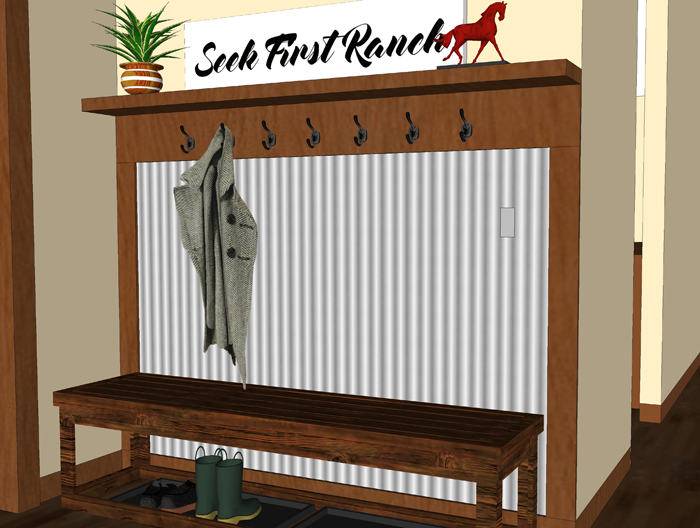
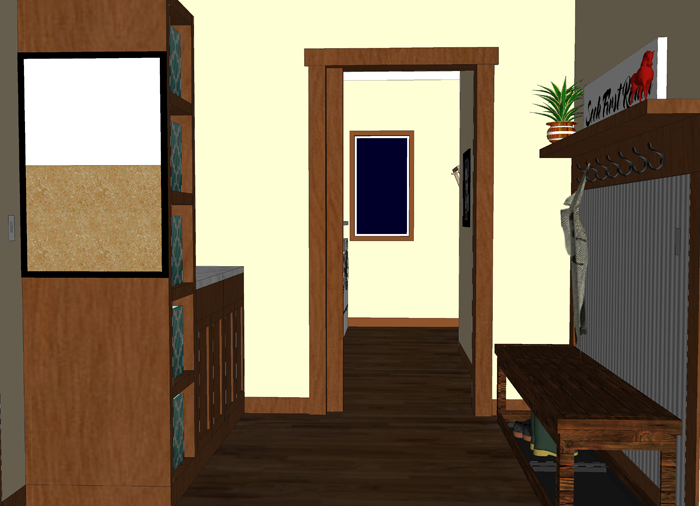
This gorgeous large stained wood bench becomes the focal point when walking into the house. It is offset by a wall of fun, yet durable, corrugated metal paneling. Hooks and shelving add function, while boot mats underneath the bench add practicality and make for easy clean up.
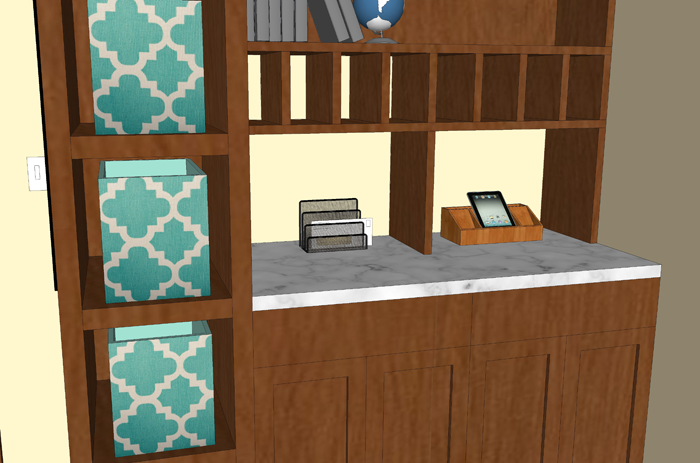
The opposite side of the room features the command center, easily accessible from the back door.
It has a place for just about everything, with cubbies and bins for each family member, drawers for small tools, cabinets for off season gear, and shelves for books. The over sized counter-top provides the perfect spot to sort mail and charge devices.
Sight lines into the laundry space can be left open to reveal natural daylight, or blocked with the beautiful pocket door. The mudroom is now functional, with a place for everything.
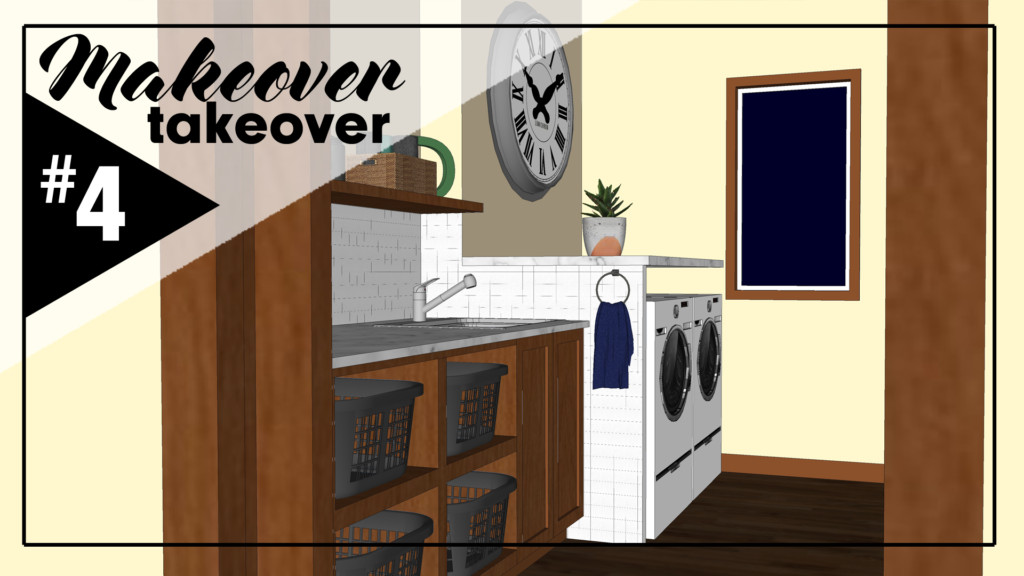
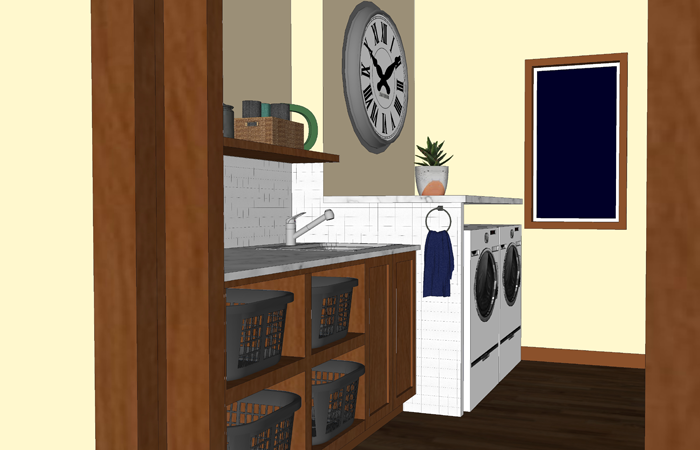
Walking into the laundry space, you are greeted by handsome wood cabinetry and sleek tiles.
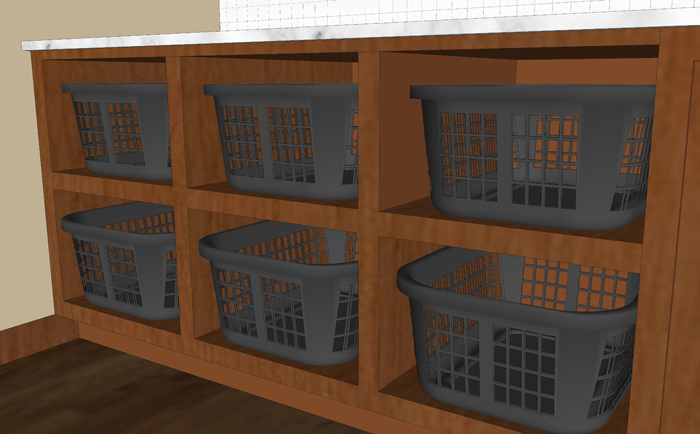
This simple laundry sorting system is practical, and now efficient with the counter space above.
Above the large counter is a convenient spot to store frequently used items, such as laundry soap and clothes pins.
By adding counter space above the washer and dryer, their scale is reduced. The laundry sink and tile are tied together by the finish of the counter material – a faux marble.
New drying racks that can be easily folded up against the wall when not in use.
A bit of whimsical laundry room art is positioned next to the storage alcove. The broom, vacuum and cleaning supplies are within easy reach and ready for action at this busy ranch home.
I’ve created a 3d animation of the mudroom/laundry makeover for a closer look. Click the play button below to view.
I hope that Josh, Tara and the rest of their family will love the ideas for this new organized space! These functional additions would help keep everything in it’s place.
Remember that this is a FREE digital home design consultation, which is available to anyone who subscribes to the Arrow Hill Cottage website. If you or someone you know could benefit from this service, simply email me with a few photos and a description of what issues you would like resolved.
If chosen, I will offer a solution + inspiration through 3d images and sourced items. Hurry though! I only have the ability to do one Makeover Takeover each month and the spots are filling up quickly! I have plans to eventually make this a paid service, so if you have been thinking of contacting me about a project and want to get in on the free deal, don’t hesitate!
This post contains affiliate links to products for your convenience. If you purchase via my links, I may receive a small commission at no additional cost to you. Thanks for supporting Arrow Hill Cottage!
Thank you all so much for your kind thoughts after my most recent post. Some of you reached out to offer the benefits of living in a smaller home, and many more commented that they actually prefer our revised/simplified design over the original.
I have to say that after a few days of simmering with the thoughts of the smaller design, Craig and I are in agreement that we too prefer it! In fact, I called the contractor last night to tell him to hold off on getting bids on the larger floor plan – and instead to focus his attention on the new configuration.
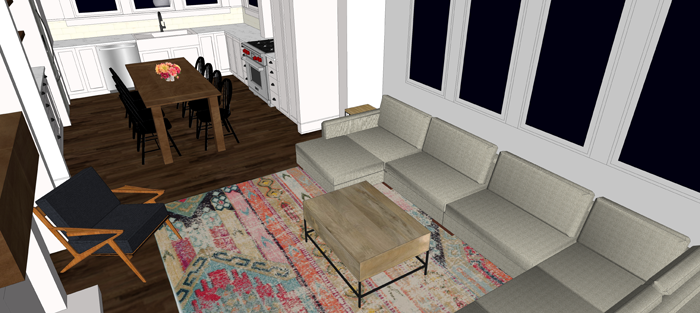
In turn, I have been focusing my design efforts as well. Here is a view of the revised living room, as seen from the far corner of the kitchen. Do you spy the vaulted wall of windows? The view out of them will be stunning!
interior view from kitchen
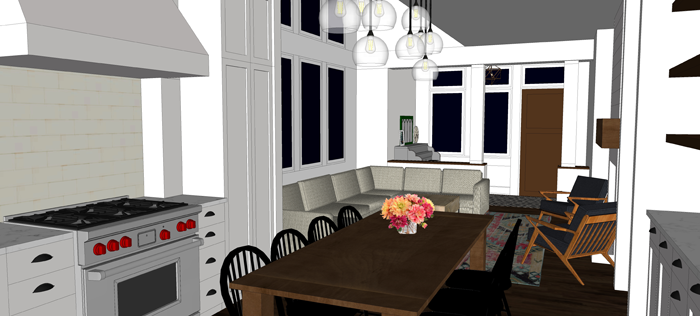
interior view from entry
I am very grateful that my husband and I are on the same page when it comes to ‘stuff’. We are both of the mindset that if something doesn’t bring us joy or serve a purpose – it isn’t needed. The same goes for square footage. Once we realized that the smaller living space would suit us just fine, the more elaborate design was no longer appealing.
We never set out to design a large house – in fact, we have said on many occasions that living in a tiny house would be comfortable if it were just the two of us. Our family now includes seven – and so our sights are on a small house instead – one with just enough room for our needs.
It is a joy to search the web and see others living in the same way. I thought it might be inspirational to share with you some of these people, and their amazing SMALL homes.
Wyoming homesteading + homeschooling family of five
Continuing on with the revised/ smaller design, things seem to be falling into place. All three levels are being re-worked slightly to match the needs of our family. For now, we sit and wait for those numbers -hopeful that construction can begin this spring, but maintaining patience if we need to wait a little longer.
This winter has been brutal. Think freezing or below for months at a time. No, I’m not exaggerating – anyone who lives in the Midwest will agree.
As I have mentioned before, our family currently lives in a rental house. As part of our agreement, we pay our own utilities – which includes the propane used to heat the house. Let’s just say the propane guy has been out here multiple times already this season, and gas isn’t cheap! The house just doesn’t heat well. It’s an older home and has leaks and cracks and windows that aren’t perfectly sealed.
This winter has been breaking us down.
One day at the dinner table Craig asked me “Is there ANY way that we can build our house sooner? I am not sure I can make it through another winter like this in the rental.” My honest answer was that I really did not know. I hadn’t let my mind go there.
But I agreed to check into it, and found myself at the bank the following week – sitting down with a loan officer who very kindly told me that our finances looked good but that she needed to have some clear estimates of how much this house would cost us to build. Gulp. Time for the dreaded bottom line.
I wrote about making sure you know what you can afford in THIS recent post. Craig and I are frugal people and no matter what a bank would tell us that we CAN spend, we would never put ourselves in a position where we had a monthly payment that was too difficult for us to meet. We had our best guess dollar figure about what we could handle/month on a loan, but had not yet determined full building costs – besides a general cost per square foot number.
We called up a contractor friend who met with us and talked us through various material decisions. He let us know industry standards and which finishes he thought weren’t worth their price tags. All very good information. Then he started throwing out numbers of recent newly built houses, similar in square footage to what we had designed, and the price tags they had attached to them. GULP again. Wow. Did he really just say that? His cost per square foot numbers were quite a bit higher than those I had been working with.
Of course, there is a range – but in all honesty even the lowest priced was slightly above our comfort level.
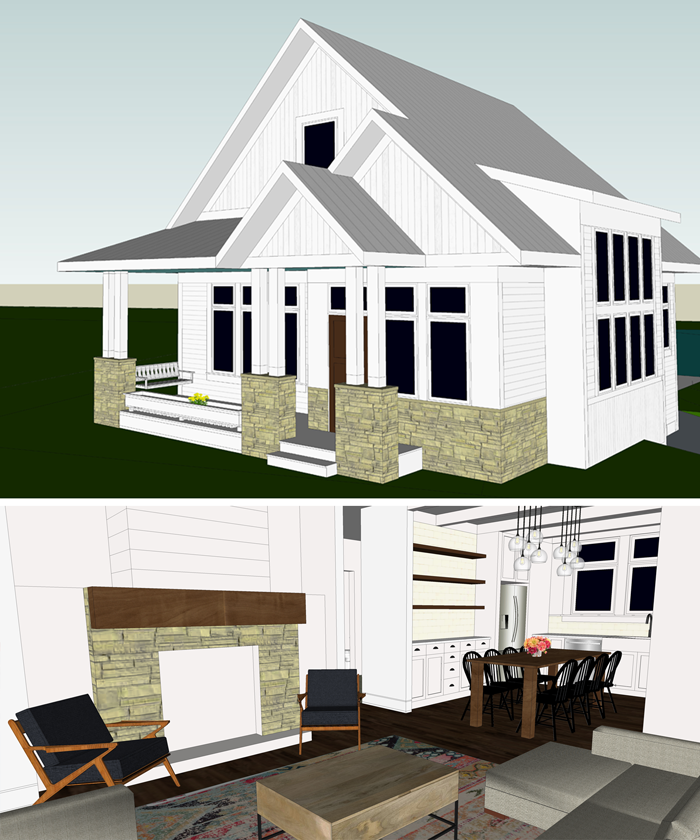
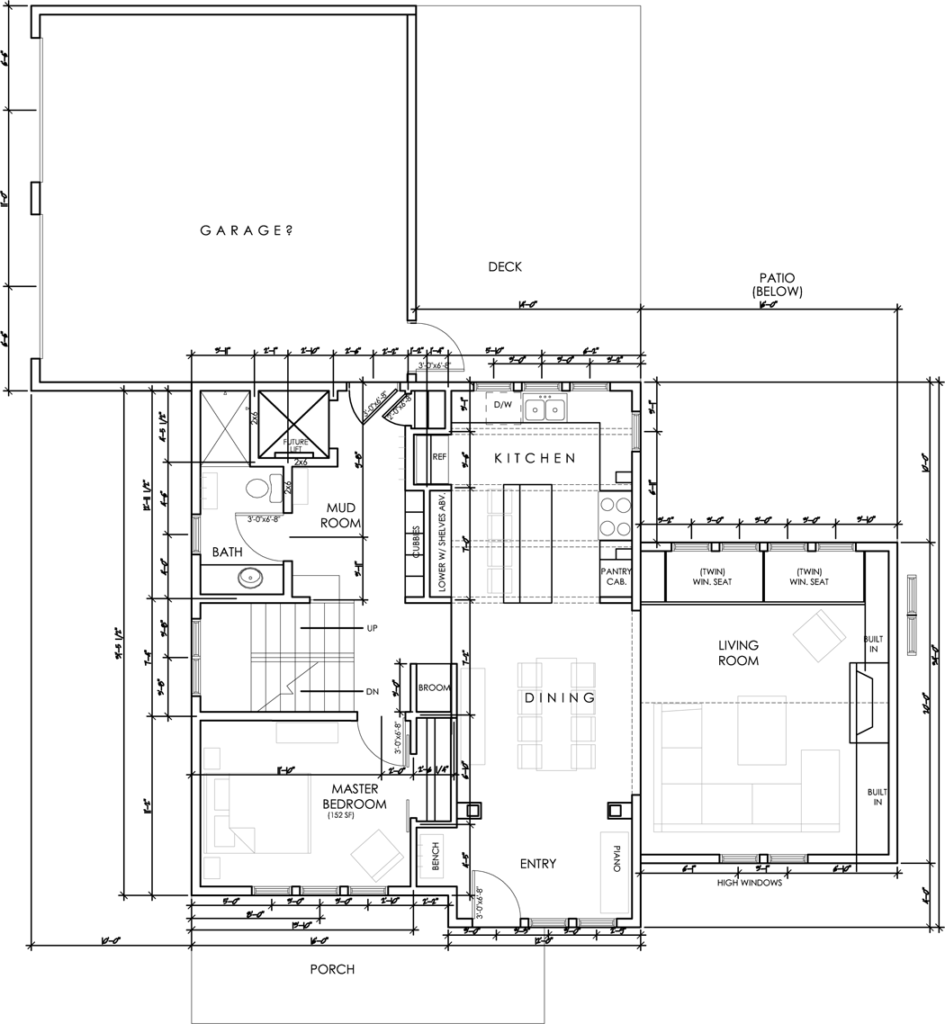
main level of the cottage (as designed when talking to the contractor)
Finishes will play a major role in the overall cost, and so in the next couple of weeks we are going to sit down with him once again and talk through actual numbers as they relate to our project. I am already guarding my heart – and I am pretty sure that the bottom line will require some major changes to be made. I’ll be honest that I was pretty bummed for a day or two after our meeting.
The good news is that we are heeding our own advice and finding out these costs early. We aren’t just hoping that everything will come in within our magical budget number.
And, it’s also good that I love to design. I’ve already gone back into the ‘archives’ of plans to see how different ideas could be incorporated. One of the first areas we noticed that could be revised was the large vaulted living room. The elimination of that wing of the house would essentially remove 640 square feet (320sf per level: main and lower). Based on what the contractor was telling us, in ‘real world dollars’ that may be a $100,000 decision. For our family that is a MAJOR amount of money.
I went looking for how that wing could be eliminated and eventually realized that by simply eliminating the kitchen island and moving the table into the kitchen in it’s place, a large area could be opened up and re-imagined into a living room. Interestingly, the positioning of the dining table in the kitchen is a building design trend that makes sense for a lot of families.
Though this revised living room isn’t as large as the initial design and doesn’t come with all the bells and whistles I had been dreaming of, it’s okay. It has the potential to be a lovely space, maybe even with a small vault space and extra windows in the bump out area.
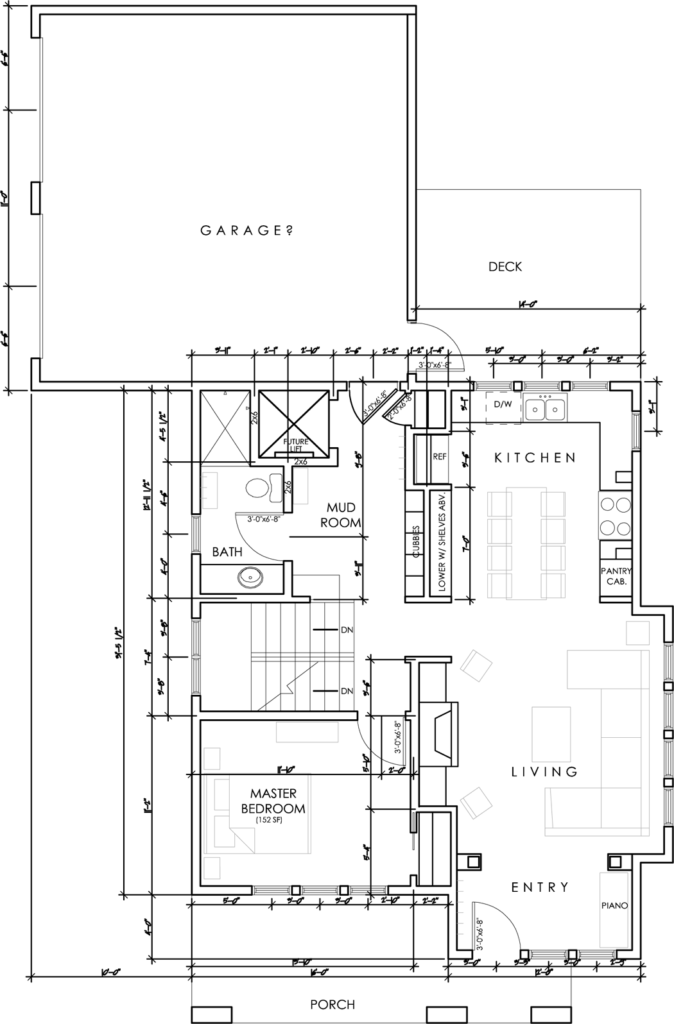
main level of the cottage – simplified and reduced square footage
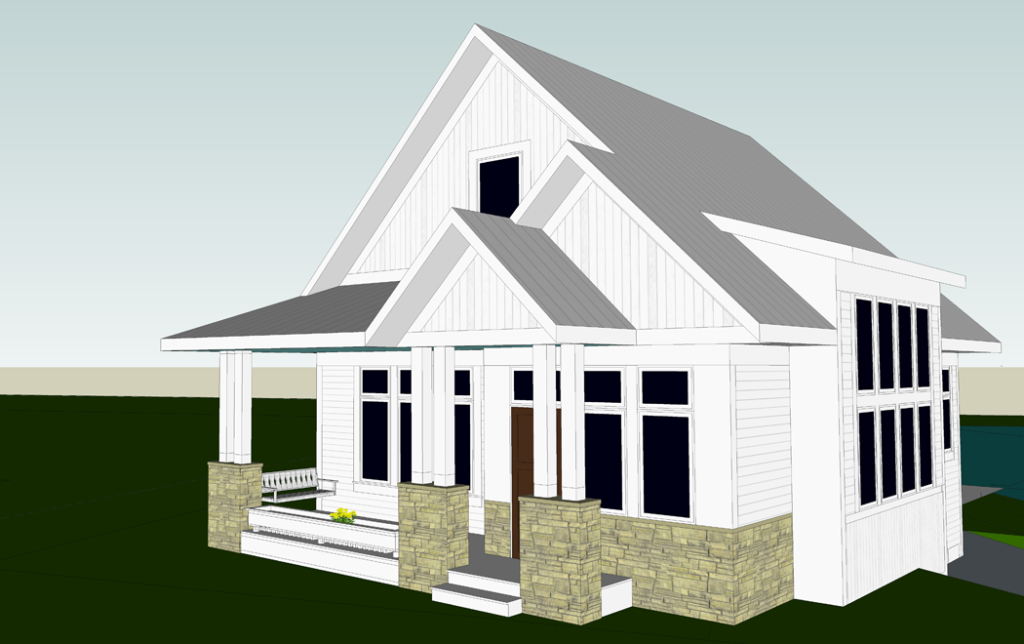
The other major bonus is that nothing else on the main level would have to change much, so from the exterior the house looks essentially the same, minus the extra wing.
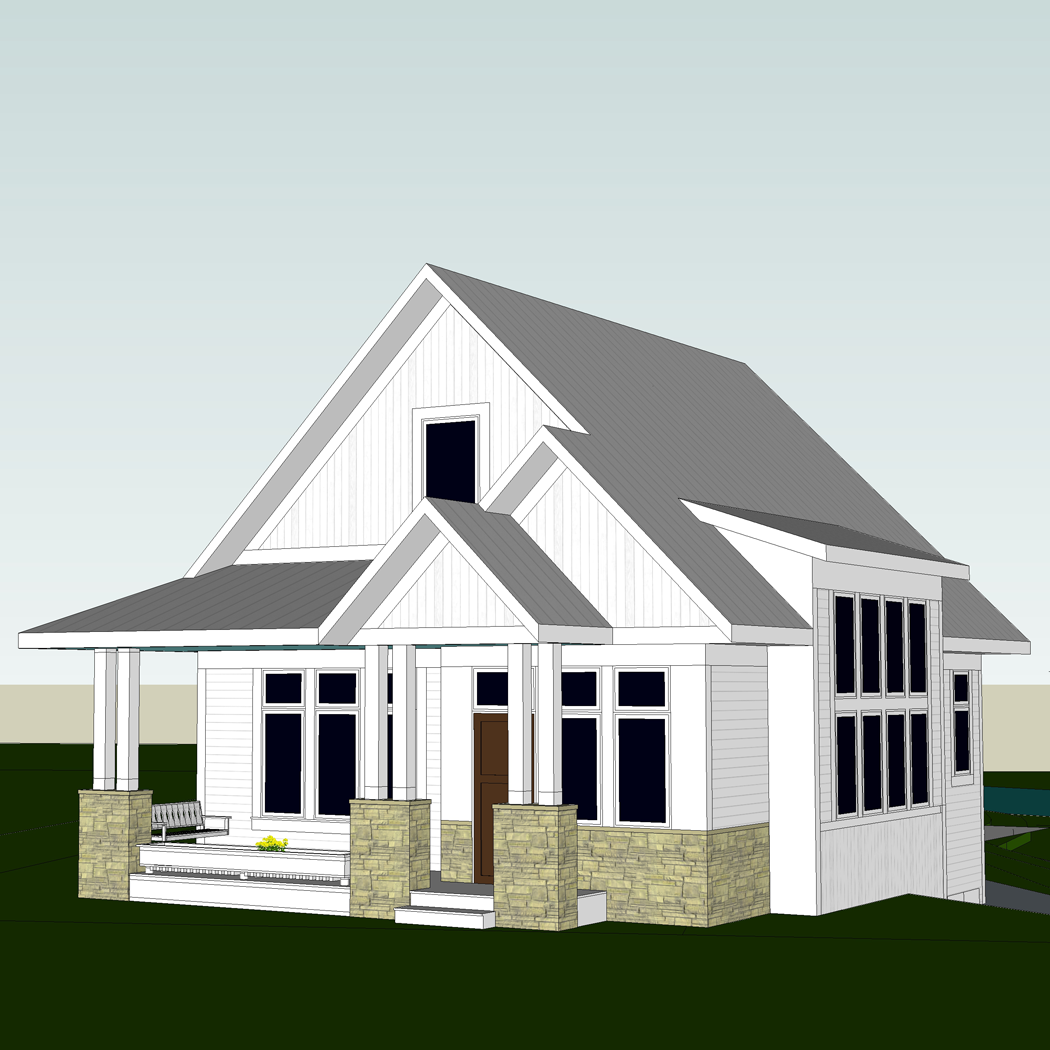
potential revised exterior without living room wing
These are all still ideas, and until we get actual bids on construction materials for our home we won’t know if this major cut will need to be made. But we are preparing for the potential, and know that whatever we end up with will be the perfect fit for our family – in size and style – while at the same time making sense for our pocketbook.
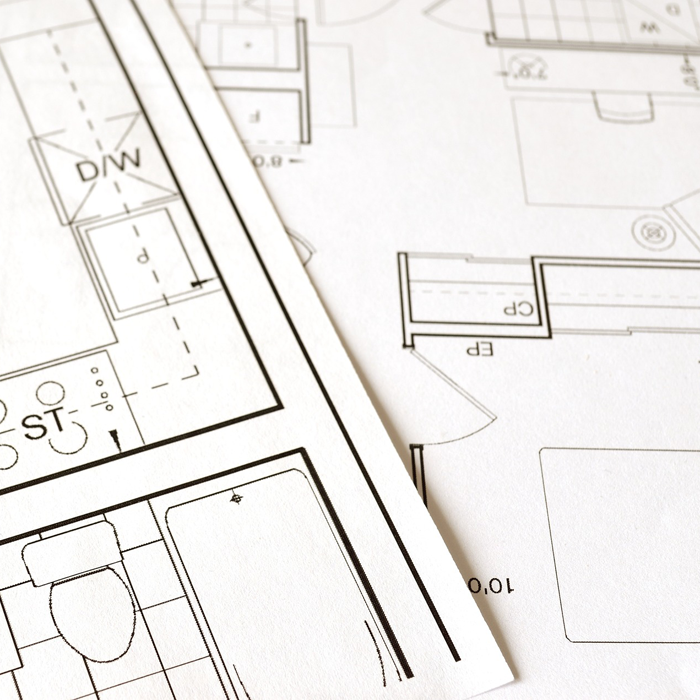
Designing a new house is an exciting and exhausting time for homeowners. It seems there are no less than a thousand decisions that will need to be made to create a house that is ‘just right’ for your family. And while each and every decision during the design process is an important one, there are four important questions you should ask yourself BEFORE you ever sit down at the drawing table by yourself or with a design professional.
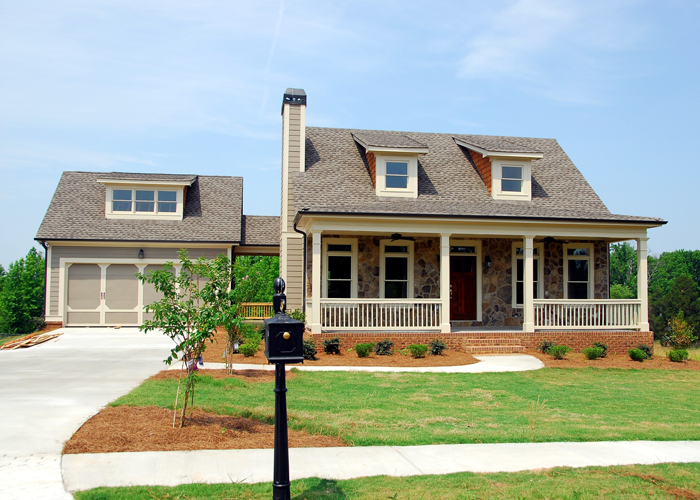
1. WHICH HOME STYLES DO WE PREFER?
While it isn’t necessary to pick only one home style that your design MUST be based on -it is valuable to understand, at least generally, which types of homes you are drawn to. Are simple, clean lines your thing? Perhaps a modern home will be a good design guide. Do you love the charm of cozy houses? Consider the characteristics of the cottage or bungalow style. You can ask yourself if you prefer an open floor plan or one with more defined spaces, and if your family would benefit from one level living or multiple stories.
Each month I work through a series here on the blog entitled ‘Elements of Home’. I dive deep into what makes each home style unique, with the hope that the information can benefit you in determining which style would be best suited to your family’s lifestyle and preferences. You can access the series HERE.
2. WHERE WILL OUR HOUSE BE SITED?
Location, location, location. It is the mantra of real-estate. You can change a house in many ways, or in this case – build nearly anything you want – but you will not be able to change your home’s location once it is tied to the foundation; That is, unless you are willing to spend major money to do so.
You may be tempted to look at home plan books or online for floor plan ideas. And while these tools can be extremely helpful, you should at the very least have an idea of where your proposed home will be located before considering floor plans. Will you be building a new home in an established historic neighborhood? In that case, the sleek modern home with floor to ceiling panes of glass that you spied online may not be the best choice. Do you love the option of having a home with a basement level that you can walk out of? If so, you will want to make sure that you have a site in mind that will accommodate that type of setup – preferably somewhere with sloped land.
There are more detailed site related questions that you will need to answer, such as how the natural daylight will affect the interior spaces of the home – but these are questions for further in the design process.
3. WHAT DO WE NEED IN A HOME?
Generally speaking, we more easily identify our wants over our needs. Sometimes the two get mixed together, in fact. When designing a home it is very important to establish the difference. The needs are absolute must haves, whereas the wants are not as important – and can possibly be added at a later date.
Size is one of the most troubling aspects to determine. When considering home square footage, a variety of questions may arise. How many bedrooms should the house have? Will 1 bathroom be sufficient, or will we need more? What is a comfortable living room size? These questions about size can leave your head spinning – but they are some of the most important decisions regarding home design. A too small home can leave you feeling cramped; While a home too large will not be comfortable or cozy – perhaps leaving you with the feeling that you are living in a museum or office building.
As a guide to determine how much space you should design for your family, I have created a variety of worksheets – which can be accessed in THIS POST.
4. HOW MUCH CAN WE AFFORD?
It’s the age old question: How much is this going to cost me? It is best to consider the financial aspects of home construction well before you fall too in love with a design. If you speak with a loan professional about what a realistic budget for your project is, you will be able to make better informed decisions as the design process progresses. If you know you will be working with a fairly strict budget, you likely won’t be looking at the granite selection for your counter tops. Better to know what you can afford than to choose those expensive finishes only to be told you will need to downgrade the quality to something cheaper.
Another benefit to determining building budget early is that you can plan your project in phases. Perhaps the entire shell can be built straight away, with the main living spaces finished – and the basement or upper level left to be finished when the budget allows, in the future.
I lay out tips on ways you can save money on your new build in THIS POST.
If you have worked through each of the four above questions, you are well on your way to laying the groundwork for the design of your future home.
For your convenience, I have laid out these questions in a simple, one sheet print out – available in the RESOURCE LIBRARY. Search for the Preliminary Home Design Worksheet – and keep it handy for when you are ready to start thinking about designing your dream home.
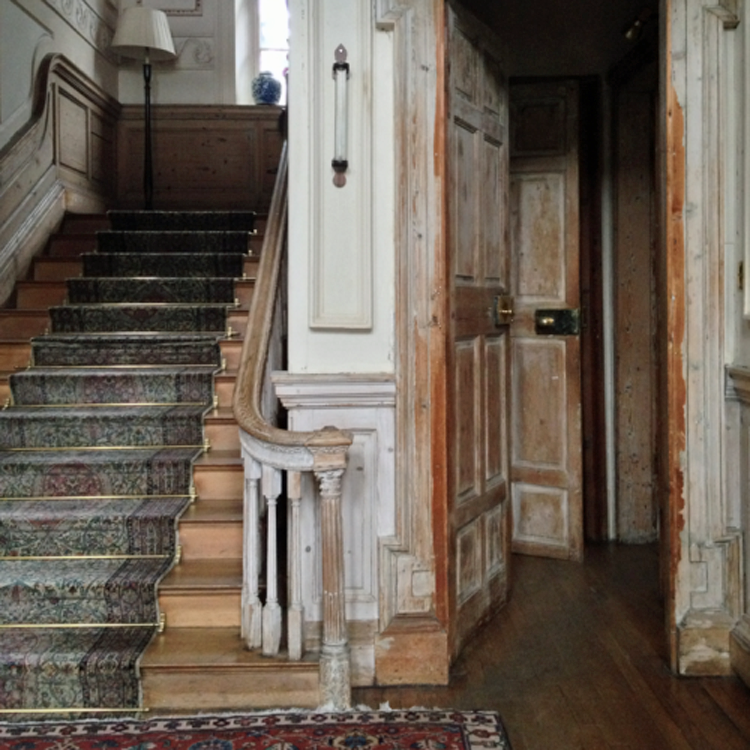
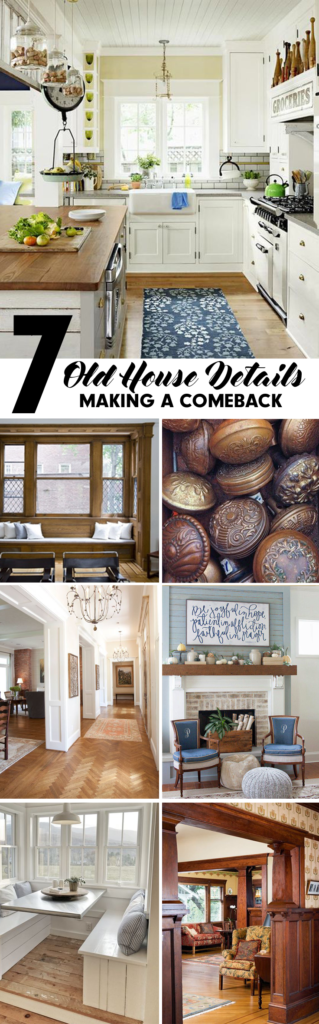
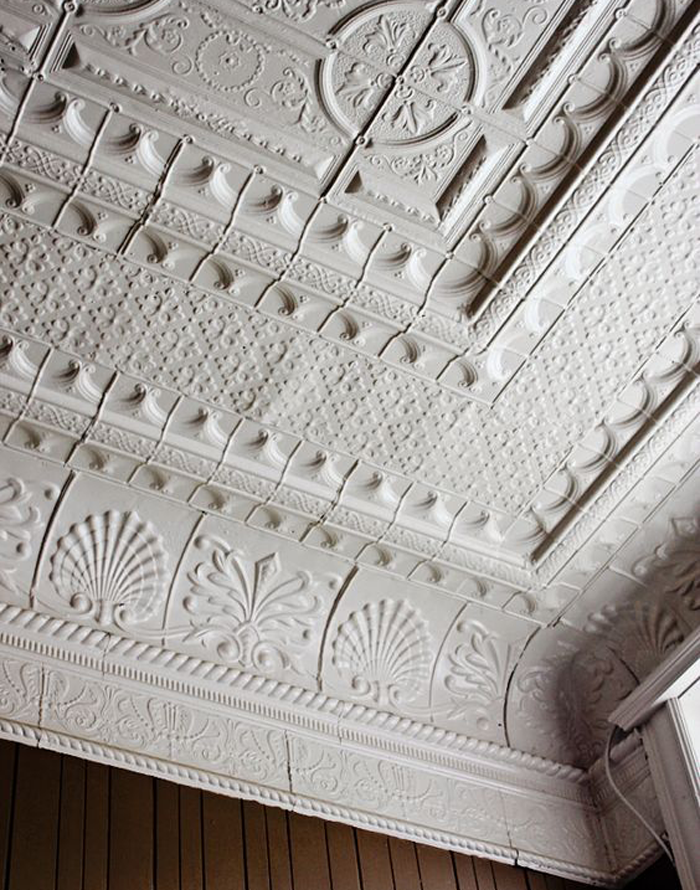
When you think of an old house – you may envision rotting siding, squeaky floor boards, and bats in the attic. While these may very well be a reality, there are plenty of merits that old homes have to offer.
The seven charming old house details I’m about to share may have you rethinking your preconceptions. Who knows – you may decide to incorporate some of them in your home as well.
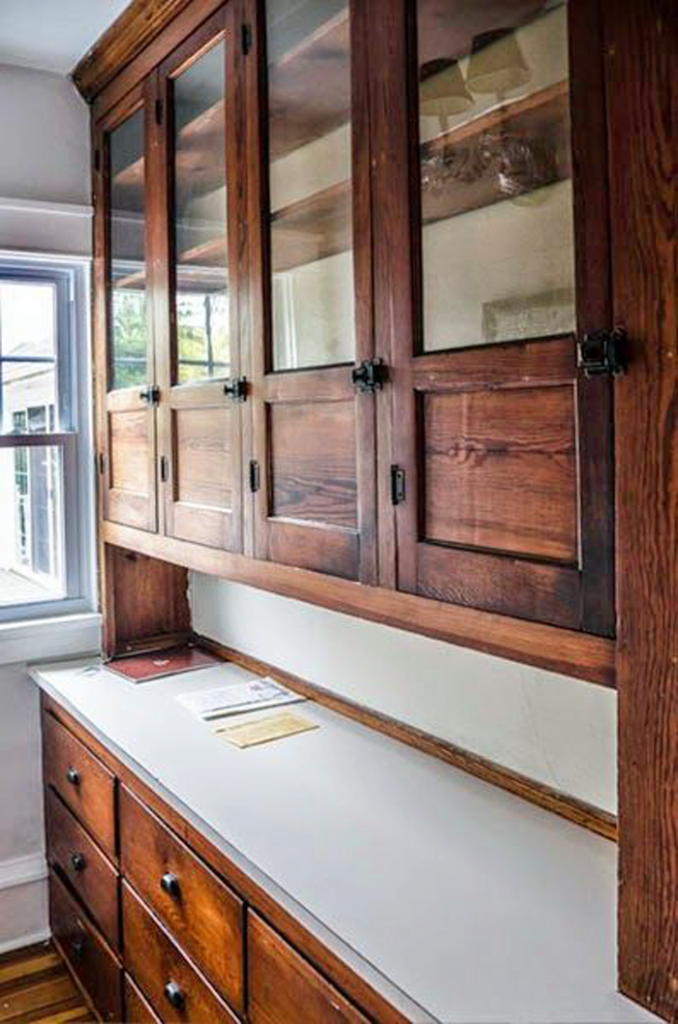
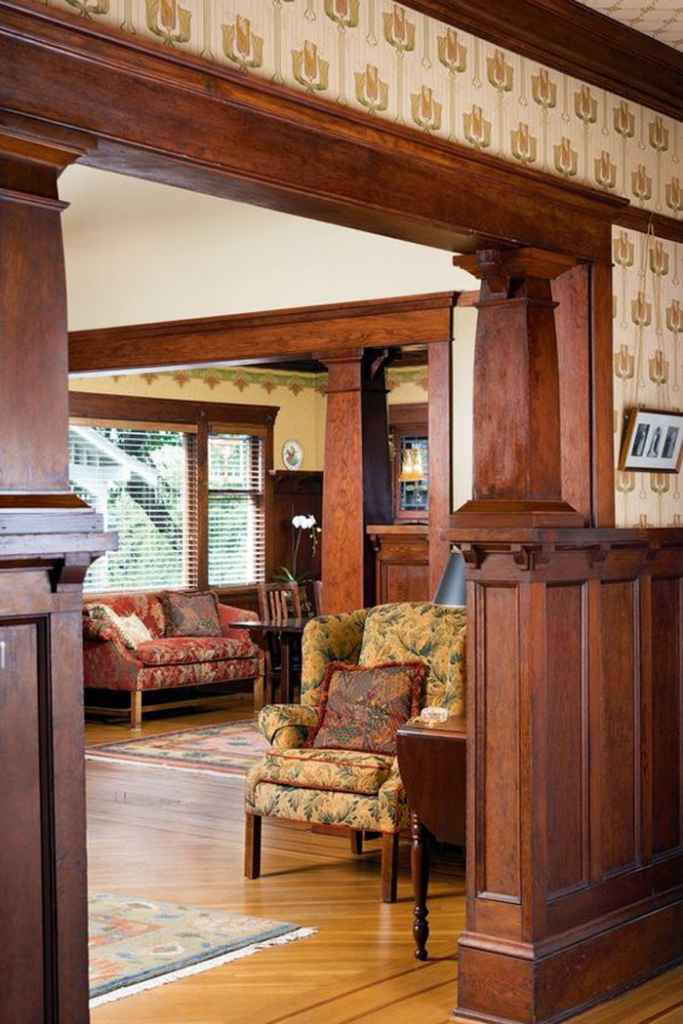
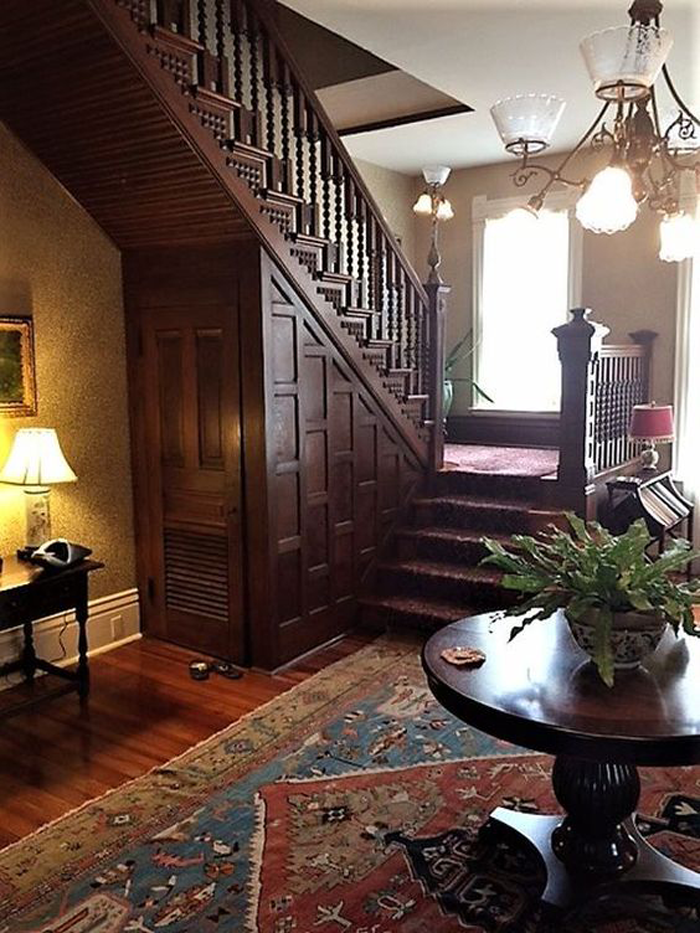
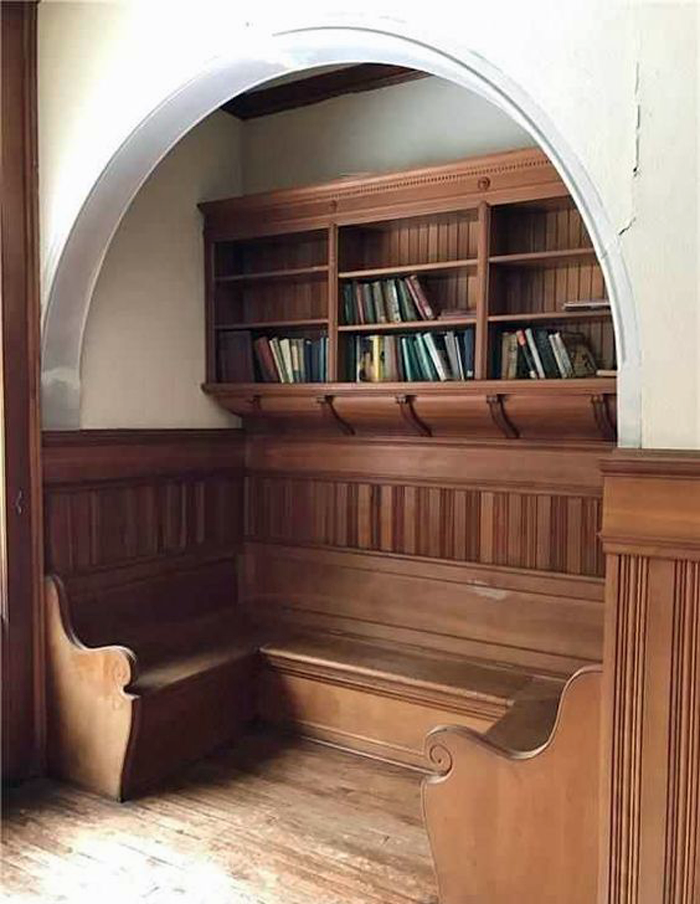
BUILT IN FURNITURE
These showstopping pieces add dramatic character. Because they are designed and built to fit with the house, in a specific space, they are becoming more and more popular with homeowners as storage pieces and as a custom way to add elegance and charm.
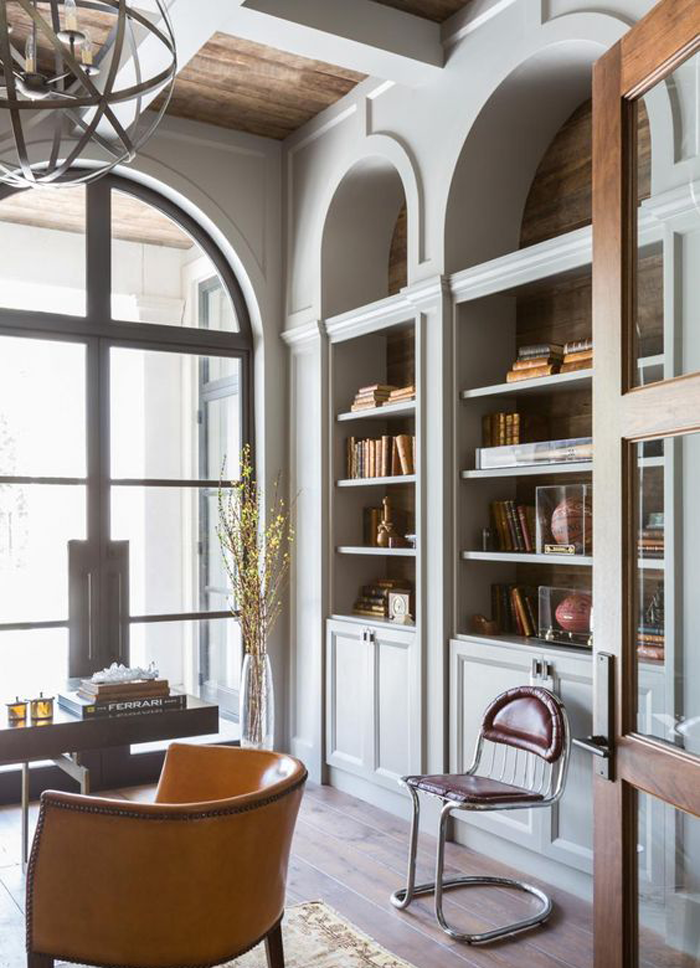
It’s true that slow growth timber was more readily available when the houses of yesteryear were being built. Craftsmen showcased their skills on detailed woodwork – from stair railings and wainscoting to window molding. Though it may never return to the intricacies of the Queen Anne Victorian era, an increased level of detail in woodwork is being re-introduced in today’s homes.
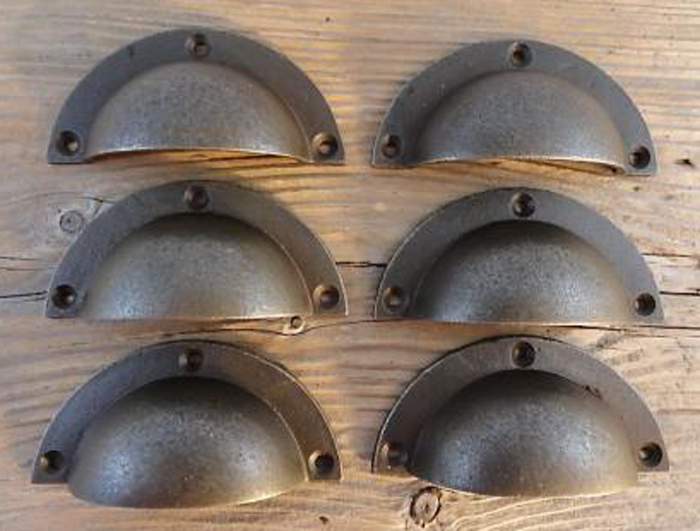
There has been a huge resurgence in adding smaller vintage details to new homes, to give them an extra dose of character. One of the easiest ways to accomplish this is by utilizing decorative hardware, such as door knobs and cabinet pulls. They are generally inexpensive and readily available. Reproductions of these classic styles are also being made.
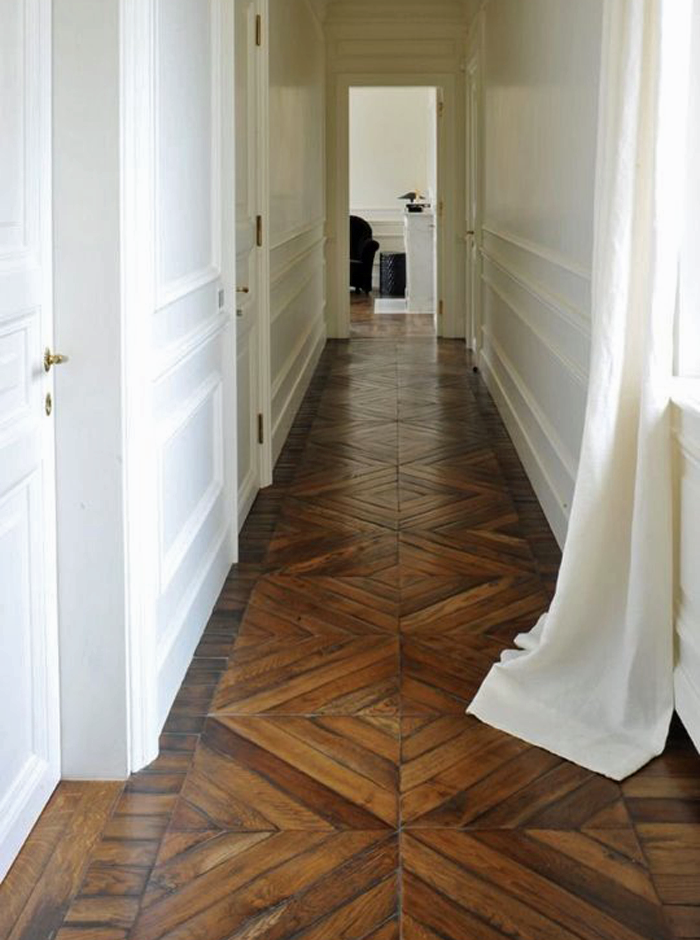
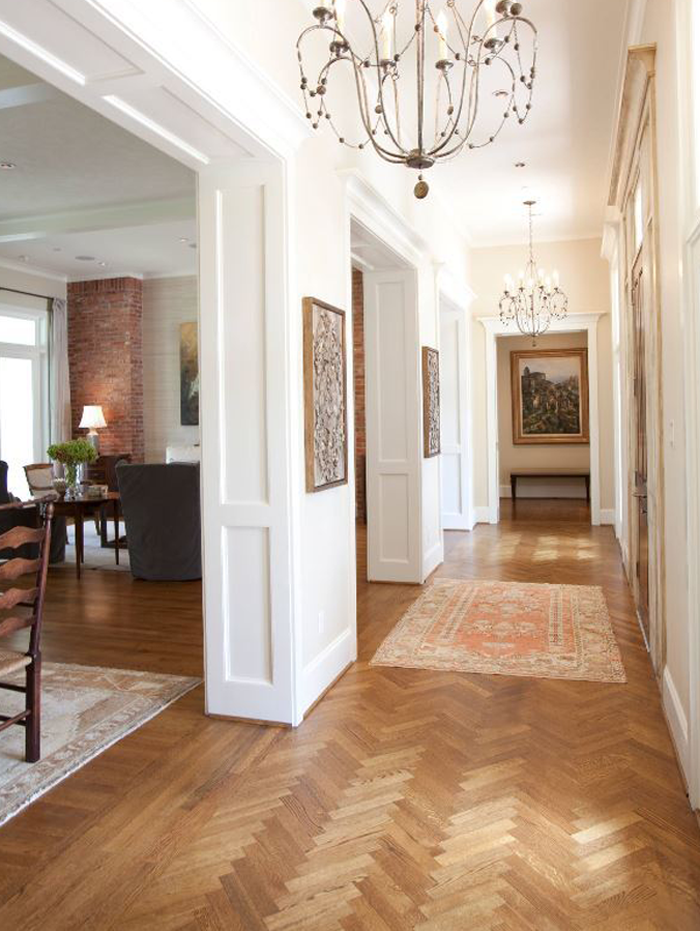
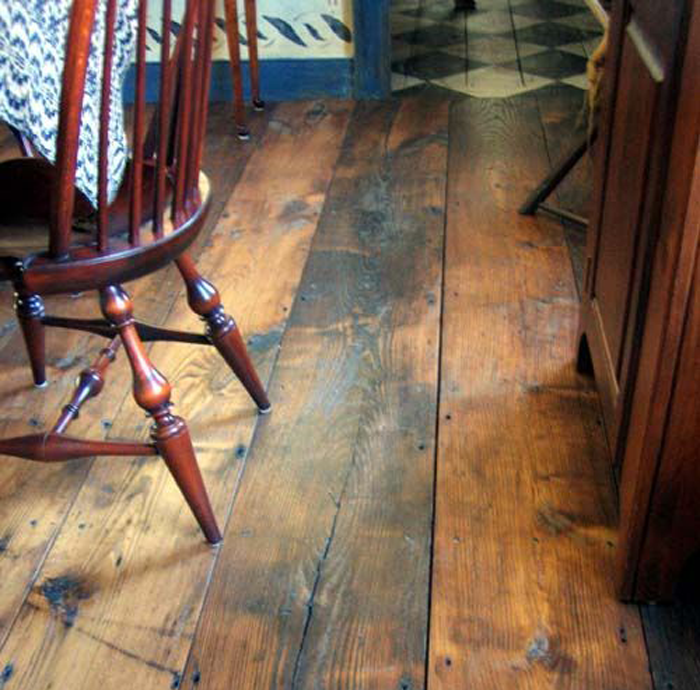
Old houses have the best floors. The patina found on aged pine, maple, and oak flooring is hard to match – but even a newer wood floor is a beautiful addition to a modern built home. Wood floors are wonderfully adaptive, lending themselves to be laid in a variety of patterns.
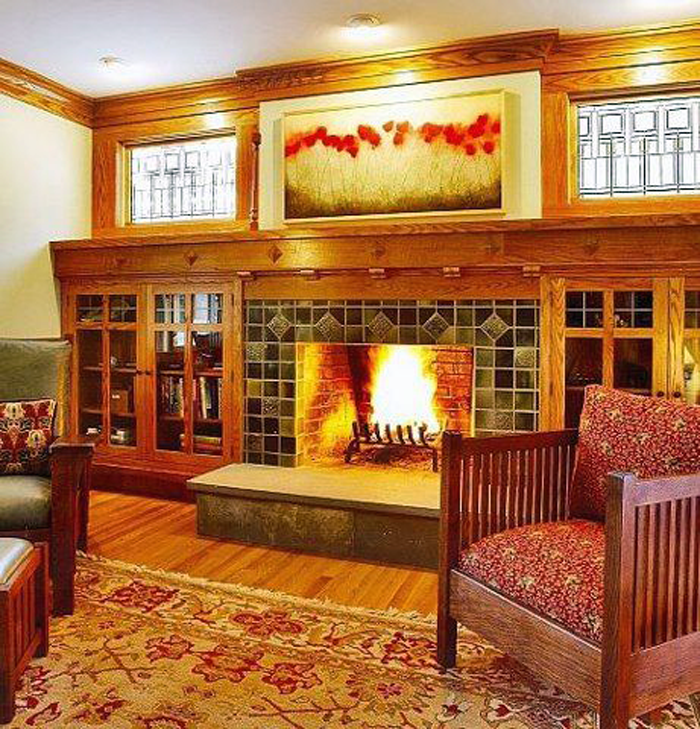
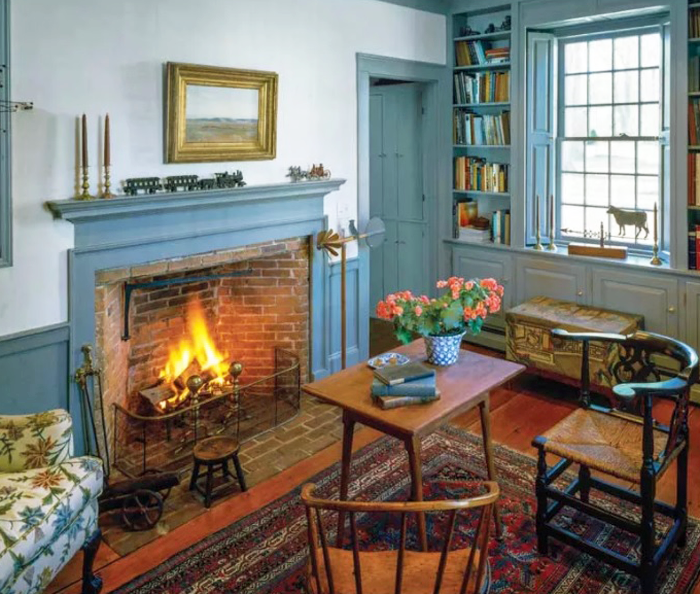
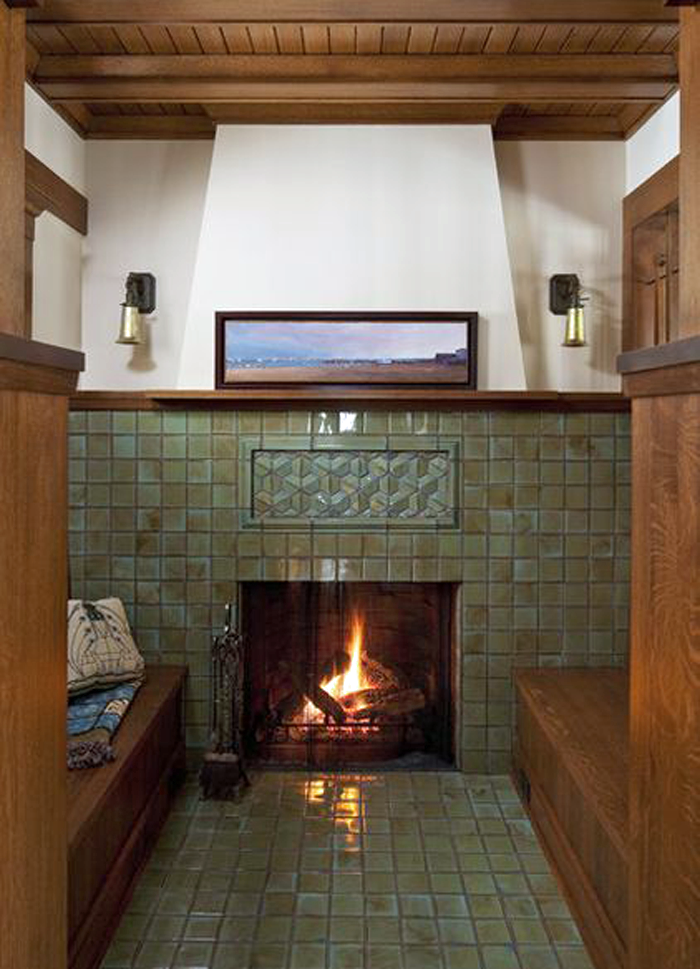
Before the television became the center of attention, the fireplace was the focal point in most homes. Now, as a way to escape the constant bombardment of electronics, families are opting to gather together in a quiet space more often. In turn, homeowners are opting to give their fireplaces more detail and prominence.
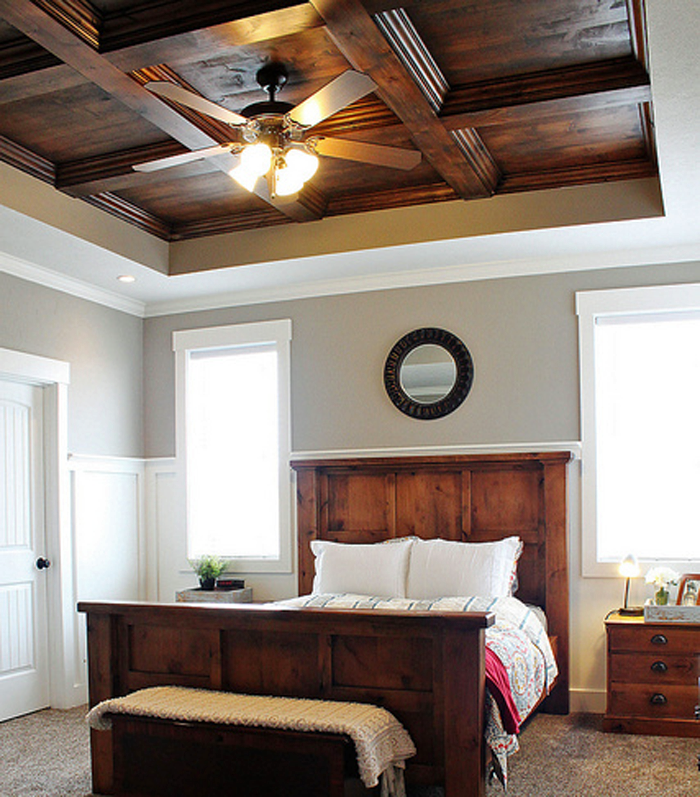
Gone are the years of popcorn textured ceilings and flimsy drop ceiling tiles. Homeowners are instead embracing a variety of decorative options, and looking to historic examples for inspiration.
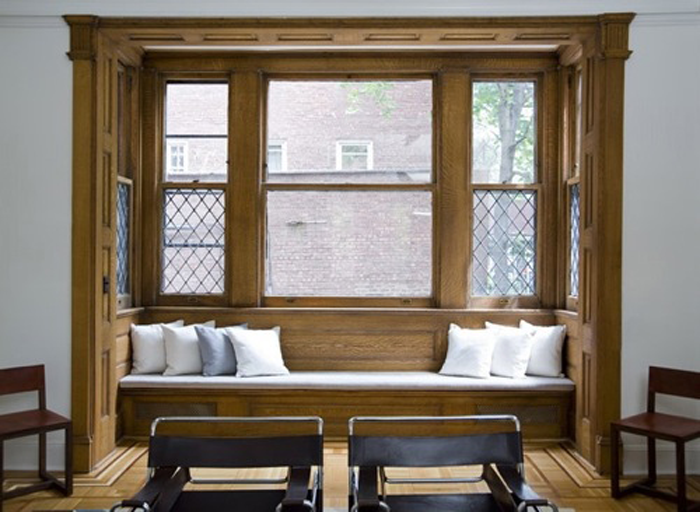
Old houses are full of nooks and crannies – just think about grandma’s attic. The cocooning nature of small, set apart spaces is comforting to many homeowners. From built in dining tables to relaxing inglenooks, these interesting and intimate spaces are becoming more and more popular once again.
Which of these seven details is your favorite? Let me know which you would love to try (or have incorporated in your home already) in the comments below.
Welcome to another installment in the ELEMENTS OF HOME series. Each month I showcase a different residential style here on the blog. It is my hope that this information will not only teach you a little something about the various styles; but also equip you if are designing or searching for a new house – by allowing you to determine which style(s) suit your lifestyle and preferences the most.
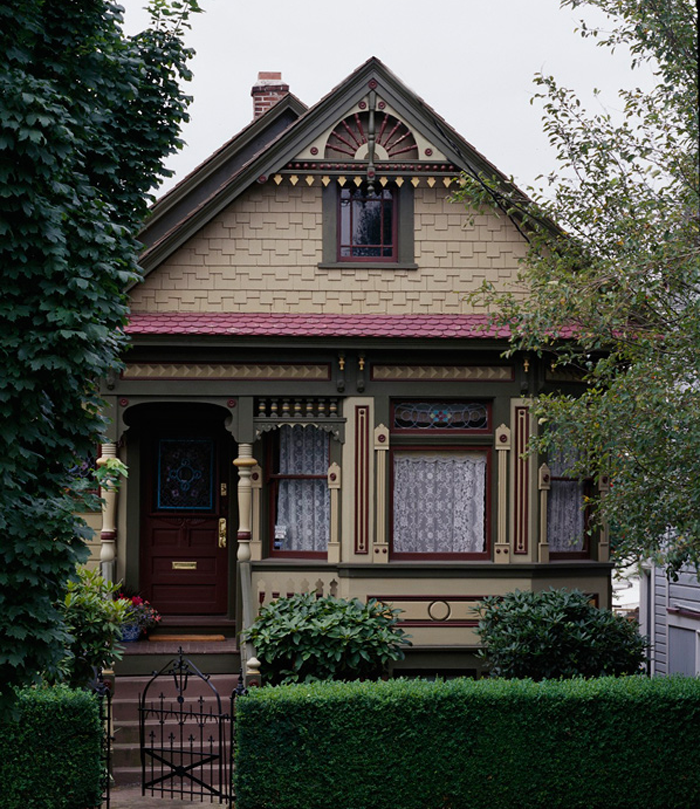
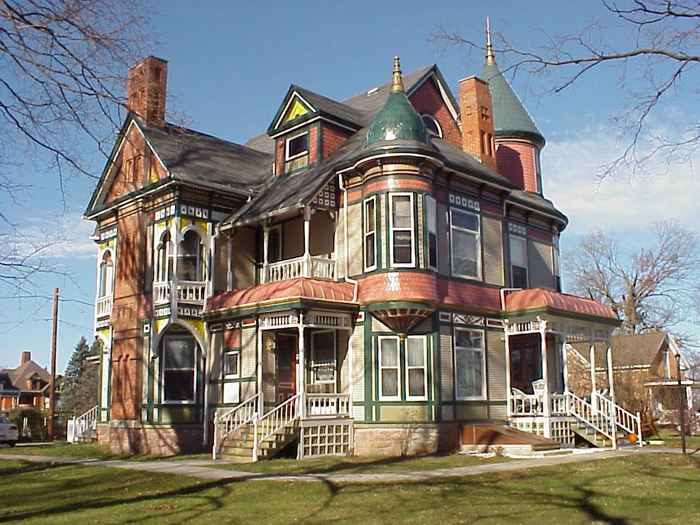
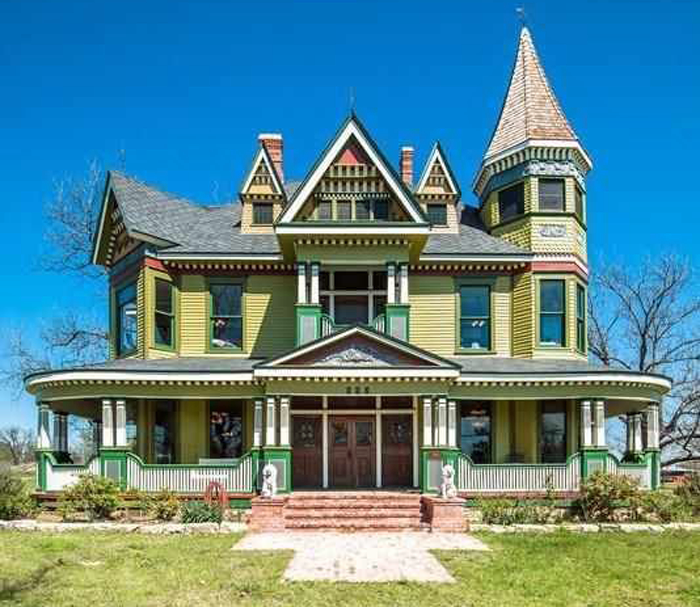
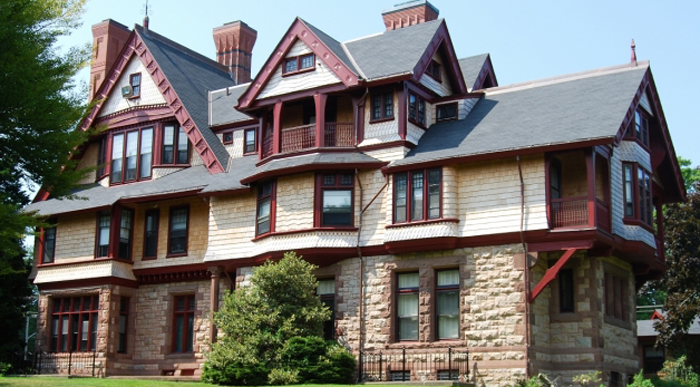
Today I will be over-viewing the Queen Anne Victorian home – including the history of the style and what makes it unique.
HISTORY OF THE QUEEN ANNE STYLE
The Victorian style in general spreads over the years 1860-1900 primarily, during the last decades of the reign of Britian’s Queen Victoria. There are six distinct variations of the style occurring during that time period – based, at least loosely, on their Medieval prototypes.
This time period saw rapid industrialization in the American built landscape. The art of balloon framing was rapidly replacing heavy timber framing as the standard building technique. Because of the flexibility of this type of construction, homes were no longer restrained to simple box-like shapes. In addition, house components such as doors, windows, siding and decorative details were beginning to be mass produced, and could easily be distributed throughout the country by use of the expanded railway lines.
When most people think about the Victorian style, they generally imagine a Queen Anne – the most elaborate and eccentric of the the six variations. I will highlight the remaining five variations (Second Empire, Stick, Shingle, Richardsonian Romanesque, and Folk Victorian) in later posts.
The ‘Queen Anne’ name is actually a bit deceiving – as it bears almost no similarities to the architecture produced during the reign of Queen Anne (from 1702-1714). The term ‘Queen Anne Style’ was used by Scottish architect Richard Norman Shaw to describe his work, and it stuck.
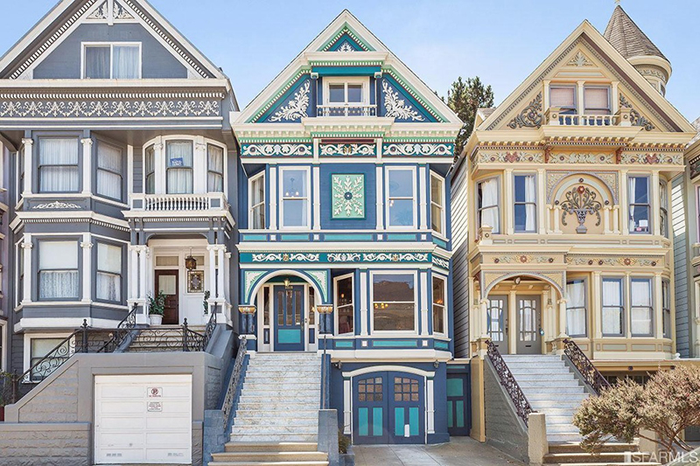
Queen Anne Victorian homes can be found throughout North America, thanks mostly to the expanding railway of the late 19th century. Pattern books made it simple for prospective homeowners and builders to choose manufactured pieces and decorative details to dress their home in the Queen Anne style. This home style is least likely to be found in the heavily populated northeastern states.
There are also distinct concentrations of the style. Seattle’s neighborhood, Queen Anne Hill, derived it’s name from the architecture used on many of the affluent homes built there. You can take a little mini video tour of the neighborhood here. And of course, San Francisco features a beautiful collection of Queen Anne row houses.
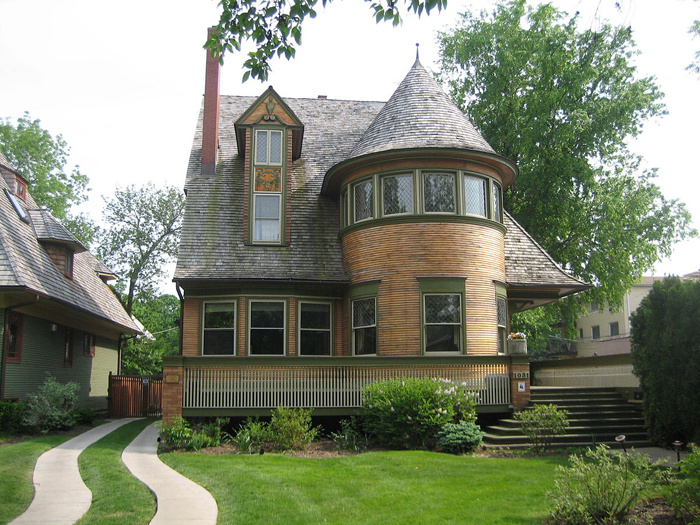
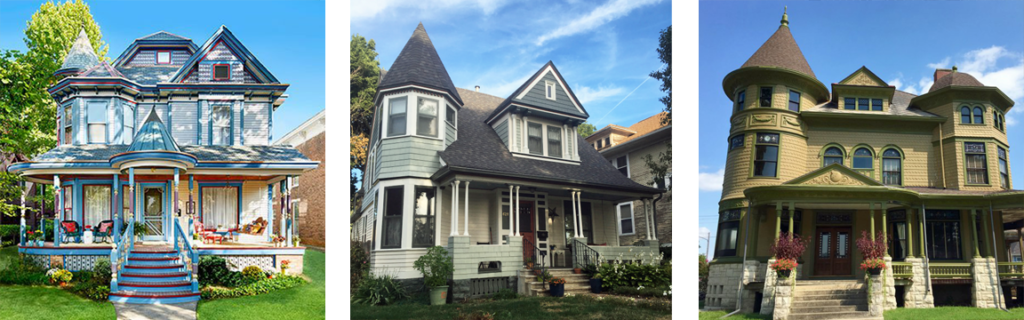
As mentioned previously, one of the major shifts that happened with the introduction of balloon framing was the flexibility of the floor plan. It allowed more interesting shapes of houses and in turn many homeowners opted for bay windows, bump outs, and cantilevered second story spaces.
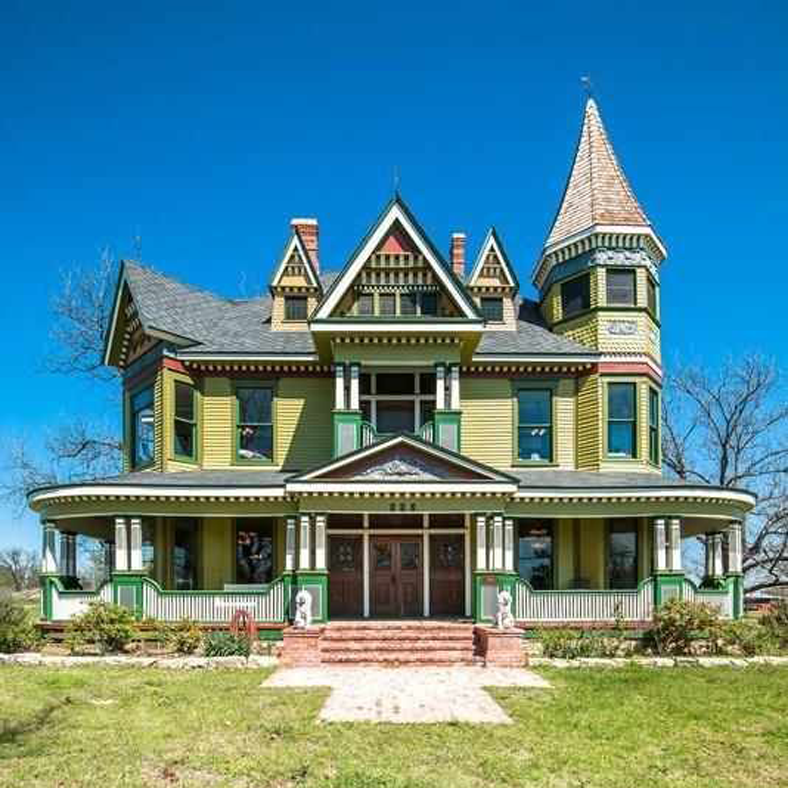
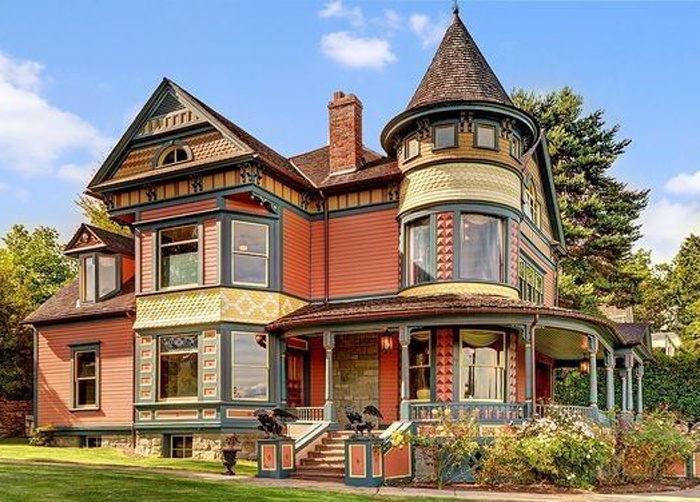
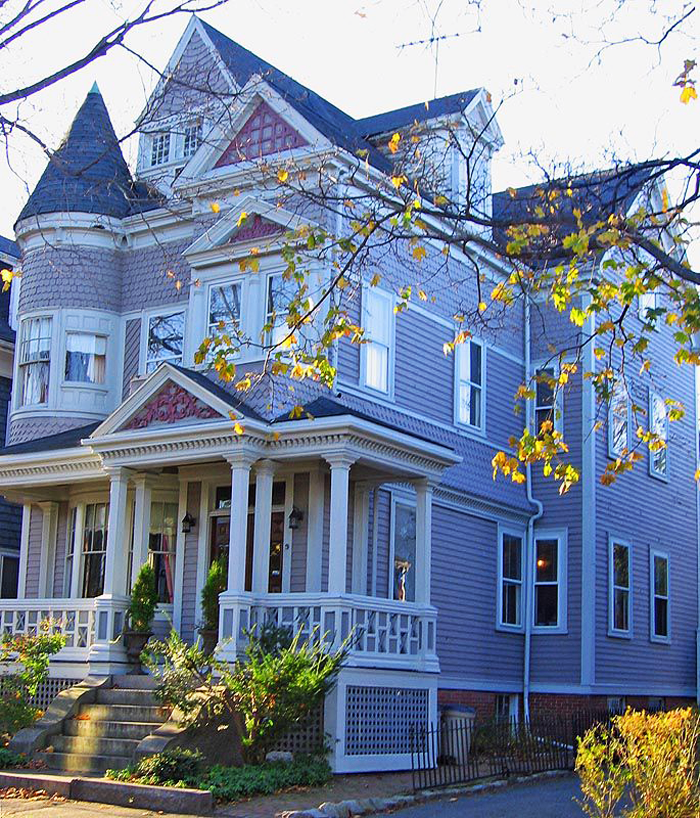
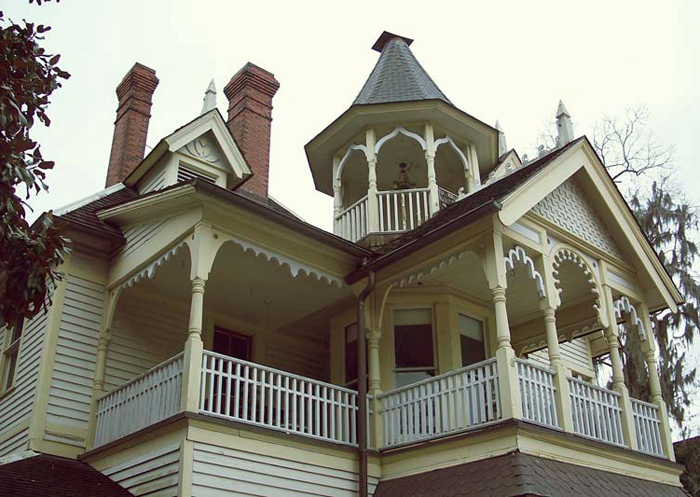
To spot a Queen Anne Victorian home, look for these style specific exterior elements.
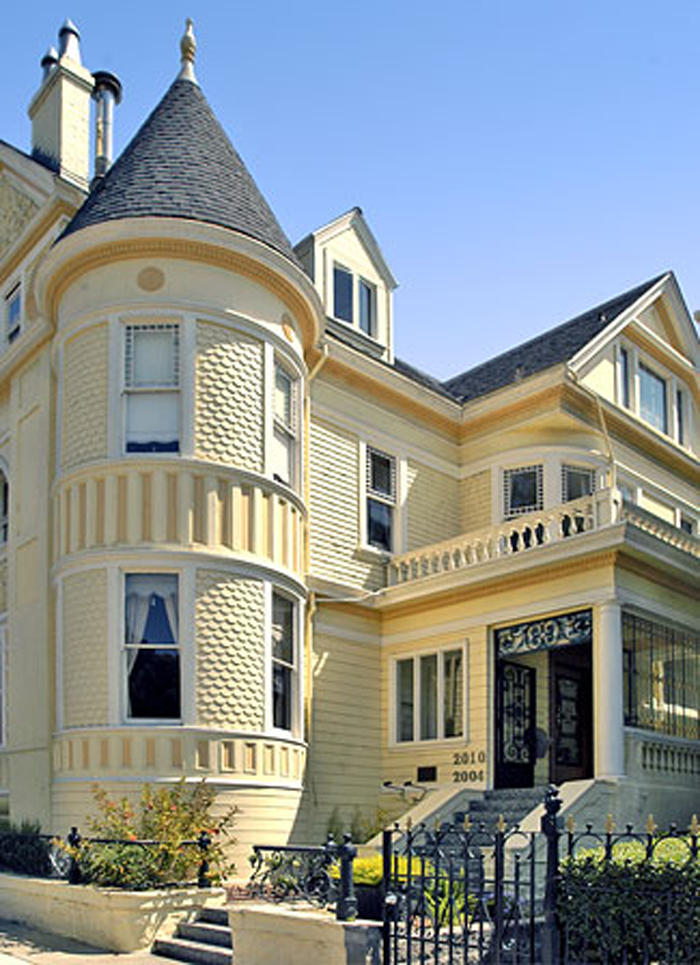
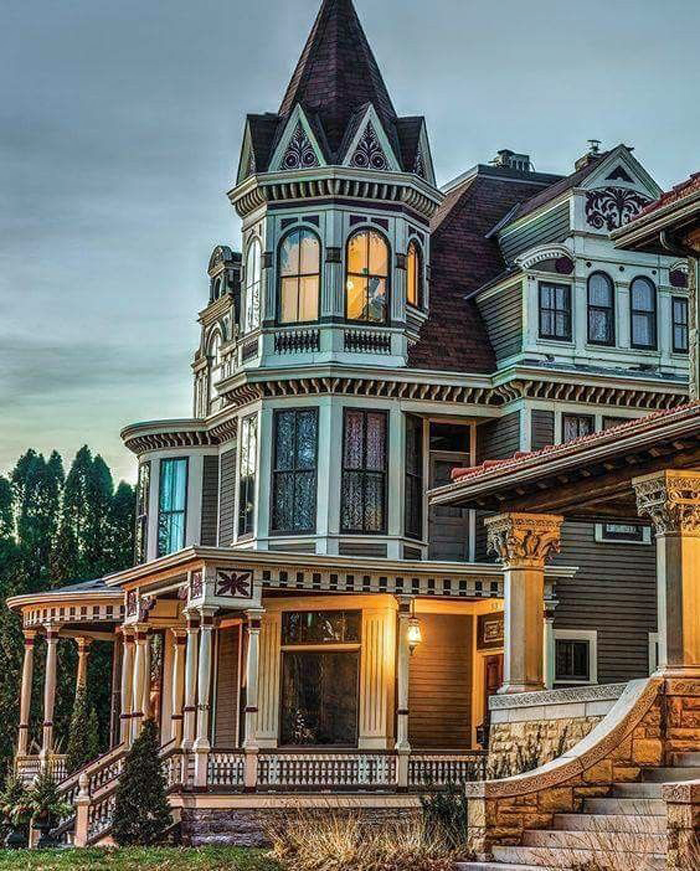
IRREGULAR SHAPES: Builders and architects of the Victorian era took full advantage of the flexibility that balloon framing provided – by avoiding rectilinear building footprints and instead opting for homes with varied shapes.
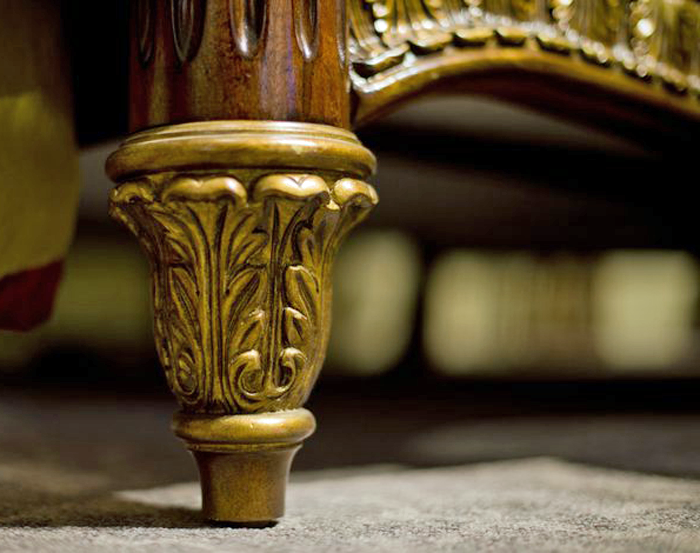
SPINDLE-WORK: Nearly 50 percent of all Queen Anne houses have spindle-work, which is also commonly referred to as gingerbread ornamentation or Eastlake detailing. This detail came in the form of turned porch balustrades, lace-like porch brackets, and as gable ornamentation.
WALL TEXTURE VARIATIONS: The use of a variety of wall textures is hallmark to the Queen Anne house style. Patterned wood shingles, bricks of different colors and terracotta panels were used to create the illusion of depth and texture on exterior walls.
PORCHES: Covering the front entrance area, and also commonly extending along one or both sides of the house, these porches were used to highlight the asymmetry of the facade. Some examples of Queen Anne homes include second story porches.
TOWERS: Also common with Queen Anne homes is the use of towers. They may present in round, square or polygonal form. They were built at varying heights from the ground up or even cantilevered from the second story only. The most popular position for a tower on a Queen Anne home is the front corner.
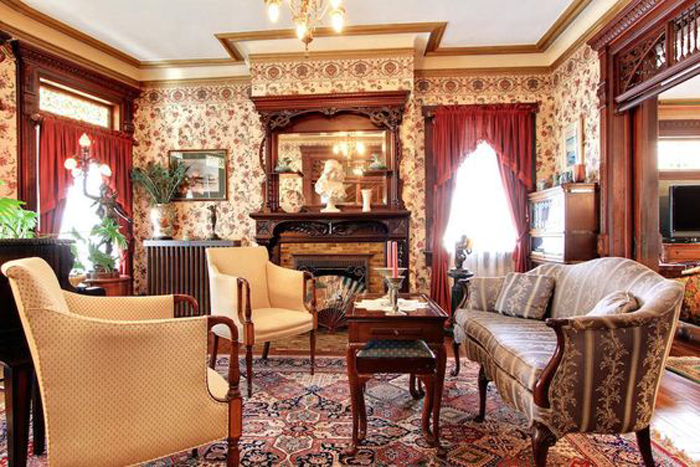
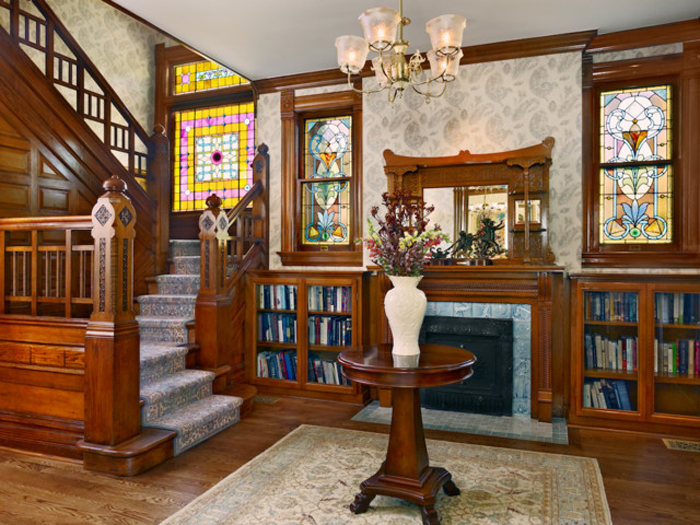
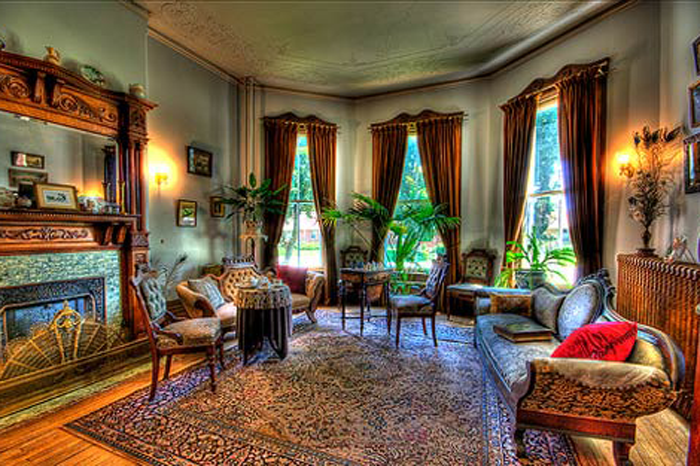
The interiors of Victorian era homes were known for their orderliness and ornamentation. The layout of the interior was formal and spaces were arranged in a manner that promoted entertaining of guests.
LAYOUT: The rooms were often small spaces, and were carefully separated between public and private uses. The parlor was considered the most important room in the home, as it was the first that guests would see when entering the home. The dining room was second in importance, with both the parlor and dining room would be used often for entertaining purposes.
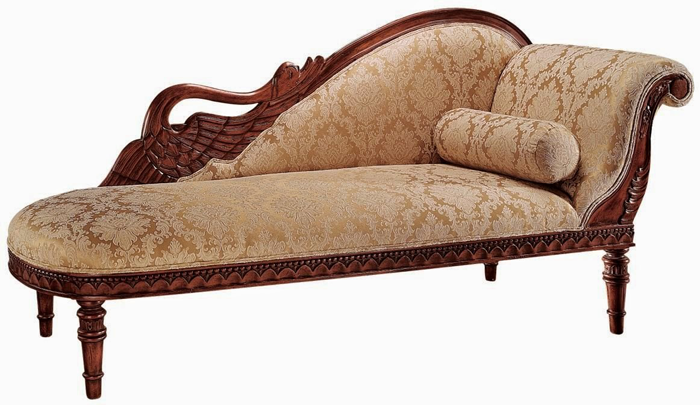
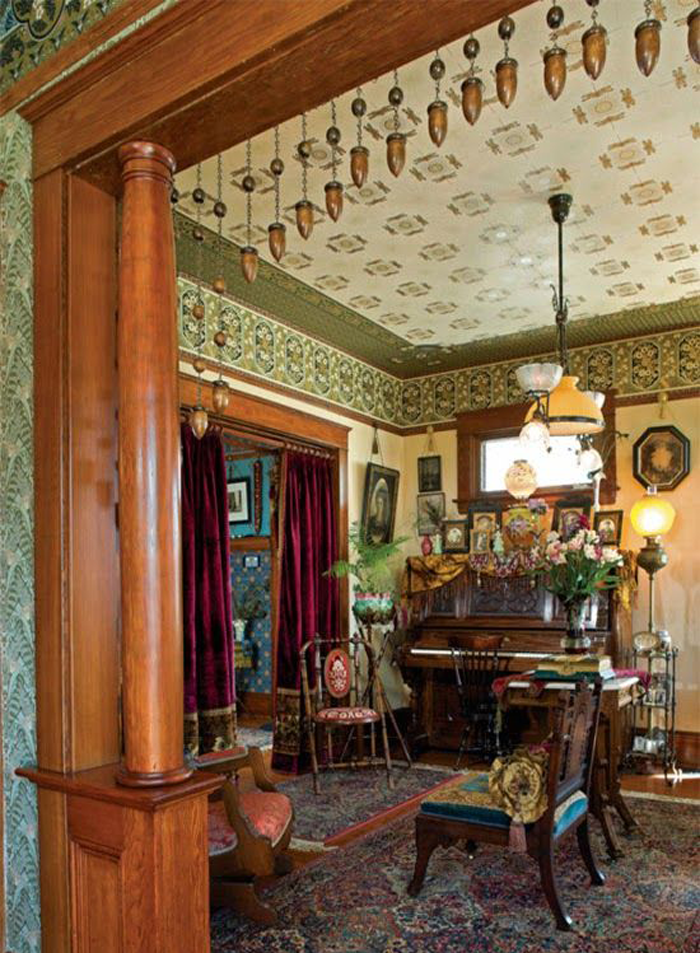
FURNISHING: Historically, Victorian homeowners would fill their rooms with art, furniture and objects that reflected their own interests and aspirations. It was thought that a bare or simply decorated room was in poor taste.
Furniture was beginning to be mass produced in factories instead of being custom created for the homeowner. In an effort to give a custom look, many pieces featured carved details. Furniture generally were of heavy proportions and featured woods such as walnut, mahogany and rosewood in dark finishes.
FINISHES: Botanical wallpaper was popular, as was the employment of embossing techniques. Walls were often embossed with a grain pattern – which was meant to imitate woods of higher quality. Heavy draperies in velvet or needlepoint were favored.
There was effort made to emphasize the height of important public rooms in the home – which was accomplished by drawing the eye up with decorative cove molding, lighting medallions and intricate patterns painted on the ceilings.
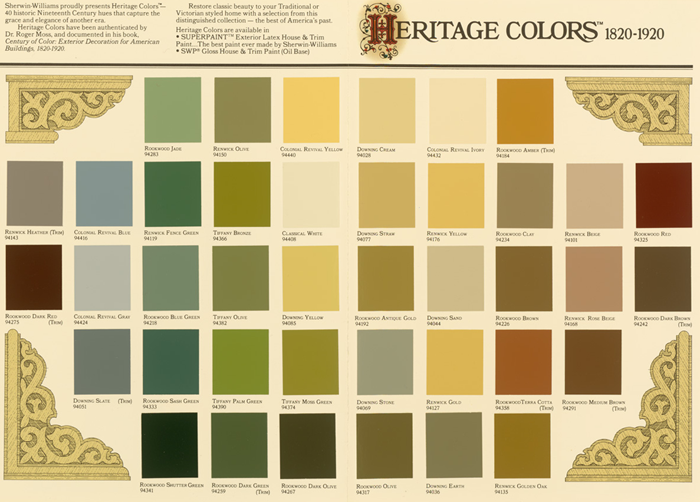
Soft and muted colors were favored over bright and vivid color schemes. It has been said that people of that era would have been upset by the flamboyant color schemes that some of their homes are being painted during restoration. They preferred delicate rose pinks, grays, lavender and sage – as well as warmer colors such as mustard yellow, burgundy or teal.
There were two schools of thought when it came to color selections. The first, “harmony by analogy” favored a palette that utilized two colors next to each other on the color wheel, such as greens and yellows. Another, “harmony by contrast” was geared toward high contrasting colors, or opposites on the color wheel- such as creams and blues.
I hope you have enjoyed learning a bit more about the Queen Anne Victorian style. Curious which residential style will be featured next month? Stay tuned!
And be sure to check out the previously showcased styles here.
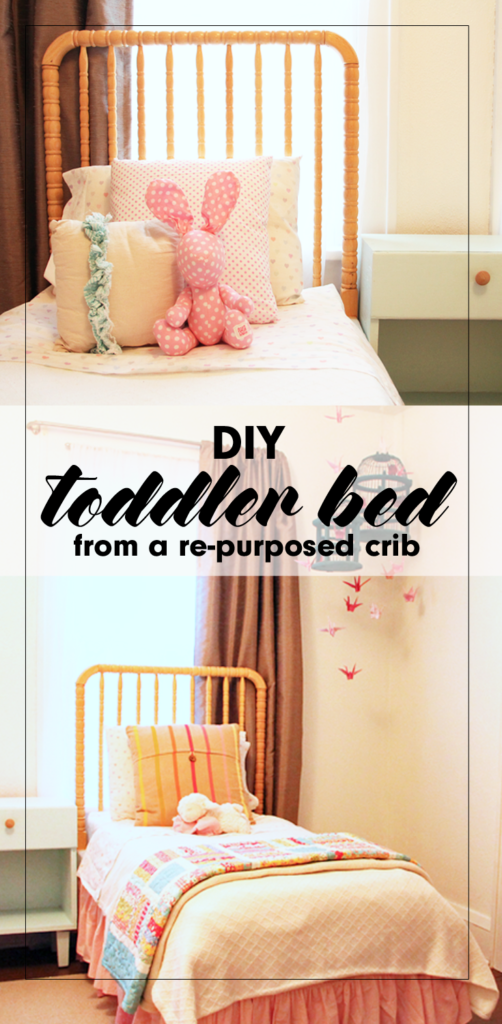
What should you do when your child outgrows his/her crib? Consider re-purposing it into an adorable DIY toddler bed, using this simple tutorial.
Not many moments spark the same amounts of joy and sadness as when the youngest child of the family finally outgrows the crib. With the celebratory occasion of assembling the ‘big boy/girl’ bed comes the equally emotional moment of taking the crib apart.
We were faced with this exact scenario in the months before we took the trip to China to finalize {K}’s adoption. {M} had always loved the security of her crib, the same crib that all three of our sons had also slept in, but at 3 1/2 years old, it was finally time for her to say goodbye as well.
It was at that moment we were faced with a difficult decision. What do we do with the crib? Maybe you are nearing this milestone and have had the same question. Today I am offering a tutorial explaining our personal crib re-purpose DIY project.
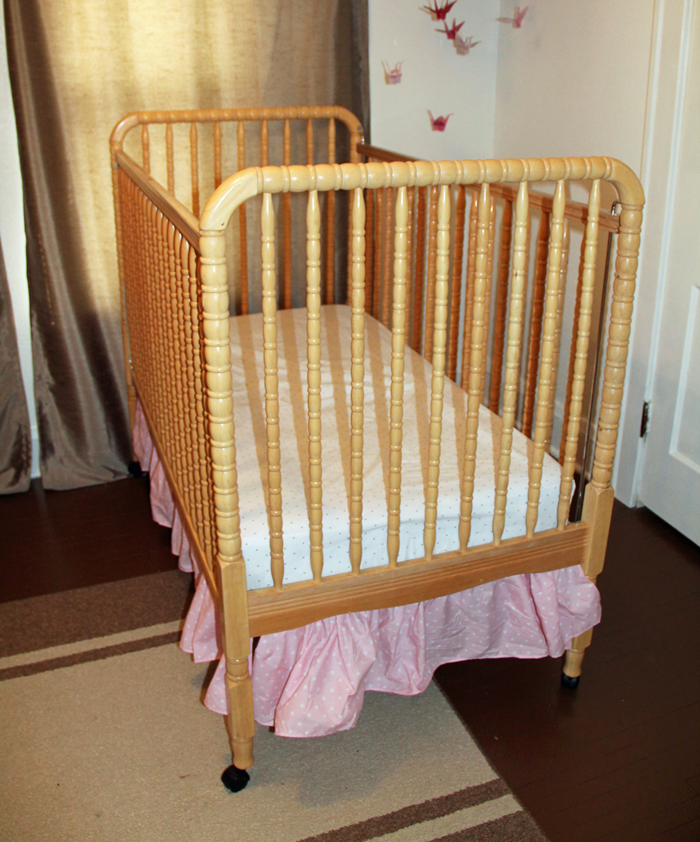
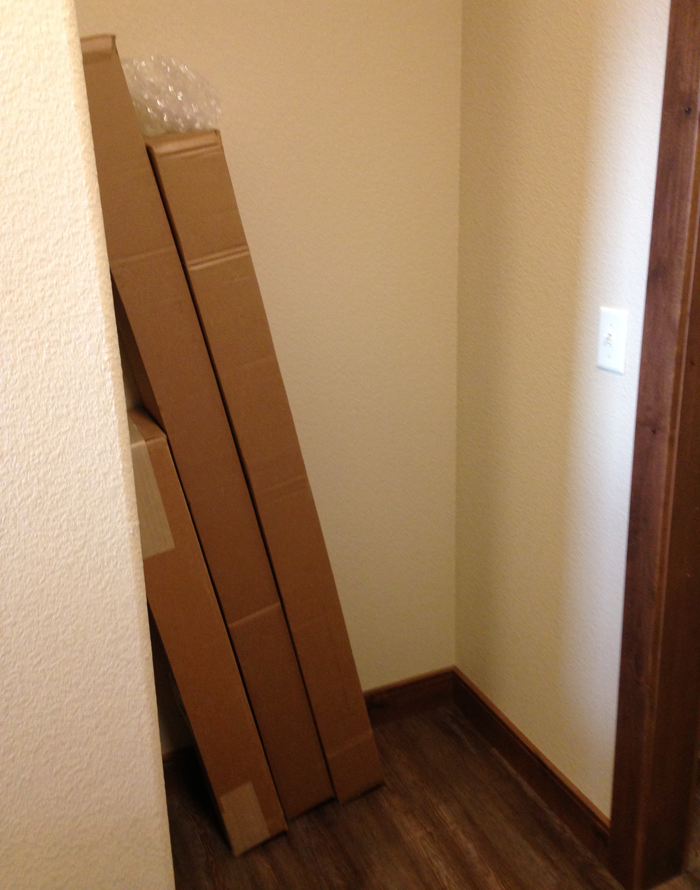
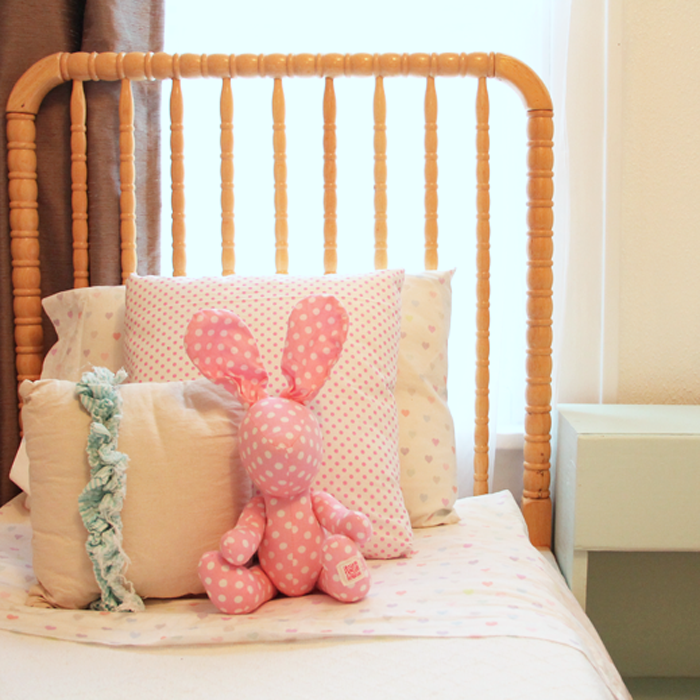
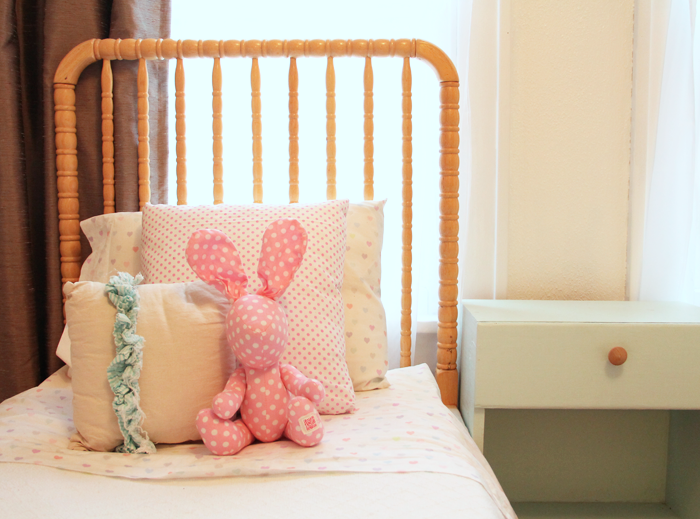
THE CRIB BEFORE
Our simple, Jenny Lind style crib was well loved but it’s natural wood finish and spindle details had a charm that we wanted to preserve.
It was given to us as a hand me down before {D} was born, over 11 years ago. Needless to say, it was equipped with the notorious ‘drop side’ – a feature now considered dangerous. We had long ago disabled the drop side, but legally the crib was no longer eligible to sell (or give away). Even still, the crib had a beautiful Jenny Lind style, and the thought of throwing it in the garbage just didn’t sit right with us.
We brainstormed a few different ideas, and eventually decided that the best option for our family was to turn this ONE crib into TWO toddler beds – one for 3 1/2 year old {M} and one for her 6 1/2 year old sister {K}, who has arthrogryposis and is small for her age. We knew they would both fit comfortably in the smaller sized bed for a while, and that the bed DIY project could save us some money as well!
CREATING THE DIY TODDLER BED
I’ll be honest that at the time of the project I wasn’t thinking in terms of getting enough pictures for a tutorial. I only have a few photos, but will try to fill in the gaps with words. If you have any questions about the process we used, feel free to comment below or send me an email!
STEP ONE
My husband Craig disassembled the crib, which actually made {M} very angry! She couldn’t see our ‘vision’ at the time and was just upset that he was breaking the comfy place where she loved to sleep. Essentially, all pieces of the crib were used to create the new beds with the exception of the hardware and the spring mat.
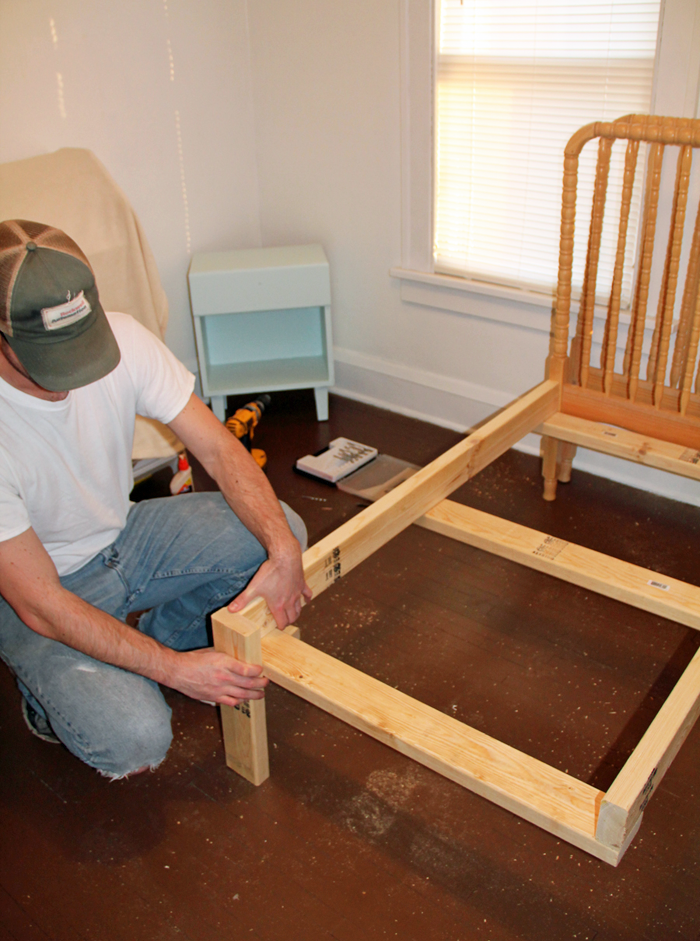
STEP TWO
We purchased standard 2×4 material, and Craig cut them to assemble a three sided ‘box’ that would hold the crib mattress. Because we planned to use the two tall sides of the crib as headboards, he only needed to make legs for the end of the box. He reinforced the center with a 2×4 cross base.
STEP THREE
Craig attached the assembled ‘box’ to the headboards, making sure everything was level. He then set one side rail into each of the ‘boxes’. The side rail piece spreads the weight from the mattress out over the 2x4s included in the ‘box’ construction.
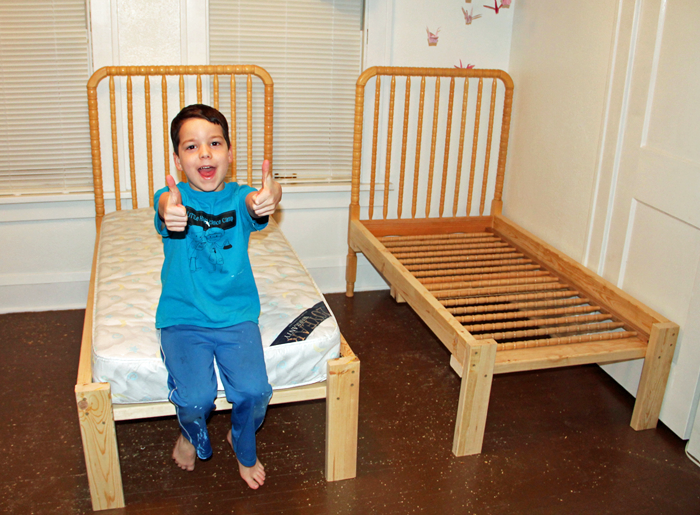
STEP FOUR
The crib mattresses were then added. They were a perfect fit, as demonstrated by this goofy picture of {L}. Crib mattresses are a standard size, but they can vary slightly. If you try this project you will want to base your dimensions on the crib mattress you have. We happened to have two mattresses, one that was used in the crib and another that we had for a different toddler bed.
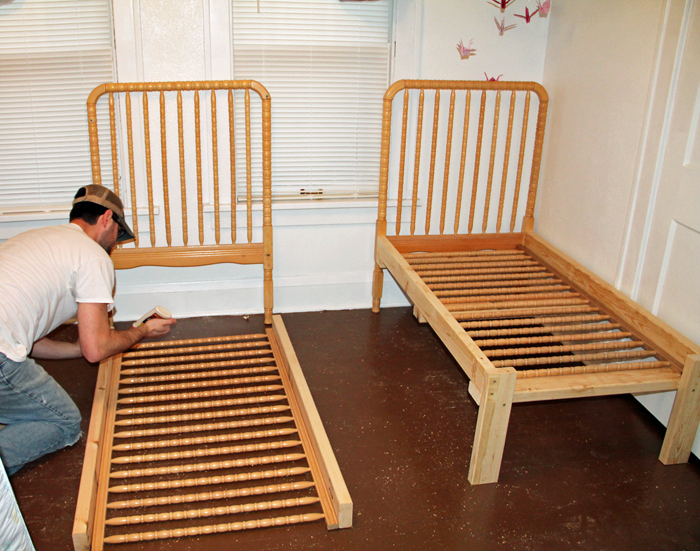
STEP FIVE
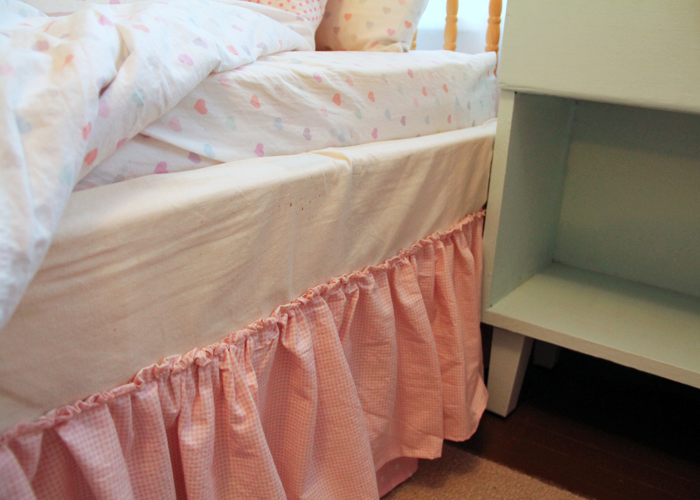
Dress it up! I created pink ruffle bed skirts using this easy tutorial. They really were simple to make, but a bit time consuming! I used muslin fabric to cover up the exposed 2x4s near the mattresses.
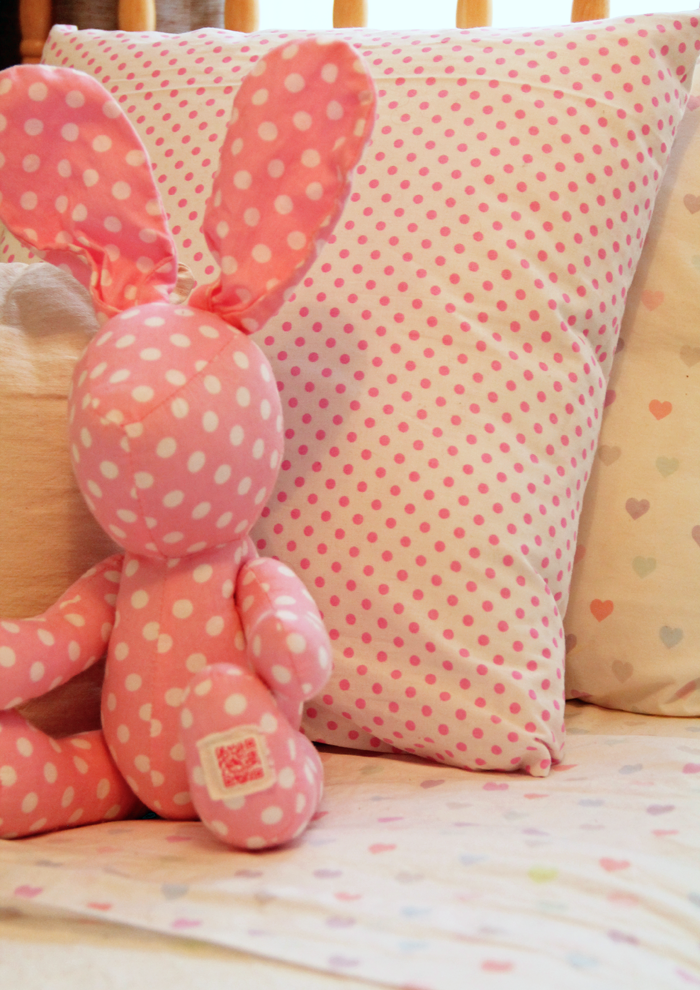
I also found some adorable heart bedding from Pottery Barn Kids. Grandpa and Grandma purchased the bedding as a gift for the girls. A king sized texture blanket was the perfect size to cut in half, allowing me to make two matching comforters. Topped with accent pillows, and comfy colorful quilts, the beds look super cute on each DIY toddler bed!
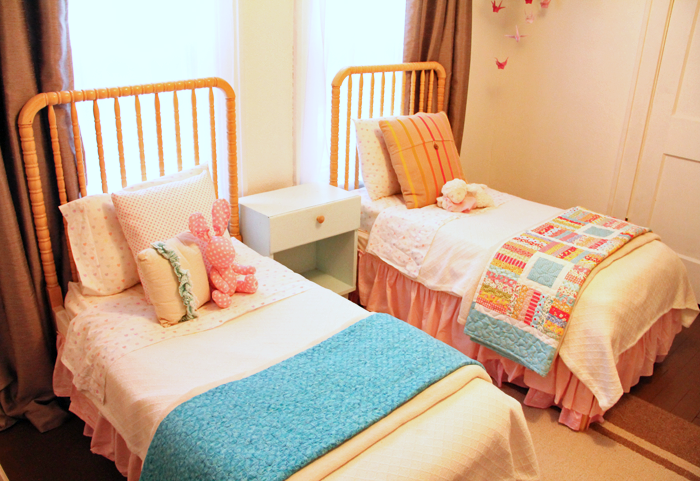
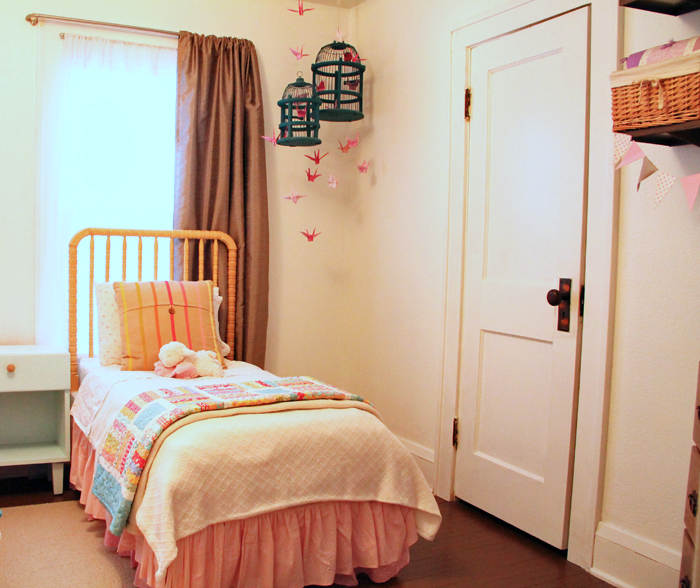
FINISHED IN THE ROOM
The finished beds look so sweet set up together in the room. I still love walking by and admiring them, over a year later!
The girls really enjoy sharing a room and their little beds fit perfectly into their bright and cheery space. Although I am having fun designing their new shared space for Arrow Hill Cottage, I will be sad when we have to retire (or pass on) these special beds their daddy made them!
MORE SHARED BEDROOM DETAILS
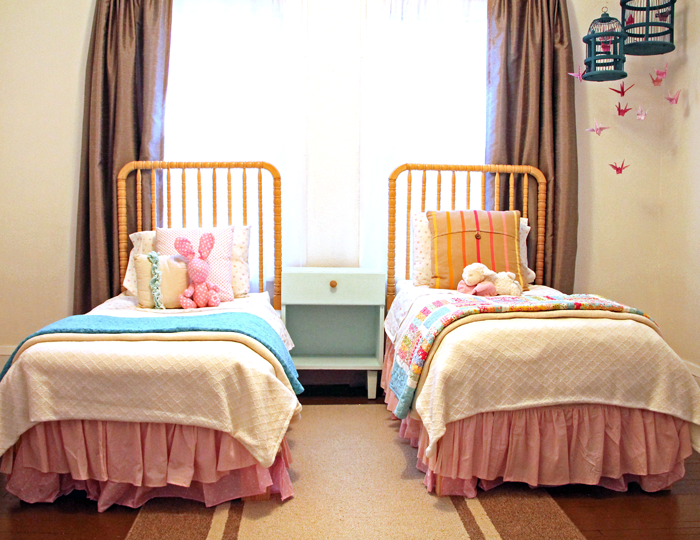
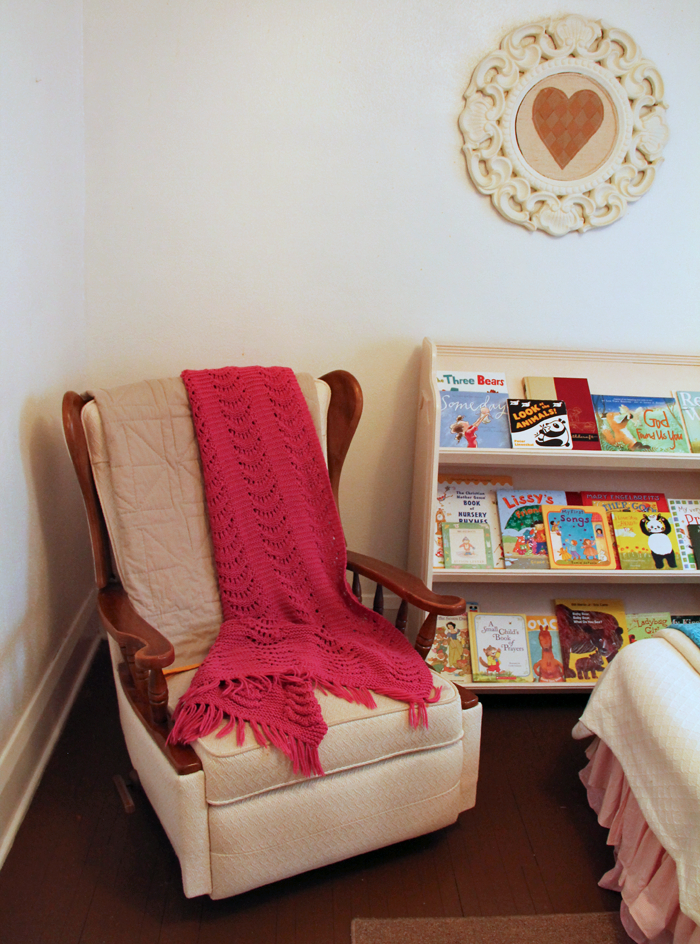
Just for fun, here are a few more details of their shared bedroom.
This rocker was Craig’s grandparents. We had it reupholstered before our first child was born, and have used it in the nursery ever since. It is a special piece. Next to it we have a bookshelf, making this the perfect spot for reading.
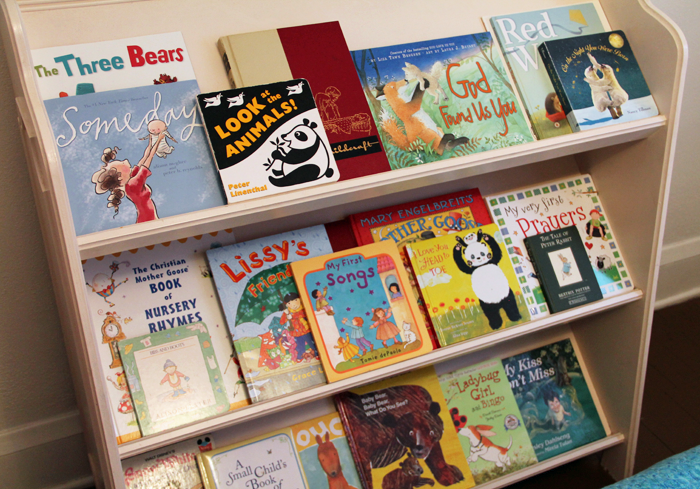
The bookcase itself is a vintage piece from our local Carnegie Library, which is now closed. I love that the girls are able to see the fronts of the books when making their selections.
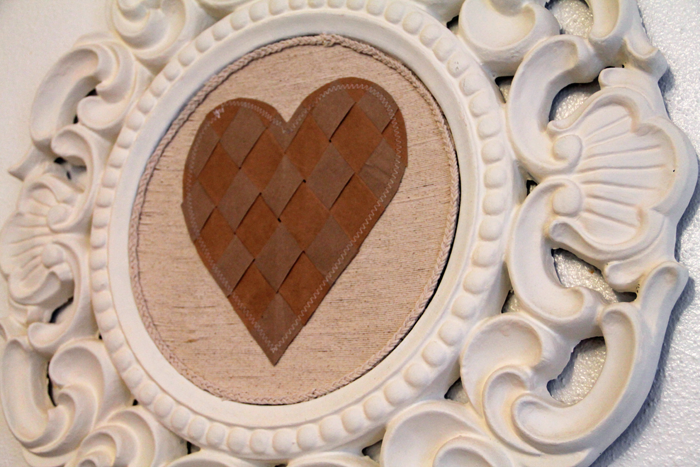
Above the bookcase is a DIY piece that I put together using a mirror frame, which I spray painted white. I covered the mirror with a fabric. It is attached with temporary adhesive, because I imagine in the future the girls may opt to use the mirror itself. The heart was made by weaving strips of paper grocery bags.
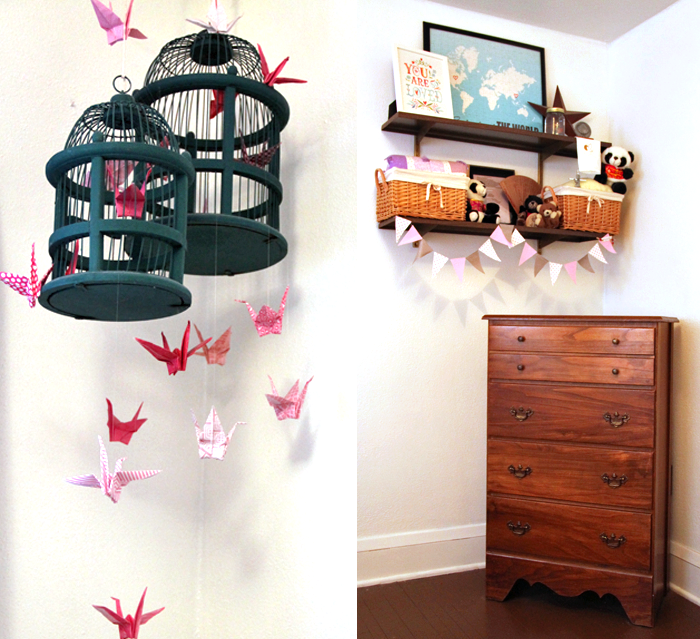
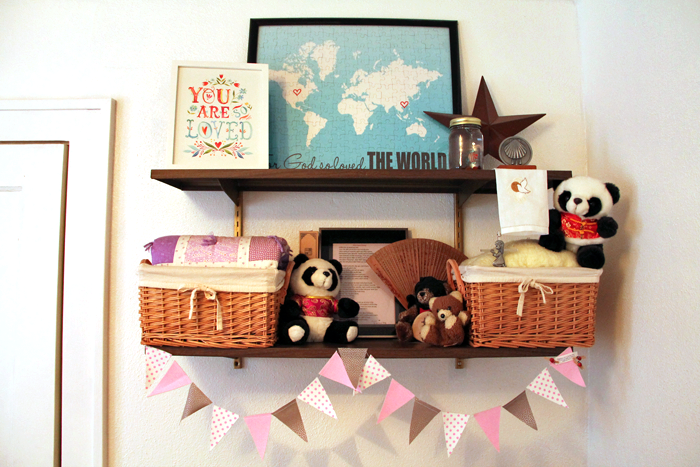
Both of our girls were adopted from China – {M} at the age of two in 2015 and {K} at age six in 2017. We always want them to be aware of their beautiful birth culture. The paper crane bird cage/ mobile symbolizes peace and longevity. I folded each of the cranes by hand using a variety of pink patterned paper. The dresser was mine when I was a little girl. It was a gift to me from my grandpa, and I love that I can pass it down to daughters of my own.
Above the dresser are more symbolic and special pieces, including two panda bears from China – one from each trip.
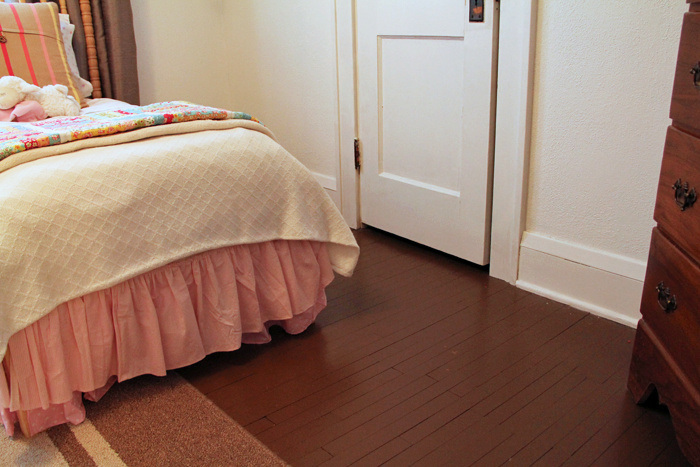
We painted the floor in the girls room, and the entire upstairs of this rental house, a chocolate brown color. It has held up very well and is actually something I am considering for the new house.
PIN THIS DIY TODDLER BED IDEA
I hope you enjoyed this little tutorial and the impromptu room tour! I would love to see the creative ways you have re-purposed a piece into something new!


 Not many moments spark the same amounts of joy and sadness as when the youngest child of the family finally outgrows the crib. With the celebratory occasion of assembling the ‘big boy/girl’ bed comes the equally emotional moment of taking the crib apart.