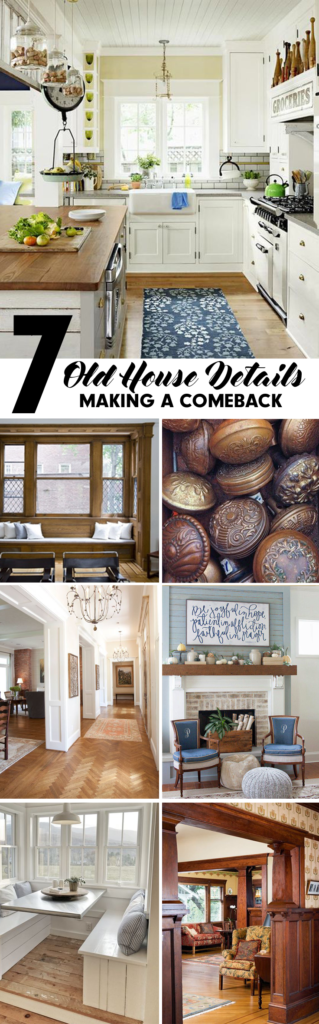
When you think of an old house – you may envision rotting siding, squeaky floor boards, and bats in the attic. While these may very well be a reality, there are plenty of merits that old homes have to offer.
The seven charming old house details I’m about to share may have you rethinking your preconceptions. Who knows – you may decide to incorporate some of them in your home as well.
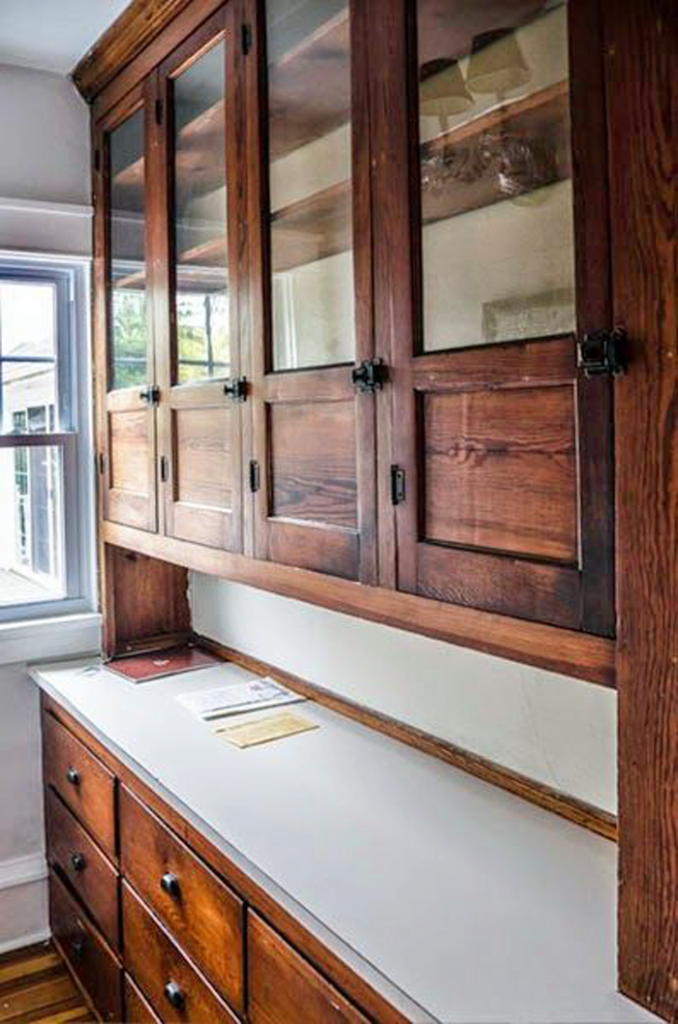
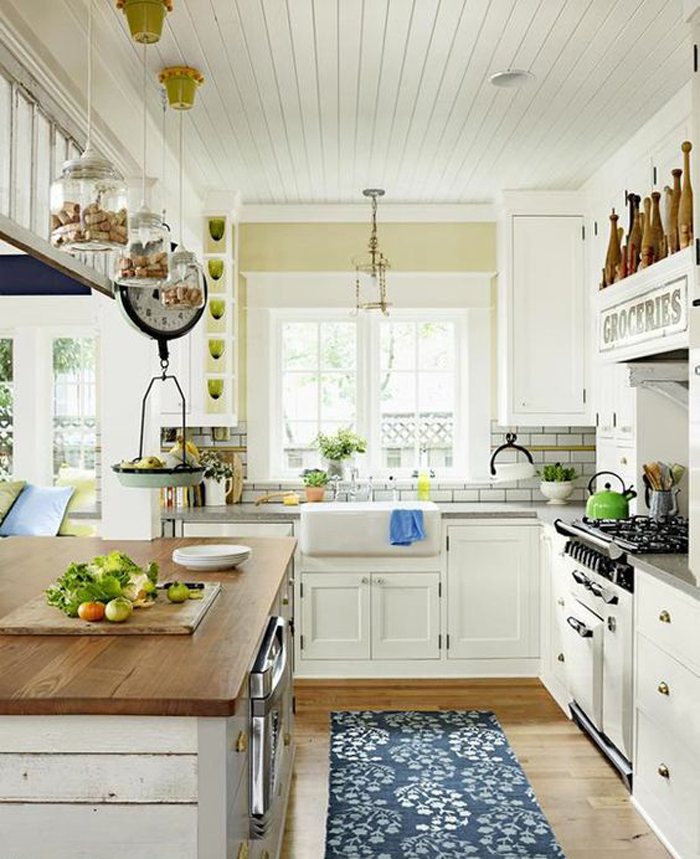
BUILT IN FURNITURE
These showstopping pieces add dramatic character. Because they are designed and built to fit with the house, in a specific space, they are becoming more and more popular with homeowners as storage pieces and as a custom way to add elegance and charm.
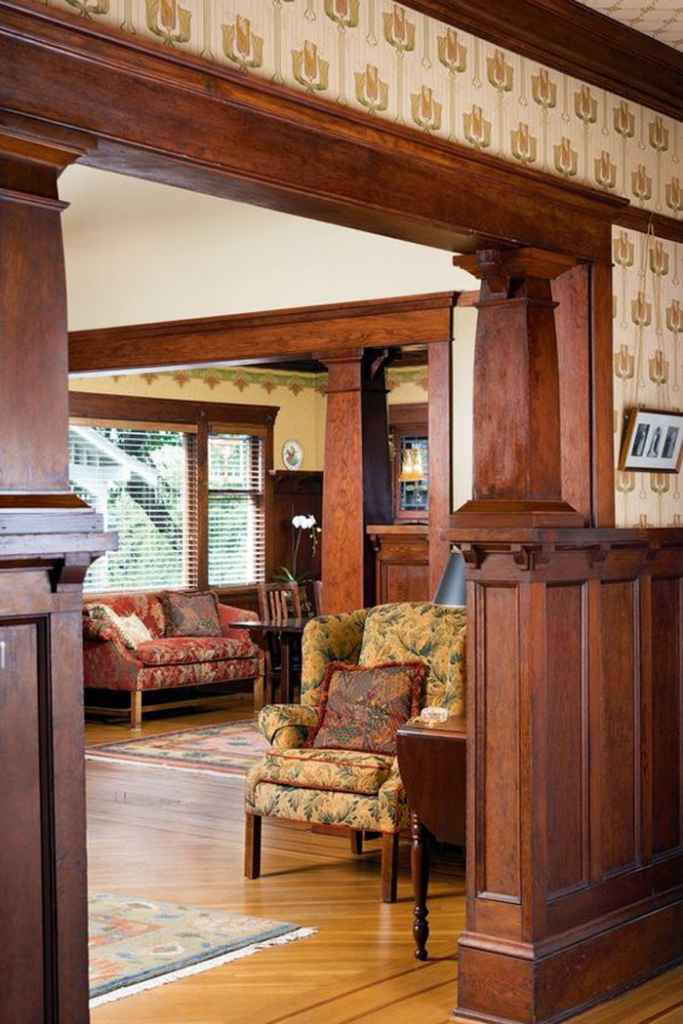
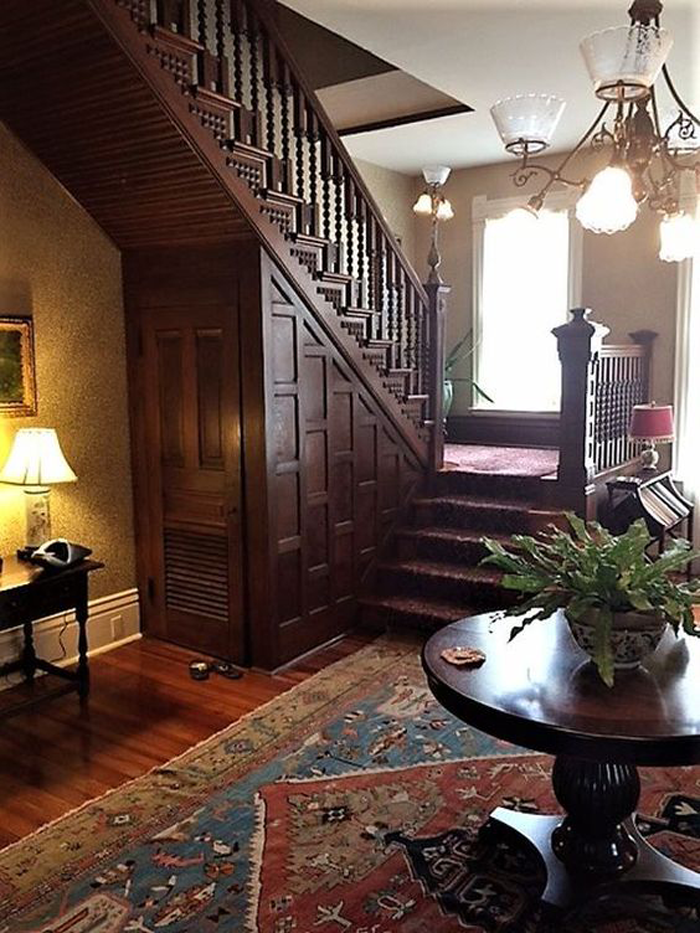
It’s true that slow growth timber was more readily available when the houses of yesteryear were being built. Craftsmen showcased their skills on detailed woodwork – from stair railings and wainscoting to window molding. Though it may never return to the intricacies of the Queen Anne Victorian era, an increased level of detail in woodwork is being re-introduced in today’s homes.
There has been a huge resurgence in adding smaller vintage details to new homes, to give them an extra dose of character. One of the easiest ways to accomplish this is by utilizing decorative hardware, such as door knobs and cabinet pulls. They are generally inexpensive and readily available. Reproductions of these classic styles are also being made.
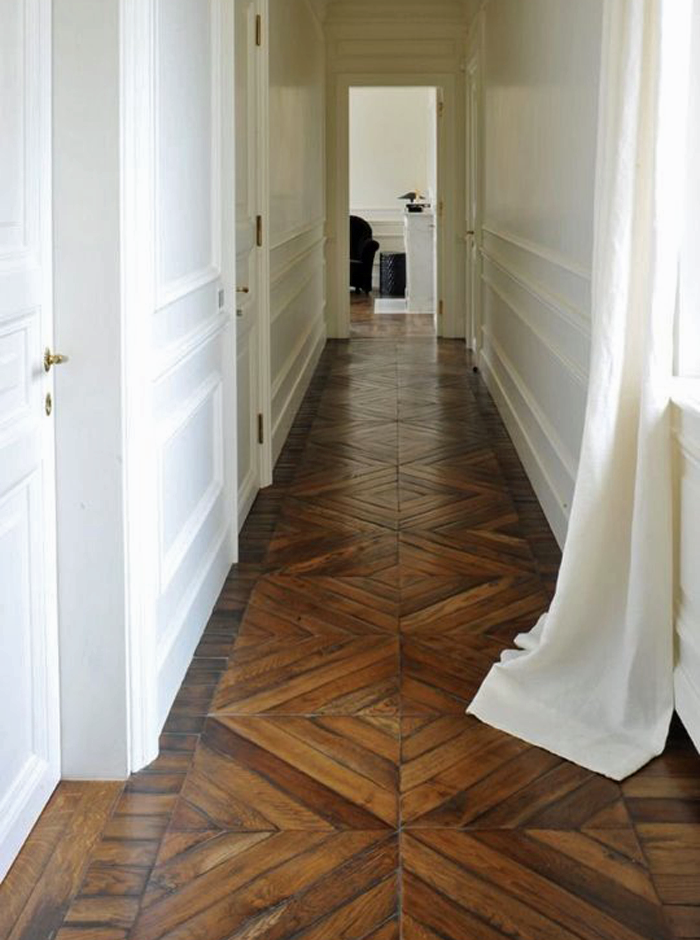
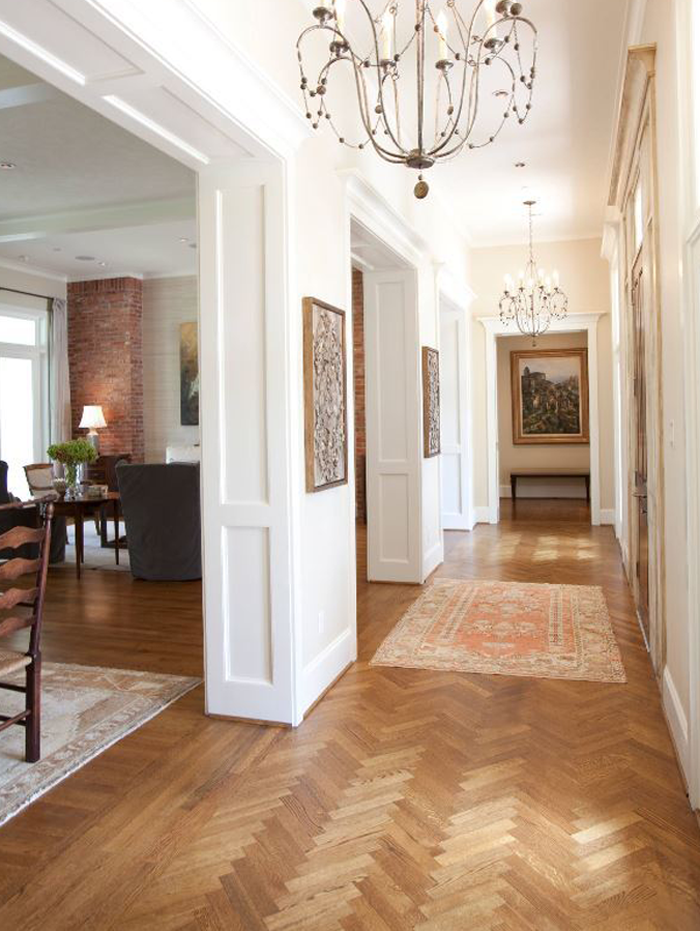
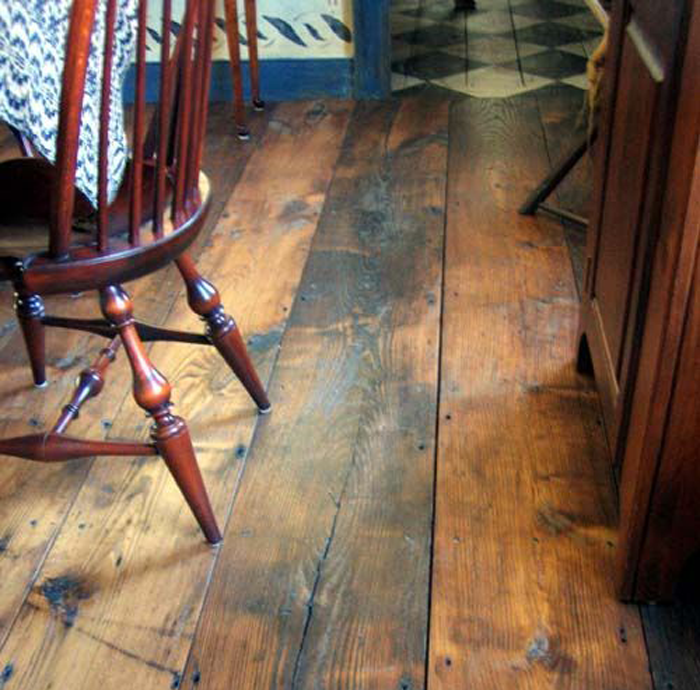
Old houses have the best floors. The patina found on aged pine, maple, and oak flooring is hard to match – but even a newer wood floor is a beautiful addition to a modern built home. Wood floors are wonderfully adaptive, lending themselves to be laid in a variety of patterns.
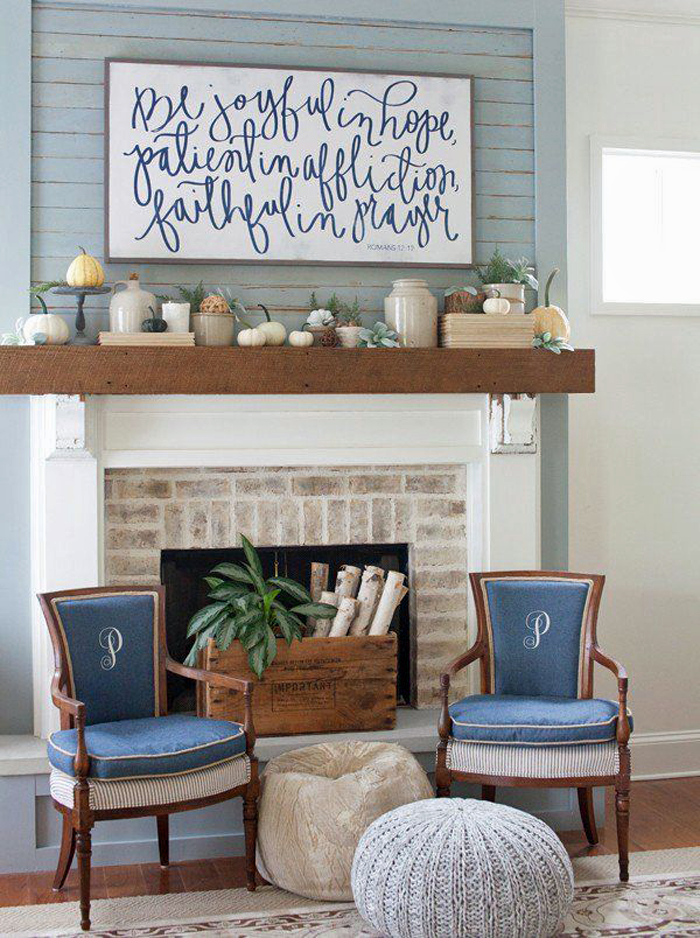
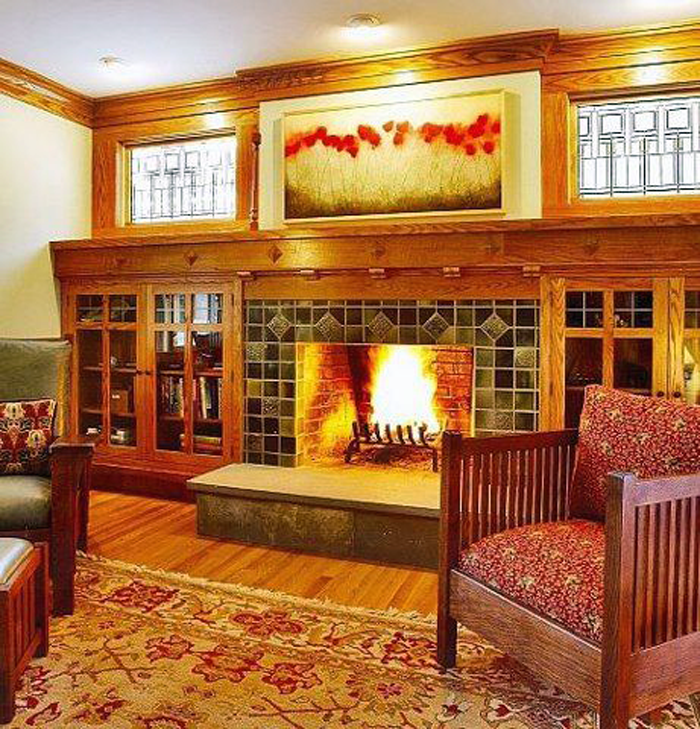
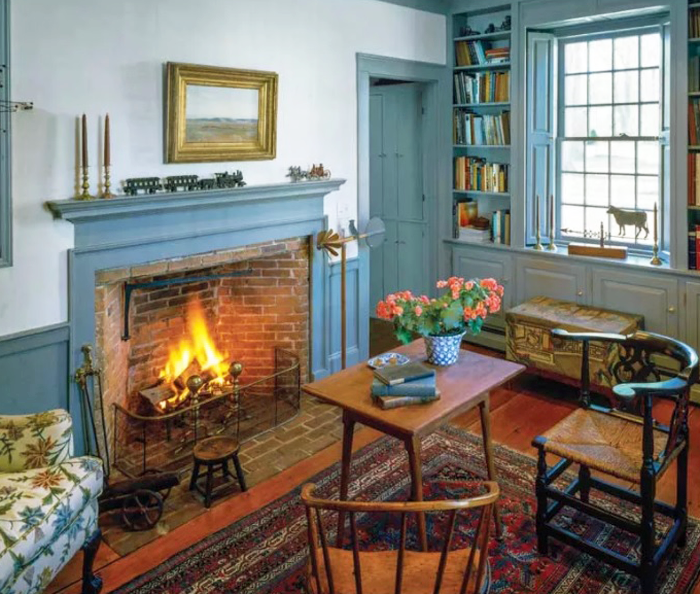
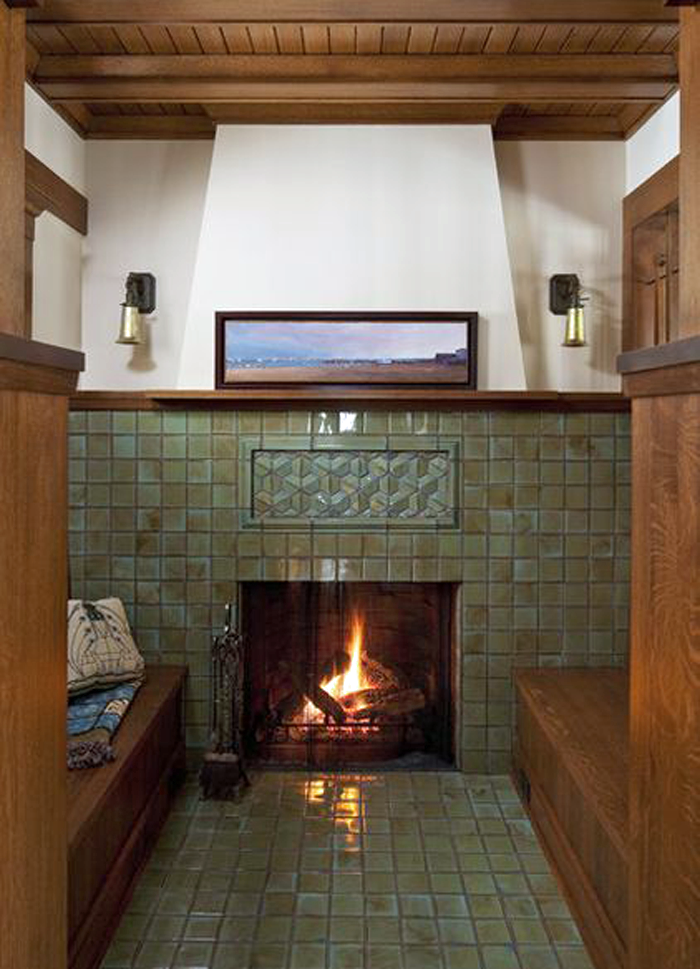
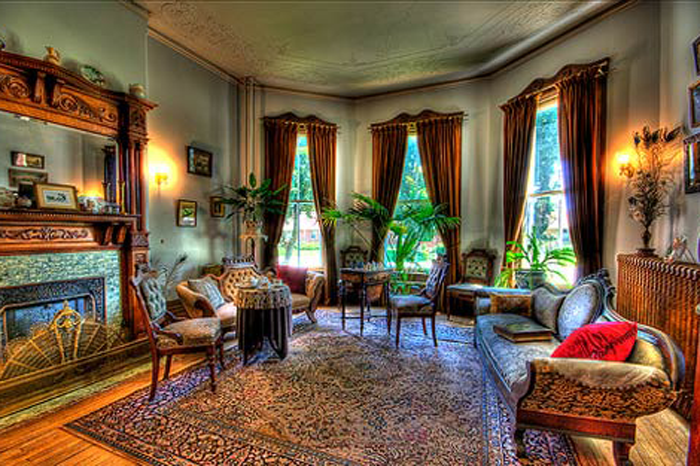
Before the television became the center of attention, the fireplace was the focal point in most homes. Now, as a way to escape the constant bombardment of electronics, families are opting to gather together in a quiet space more often. In turn, homeowners are opting to give their fireplaces more detail and prominence.
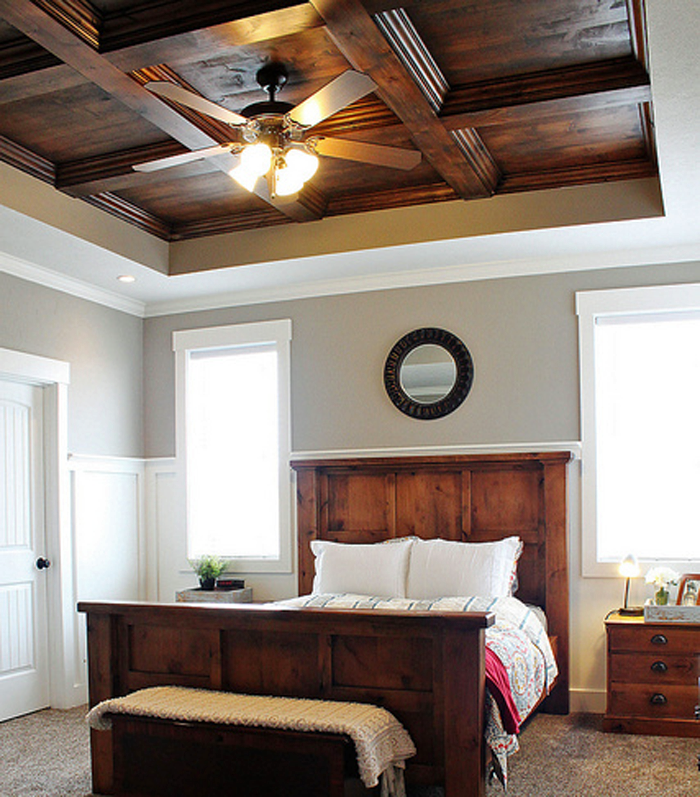
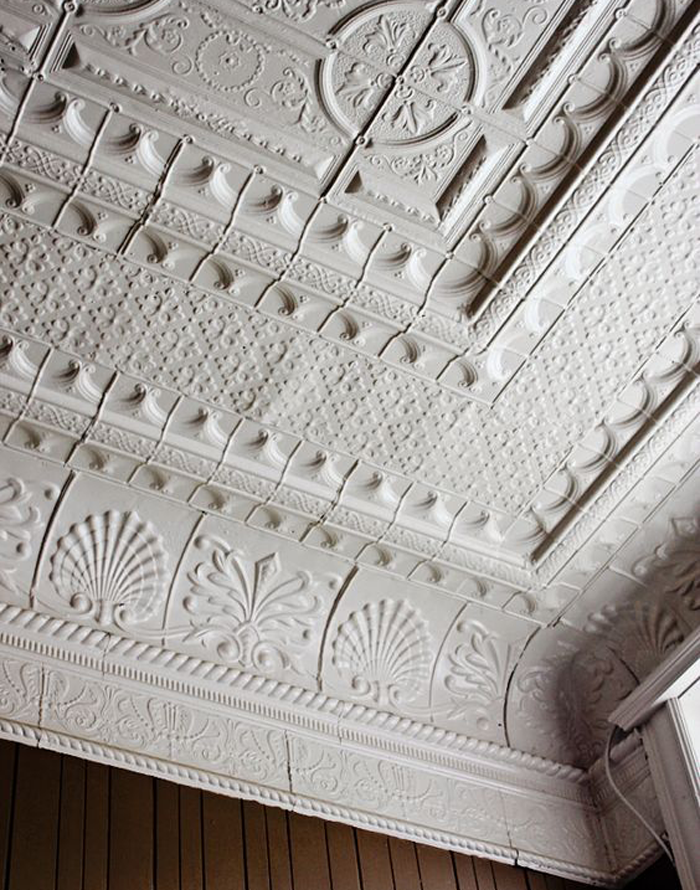
Gone are the years of popcorn textured ceilings and flimsy drop ceiling tiles. Homeowners are instead embracing a variety of decorative options, and looking to historic examples for inspiration.
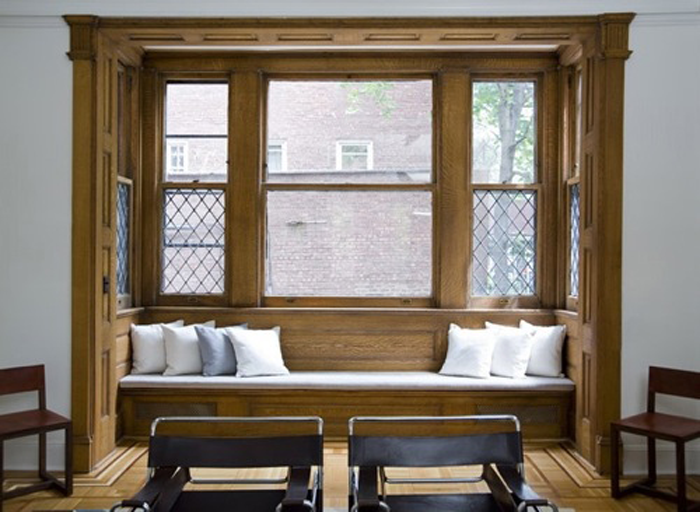
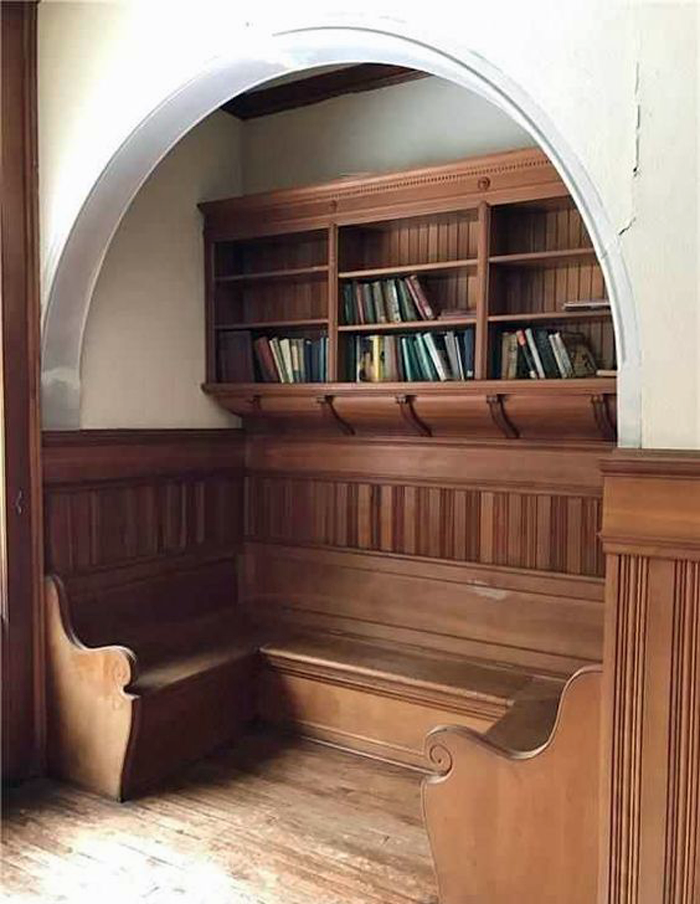
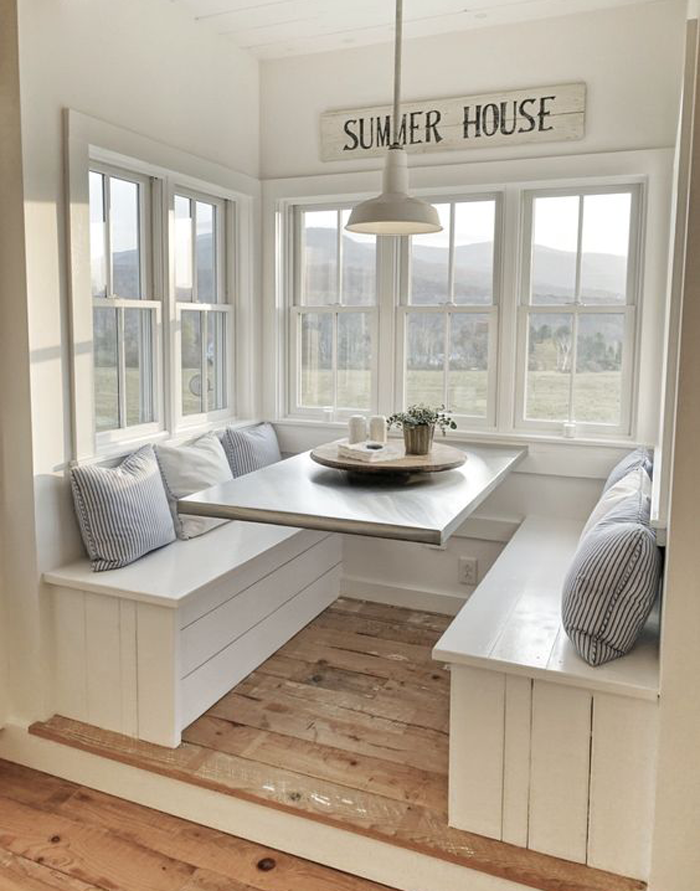
Old houses are full of nooks and crannies – just think about grandma’s attic. The cocooning nature of small, set apart spaces is comforting to many homeowners. From built in dining tables to relaxing inglenooks, these interesting and intimate spaces are becoming more and more popular once again.
Which of these seven details is your favorite? Let me know which you would love to try (or have incorporated in your home already) in the comments below.
Welcome to another installment in the ELEMENTS OF HOME series. Each month I showcase a different residential style here on the blog. It is my hope that this information will not only teach you a little something about the various styles; but also equip you if are designing or searching for a new house – by allowing you to determine which style(s) suit your lifestyle and preferences the most.
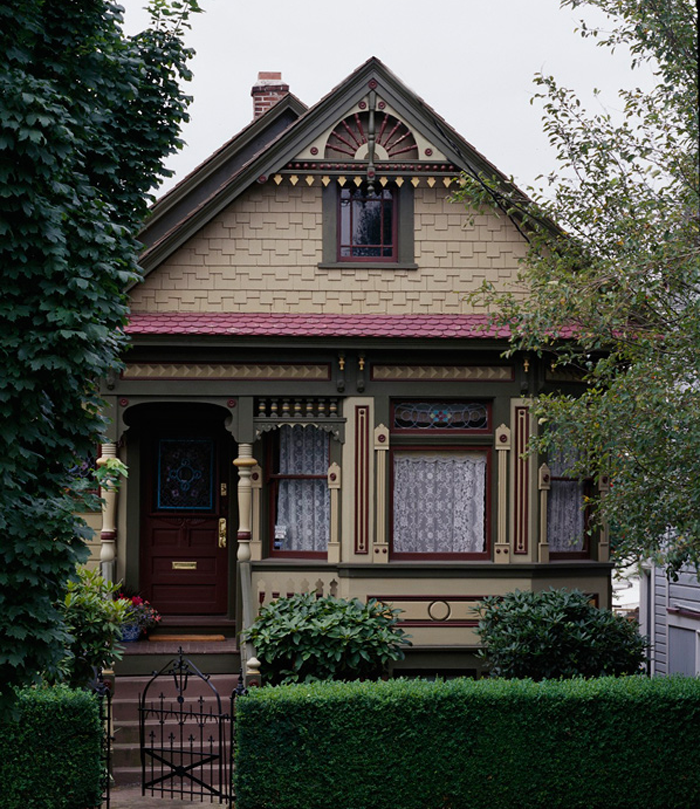
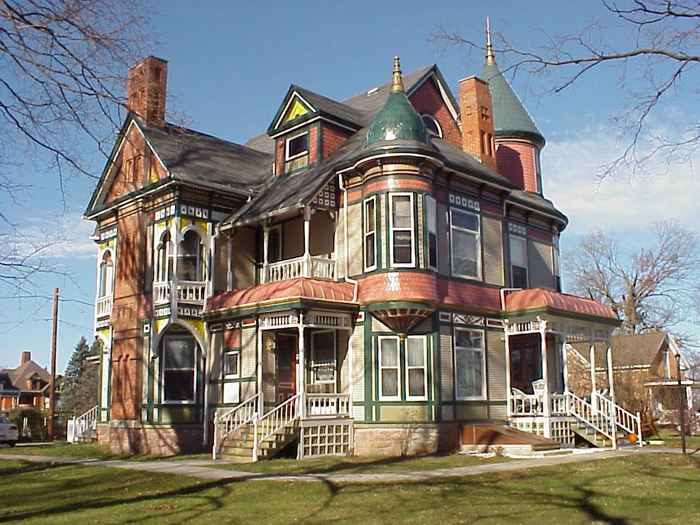
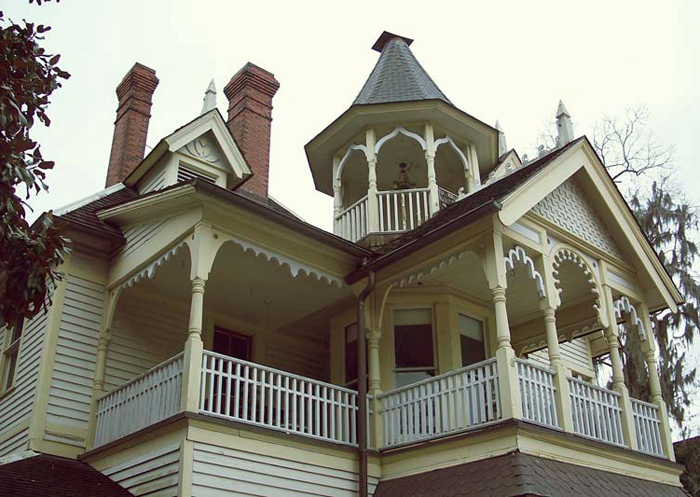
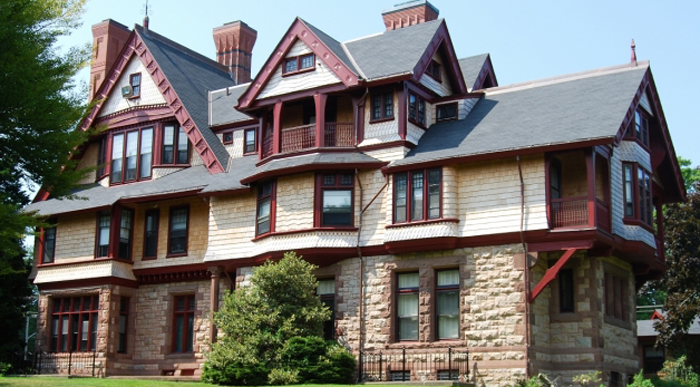
Today I will be over-viewing the Queen Anne Victorian home – including the history of the style and what makes it unique.
HISTORY OF THE QUEEN ANNE STYLE
The Victorian style in general spreads over the years 1860-1900 primarily, during the last decades of the reign of Britian’s Queen Victoria. There are six distinct variations of the style occurring during that time period – based, at least loosely, on their Medieval prototypes.
This time period saw rapid industrialization in the American built landscape. The art of balloon framing was rapidly replacing heavy timber framing as the standard building technique. Because of the flexibility of this type of construction, homes were no longer restrained to simple box-like shapes. In addition, house components such as doors, windows, siding and decorative details were beginning to be mass produced, and could easily be distributed throughout the country by use of the expanded railway lines.
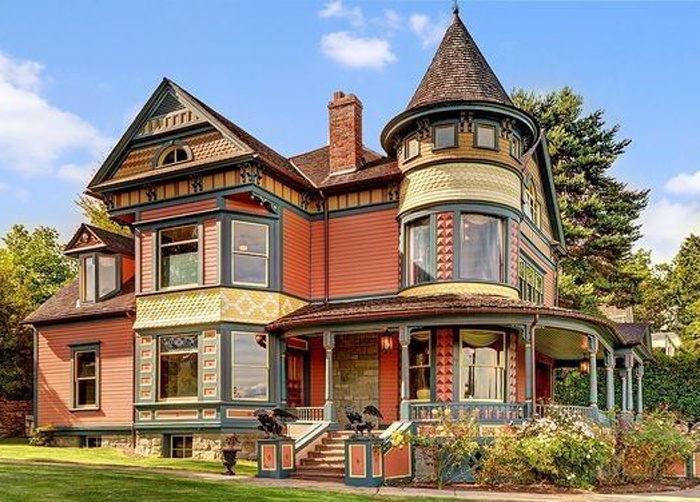
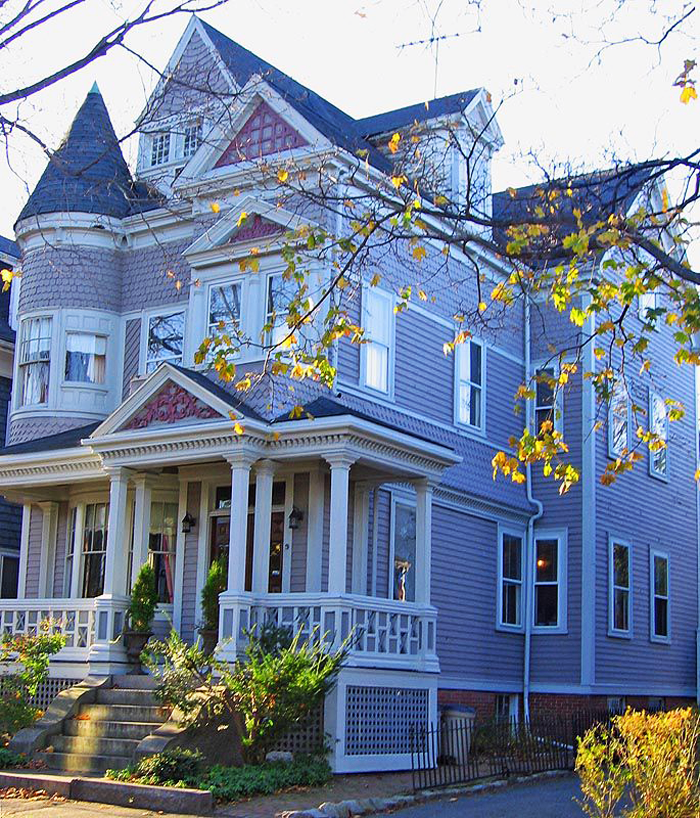
When most people think about the Victorian style, they generally imagine a Queen Anne – the most elaborate and eccentric of the the six variations. I will highlight the remaining five variations (Second Empire, Stick, Shingle, Richardsonian Romanesque, and Folk Victorian) in later posts.
The ‘Queen Anne’ name is actually a bit deceiving – as it bears almost no similarities to the architecture produced during the reign of Queen Anne (from 1702-1714). The term ‘Queen Anne Style’ was used by Scottish architect Richard Norman Shaw to describe his work, and it stuck.
Queen Anne Victorian homes can be found throughout North America, thanks mostly to the expanding railway of the late 19th century. Pattern books made it simple for prospective homeowners and builders to choose manufactured pieces and decorative details to dress their home in the Queen Anne style. This home style is least likely to be found in the heavily populated northeastern states.
There are also distinct concentrations of the style. Seattle’s neighborhood, Queen Anne Hill, derived it’s name from the architecture used on many of the affluent homes built there. You can take a little mini video tour of the neighborhood here. And of course, San Francisco features a beautiful collection of Queen Anne row houses.
As mentioned previously, one of the major shifts that happened with the introduction of balloon framing was the flexibility of the floor plan. It allowed more interesting shapes of houses and in turn many homeowners opted for bay windows, bump outs, and cantilevered second story spaces.
To spot a Queen Anne Victorian home, look for these style specific exterior elements.
IRREGULAR SHAPES: Builders and architects of the Victorian era took full advantage of the flexibility that balloon framing provided – by avoiding rectilinear building footprints and instead opting for homes with varied shapes.
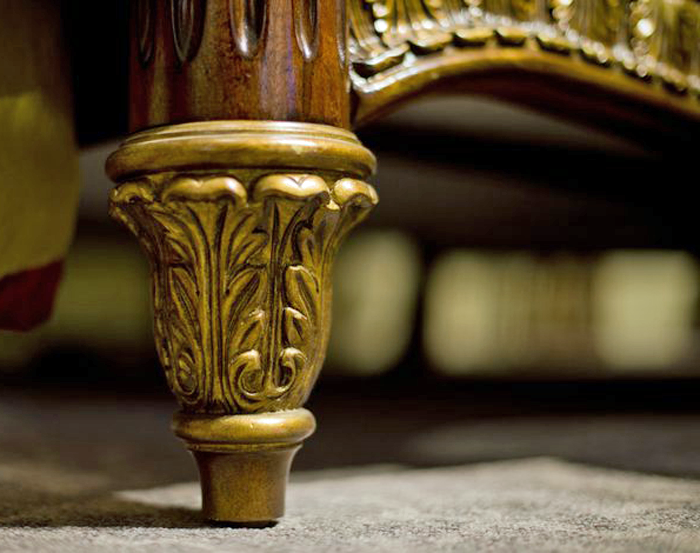
SPINDLE-WORK: Nearly 50 percent of all Queen Anne houses have spindle-work, which is also commonly referred to as gingerbread ornamentation or Eastlake detailing. This detail came in the form of turned porch balustrades, lace-like porch brackets, and as gable ornamentation.
WALL TEXTURE VARIATIONS: The use of a variety of wall textures is hallmark to the Queen Anne house style. Patterned wood shingles, bricks of different colors and terracotta panels were used to create the illusion of depth and texture on exterior walls.
PORCHES: Covering the front entrance area, and also commonly extending along one or both sides of the house, these porches were used to highlight the asymmetry of the facade. Some examples of Queen Anne homes include second story porches.
TOWERS: Also common with Queen Anne homes is the use of towers. They may present in round, square or polygonal form. They were built at varying heights from the ground up or even cantilevered from the second story only. The most popular position for a tower on a Queen Anne home is the front corner.
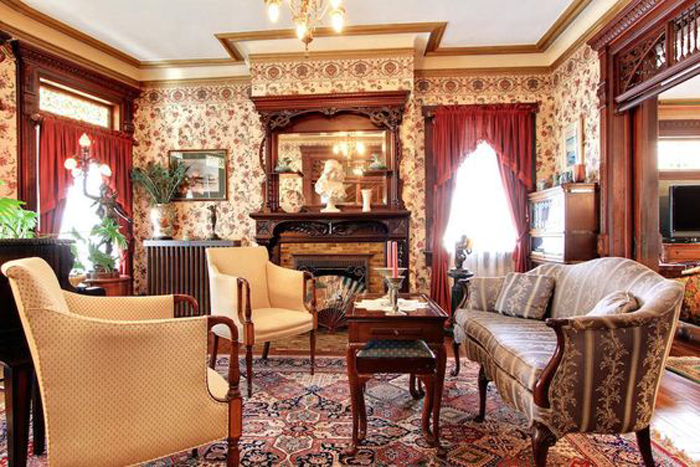
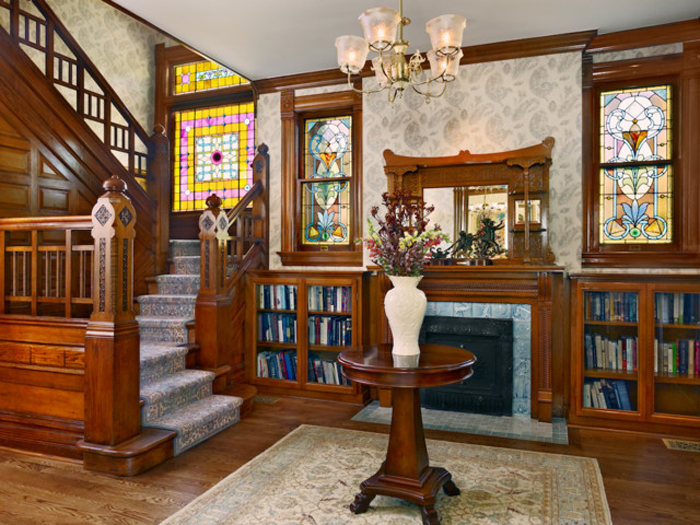
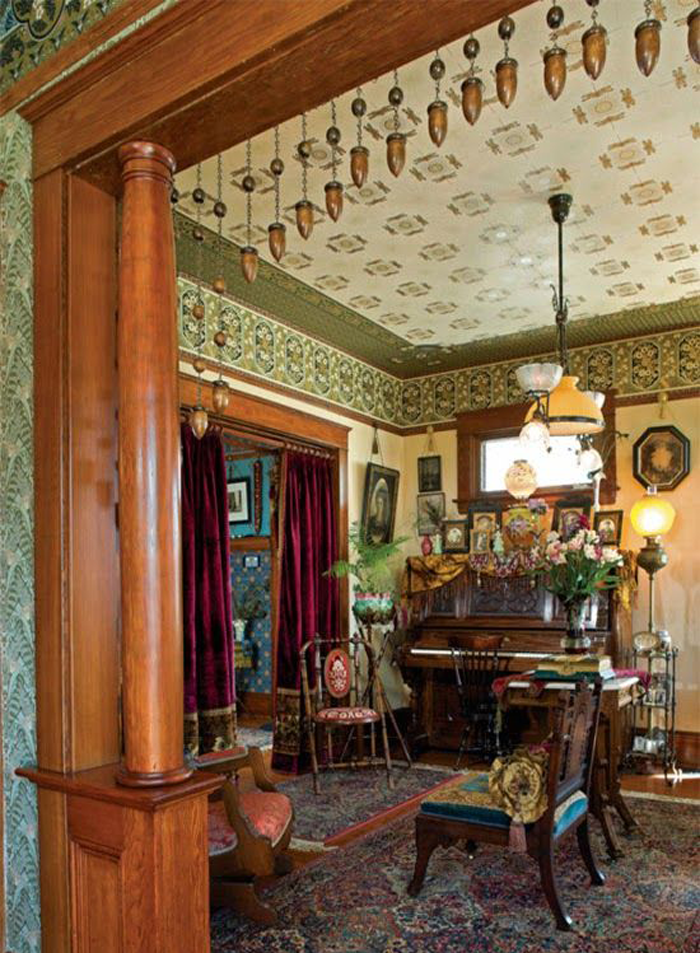
The interiors of Victorian era homes were known for their orderliness and ornamentation. The layout of the interior was formal and spaces were arranged in a manner that promoted entertaining of guests.
LAYOUT: The rooms were often small spaces, and were carefully separated between public and private uses. The parlor was considered the most important room in the home, as it was the first that guests would see when entering the home. The dining room was second in importance, with both the parlor and dining room would be used often for entertaining purposes.
FURNISHING: Historically, Victorian homeowners would fill their rooms with art, furniture and objects that reflected their own interests and aspirations. It was thought that a bare or simply decorated room was in poor taste.
Furniture was beginning to be mass produced in factories instead of being custom created for the homeowner. In an effort to give a custom look, many pieces featured carved details. Furniture generally were of heavy proportions and featured woods such as walnut, mahogany and rosewood in dark finishes.
FINISHES: Botanical wallpaper was popular, as was the employment of embossing techniques. Walls were often embossed with a grain pattern – which was meant to imitate woods of higher quality. Heavy draperies in velvet or needlepoint were favored.
There was effort made to emphasize the height of important public rooms in the home – which was accomplished by drawing the eye up with decorative cove molding, lighting medallions and intricate patterns painted on the ceilings.
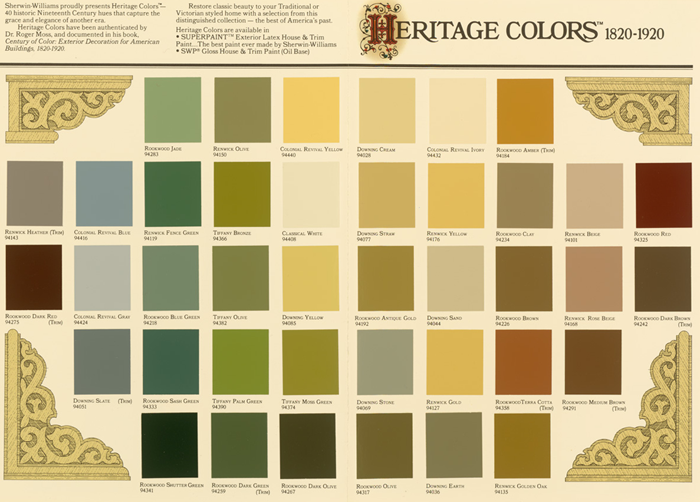
Soft and muted colors were favored over bright and vivid color schemes. It has been said that people of that era would have been upset by the flamboyant color schemes that some of their homes are being painted during restoration. They preferred delicate rose pinks, grays, lavender and sage – as well as warmer colors such as mustard yellow, burgundy or teal.
There were two schools of thought when it came to color selections. The first, “harmony by analogy” favored a palette that utilized two colors next to each other on the color wheel, such as greens and yellows. Another, “harmony by contrast” was geared toward high contrasting colors, or opposites on the color wheel- such as creams and blues.
I hope you have enjoyed learning a bit more about the Queen Anne Victorian style. Curious which residential style will be featured next month? Stay tuned!
And be sure to check out the previously showcased styles here.
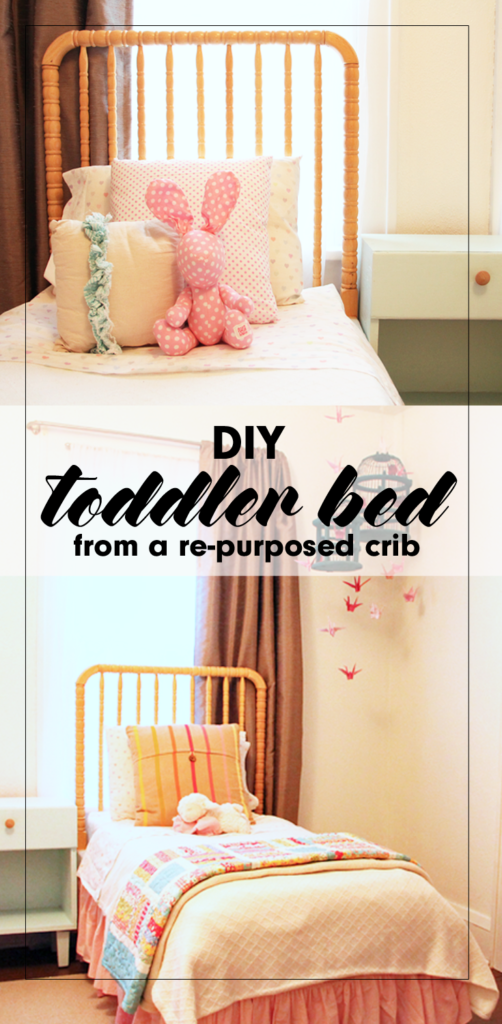
What should you do when your child outgrows his/her crib? Consider re-purposing it into an adorable DIY toddler bed, using this simple tutorial.
Not many moments spark the same amounts of joy and sadness as when the youngest child of the family finally outgrows the crib. With the celebratory occasion of assembling the ‘big boy/girl’ bed comes the equally emotional moment of taking the crib apart.
We were faced with this exact scenario in the months before we took the trip to China to finalize {K}’s adoption. {M} had always loved the security of her crib, the same crib that all three of our sons had also slept in, but at 3 1/2 years old, it was finally time for her to say goodbye as well.
It was at that moment we were faced with a difficult decision. What do we do with the crib? Maybe you are nearing this milestone and have had the same question. Today I am offering a tutorial explaining our personal crib re-purpose DIY project.
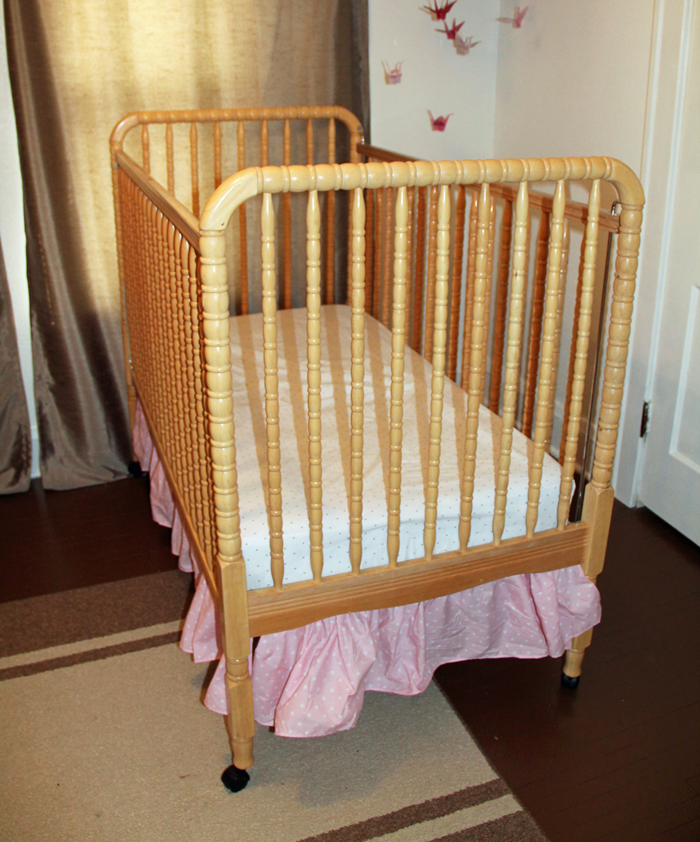
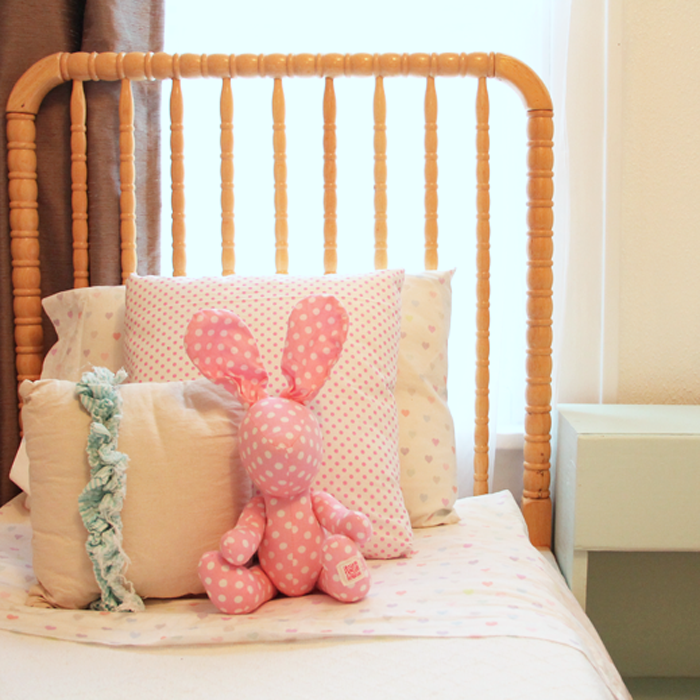
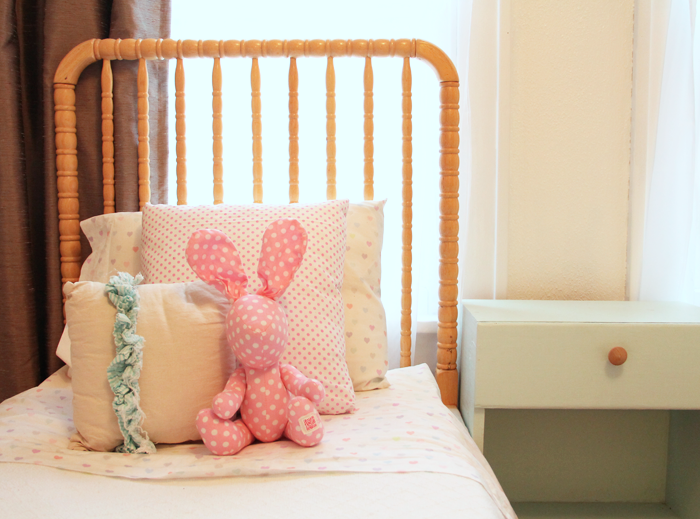
THE CRIB BEFORE
Our simple, Jenny Lind style crib was well loved but it’s natural wood finish and spindle details had a charm that we wanted to preserve.
It was given to us as a hand me down before {D} was born, over 11 years ago. Needless to say, it was equipped with the notorious ‘drop side’ – a feature now considered dangerous. We had long ago disabled the drop side, but legally the crib was no longer eligible to sell (or give away). Even still, the crib had a beautiful Jenny Lind style, and the thought of throwing it in the garbage just didn’t sit right with us.
We brainstormed a few different ideas, and eventually decided that the best option for our family was to turn this ONE crib into TWO toddler beds – one for 3 1/2 year old {M} and one for her 6 1/2 year old sister {K}, who has arthrogryposis and is small for her age. We knew they would both fit comfortably in the smaller sized bed for a while, and that the bed DIY project could save us some money as well!
CREATING THE DIY TODDLER BED
I’ll be honest that at the time of the project I wasn’t thinking in terms of getting enough pictures for a tutorial. I only have a few photos, but will try to fill in the gaps with words. If you have any questions about the process we used, feel free to comment below or send me an email!
STEP ONE
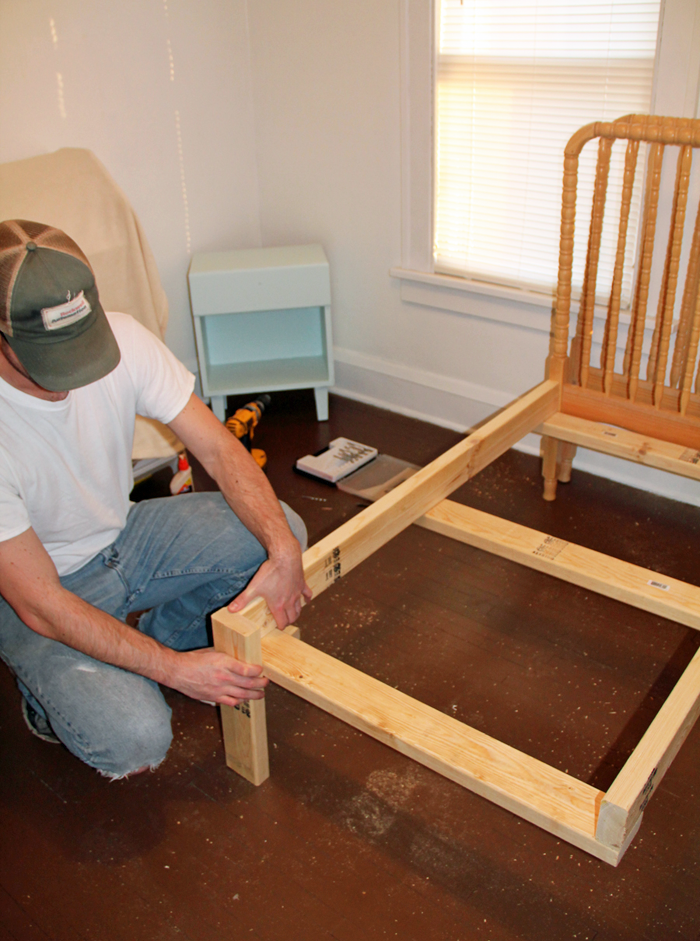
My husband Craig disassembled the crib, which actually made {M} very angry! She couldn’t see our ‘vision’ at the time and was just upset that he was breaking the comfy place where she loved to sleep. Essentially, all pieces of the crib were used to create the new beds with the exception of the hardware and the spring mat.
STEP TWO
We purchased standard 2×4 material, and Craig cut them to assemble a three sided ‘box’ that would hold the crib mattress. Because we planned to use the two tall sides of the crib as headboards, he only needed to make legs for the end of the box. He reinforced the center with a 2×4 cross base.
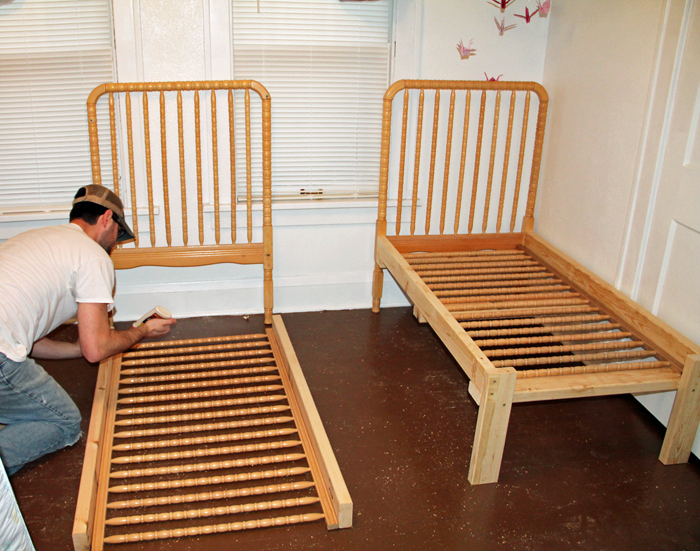
STEP THREE
Craig attached the assembled ‘box’ to the headboards, making sure everything was level. He then set one side rail into each of the ‘boxes’. The side rail piece spreads the weight from the mattress out over the 2x4s included in the ‘box’ construction.
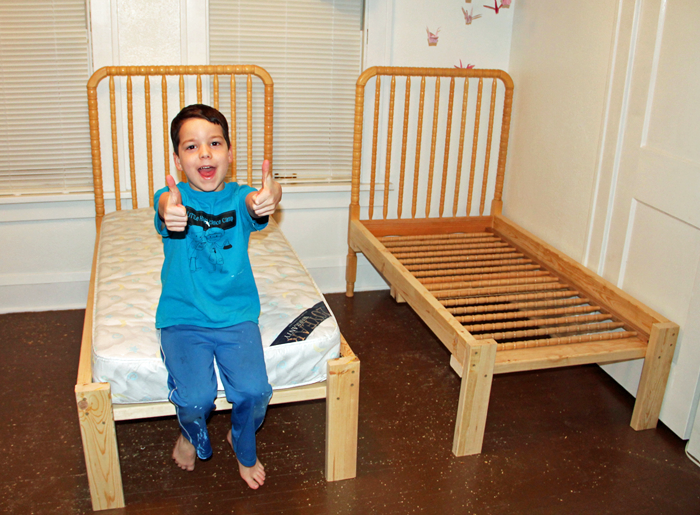
STEP FOUR
The crib mattresses were then added. They were a perfect fit, as demonstrated by this goofy picture of {L}. Crib mattresses are a standard size, but they can vary slightly. If you try this project you will want to base your dimensions on the crib mattress you have. We happened to have two mattresses, one that was used in the crib and another that we had for a different toddler bed.
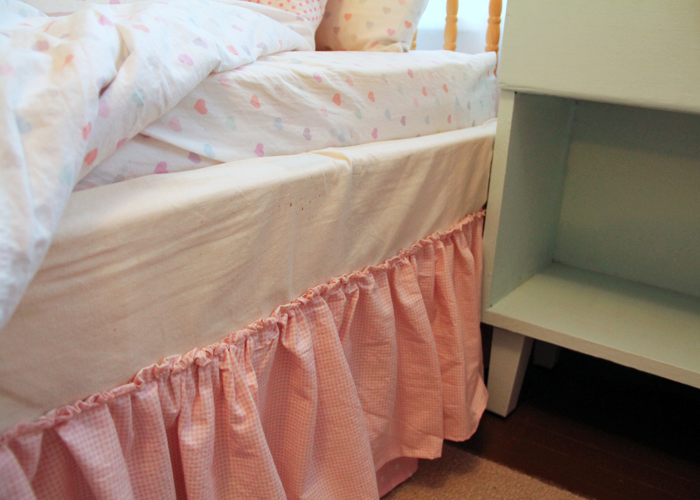
STEP FIVE
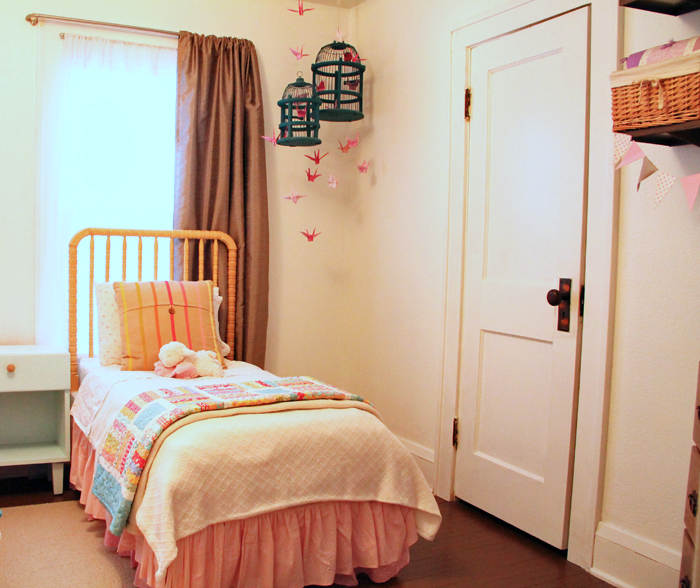
Dress it up! I created pink ruffle bed skirts using this easy tutorial. They really were simple to make, but a bit time consuming! I used muslin fabric to cover up the exposed 2x4s near the mattresses.
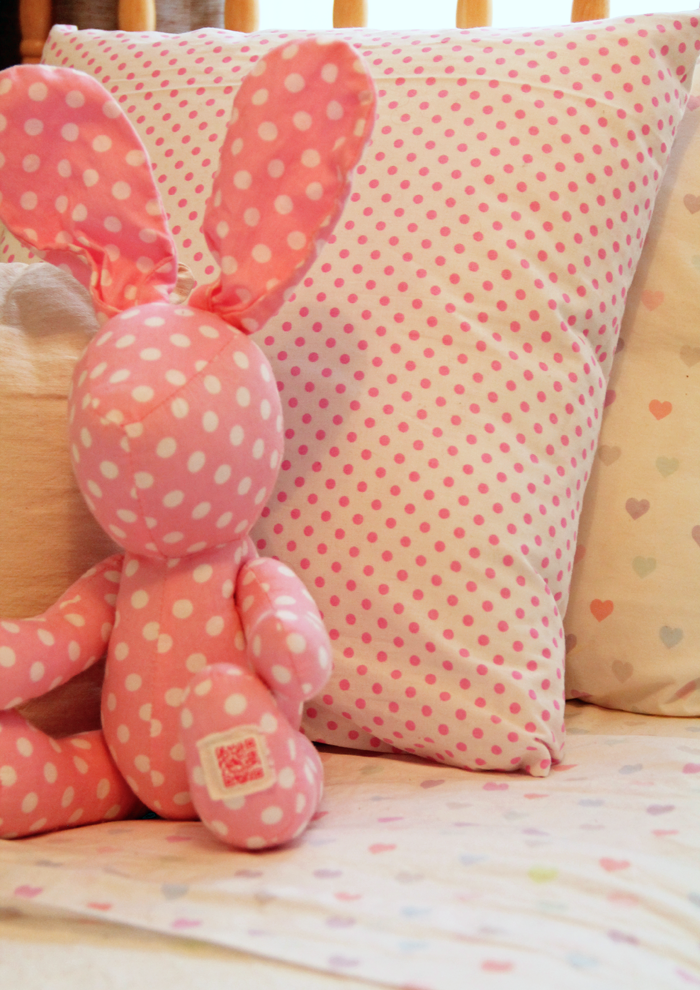
I also found some adorable heart bedding from Pottery Barn Kids. Grandpa and Grandma purchased the bedding as a gift for the girls. A king sized texture blanket was the perfect size to cut in half, allowing me to make two matching comforters. Topped with accent pillows, and comfy colorful quilts, the beds look super cute on each DIY toddler bed!
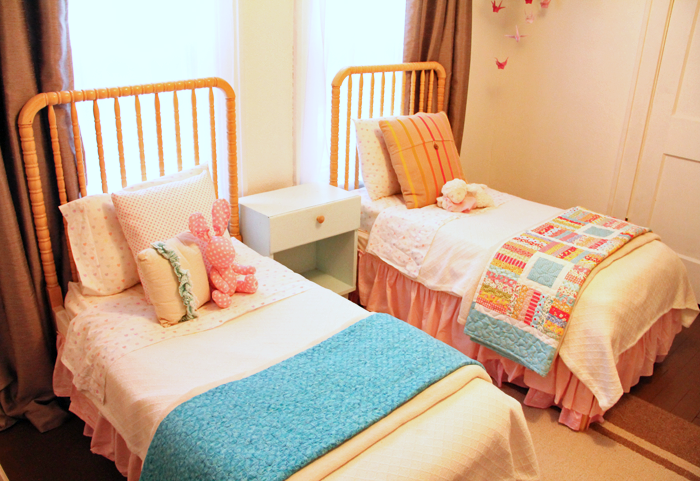
FINISHED IN THE ROOM
The finished beds look so sweet set up together in the room. I still love walking by and admiring them, over a year later!
The girls really enjoy sharing a room and their little beds fit perfectly into their bright and cheery space. Although I am having fun designing their new shared space for Arrow Hill Cottage, I will be sad when we have to retire (or pass on) these special beds their daddy made them!
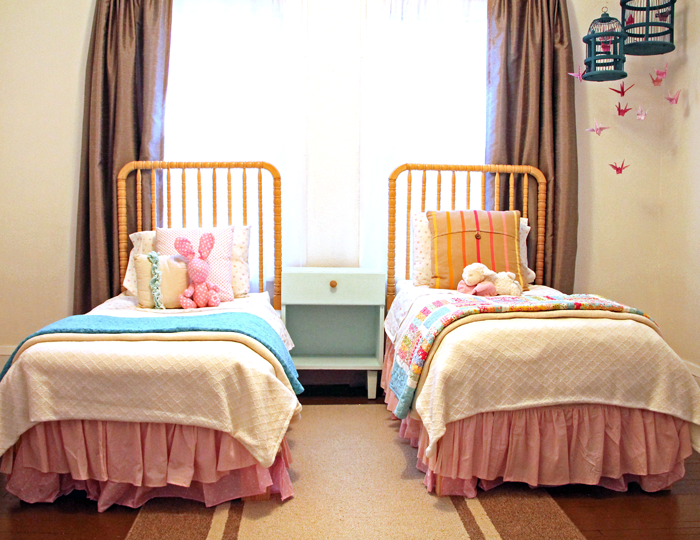
MORE SHARED BEDROOM DETAILS
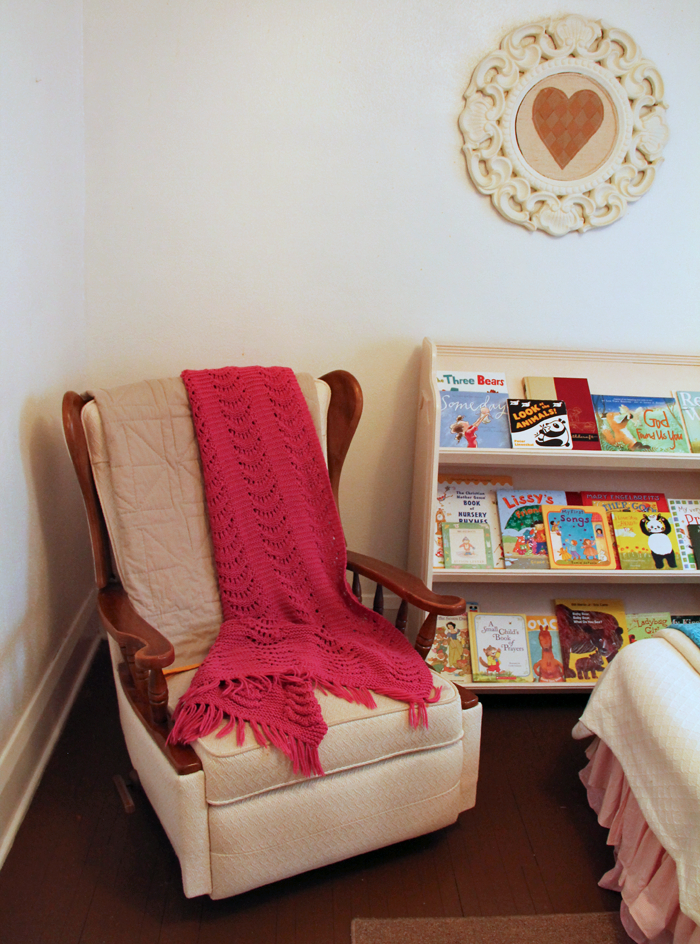
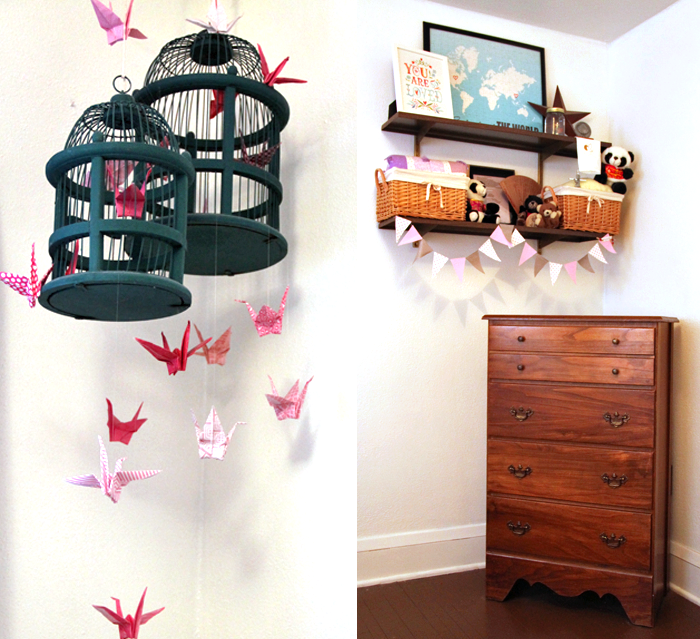
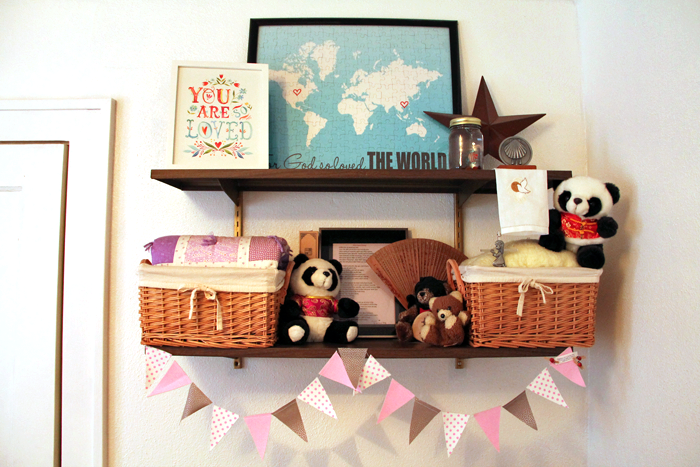
Just for fun, here are a few more details of their shared bedroom.
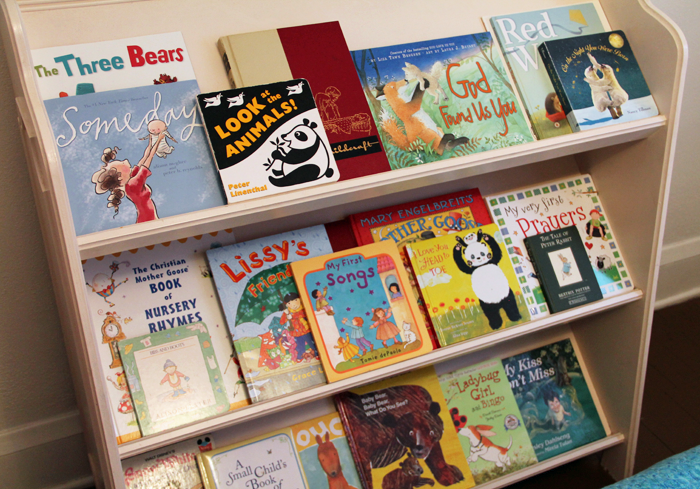
This rocker was Craig’s grandparents. We had it reupholstered before our first child was born, and have used it in the nursery ever since. It is a special piece. Next to it we have a bookshelf, making this the perfect spot for reading.
The bookcase itself is a vintage piece from our local Carnegie Library, which is now closed. I love that the girls are able to see the fronts of the books when making their selections.
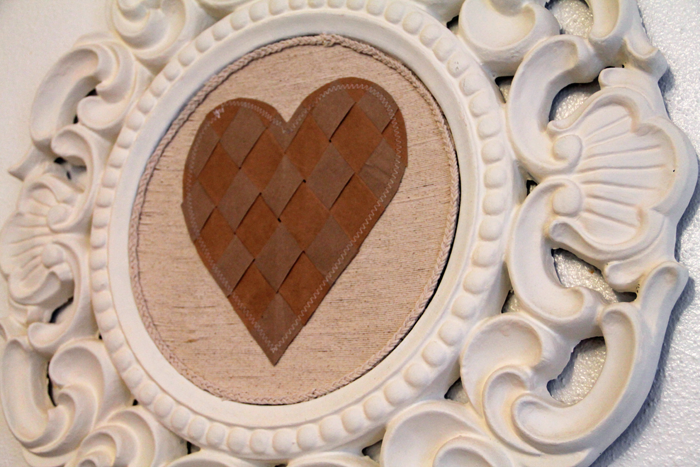
Above the bookcase is a DIY piece that I put together using a mirror frame, which I spray painted white. I covered the mirror with a fabric. It is attached with temporary adhesive, because I imagine in the future the girls may opt to use the mirror itself. The heart was made by weaving strips of paper grocery bags.
Both of our girls were adopted from China – {M} at the age of two in 2015 and {K} at age six in 2017. We always want them to be aware of their beautiful birth culture. The paper crane bird cage/ mobile symbolizes peace and longevity. I folded each of the cranes by hand using a variety of pink patterned paper. The dresser was mine when I was a little girl. It was a gift to me from my grandpa, and I love that I can pass it down to daughters of my own.
Above the dresser are more symbolic and special pieces, including two panda bears from China – one from each trip.
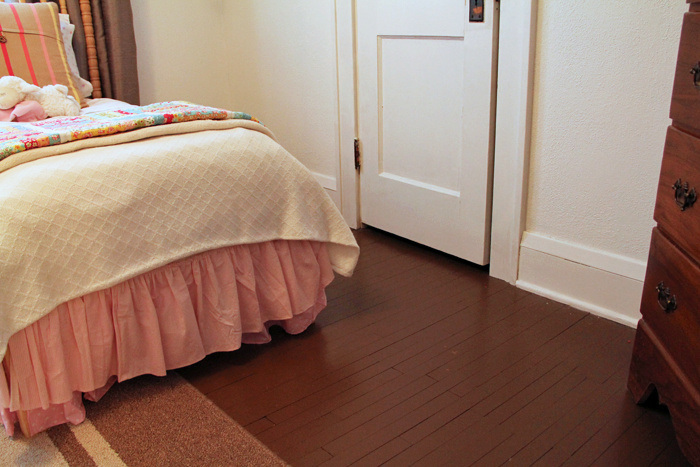
We painted the floor in the girls room, and the entire upstairs of this rental house, a chocolate brown color. It has held up very well and is actually something I am considering for the new house.
PIN THIS DIY TODDLER BED IDEA
I hope you enjoyed this little tutorial and the impromptu room tour! I would love to see the creative ways you have re-purposed a piece into something new!
WATCHING {D} as he learns to play basketball. He was nervous going into the season, not having any prior experience; But he has grown in confidence and skill. The moment he scored his first ever two-pointer he was beaming with pride. We are proud of the hustle and persistence he shows out on the court.
We are thankful for his teammates, some of who are much more experienced in the game, for their encouragement.
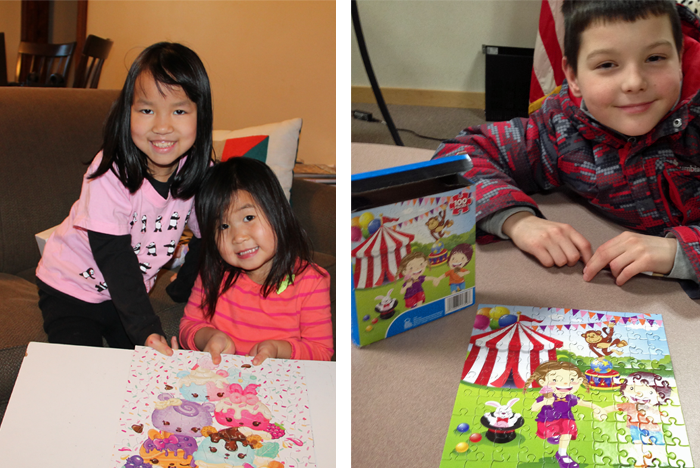
COMPLETING puzzles. For some reason January tends to be puzzle month in our house. It is probably mostly because of the cold temperatures and the fact that we spend much more time indoors. Every weekend this month we have had a puzzle going, with the kids contributing their help now and then and the adults working diligently after the kids are in bed.
A couple of the kids also enjoy working on their own smaller puzzles. {I} and {K} will sit down and complete a 150 piece puzzle in one sitting.
SICK. A bug has been going around at school, and a couple of the kids were struck with it – as was Craig. Tis’ the time of year for sickness, and we only hope that it passes quickly. Being sick is no fun.
UPSET by the ending of the Vikings football season. They had a good chance to play at the Superbowl, which is going to be taking place this coming weekend in Minneapolis – their home turf. They lost the Championship game to the Eagles, after winning on a last second touchdown the week before. Kind of a heartbreaking end to the season.
We know that it is ‘just a game’ and although we feel disappointed, we are thankful for the entertainment this football team has given our family. We look forward to next season and hope they can make it all the way!
FREEZING, but still participating in winter activities. January was a very frosty month, but we still managed to spend time outside. Craig had a couple of very cold fire calls, and ended up with a frosty beard.
There is still not much snow, but the kids have been taking what they can and have built a small snow fort in the yard. They were also able to go skiing with school.
This is just a glimpse at what our family has been up to. If you’d like a closer look, be sure to check out our weekly ‘mini vlogs’ on our YouTube channel ARROW HILL FAMILY. Be well everyone!
The Makeover Takeover series focuses on helping my readers with bits of their own homes that are giving them challenges. Whether it is a room that they want guidance on styling, a floor plan that needs re-configuring, or they are stumbling with choosing an exterior color palette, I am happy to help. I offer solutions through virtual design and source links.
My first two Takeovers were both bathrooms – a modern Small Beachy Bathroom, and a Classic + Clean Bathroom remodel in a historic home. They were both met with wonderful reviews, and this time around I was excited to shift gears a bit and work on a kitchen remodel.
My friend Adell and her husband Ben live in a super adorable traditional home with their four young kids. Though the house has architectural features that really shine, the kitchen leaves much to be desired.
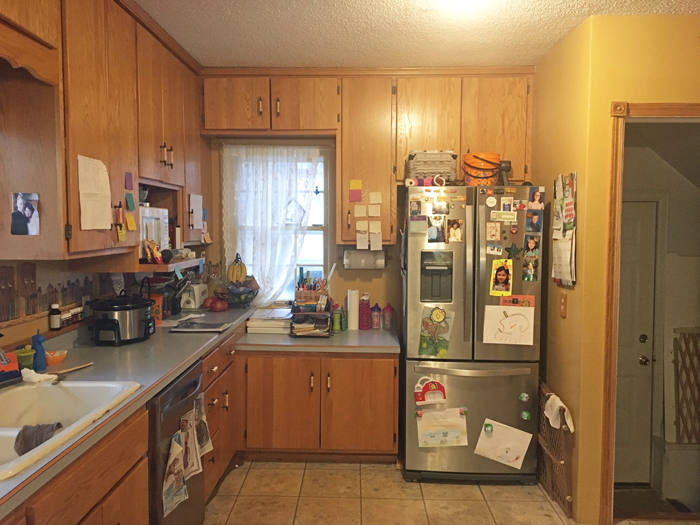
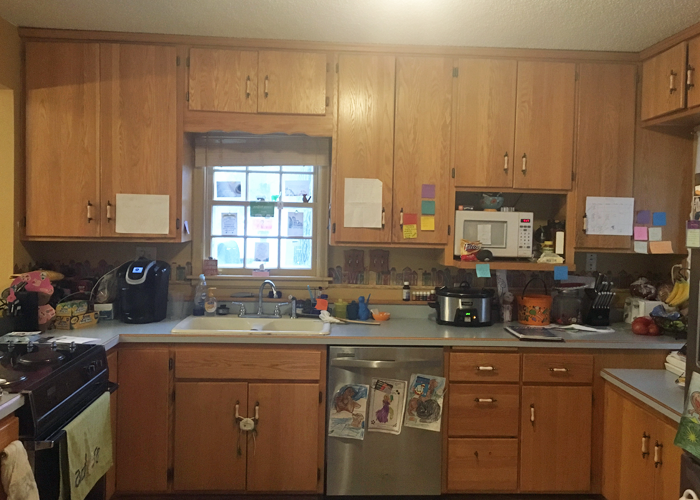
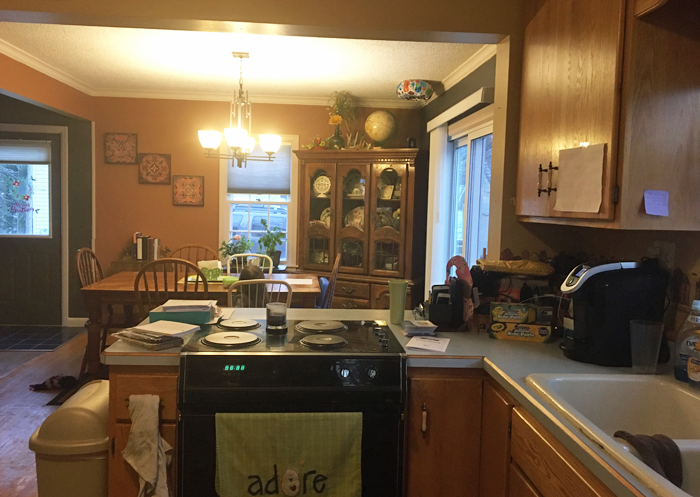
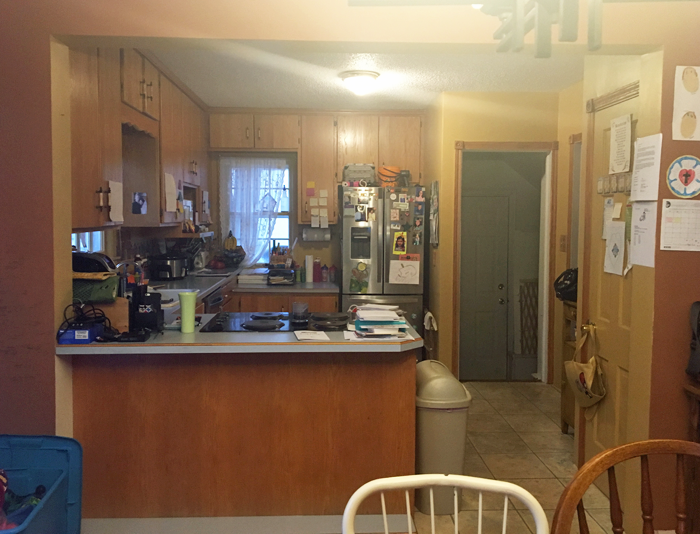
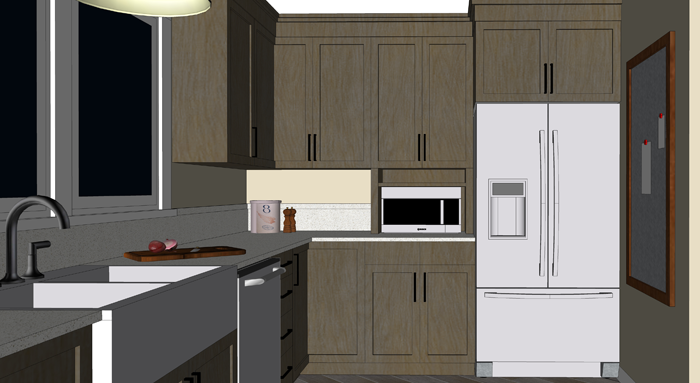
THE KITCHEN TODAY
The layout of the appliances is actually quite efficient. The sink/ DW, fridge and oven are arranged in the basic work triangle, which works well. There is a portion of wall next to the fridge that juts into the space, but because of the way the floor steps down to meet the attached garage access, it needed to stay. For the most part, I wanted to focus on the cosmetic aspects of the room and on making it as organized as possible, finding a home for everything.
PROPOSED PLAN CHANGES
As you can see from the photos, this is one busy family! There are little reminder notes, and calendars on the cupboards, and the kids art projects are taking over the fridge. I wanted to streamline the organization of these bits, cleaning up the space.
I also wanted to maximize the work space, by finding a home for all of the small appliances and kitchen gadgets that are residing on the counter tops.
They have an open layout from kitchen to dining, and the counter extends so that there is space for seating on the dining room side. However, because of the position of the stove, it isn’t a safe place for the kids to sit.
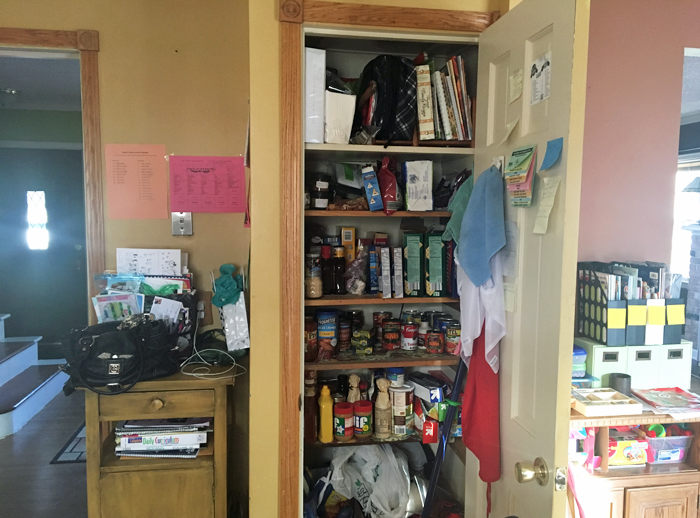
There is a pantry that opens into the kitchen. The storage is nice, but it creates a bump out that leaves a strange little corner. The family has a small table positioned here, but as you can tell by the picture – it has become a bit of a drop spot. Again, I wanted to provide them with functional storage.
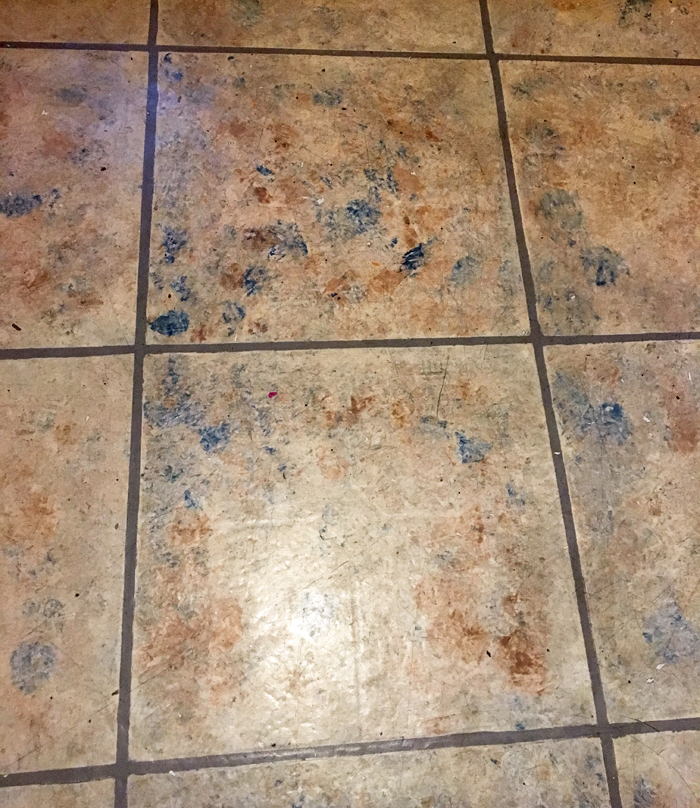
And last but not least, I wanted to clean up some of the strange finishes that the previous owners of the house have left – including the wallpaper border/ back-splash and the sheet linoleum floor that was PAINTED to look like individual ceramic tiles. What? Yes, it’s true.
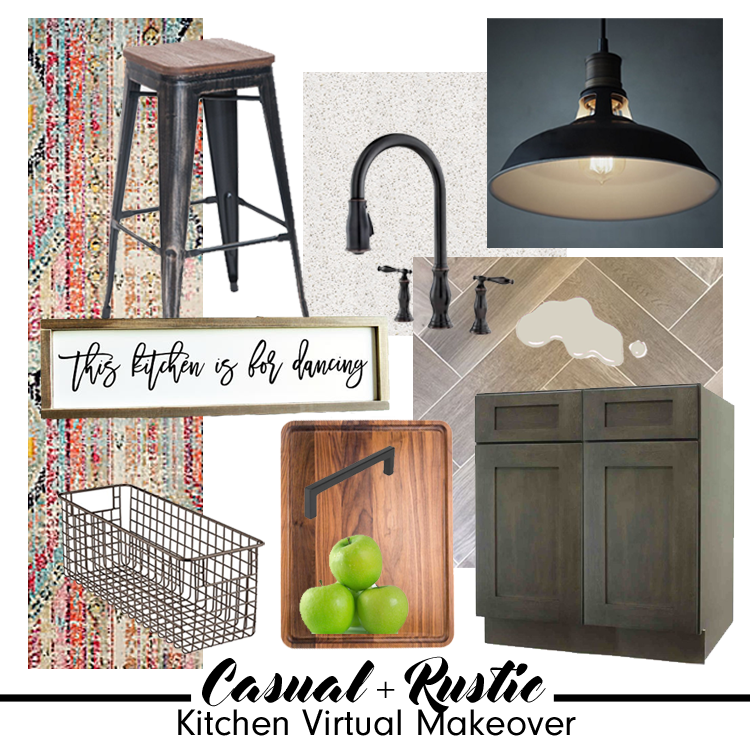
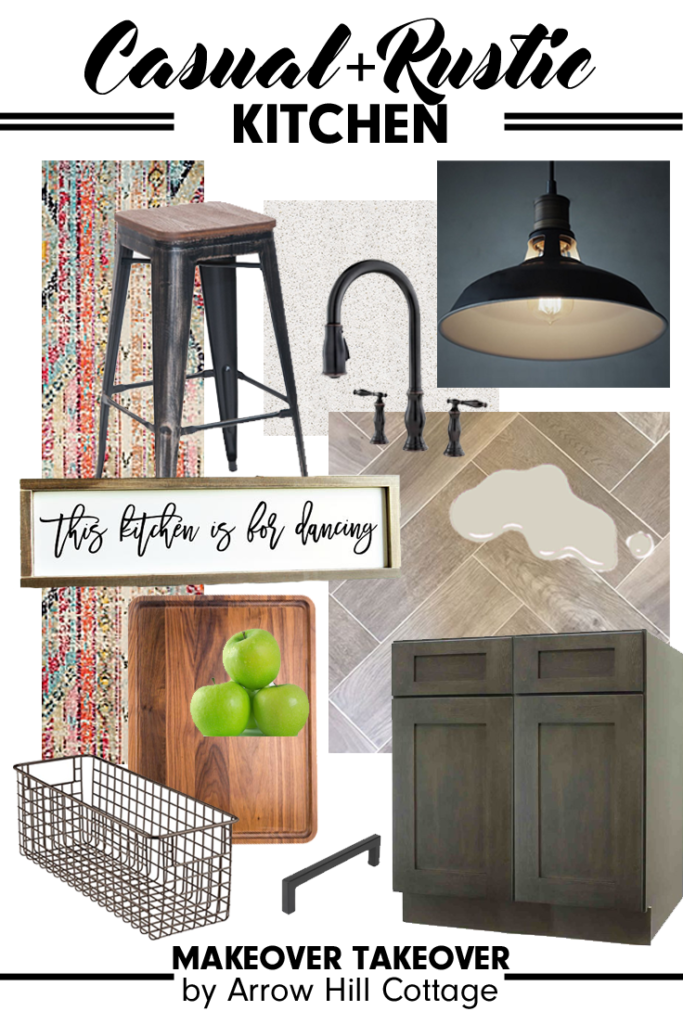
FINISH INSPIRATION
Adell and Ben sent me images of kitchens and materials that they love – and based off of their selections, I would say that they have a very classic style, with traditional lines and a touch of rustic flair.
I was able to source a wonderful selection of products that I think would be amazing in their space. You can learn more about each product by clicking on the titles below.
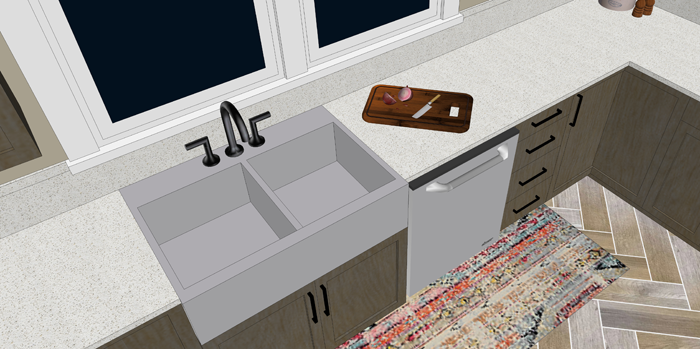
SINK: This stainless steel apron sink will match the other appliances well.
WALL COLOR: ‘Agreeable Gray’ from Sherwin Williams – the perfect neutral.
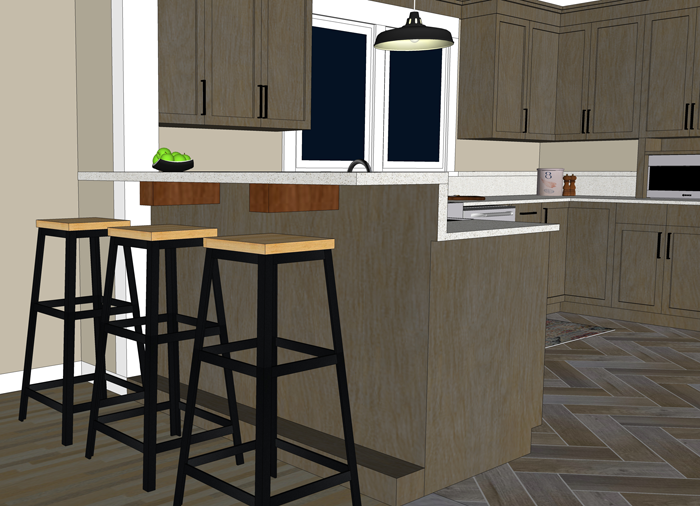
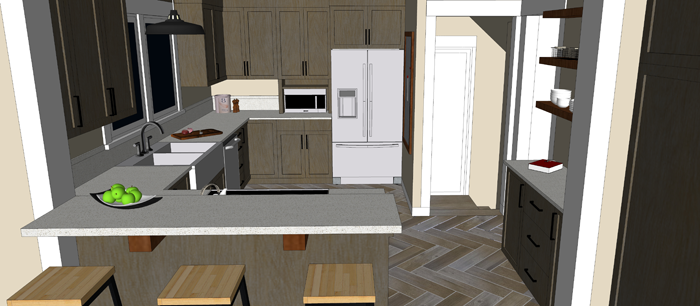
AND NOW FOR THE BIG REVEAL!
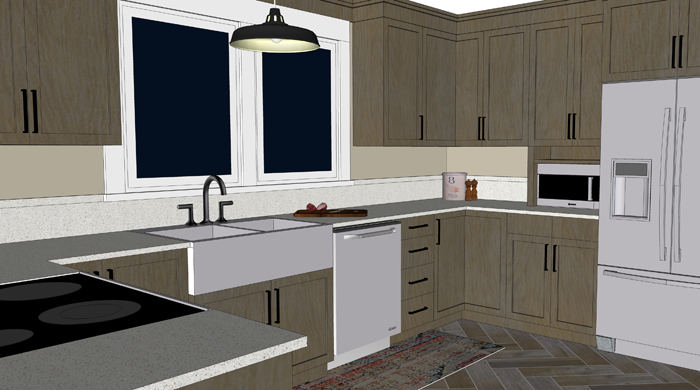
Can you see the changes? Even though the footprint of the room didn’t change – it seems so much more open! The colors are muted and neutral, which will blend well with the rest of the home decor. Just for reference, let’s take another look at the space pre-makeover.
Quite the difference, I think! Here are the details of what I did to achieve the casual rustic look that Adell and Ben love.
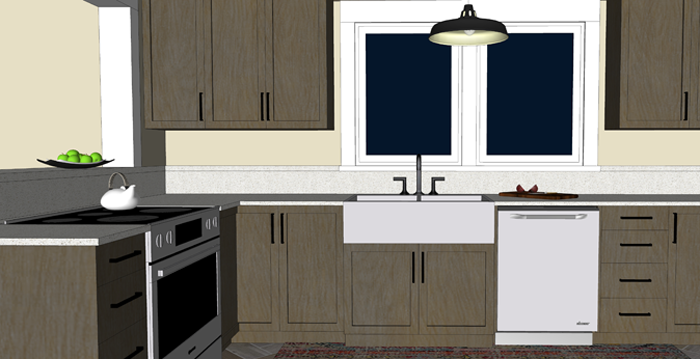
Obviously, all new cabinetry provides a fresh look. Because they are a darker gray stain that shows some wood-grain, I opted to go with a very simple quartz for the counters. Quartz is a wonderful low maintenance surface that is perfect for families with young children. The window above the sink was doubled in size, to allow a greater view of the backyard and let in more natural daylight.
The sink was replaced with a stainless steel apron variety. The large double bowls are very efficient. All corner cabinets in the kitchen have hinged doors that allow access to Lazy Susan storage.
Above the sink I hung a large industrial barn style pendant light. This will provide wonderful task lighting, and is also a focal point for the room.
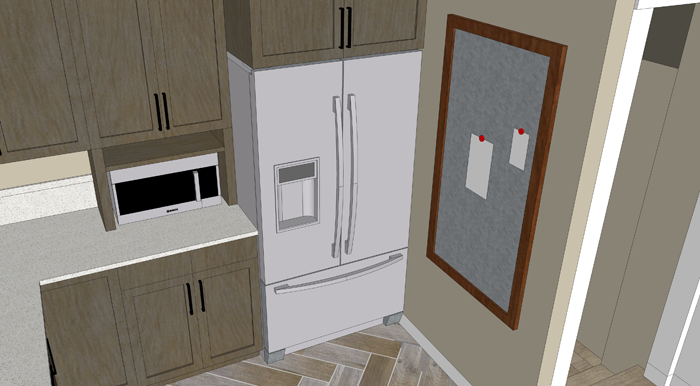
I removed a window on the fridge wall, which allowed me to even out the counters and provide a more accessible spot for the microwave. The small shelf above the microwave is the perfect size for a cookbook or two.
Next to the fridge, I am proposing a framed piece of sheet metal that can be used to hang notes, calendars and even kid artwork. This wall isn’t as visible from other rooms in the house, making it the perfect location for those random bits.
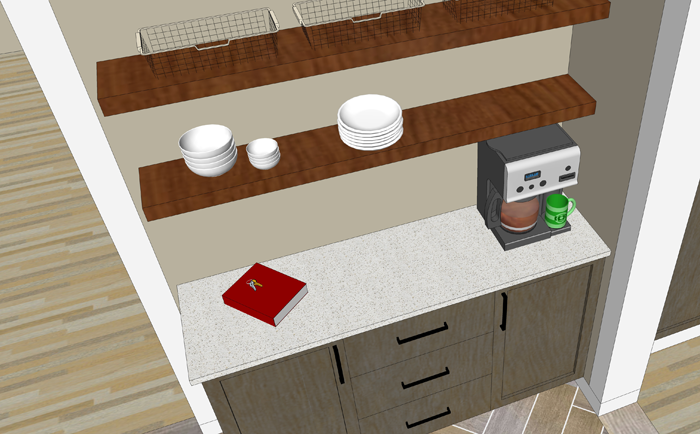
Where the pantry used to be, I am proposing a more shallow base cabinet with pull out pantry drawers. This is efficient storage for canned and boxed goods, and it offers additional counter space. Because of it’s location to the entry from the attached garage, this area naturally becomes a drop spot.
There is no shame in that. Every house needs a drop spot! The key is to keep the space organized and efficient so that it remains useful and not cluttered storage. Baskets can be placed on the shelves for papers that need to be filed, bills that need to be paid.
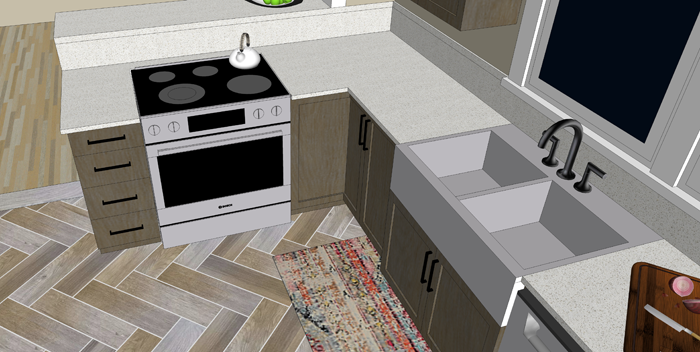
The counter/bar seating near the range has been raised, for safety purposes.
With the addition of rustic wood corbels, this is now an attractive spot to eat an afternoon snack or do homework.
And immediately next to the bar, where a small cart used to reside, I am proposing an additional built in cabinet – to house the broom, cleaning supplies, and all of those fun kid craft materials.
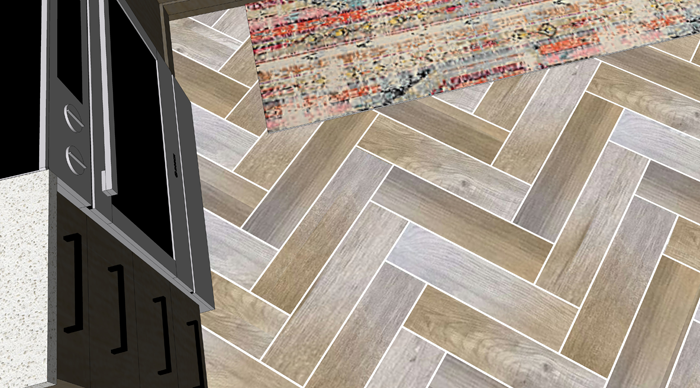
The real masterpiece of the room though has to be the amazing wood-grain tiles set in a herringbone pattern. So beautiful and durable! Accented with a pop of color from a distressed bohemian style rug, these floors really come to life!
One last look at the completed space:
I’ve created a 3d animation of the kitchen makeover for a closer look. Click the play button below to view.
I think that this casual rustic kitchen design would blend very well with the rest of Ben and Adell’s beautiful home. Working on this project for them was a lot of fun!
Remember that this is a FREE digital home design consultation, which is available to anyone who subscribes to the Arrow Hill Cottage website. If you or someone you know could benefit from this service, simply email me with a few photos and a description of what issues you would like resolved.
If chosen, I will offer a solution + inspiration through 3d images and sourced items. Hurry though! I only have the ability to do one Makeover Takeover each month and the spots are filling up quickly! I have plans to eventually make this a paid service, so if you have been thinking of contacting me about a project and want to get in on the free deal, don’t hesitate!
This post contains affiliate links to products for your convenience. If you purchase via my links, I may receive a small commission at no additional cost to you. Thanks for supporting Arrow Hill Cottage!
You’re in for a treat today friends! The Reader Showcase is where I feature the homes and home projects that my readers have tackled. I am constantly amazed at the talent and varied styles that each person has to offer!
Today’s talent is no exception. I first met Minna on Instagram. She posted photos of her absolutely stunning home, The Little Plaid Cottage, which is plump full of character. She is super creative and her husband Scot is super handy. They make quite the duo. I think you will agree!
Minna, please tell me a little bit about your home:
I would describe our home as a cottage. It is a single story 1,430 square foot house that has lots of charm, including a large front porch, built in bookcases, a floor to ceiling rock fireplace, cedar beams on 12 foot ceilings, and a brick surrounded cook-top in the kitchen.
It was built in 1991 on the outskirts of town, and sits on half an acre.
That front porch speaks to me. Looks like a great place to relax!
What is your personal design style?
If I had to define it, I would say cottage/farmhouse. I prefer to find interesting antiques to decorate with rather than just going to Target and buying the latest Magnolia pieces that are on the shelves. I love Joanna Gaines as much as the next person, but I don’t want my house to look exactly like everyone else’s house.
Antiques have history and tell a story. They have stood the test of time and have a beauty all their own. I love displaying vintage finds in my home and plan to enjoy them for years to come. I also love decorating with plaids & buffalo check, and tend to gravitate towards wreaths and white pitchers.
Explain your favorite remodel projects. What was done to each space?
We have done quite a bit of work to our current house during the 7 years we have lived here!
KITCHEN
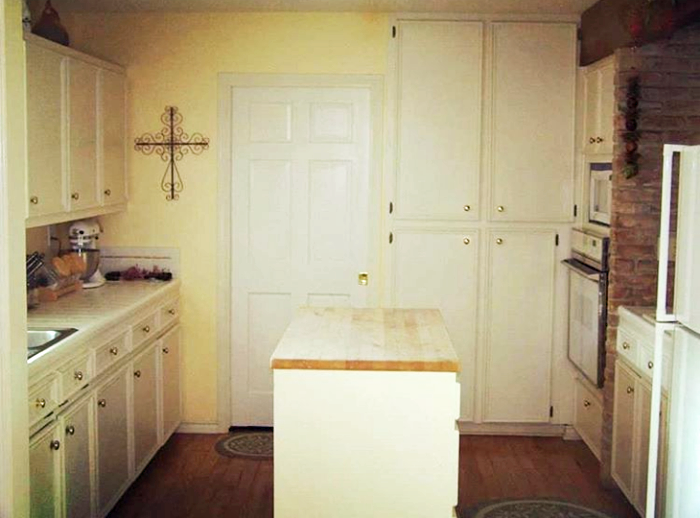
Our kitchen has by far been my favorite remodel project to date. We started off with popcorn ceilings, a pantry cabinet that was limited to opening the full way because it would hit the oven handle, chipped tile counter-tops, original builder grade appliances, and a shallow kitchen sink with a rotted cabinet below.
Kitchen before. Charming, but very ‘vanilla’
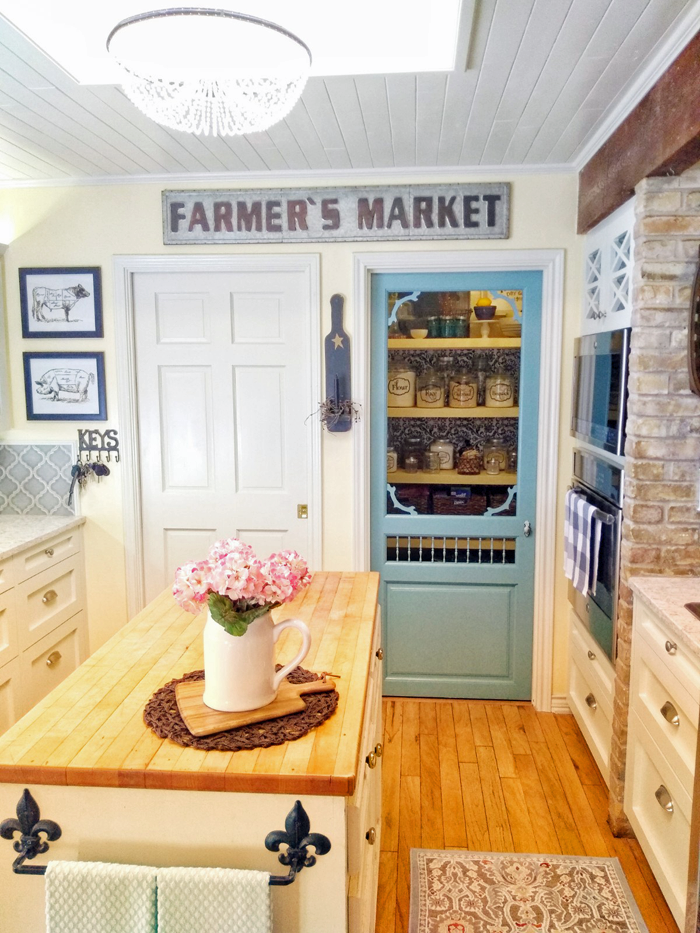
The first thing we did was add a walk in pantry. We were able to carve a bit of space from the attached garage and include it in the kitchen. My husband did all of the framing, finishing, painting and even built custom shelving. I found some fabric from Hobby Lobby to use on the back wall in lieu of wallpaper. We installed matching tile and added a screen door, which may seem an odd choice for a kitchen – but it works for us for two reasons: 1. It adds charm + character, and 2. It forces me to keep the things inside clean and organized!
My goodness what a great idea! The pantry looks so organized.
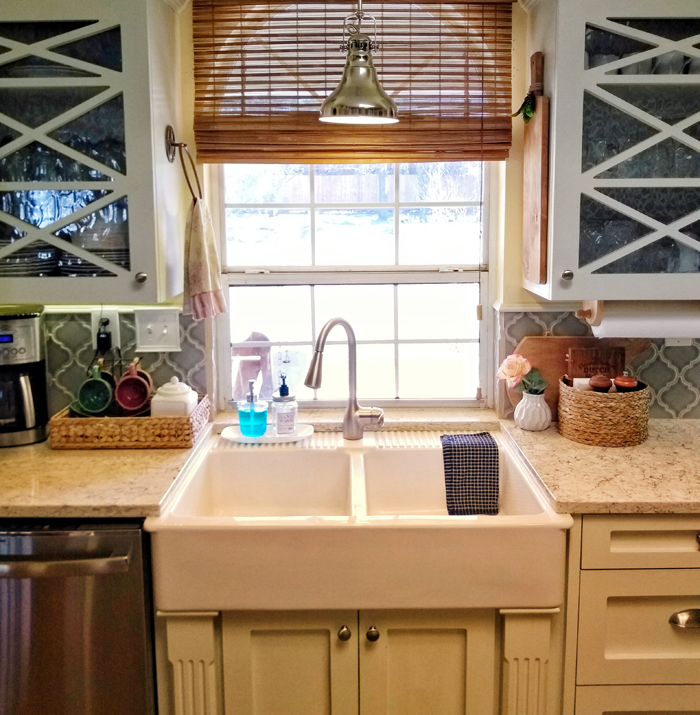
I found a farm sink on Craigslist for $50. The price was low because it had a chip on one corner, but I knew that we would be under-mounting it and that the counter material would hide the chip. The sink literally sat in my garage covered in a blanket for two years while we saved up for the remodel.
I can’t see the chip, can you?
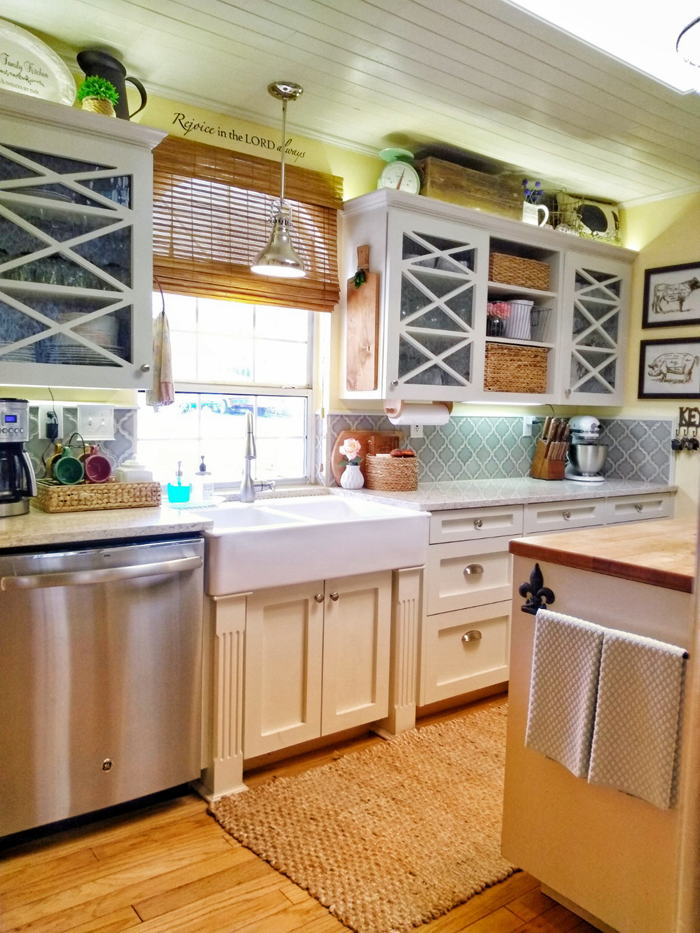
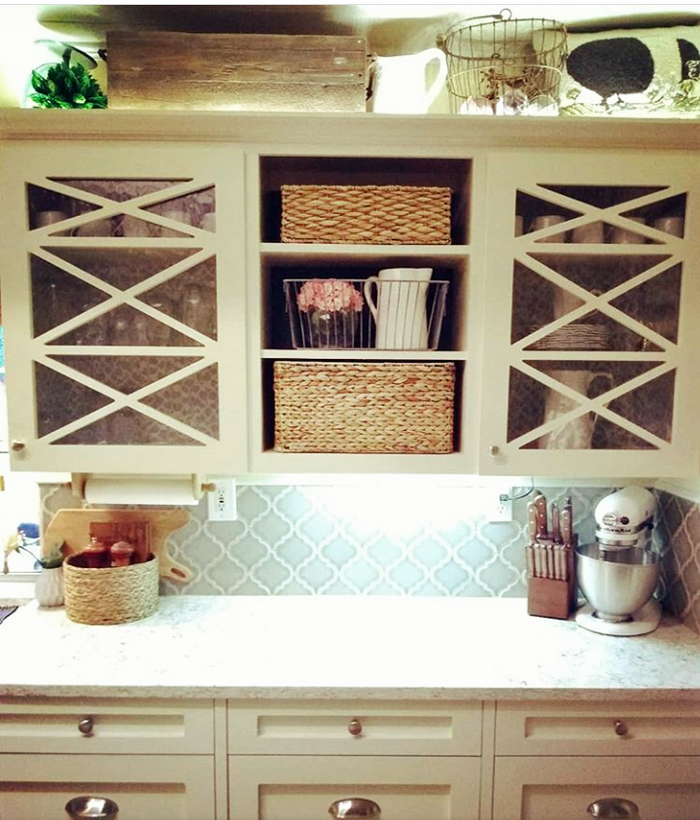
To save money during the remodel, we decided to keep the upper cabinets and update them with crown molding and new doors. I knew that I wanted glass for the upper cabinets, but also wanted to do an interesting design. My husband built a triple X design on the doors and we used wavy glass, which I love because it reminds me of something you might find in an old home.
Custom cabinet design. I love the look!
We also removed the middle cabinet door above the fridge so that I could add some warmth and contrast with baskets. I lined the backs of the glass front cabinets with contact paper from Dollar tree.
My husband converted all of the bottom cabinets from shelves to drawers. It is so nice not having to get on my hands and knees to find a missing Tupperware lid in the back of a dark cabinet anymore!
Let’s all just take a moment and appreciate how lovely their cook-top is. Such a happy place to create meals!
We got an amazing deal on our quartz counter-tops and my husband cut and installed them without ever having done it before. I have to say, I am married to a perfectionist – and they turned out fabulous! Since the cabinets and counters are both white, I decided to make the back splash a contrasting color and found bluish gray Arabesque tile from Home Depot.
The tile is gorgeous, and I really love all of the neutral accessories!
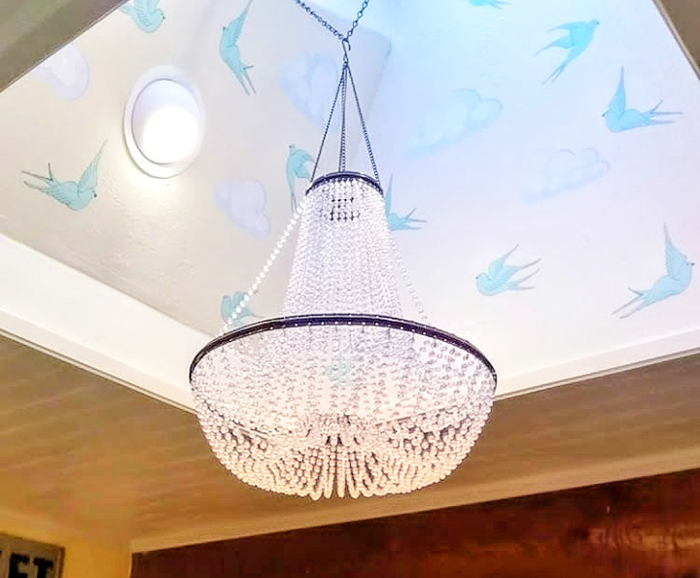
The final part of the remodel was installing wood planks on the ceiling, which added so much character. We have a large skylight in the kitchen that is a wonderful feature. The ceiling height in the room is only 8 feet but the skylight opening extends to 12 feet! To draw the eye up I found bird decals online, which we affixed within the skylight. They add a special unexpected touch.
How’s that for whimsy? And a chandelier in the kitchen? Yes please!
My husband Scot DIY’d so much of our kitchen and it saved us a ton of money! We would not have been able to afford to do a full kitchen renovation had it not been for all of his hard work!
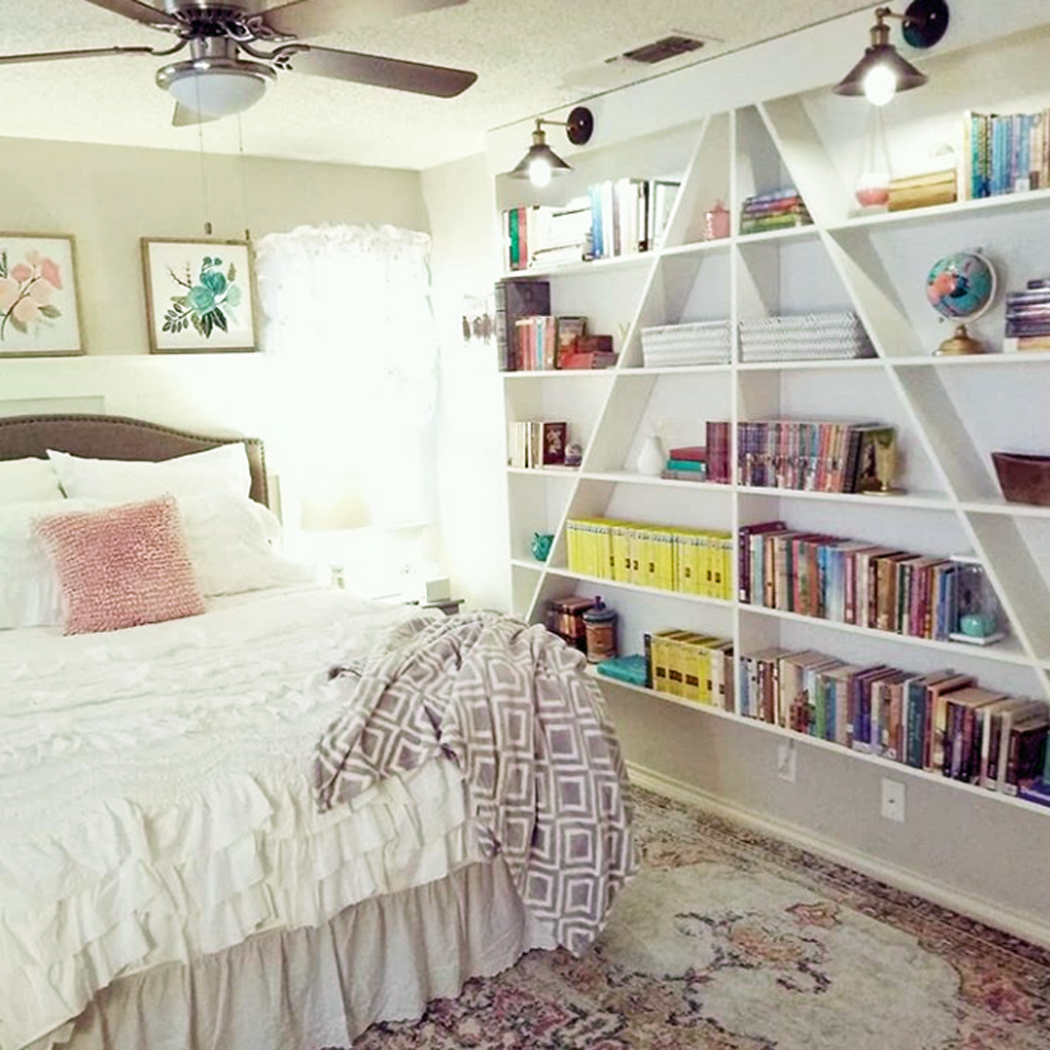
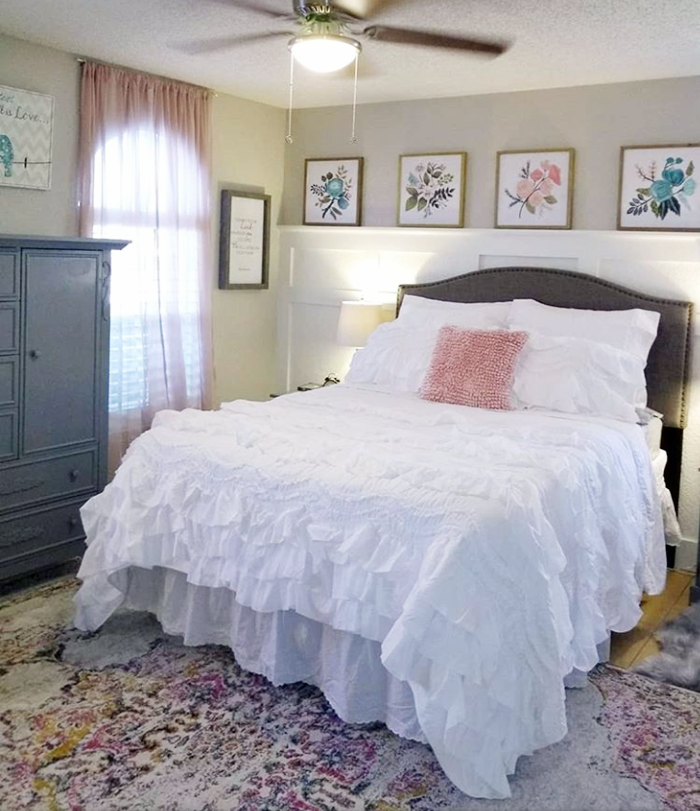
DAUGHTER’S BEDROOM
Another area in our house that I had so much fun designing and decorating is our daughter’s bedroom. For Christmas this year we gave her a whole new room. We painted the walls with Sherwin-Williams ‘agreeable gray’, and my husband installed board and batten on an accent wall for contrast.
Her armoire and nightstands were painted with Sherwin Williams ‘cityscape’. The headboard was an incredible Black Friday deal from Walmart. We got it for a steal at $59! I shopped various other stores – including Target, H&M, and Hobby Lobby – to pull the decor of the room together.
Such a soft and comfortable looking space!
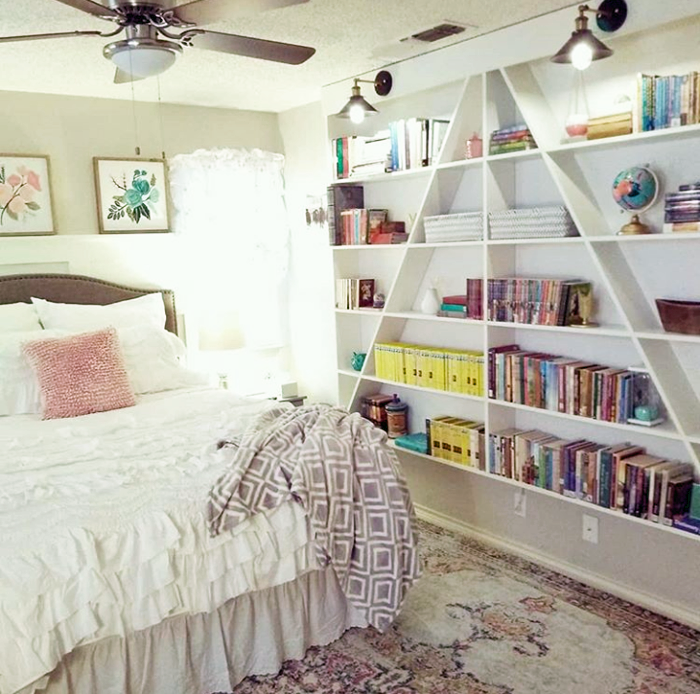
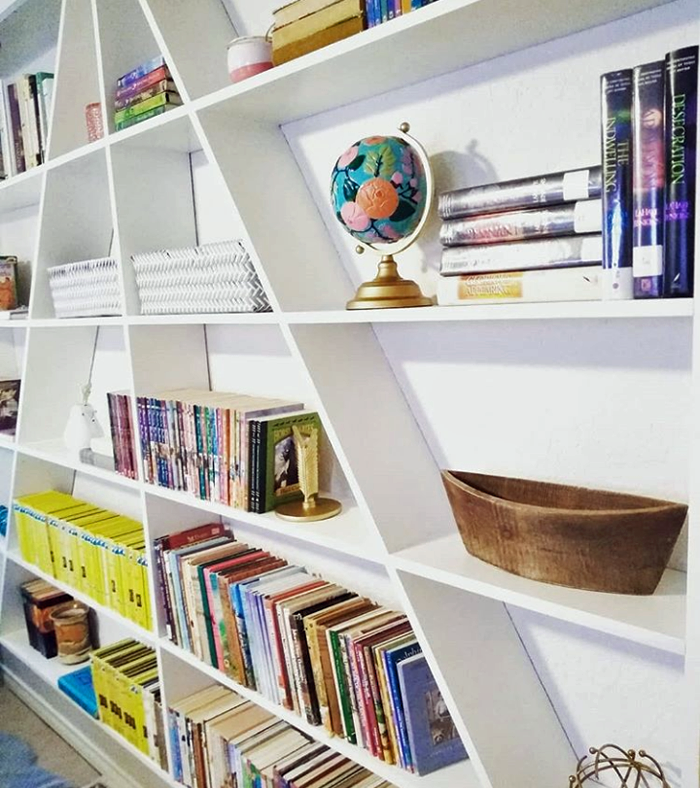
I am most pleased with the A-frame bookcase that my husband built for the room. It adds so much visual interest to the space and is so fun to style!
This bookcase is a stunner! Fun looking + functional = major win!
What would you like readers to know about designing and styling a home? Do you have any tips to share?
Think about what you personally like and are drawn to, and not necessarily what’s popular in the moment that everyone else can go to the store and buy. You are a unique individual created by God to shine and share your own creative talents with others.
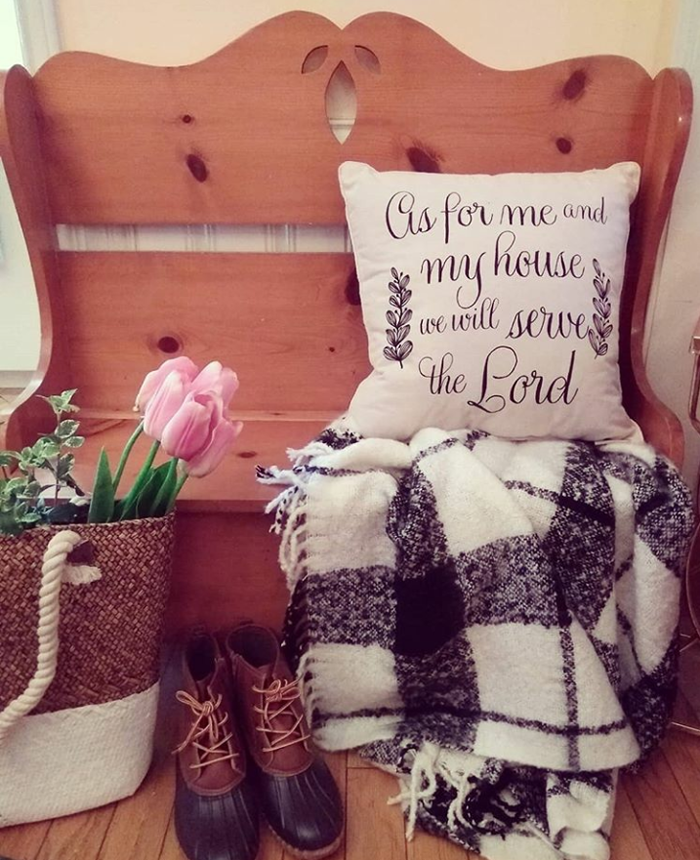
Scot made this cute bench for Minna as a gift years ago
Don’t get stuck in a mold with everyone else. Be your own person and display what’s important to you and that which speaks to you. I believe Edith Schaeffer says it best: “This place should be expressing something of yourself. It should be communicating something of you to your visitors, but it should also satisfy something within you. You should feel ‘at home’ here, because you have made it home with something of yourself.”
Do you have any remodeling / decorating plans for the future?
My immediate plans are to style the small guest bedroom, which used to be our son’s bedroom before he moved out. We also want to scrape the popcorn texture off of the ceiling in other rooms in the house. It’s a messy job, but it isn’t difficult and it really does make a dramatic difference!
Outside, we have plans to paint the front porch once the weather warms up and remodel our back patio – including the addition of an outdoor kitchen and fireplace.
This space is already pretty amazing. I can’t wait to see the new additions!
A few months down the road, I would love to tackle a master bathroom remodel. We tend to focus on one project at a time and at our own pace.
We are enjoying the fruits of our labor in this house and though we don’t have plans to move any time soon, I can envision us living in a smaller one or two bedroom home on a larger piece of property sometime in the future.
Thank you so much Minna and Scot for sharing your wonderful home with all of us! I encourage all of my readers to go check out Minna’s Instagram account HERE to watch the progress while she and Scot continue to remodel and make their house into a home that reflects their personality and style.
Now it’s your turn! Have you been putting your personal touches on your home? Maybe the entire house isn’t finished, but you are particularly proud of one room – I would love to see, and share with my readers!
If you are a blog subscriber, you are eligible! Simply email photos and a brief description to angela@arrowhillcottage.com for your chance to be featured!
If you share your home with children, you know that they are little art making machines. There is something so precious about your child’s creativity and imagination that you just want to bottle it up and save it for all time. Even still, it can be quite overwhelming trying to figure out what to do with each of these masterpieces.
In my search for unique and stylish solutions to this very problem, I have discovered 18 creative ways to display kid artwork. I think you will enjoy what I found.
This setup requires little to no prep work. When a child creates something that they want displayed, use a bit of tape or another removable adhesive such as poster putty, and add to the wall. Personally, I feel that this technique is best suited for a kid friendly space, such as a toy room, as it has a tendency to look a bit more cluttered than other display options.
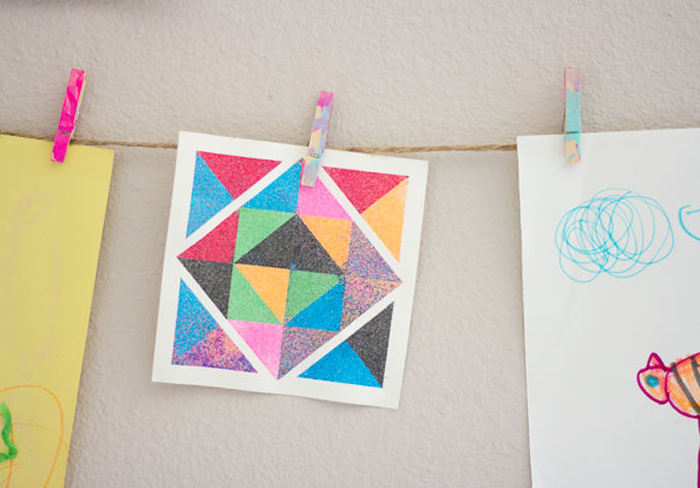
This highly adaptable hanging technique is accommodating for various sizes and shapes of projects. All you need for this simple DIY is a thin twine rope, a few clothes pins, and your child’s creativity. The great thing about this option is that the kids can clip up and take down the art all on their own!
Positioning an extra large cork board against the wall and adding a desk can create an instant art station. Though similar to a raw art wall, the chaos is a bit more consolidated. Learn how this set up was created using cork squares, on the blog Young House Love.
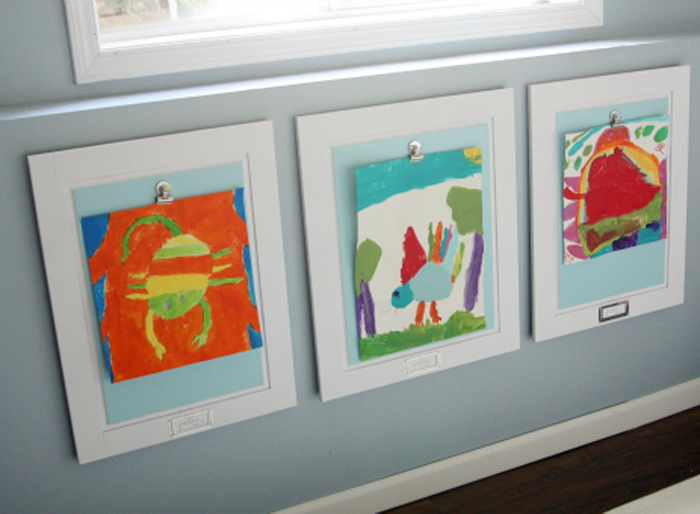
These clipboard displays may tidy things up a bit more, but will mainly accommodate similar sized pieces of artwork. I love the added touch of the nameplate, which can be changed up as often as the artwork is.
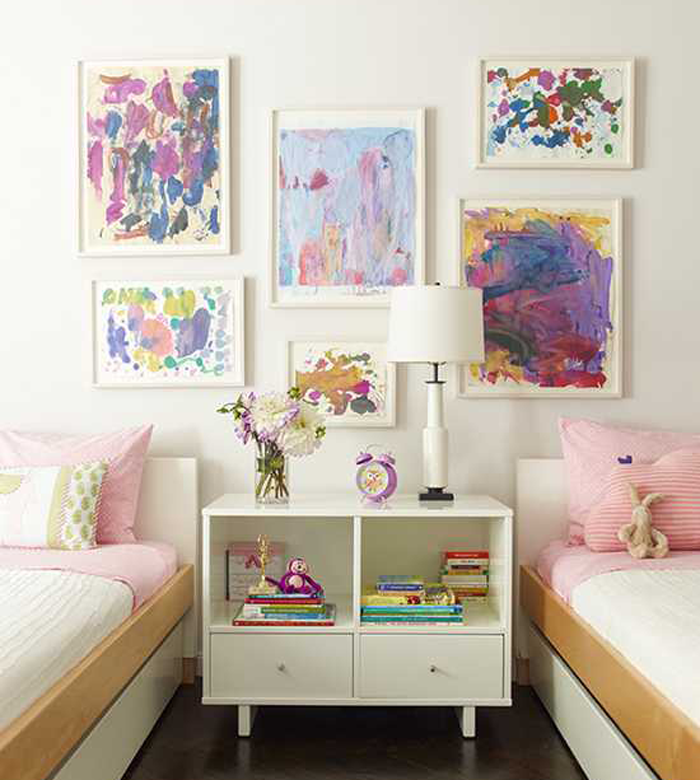
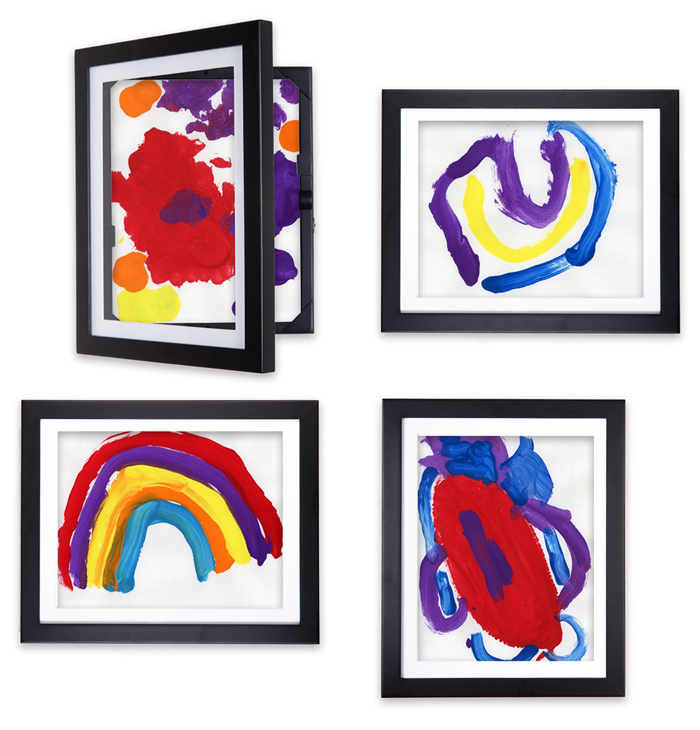
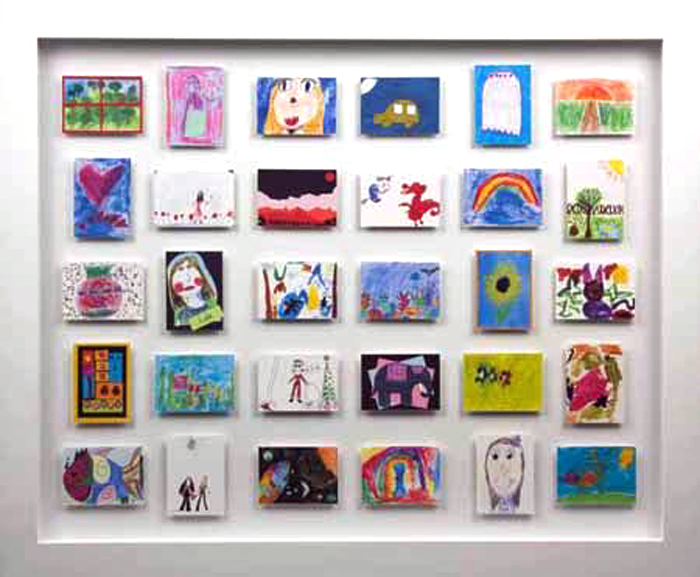
If your child is a master at one type of artwork – flowers, glitter, abstract – this may be the option for you. Grouping similar styles of art pieces lends itself to a beautiful gallery style display. I imagine the frames used in this setup are either poster size or custom created to fit the artwork.
A simple shelf ledge arrangement may be the perfect option may be preferable if you tend to change out your child’s artwork frequently. Anna White has a wonderful tutorial on how to build these ledges out of standard materials – for only $10!
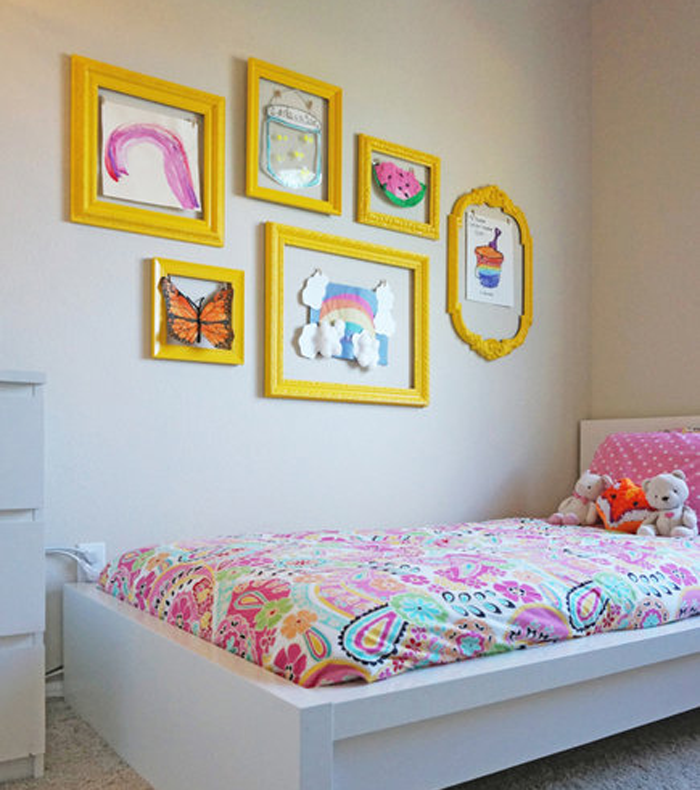
Another way to tie varied art pieces together is by removing glass from old frames and painting them all the same color. This also gives the display a gallery look. These sunny yellow frames are really helping the art shine!
Perhaps you love the idea of framing your child’s art pieces but imagine that changing them out would be too much of a hassle. This hinged frame product may be the option you are looking for. They are said to be able to hold up to 50 sheets of paper! Click on the link above to purchase, or make them yourself!
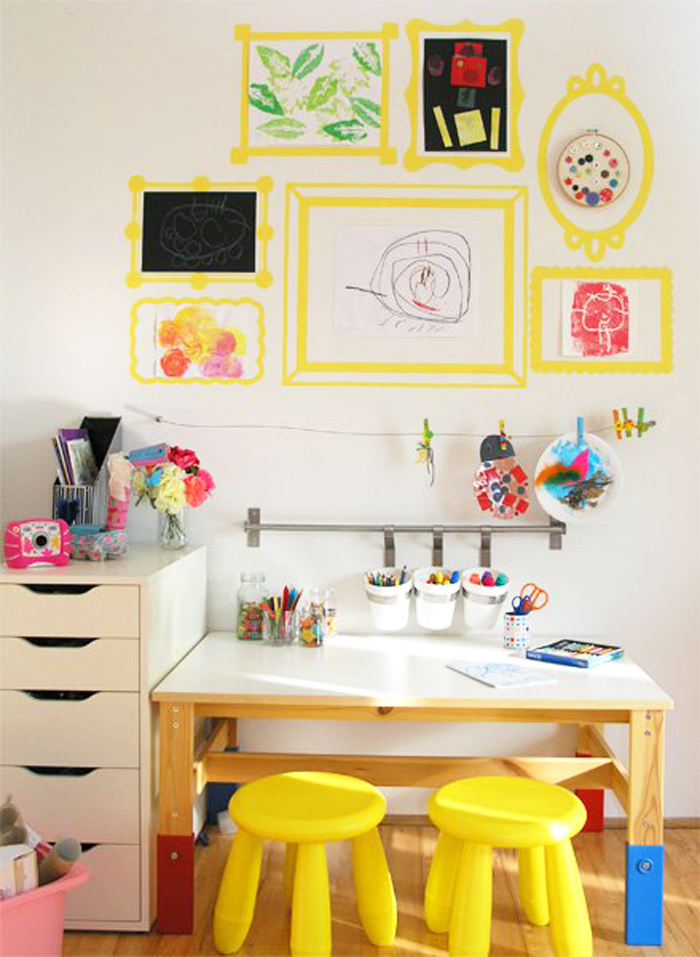
This is an inexpensive craft – and it looks cute too! You can create various sizes and change up the patterns and colors of the tape. The wonderful thing about washi tape is that it is easily removable and doesn’t leave residue – meaning you can have a traveling gallery that moves from room to room.
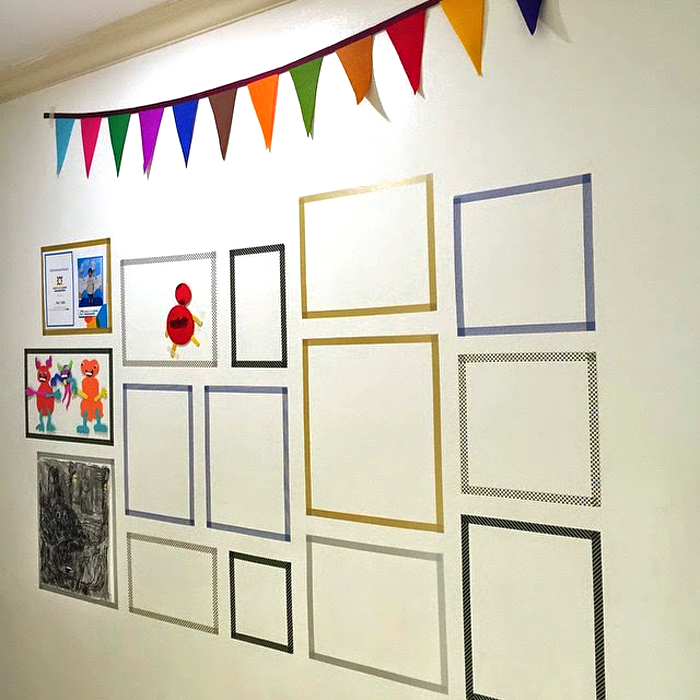
For a more permanent look, painting frame patterns on the wall could be another simple fix. This display sets the mood for a creative art station where the littles can be inspired.
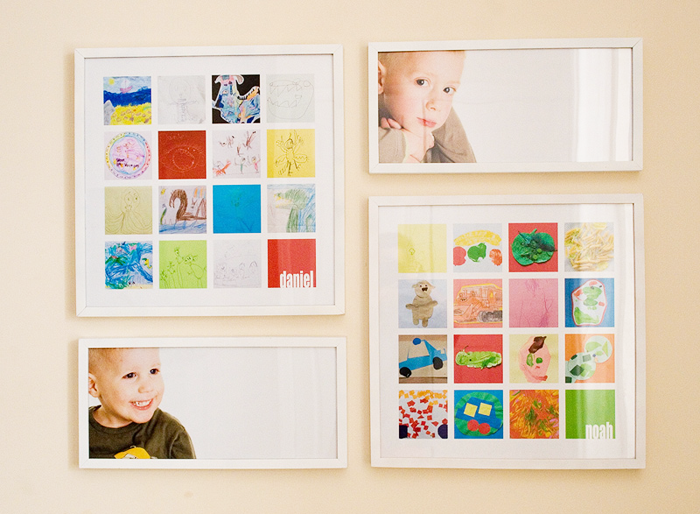
If you have access to basic computer software, you can easily create this stunning look. Simply take photos of or scan each art piece, then crop and scale the images and arrange them in a grid pattern. Hang photos of the little artists nearby for an added personalized touch.
mini masterpieces
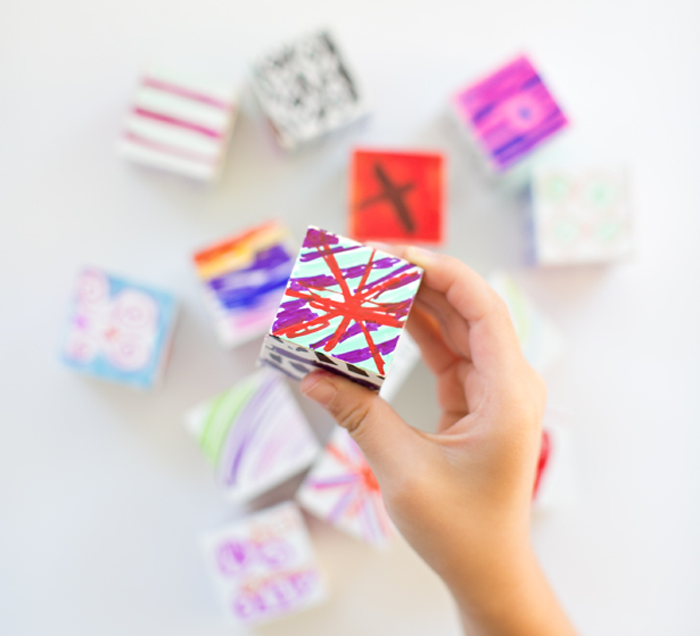
Another miniaturization of artwork, this display is created by scaling and printing the images and gluing them to bits of foam board. The individual mini art pieces are then arranged in a single frame.
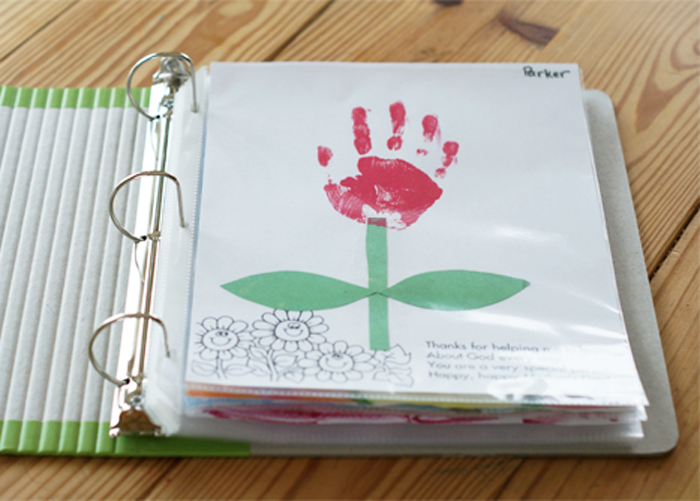
Displaying of artwork doesn’t always need to happen on the walls or shelves of your home. A binder filled with projects may be the perfect low-tech option to keep things clean and organized. This is such an easy technique that you might be tempted to save every last artistic scrap. Try to be selective or your child may end up with a storage room full of filled binders when they are ready to move out!
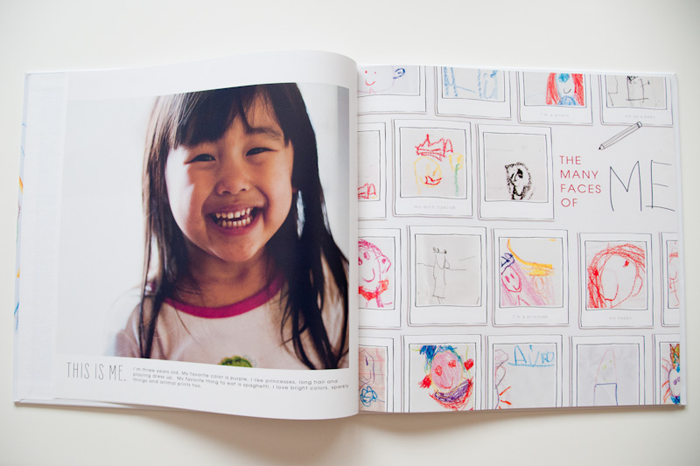
Photo books are very popular and may be just the thing you are looking for to display (and keep) your child’s artwork. Add photos of your child and short write ups about their projects to create a wonderful keepsake. Popular photo book companies include Snapfish and Shutterfly.
Is your fridge the place where most of the artwork migrates? Reclaim space by resizing each masterpiece digitally and creating fun, kid-friendly magnets! The kids will love rearranging their art pieces and making their own small exhibits.
Artwork can also easily be turned into puzzles! Websites such as Collage.com and PuzzleYou.com allow you to upload scanned images and create these custom, fun keepsakes.
If you really want to up the wow factor there are various artists, such as Custom Plush Art , who will bring your child’s artwork to life with a hand made stuffie! Just look at the details!
Each of these 18 ideas for displaying kid’s artwork is so creative and fun! I hope you will give some of them a try.
If you want to save this information for later, remember to pin!
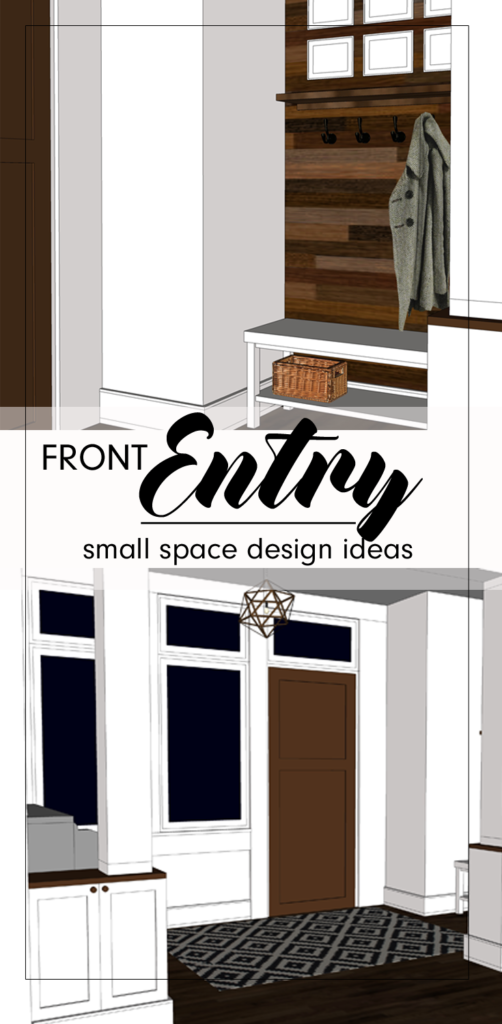
A front entrance for guests is a great feature to add to any home. It doesn’t need to be a large space, but having it laid out well is important. Today I am sharing the front entryway design ideas I have for Arrow Hill Cottage.
Although our home will have an attached garage, and our family is most likely to enter and leave in that direction, I wanted to make sure to include a straightforward front entrance – where we expect visitors to enter. I’m not sure about you, but our garage has a tendency to become cluttered and dirty far faster than any other space we own – and we don’t want our visitors to experience our day to day.
ENTERING FROM OUTSIDE
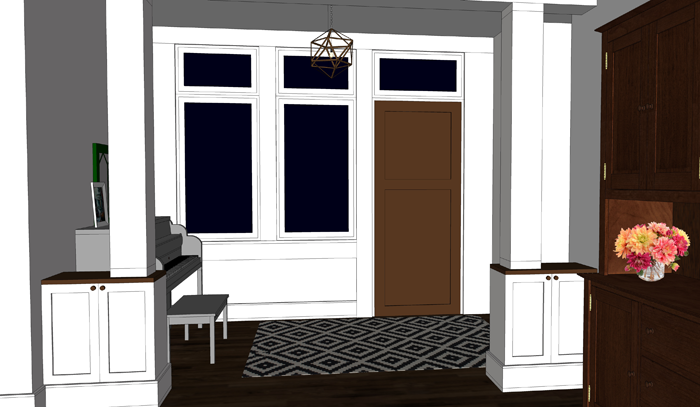
As you can see in this image, the front door will have a prominent position. Although the house is not symmetrical, your eye is drawn to the small gable above the door.
In case you noticed… yes, I am still #teamplanter, and it remains as part of the design, at least for now. If you have no idea what I’m talking about – go ahead and visit THIS POST to learn all about the debate.
The large stone pillars and double columns frame the view. I’m sure there will be some sort of feature light fixture here also, but I haven’t made any decisions on that yet. And yes, I am dreaming of a light blue bead-board ceiling for the porch. Love.
I have chosen a solid wood door. Because there will be windows directly next to and above it (transom), I felt that including a smaller pane of glass within the door itself would complicate the arrangement. The windows should provide plenty of natural light (this wall will be south-west facing)
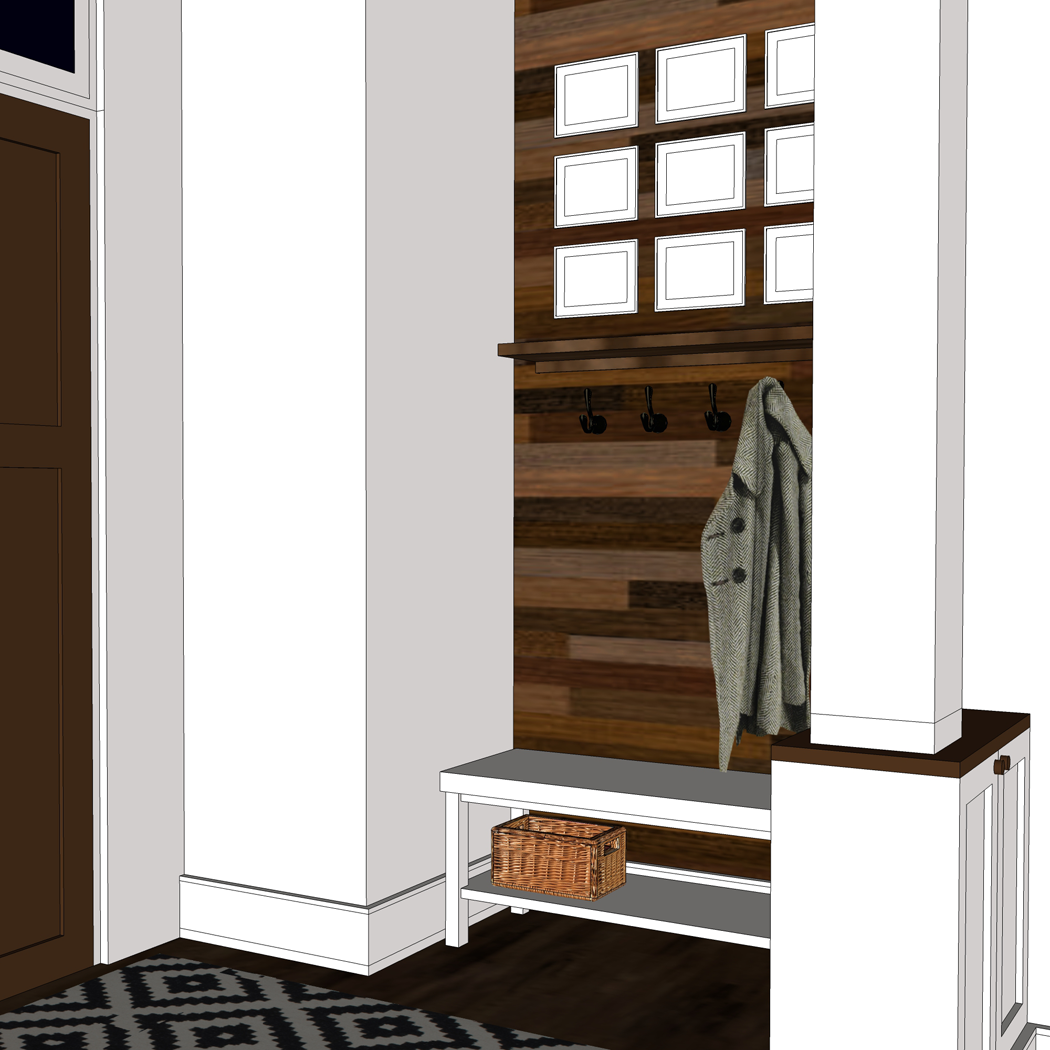
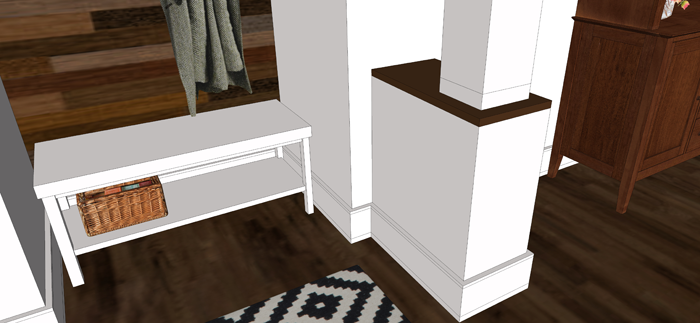
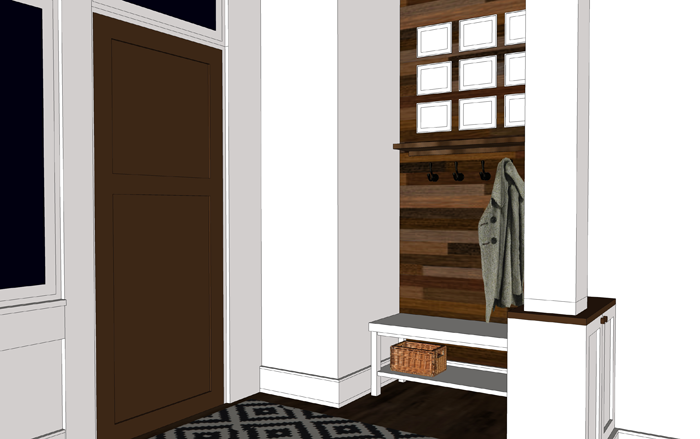
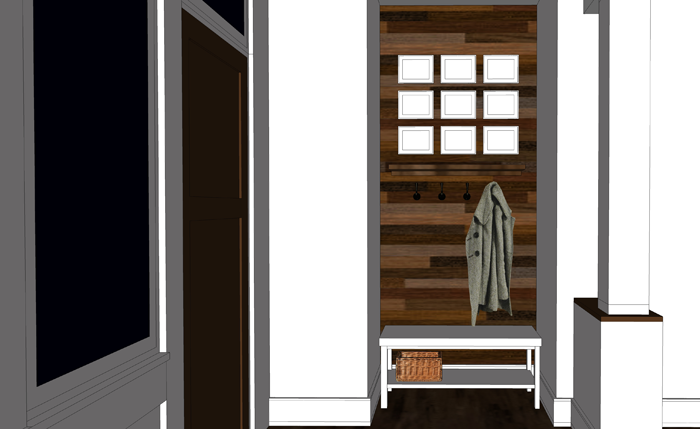
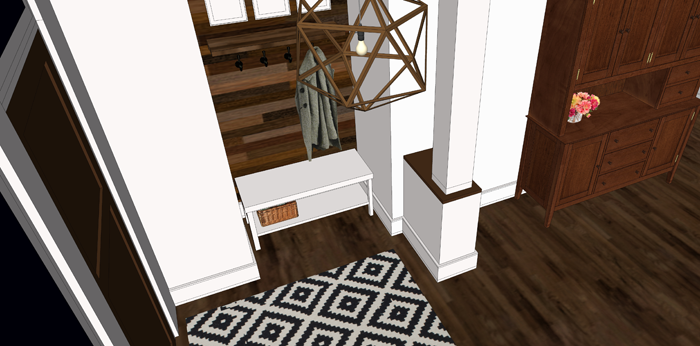
INSIDE THE ENTRYWAY
Stepping through the door, you are welcomed with a space approximately 6 feet deep by 12 feet wide. The room is partitioned from the dining room by a pair of built-in cabinets and columns.
We will likely have our builder or cabinet maker create these cabinets and columns, but This Old House wrote a fantastic post about how you can make this a DIY project. I purposely chose to offset the built-in slightly from the alcove since the wall finish and the cabinet finish will be different. This will help eliminate a clumsy transition from cabinet to wall. The baseboard trim will help to tie everything together.
As I mentioned in this post, we have found that with fewer closets we are less likely to hold onto items we don’t need. This entry is indeed the perfect opportunity to live that theory. Because most of our family’s shoes, coats and bags will be coming in through the back entry / mudroom, we won’t need much for storage near the front entry. Instead of using the recessed space as a closet, I am opting to leave the alcove open and instead will incorporate a bench with simple hooks and a shelf above.
This alcove also lends itself to the inclusion of a feature wall. At the moment, I am thinking that beautiful rustic barn wood would serve as the perfect surprise. The feature wall will serve as a backdrop for a family photo gallery.
This post, from the blog Ivory Lane , has given me a ton of inspiration for the entryway gallery. I love the simple nature of the metallic frames, white picture mats, and black and white images.
ACCESSORIES + DETAILS
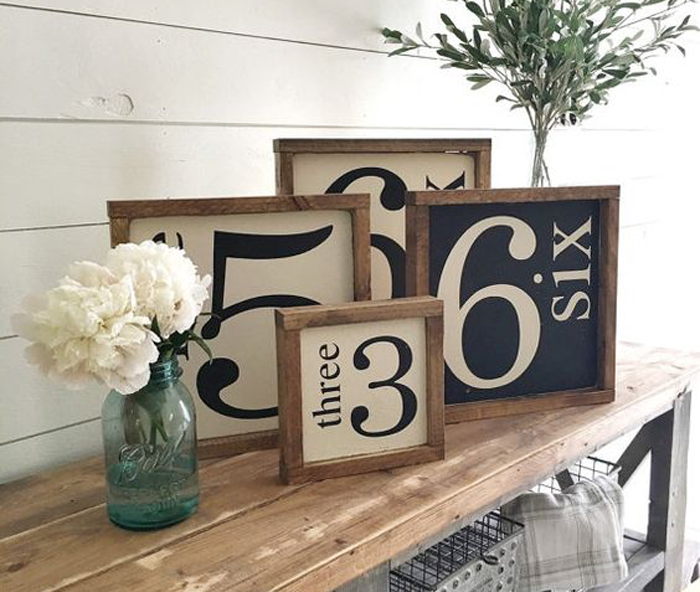
On top of the small shelf above the coat hooks, I envision some cute artwork that represents our family. These number squares are amazing.
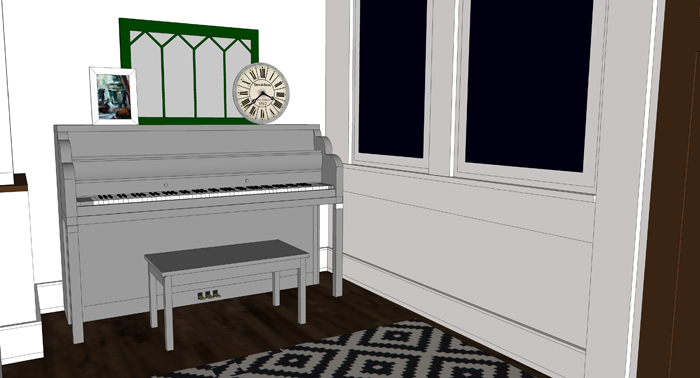
Opposite the bench area is where I envision our piano being placed. We own a low grade piano that is natural wood and wood grain veneer at the moment. I would love to paint it a soft gray color and decorate it with special accessories – such as the vintage green cottage window that I recently purchased at an antique store. I know there is some debate about painting pianos, but they make it look so easy on Pinterest, and I am really intrigued by the results.
Nobody in our family is a concert pianist, but we do enjoy having a piano to tinker around on. In this location it is available, but set aside so that it isn’t in the way of other daily activities.
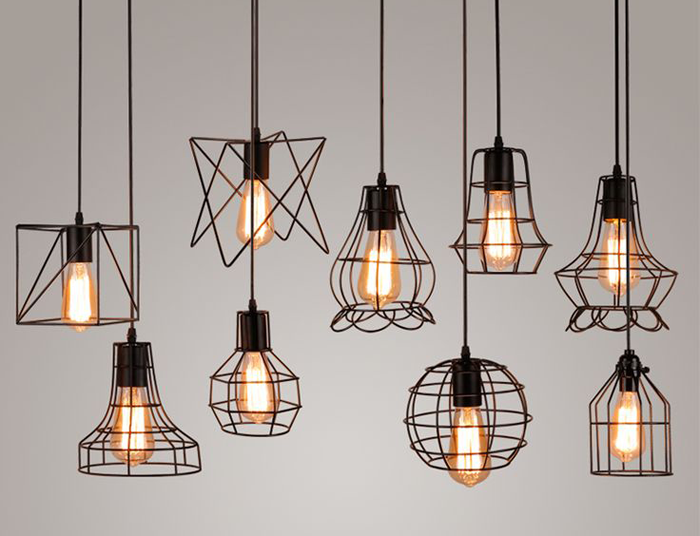
For the center of the room I would like to find a special light fixture. I am thinking something with a metallic finish, probably a hanging pendant.
Perhaps something from this collection would work well.
The floor will require some sort of durable rug that will mostly protect the wood floors. I love the idea of a black and white patterned rug.
This website seems to have a wonderful selection of rugs to choose from.
ADDITIONAL ENTRYWAY VIEWS
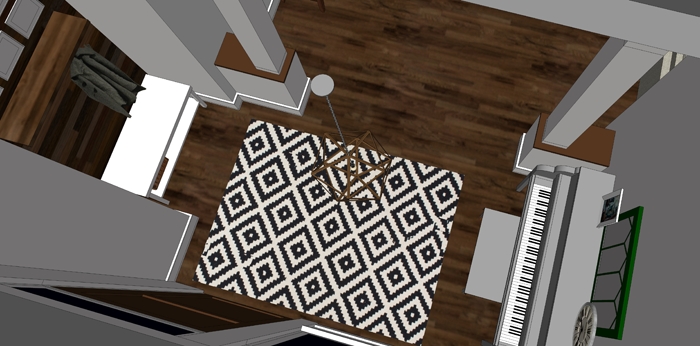
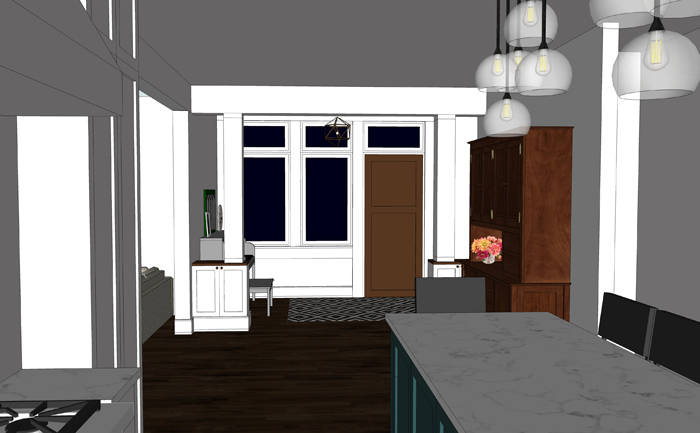
And now for a few more views of the entryway. First, a view from above – one that nobody will ever experience in real life. It shows the overall space well.
A view from the kitchen (standing near the stove) looking toward the entry. You can see the kitchen design in this post. The space between is the dining room, of which I am still working on designing. The only thing I know for sure is that I want to include some sort of antique hutch on the long wall.
Another room that is still a blank slate is the living room. Besides knowing that I want to include a large sectional sofa for our large family, there are still a lot of decisions to be made here. This is a view of the entryway as seen from the living room. Again, that large open space will eventually house our dining table.
I am really loving how the main level is laid out. The flow seems like it will work well for our family. In this image you can see the stairs leading to the bedrooms (up) and the family room (down). That blank spot at the landing is where the largest window of the house will be positioned. I’m excited to see the design of the stairs come together.
Maybe I will work on that next!
UPDATE: Our floorplans changed quite a bit since this was originally posted. You can see our revised design HERE.
PIN THESE ENTRYWAY DESIGN IDEAS
feeling inspired? Be sure to save this post for later!
Nobody loves your house like you do. Nobody. Even if that house is still lines on a page – it will never bear the same emotional connection to anyone other than you and those who will reside under it’s roof.
Whether you are looking for someone to build your dream house or need an extra hand with a tricky remodel project, there are 10 things you need to know before hiring someone to work on your house.
1. IT’S OKAY TO ASK FOR HELP
It might be tough for you to hand over the reigns. Maybe you have tackled a variety of projects in the past all on your own and have come out successful. You have pride in your work, no doubt. But it is also okay to realize that maybe you can’t do everything on your own.
Whether it is a time constraint issue or just the fact that you do not have the skills to complete the task at hand, don’t feel ashamed. There are people who are specialized in this work, who are just waiting for your phone call.
2. DETERMINE IF YOU NEED A CONTRACTOR
Do you need a full blown general contractor, or someone who specializes in one specific area. Are you looking for a ‘jack of all trades’ handyman or a license professional? The size of the project will likely be a deciding factor in this decision.
If a small area of your existing home needs new flooring, for example, hiring a handyman may be perfectly fine. The large and complicated projects – and whole house builds – should be left to the seasoned contractors.
3. ASK TRUSTED FRIENDS FOR RECOMMENDATIONS
Who better to get referrals from than the people you know and trust? This is simple, and free word of mouth marketing. It is why contractors are looking to do their best work. They know that their reputation will precede them.
You may also get good results from others living in your same community – by posting on an online message board. You might be surprised to learn that the neighbor next door had the same type of work done on their home recently. If you approach the subject carefully, you may be able to find out what they paid their contractor for their similar project, something that may come in handy when considering the bids you are given.
4. PREPARE A LIST OF QUESTIONS
Call a minimum of two different contractors. Ask them the same questions, and write down their responses. Their answers may give you peace or give you pause. Some of the more common questions to ask include:
How long have you been in business? Obviously, a contractor who has been in the business locally for many years will have the experience and references to back up their work. That doesn’t mean you need to count out the new guy though. They may be hungry to build their business and put forth their best effort.
How many projects like mine have you completed in the last year? It won’t hurt to also ask to see examples of their work.
Do you have a license? The requirement varies from state to state, and also between trades. Check this site for details on state specific licensing requirements.
Can I see your certificate of insurance? Contractors should have both liability insurance and workers’ compensation for the specific job they are doing. Seeing the physical certificates is important.
Who are your main suppliers? Contractors will generally work with supply companies time and time again. Consider them additional references. Go ahead and call the suppliers (tile stores, lumberyards, home improvement stores) and find out if the contractor does reliable work or if they have left a path of unhappy customers. If a contractor is unwilling to offer suppliers names, you can consider he or she has something to hide.
What is the size of your crew? How many people will be working on my project? It is unlikely that the contractor themselves will be doing much, if any of the work on your project. They generally will have a crew, whether that is 2 or 20+ employees. Ask to meet with the foreman who would potentially be heading your project – preferably visiting with him or her on a current job site. You will be working closely with this person, and it is important to determine early in the game if your personalities mesh. Visiting on the job will provide an added bonus of allowing you to witness if their work is running smoothly.
Do you bid estimates or offer fixed prices? If possible, ask the contractor to provide you with a breakdown of how much each portion of the project will cost, including the breakdown of how much will be applied toward materials and labor expenses.
Will you be pulling the permits and scheduling inspections? The answer to this question should be yes. Not only should the contractor be aware of which pieces of the project will require permits and inspections and how to get them, he should also be willing to do the leg work.
What is your timeline for completing my project? Determine when they would be able to start the job. If they are booked up and you have a project that is time sensitive, you may need to move on. Ask the contractor to estimate how long the job may take, and also what factors may delay progress (weather? other jobs they are working on, etc).
What is your typical working day schedule? Determining the core hours your contractor and his crew plan to operate will help you know what to expect. Do they start early in the morning? When are the tools packed up for the night? Also ask what type of noise level can be expected and if they want you to be present at any point during the day.
How will you care for my home during your time there? Find out what the protocol is for storing supplies and tools for projects that span multiple days and learn if you can expect a daily site clean-up. Also be sure to ask what measures will be taken to protect the portion of your home that is not included in the project (if a remodel). For example – will they be sealing off the work zone?
The communication between contractor and homeowner is an important one – and it shouldn’t be a one sided conversation. Before the project is handed to them a good contractor should have some questions for you as well!
5. DETERMINE A PAYMENT PLAN
The Better Business Bureau advises against paying in full upfront for a job that has yet to be completed – but you may have to make an early payment for supplies. From there you will need to discuss how much will need to be paid at what point during the project. Your chosen contractor should be able to give you a reasonable payment schedule.
6. OBTAIN A WRITTEN CONTRACT
Make sure that all the bases are covered and written down. Even if your state does not require a written contract, ask for one. Before signing, make sure it includes all of the following information:
The contractor’s name, address, phone and license number (if required)
Details on the estimated start and completion date
Payment schedule
The contractor’s agreement to obtain necessary permits
Information about how change orders will be handled
A list of materials that will be used – the more detailed the better. Determine who is responsible for choosing the products that will be purchased at a later date, and who is responsible for paying for them (If it is in the budget, know what ‘allowance’ will be given to each item)
A list of what the contractor is or is not responsible for
7. KEEP RECORDS OF COMMUNICATION
Change orders are quite common during construction. They can be as small as moving the location of a light switch or as large as eliminating an entire portion of the project. Whenever a homeowner and contractor or builder agree on a change, it needs to be documented. Keep notes of these changes in a file, including the date they were made, who discussed the changes with you, and if the monetary impact was discussed.
8. BE PRESENT
Very rare is the situation where the homeowner shakes hands with their contractor and walks away until the construction is finished. It is understandable that you will want to know what is going on with the project, but it is important to note that a construction zone is a dangerous place to be.
You should discuss with your contractor early in the process how often you plan to drop in to check on things. It is always best that when walking on the construction site you do so with the job foreman – who can give you a tour of what has been completed and point out what is to come. For job site safety tips, check out this post from Construction Dive – which highlights 5 ways to keep the homeowner safe when they visit the job site.
9. FINISH THE JOB WITH A CHECKLIST
Before that final payment is made, check to make sure these things have been done and/or collected:
The work has been completed to the specifications outlined in the contract. As the homeowner, you should inspect the final product to be sure it meets your satisfaction.
Written warranties on products and services, including who will honor them and the expiration date of each
Written proof that all subcontractors and suppliers have been paid in full
The job site has been cleaned of debris and extra construction material
10. BEWARE OF SCAMS
If you have done your research and walked through steps one through nine, chances are number 10 won’t be a problem; But be aware that there are contractor scams out there. You should be wary of any contractor who:
Knocks on your door asking for work and offering you money for the referrals you make
Pressures you to make a decision more quickly than you are ready
Only accepts cash or asks you to pay upfront for the job
Asks you to obtain the building permits
Offers a ‘lifetime warranty’ or long term guarantee
Doesn’t list a telephone number in the local business directory
I hope that this list of 10 things to consider when hiring a contractor is helpful as you prepare for your next house project.
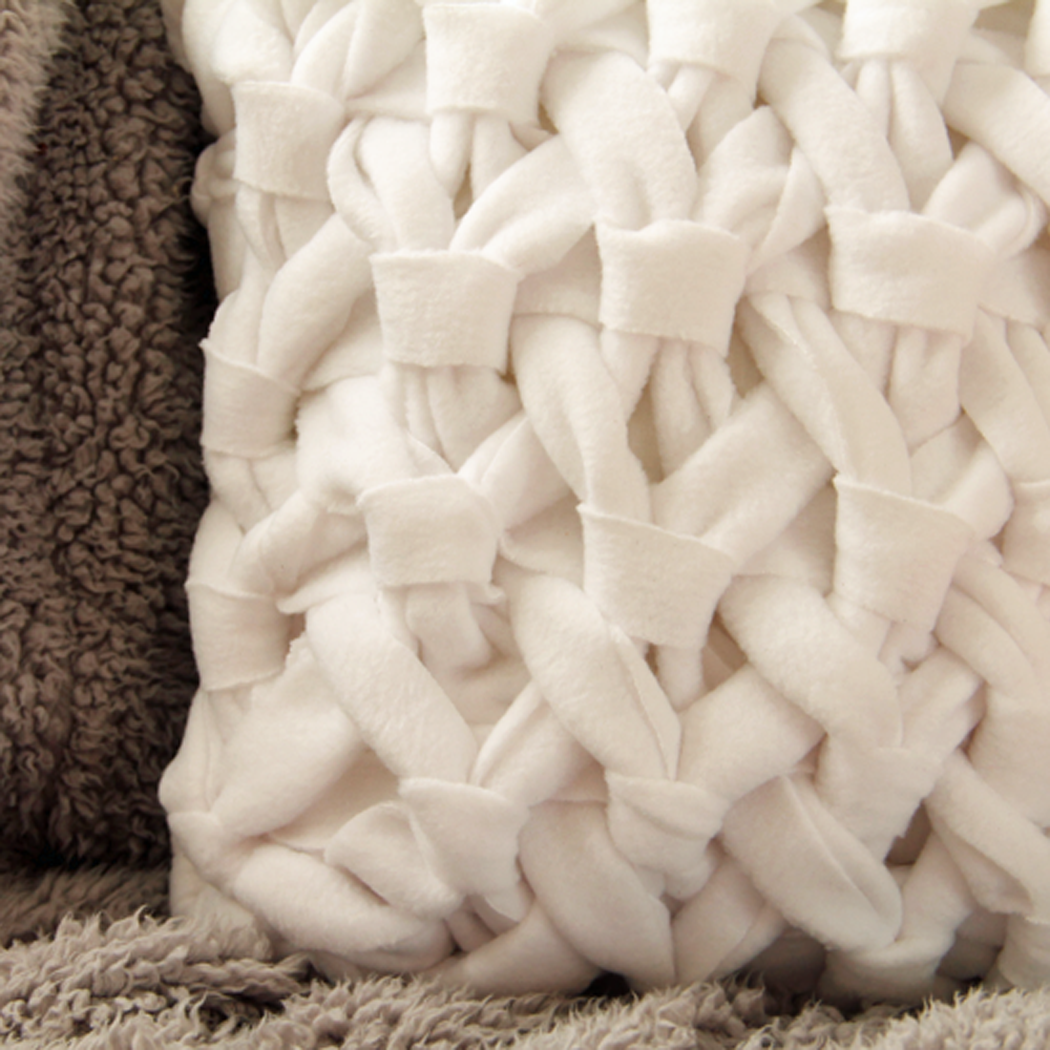
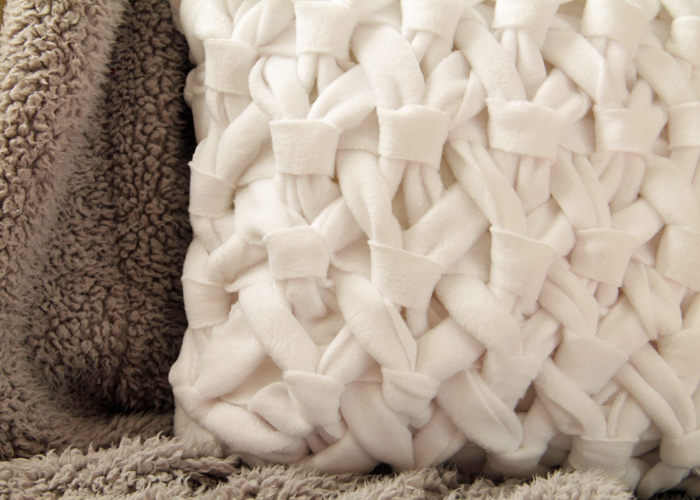
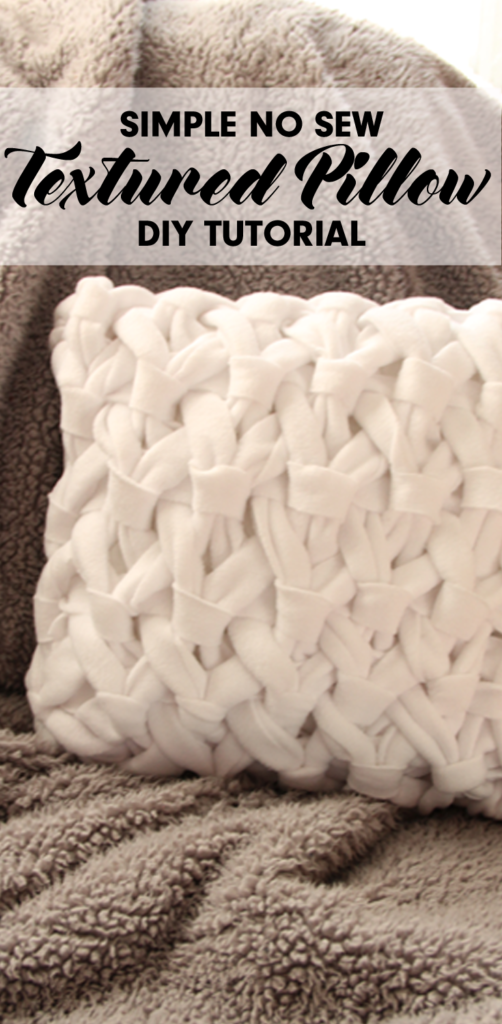
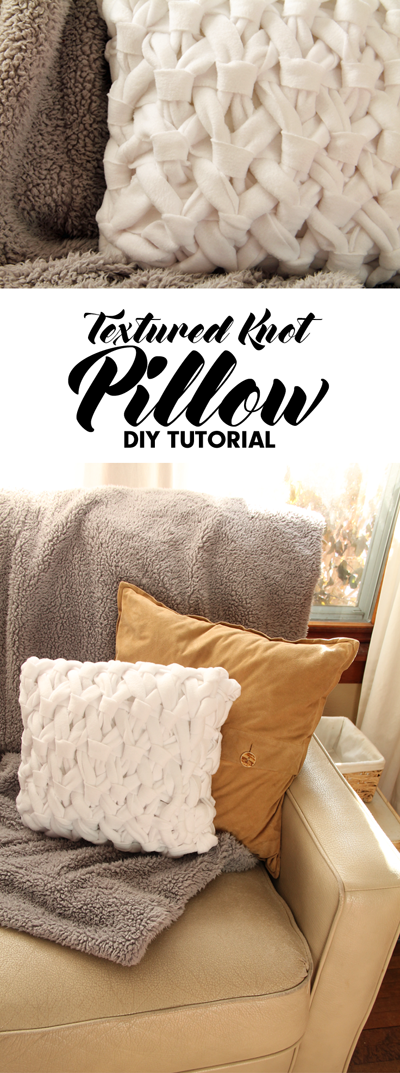
This no sew textured pillow is extremely simple to make and looks great! If you can braid and tie a knot, you can make it. I’ll show you how!
I mentioned this textured pillow in a recent post about our home’s Christmas decorations. The pillow went perfectly with the rest of the festive green and red decorations. I love it so much that it is still gracing our couch this winter.
These cold months are the perfect time to experiment with cozy, chunky textures for the home. I’m excited to share how you can add some to your home easily and affordably, with this do it yourself project!
Though the finished product may appear complicated, I guarantee it isn’t! There is NO sewing NO knitting and NO complicated movements involved. Basically, if you can braid and tie knots, you can do this!
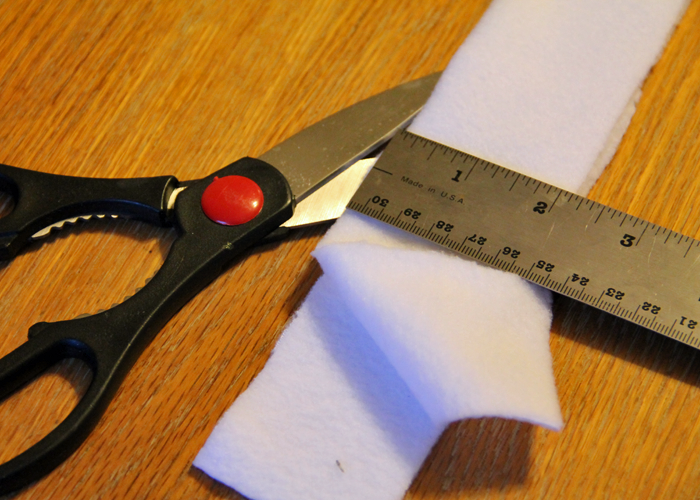
SUPPLIES YOU WILL NEED
Fleece Fabric: 1 1/2 yards of fleece in any solid color. I used a 60″ wide variety, but they come in varying yard widths. Any width over 60 inches will work for this tutorial. My overall fabric size was 54 inches long x 60 inches wide. Fleece is perfect for this project because it does not fray when cut.
Pillow Form: This tutorial uses a 13″ pillow form (13 inches wide x 13 inches tall)
Scissors: Make sure they are sharp!
Ruler: Measure twice and cut once. I share a simple technique for cutting the fabric that will save time.
(2) Rubber Bands: Or some other temporary tying device – I used hair ties!
A clear, flat area, such as a table or the floor will make the initial steps of this project easier. Let’s get started!
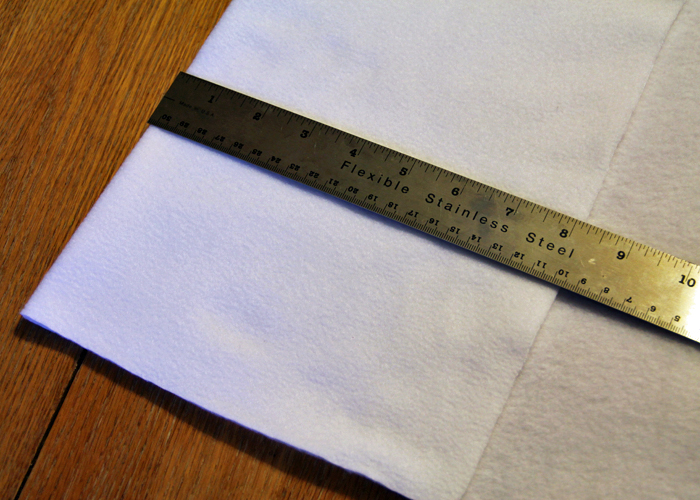
STEP 1 : LAY OUT THE FABRIC
I recommend that you lay the fabric out so that the longest width is laying horizontally in front of you. In my case, the fabric was set out so that there were 60 inches from left to right when I was looking at the table. Fold the left side of the fabric over 8 inches.
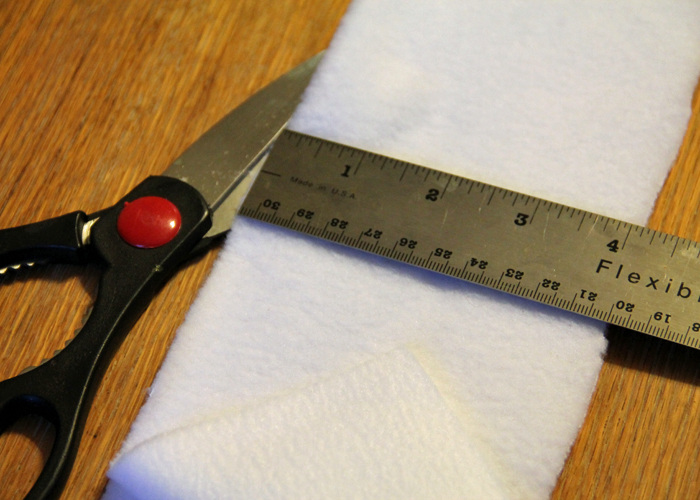
STEP 2: CUT THE FABRIC INTO STRIPS
Here is where I introduce my handy little tip for cutting fleece fabric. Instead of marking on the fabric itself, I like to fold the fabric over – then cut on the ‘looped’ side. First we will cut the loop of the 8″ measured fabric.
While the 8 inch strip is still laying on the large piece of fabric, use it as a guide to cut another 8 inch strip. Continue this process of laying an 8 inch strip above the larger piece of fabric until you have used up the rest of the fabric. For the 60 inch long variety of fleece, that will yield you (7) 8 inch strips + an extra 4 inch strip.
These 8 inch strips will further be folded in half and cut on the ‘loop’. Each 8 inch strip will give you (2) 4 inch strips – by folding and cutting using the same technique.
And each 4 inch strip will give you (2) 2 inch strips.
All told, you will be left with (30) 2 inch strips – which is what you will be using for the next step. If there is a little wobble in the straight line cuts, that is no problem at all!
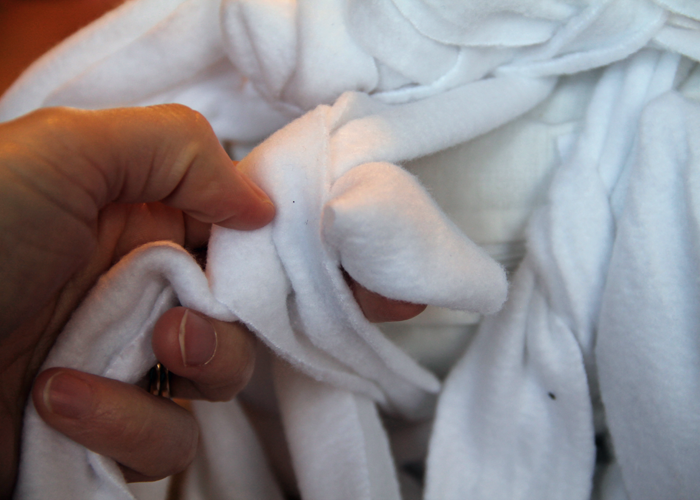
STEP 3: BRAID THE STRIPS
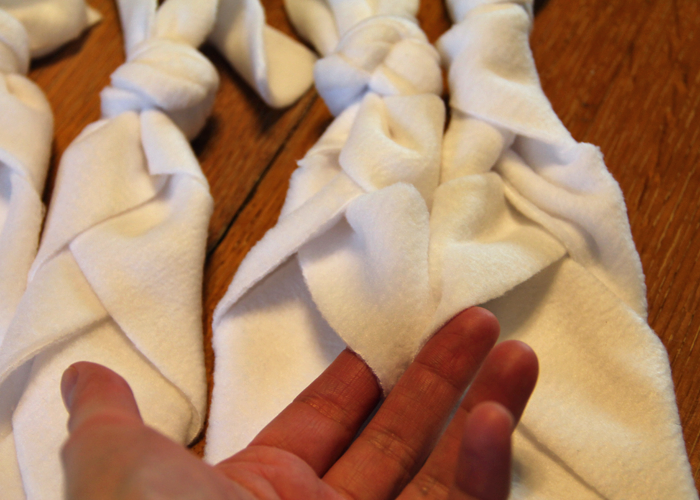
Lay (3) of the 2 inch strips on top of one another. Tie them together with a large knot on top.
You will be creating 7 braids in total, using (21) of the 2 inch strips.
They will be flat/ large braids. One tip that I found to allow them to lay flat is to make sure the top fabric strip becomes the center of the braid.
Braid each section. I created a little video of a few portions of this project – linked at the end of this post – if you need a refresher on braiding.
Tie each braid at the end with a knot. It is okay if the end portions of the braid aren’t perfectly flat – as these knots will be removed later in the process. Set the braids side by side so that the knots are at the top and bottom when laid in front of you on the flat surface.
At this point in the process you might want to just double check that your pillow form fits on top of the braids. If you decided to use a pillow form size other than 13″ x 13″ you will need more or less braids, accordingly.
Just make sure there is a little bit of the braid showing on either side of the pillow form, as the following step will tighten things up a bit.
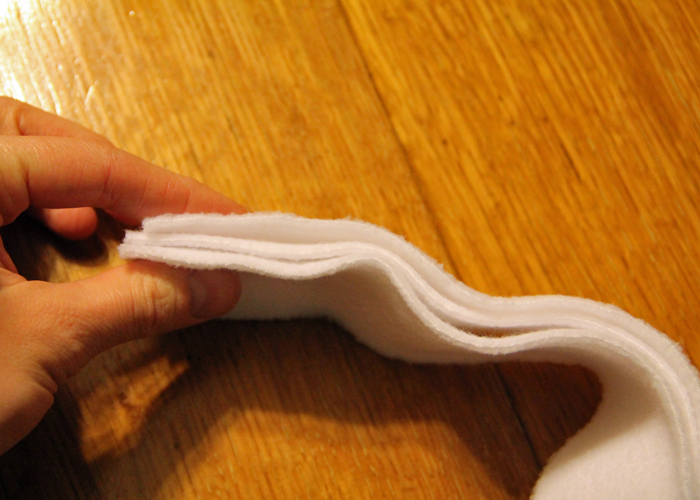
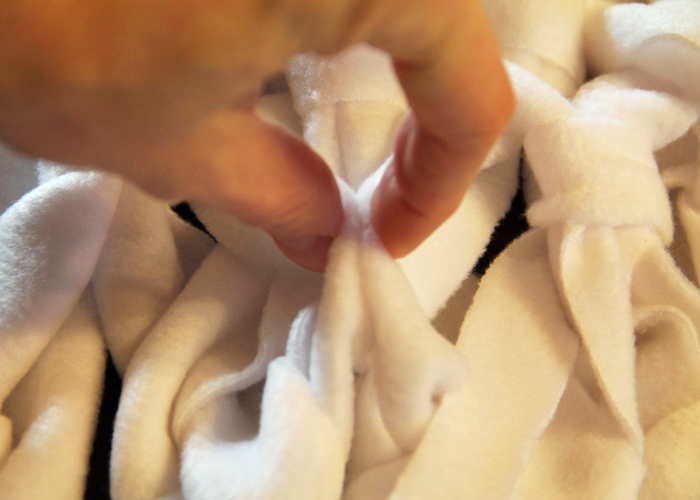
STEP 4: COMBINE THE BRAIDS
I’m going to prep you now by saying that this next step is probably the most tricky. However, once you get the hang of it you will just repeat the process over and over. Pay careful attention to the next photos, and watch the video if you need a bit of extra guidance.
Set two braids side by side and match up the second folds together. I didn’t start at the very top because the knots tend to get in the way a bit. It will be easier to get the hang of this technique when you are a little lower down the braid.
There should be (9) remaining strips of 2 inch wide fabric remaining. These strips will be used to weave together the braids, giving the pillow its signature ‘knot’ look. Lace the fabric under the loops of the folds you are holding.
Tie the weave fabric in a knot, allowing at least 3 to 4 inches on the right side of the knot. The remaining length of the fabric strip will be used to create the ‘knots’ through the rest of the braids.
Gather the next lined up ‘fold’ pieces, and repeat the process – only this time instead of applying a knot, wrap the fabric strip over the folds. (this is easily seen in the video)
Continue this process until all seven braids are connected. Then move to the next row down and repeat the process. In all, you will use 9 strips of fabric to do the weaving.
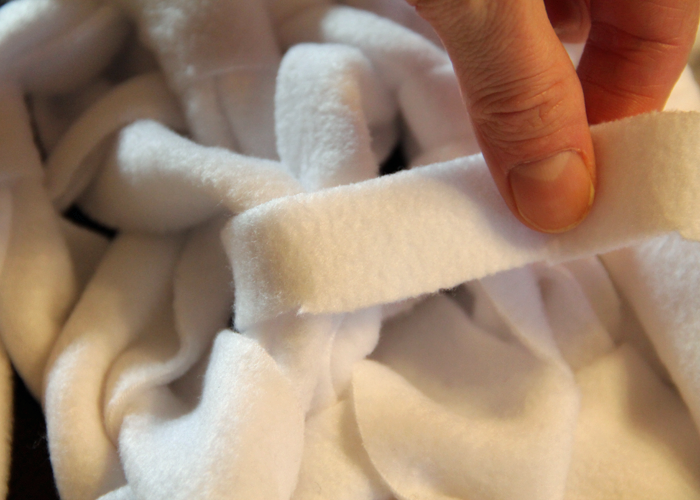
Your finished product will look something like this.
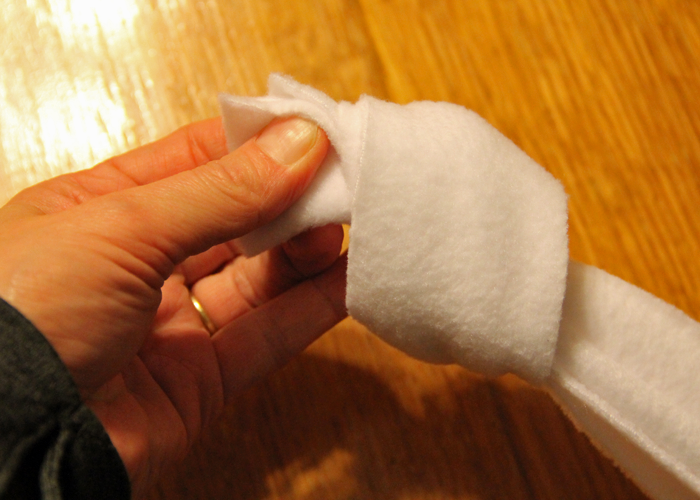
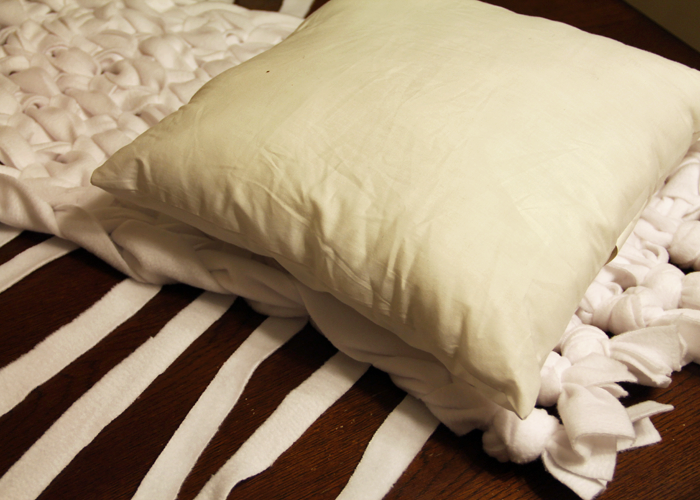
At this point you should flip the braided/woven fabric piece over so that the best looking side is facing out. This may vary from person to person – depending on your preference – just make sure that whichever side you want to be seen for your finished project is laying face DOWN. Then place the pillow form on top – on one end.
Fold the rest of the woven braids over the top of the pillow form, so that the knots are lined up on top of one another – and you are ready for the final step!
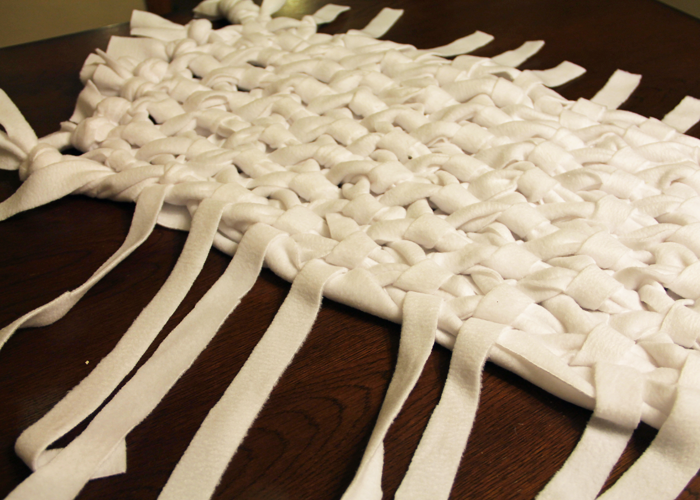
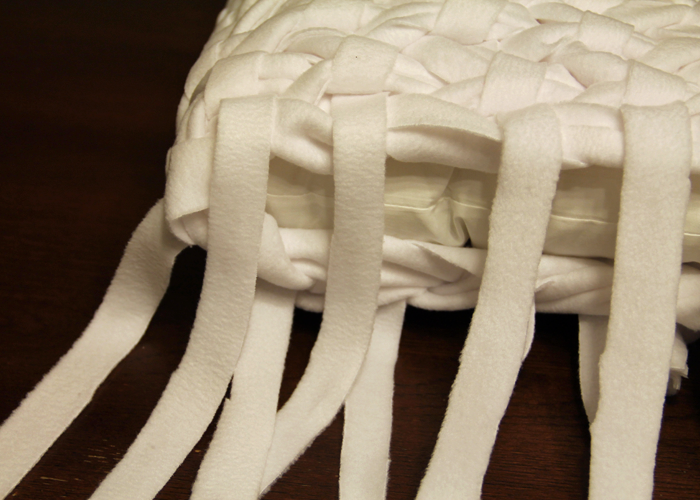
STEP 5: FINISH THE TEXTURED PILLOW
Get ready for more tying! Start with the non-knotted fabric strips. Match the top and bottom strips and tie them into knots.
To finish the sides, simply tuck the remaining fabric in – or, if you prefer, cut the ends of the strips a bit and leave them exposed for a fringed look.
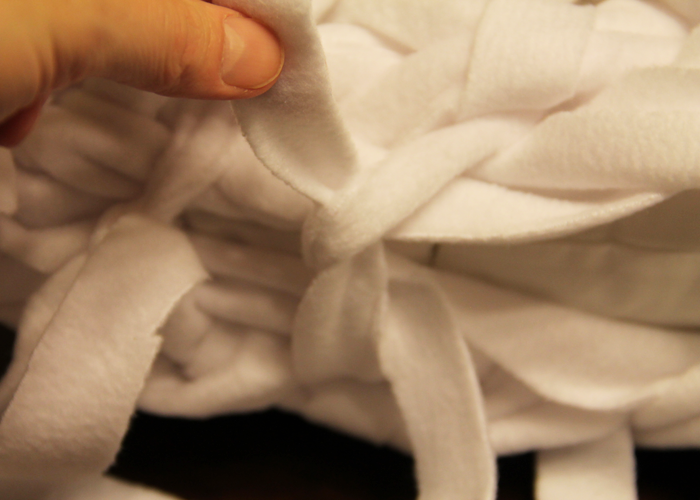
At this stage, it is safe to remove the knots from the bottom of the braids. Once the knots have been untied, lay the strips flat. Cut the extra length of the fabric from the strips so that there are between 6 and 9 inches of fabric loose below the faux ‘knots’ that remain.
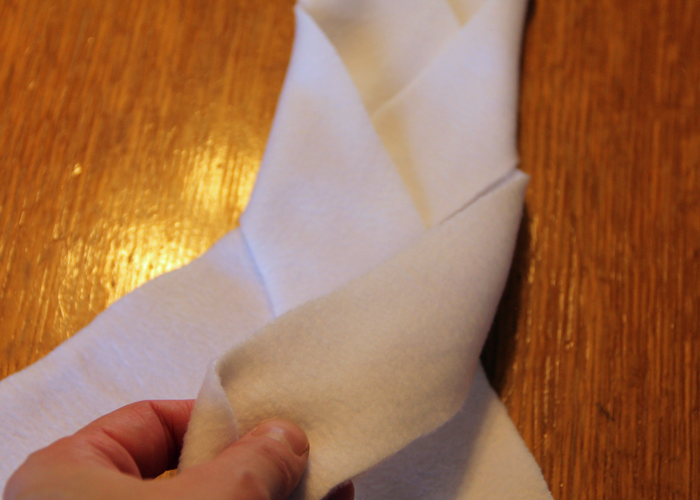
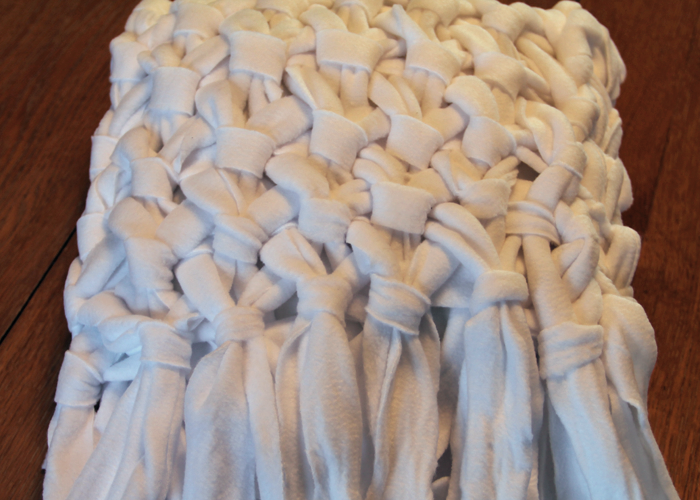
You are left with a lot of strips hanging down. Feel free to get creative with how you finish the bottom of the pillow. I initially decided to tie the strips together and leave a bit of a fringe hanging on the bottom; But eventually I decided to give the pillow a bit of a more finished look, and developed the following technique.
Flip the top ‘knotted’ strips up, gather them and tie temporarily. Turn the pillow over and repeat these steps. This will leave exposed strips in the center.
Flip your pillow so that the skinny edge is up and oriented up and down in front of you. Working top to bottom, match up the fabric strips and tie/ loop them together. The extra fabric should be tucked in, the same way you tucked in the sides.
The finished center bottom of the pillow will look something like this. Don’t worry too much about perfection, as this will all be covered soon.
Lay the pillow flat again and untie the bundled portions now. There should be (7) sets of two on the top, and (7) on the bottom. Find the center sets, and position the strips as shown here.
Tie the overlapping pieces together, then once again tuck the remaining fabric into the pillow.
You will continue this process working from the middle to the side edges. With the remaining portions, plan to make ‘loops’ instead of knots – as you did in the weaving portion of this project – and continue to tuck in the remaining fabric.
As promised, here is a link to the video showing little clips of the process – including the technique I used to finish the bottom.
Now you have a gorgeous textured pillow ready to cozy up to! It is sure to add style to any space in your home.
I hope you will give this fun project a try! If you do, I would love for you to share with me your finished product! Don’t forget to save the pin below for reference! Happy Crafting!


 Not many moments spark the same amounts of joy and sadness as when the youngest child of the family finally outgrows the crib. With the celebratory occasion of assembling the ‘big boy/girl’ bed comes the equally emotional moment of taking the crib apart.