SATURDAY SKETCHBOOK: POSITIONING THE COTTAGE

The building site where a new home will be constructed is so, so important. Generally, it is recommended that you don’t even begin designing your house until a potential building site has been selected – so that the house can be developed to utilize the best features of the land, and avoid the pitfalls.


We purchased our building site in 2009. You can read more details about how we found and fell in love with our 4.5 acres in this post. Through the years, as I have been sketching ideas for the cottage, I have been careful to keep the lay of the land in mind – at least conceptually. I am now far enough in the design that I need to look more closely at how the cottage will actually be positioned.

This week I spent quite a bit of time fine tuning design details – the garage placement, the driveway configuration, and where the walkout door from the basement will be. Each of these decisions were heavily based on the site.


Our site is super unique, and has some interesting challenges. These are some of the site related issues that have been guiding our design:


SLOPED LAND

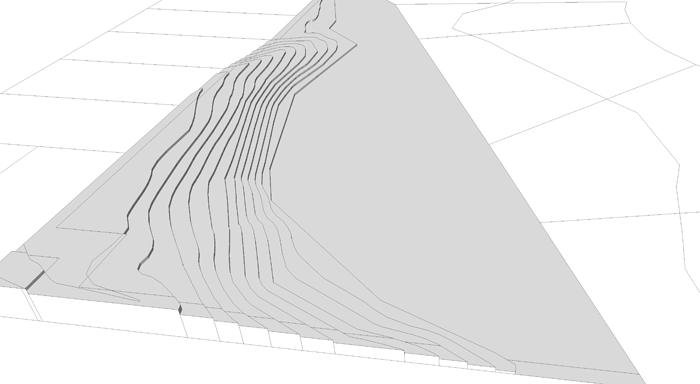
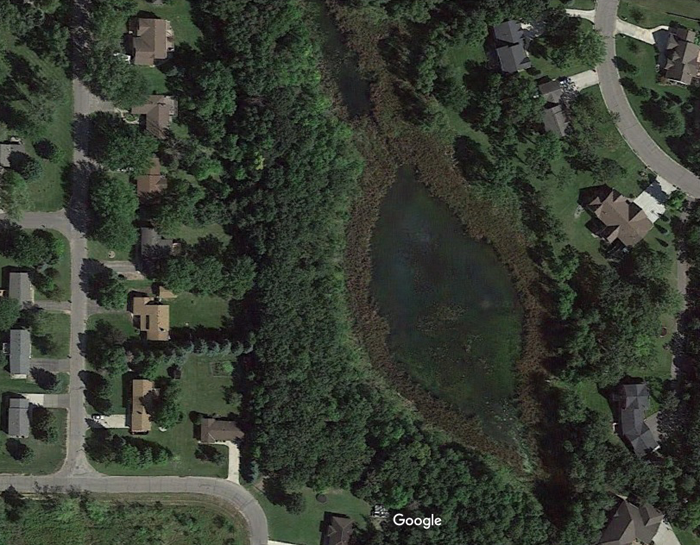
I’m sure that this particular parcel of land was passed over by multiple people solely because of its most dramatic natural feature – the slope. From the roadside there is a bit of flat land, but the slope down to the pond below is quite dramatic.


SETBACKS

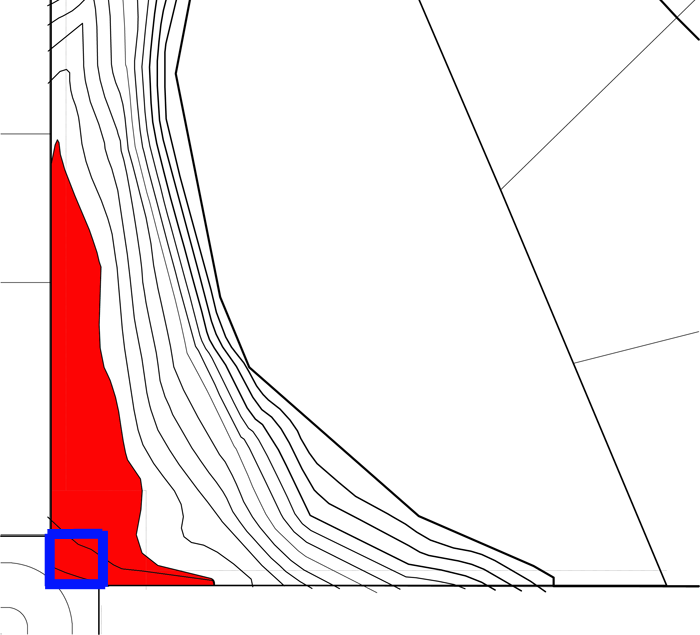
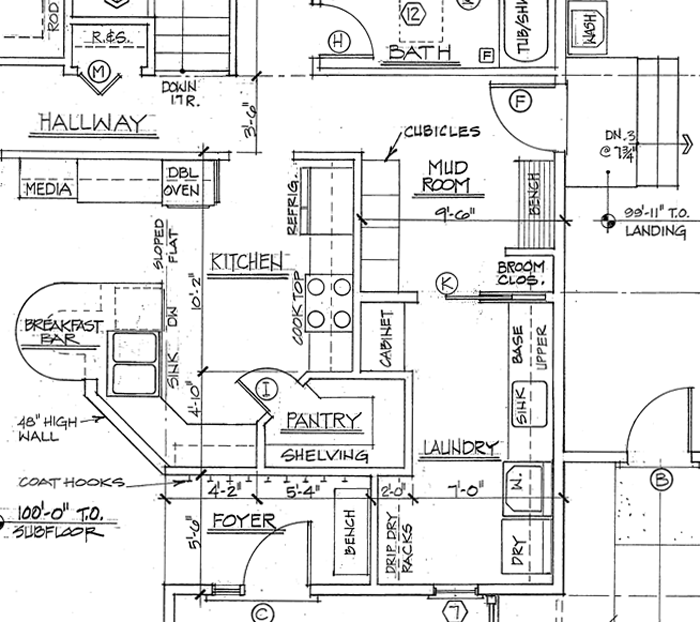
The red area shown in the above graphic is the ‘flat’ land. The portion of land closest to the road (shown outlined in blue) is not build-able, because of setbacks and easements. Right from the start, we knew that we would likely have a longer driveway than most because of these setbacks alone.


MANY NEIGHBORS

Our land borders quite a few properties – both on the south and west property lines and, visually, across the pond. 14 parcels border ours. While this could be seen as a major drawback, I have been working strategically on the design so that our privacy within the home is maintained.
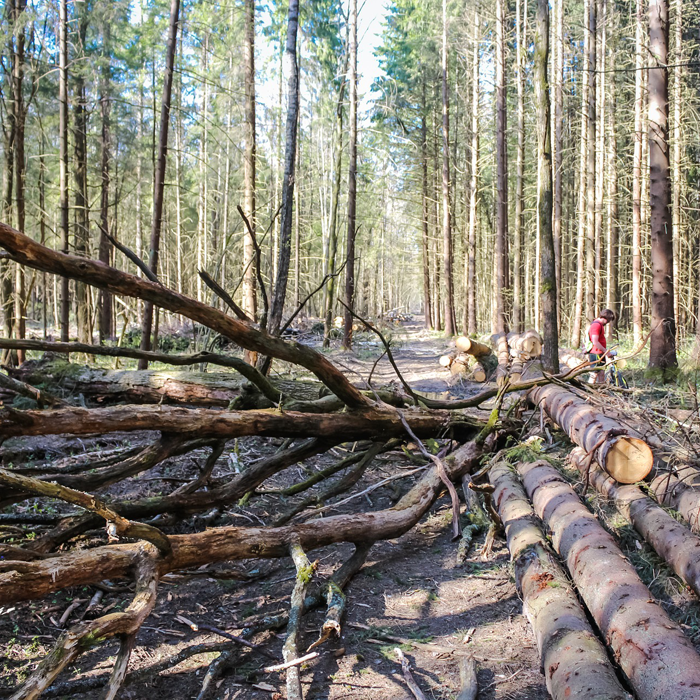
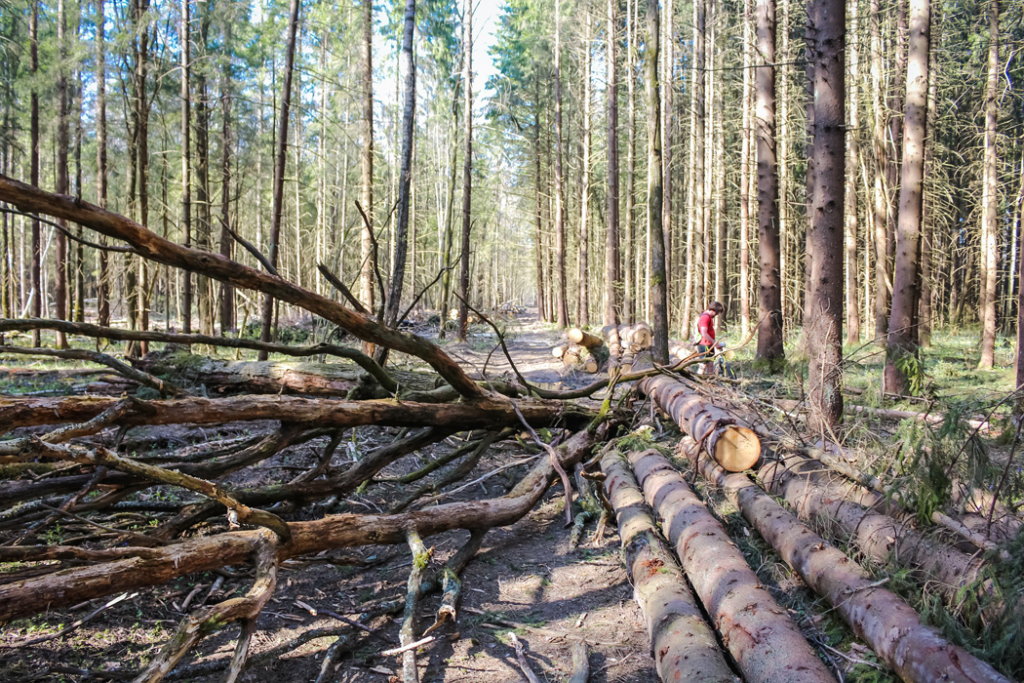
 

DENSE TREES

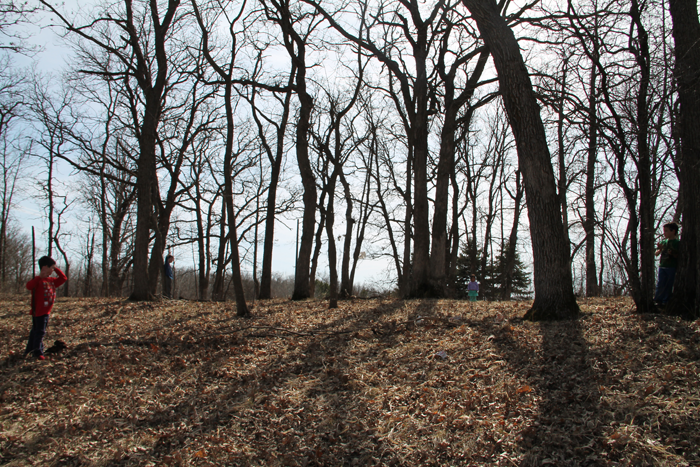
the kids standing by one of the many large trees that will need to be removed (2017)

One of the reasons we fell in love with our building site was that it was absolutely FILLED with mature trees: oak, maple, and other varieties. Sadly, there will be tree removal when the time comes to build. There is absolutely no avoiding that fact. By minimizing the overall footprint of the cottage, we hope to remove as few trees as possible.


EXPOSURE TO THE ELEMENTS

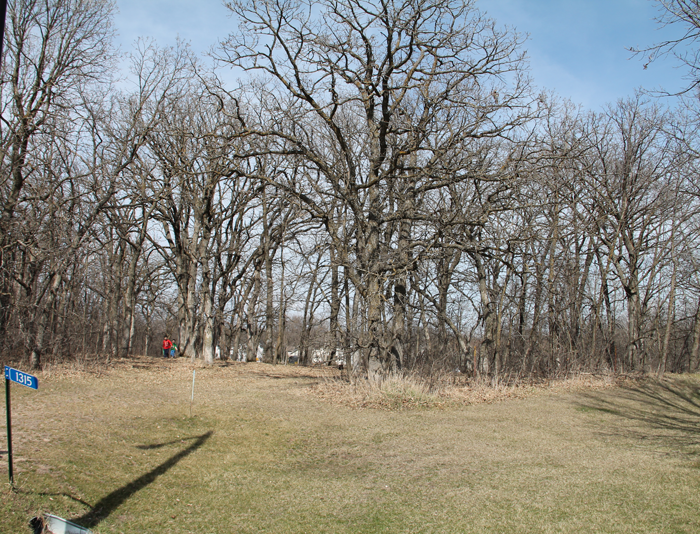
A view from our property, looking south. Our mini van is parked on the curved portion of the road.

An often overlooked, but important aspect of home design is the orientation it has in regard to the sun and wind. Because we live in a Northern climate, our strongest sunshine comes from the south. It is generally advised in this climate that you position your home with windows facing south (both for daylight, and for heating purposes in the winter). Thankfully, once a few trees are removed, we will have quite a bit of southern exposure.

It can get very cold in our state during the winter months – and the prevailing wind direction is from the northwest. I plan to rotate the cottage so that the garage can be used a bit for protection from those strong winds.


THE IDEAL POSITION FOR OUR COTTAGE

With all of these site issues in mind, I have narrowed down the placement of our cottage. I am working on finding the best angle of rotation and also determining how exactly the driveway will function – but we are getting close!


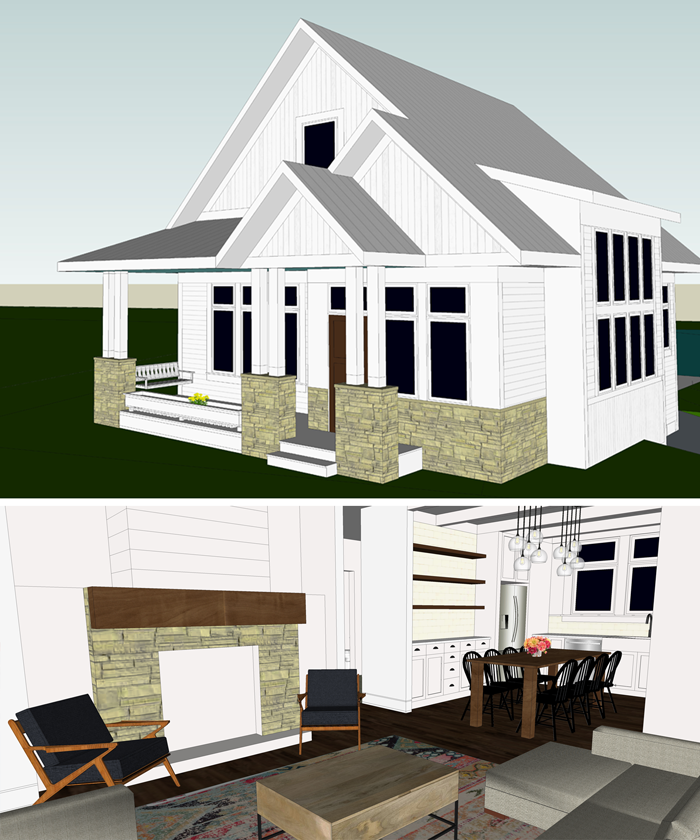
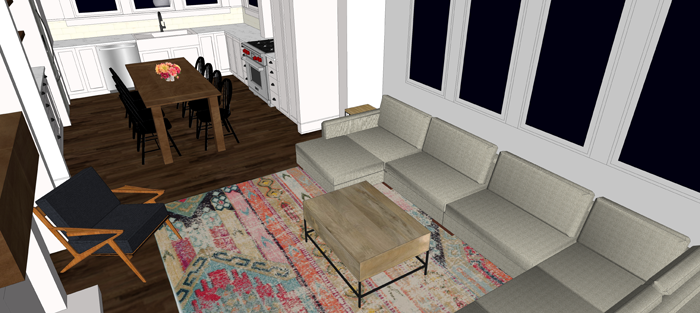
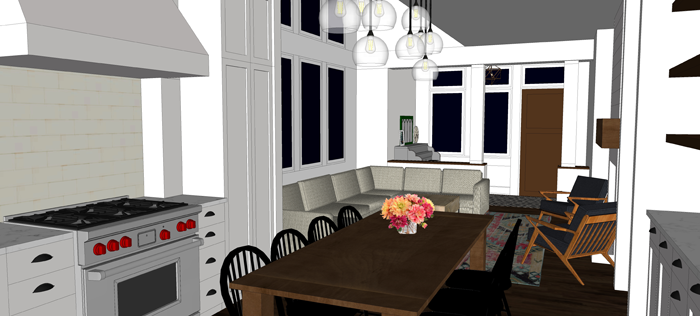
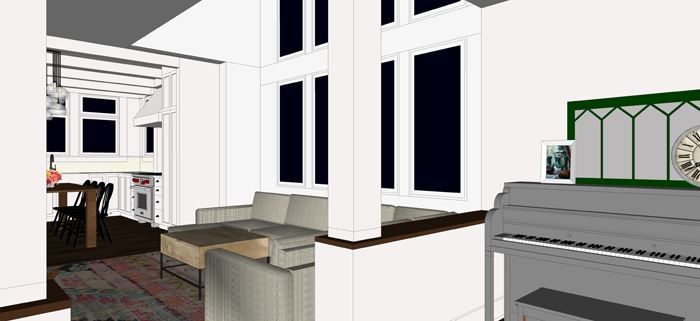
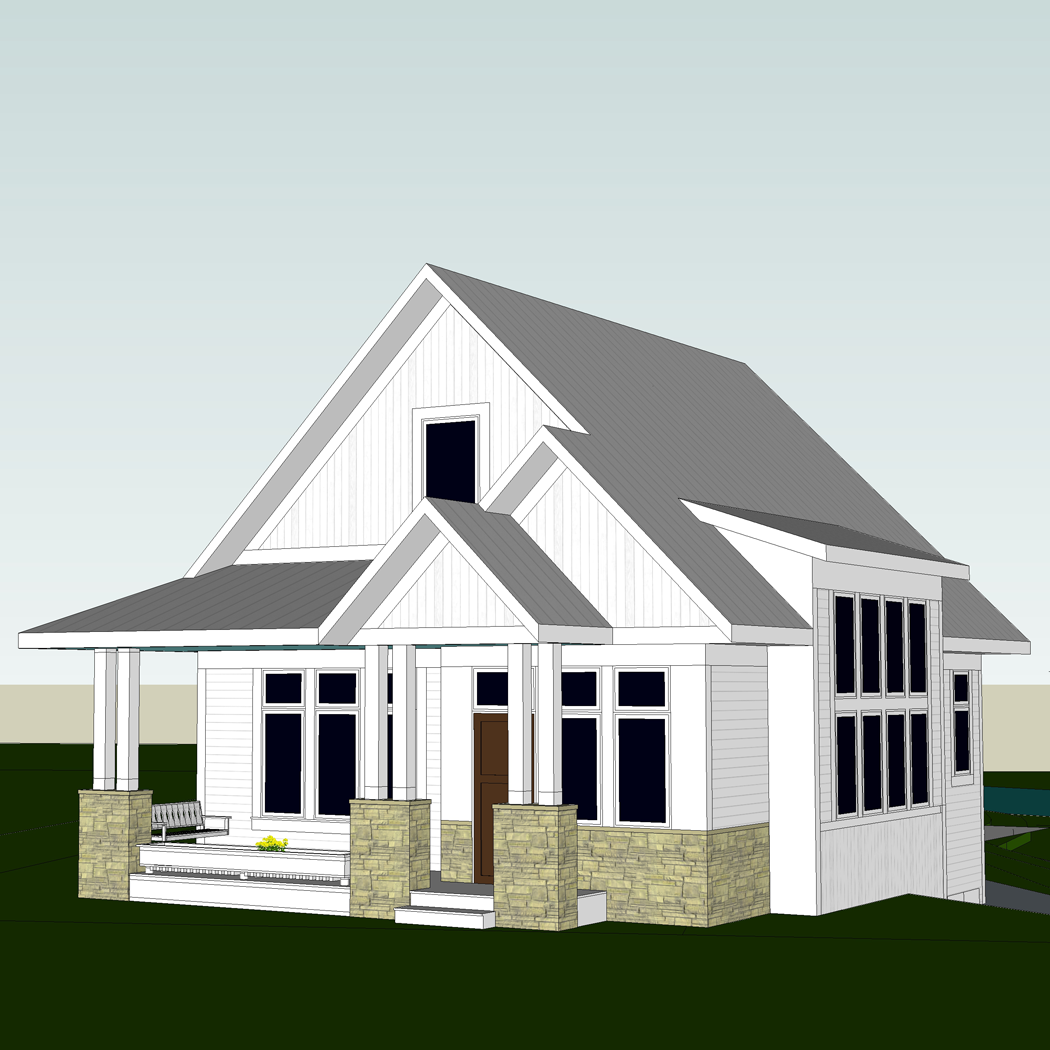
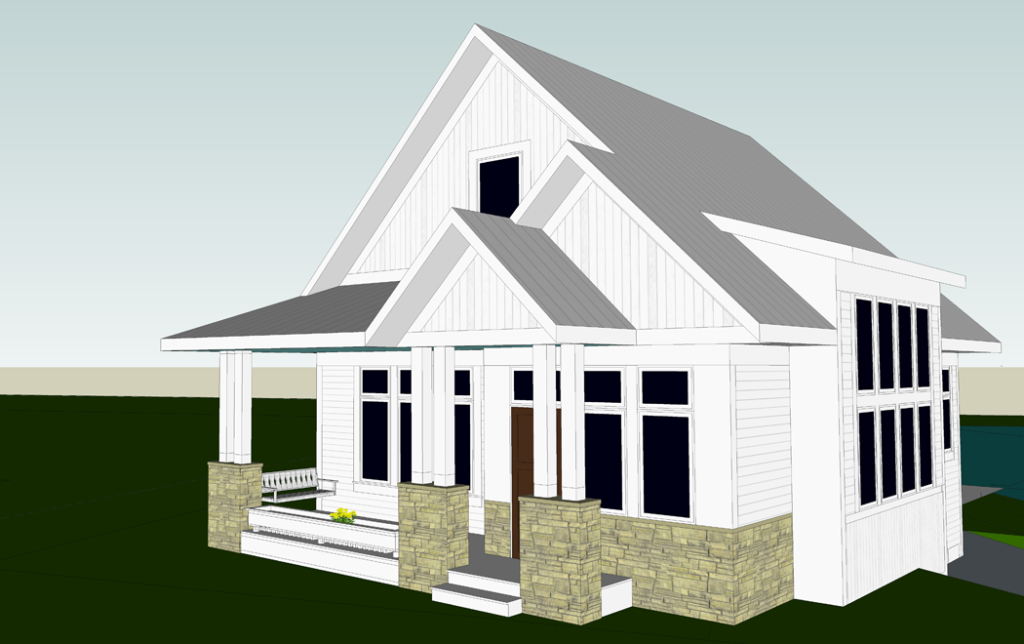
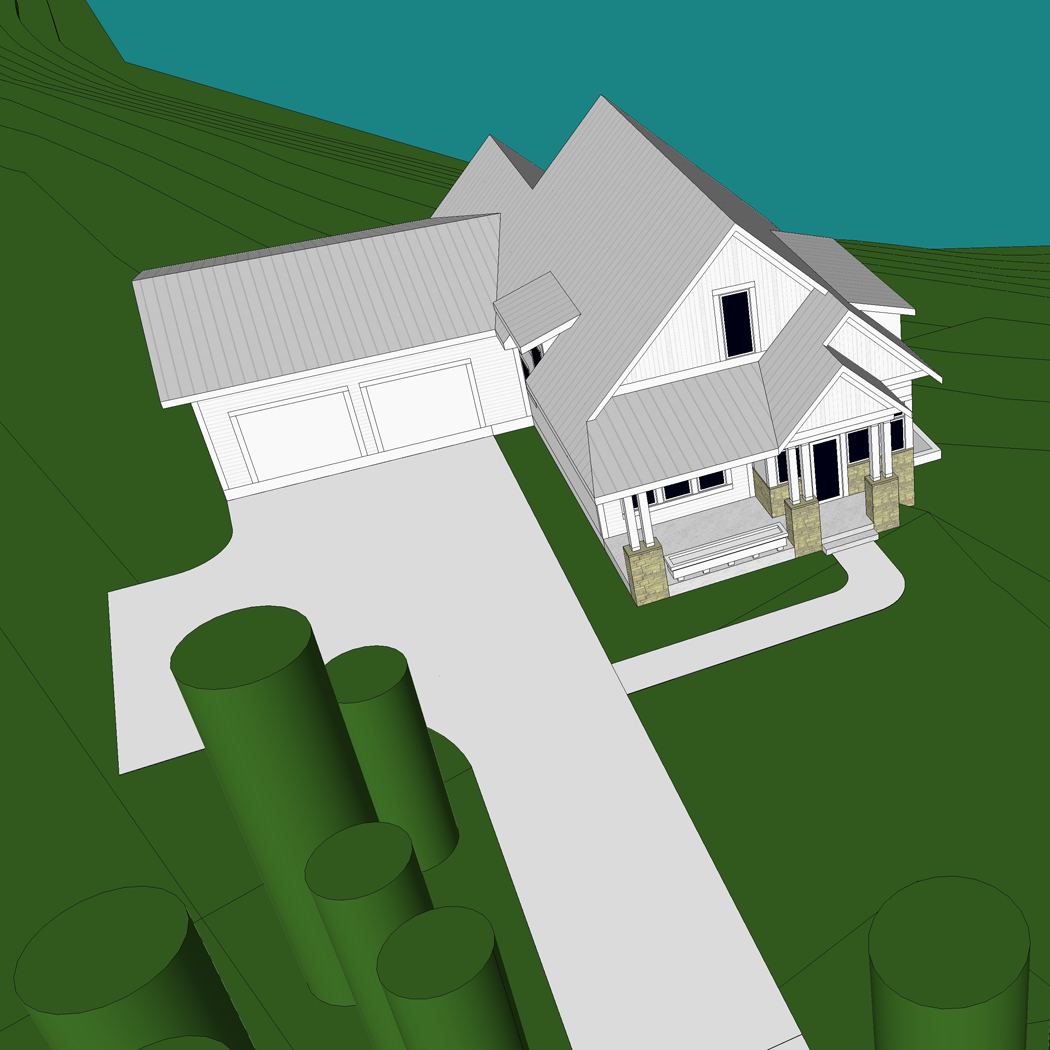
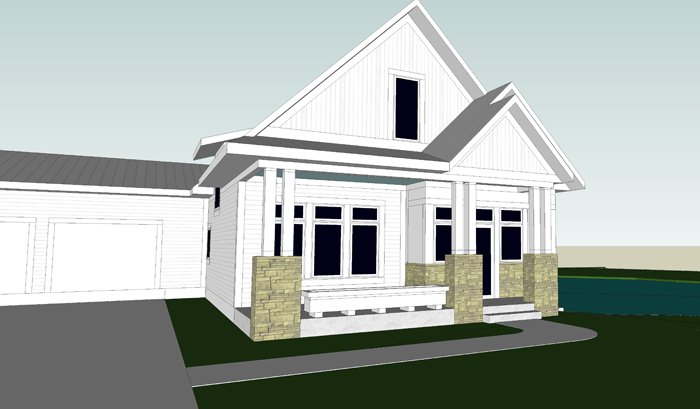
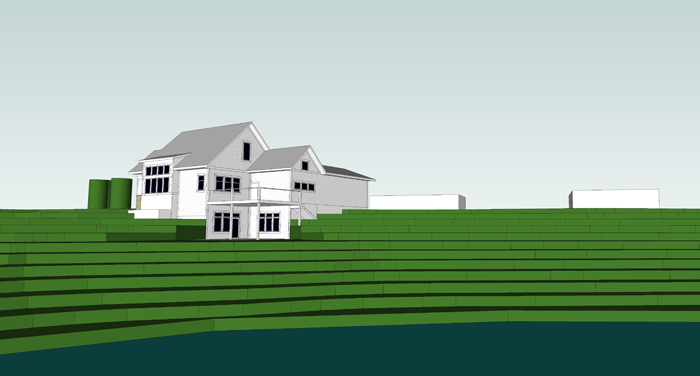
Just for fun, here are a few 3d images showing the cottage positioned on the land.

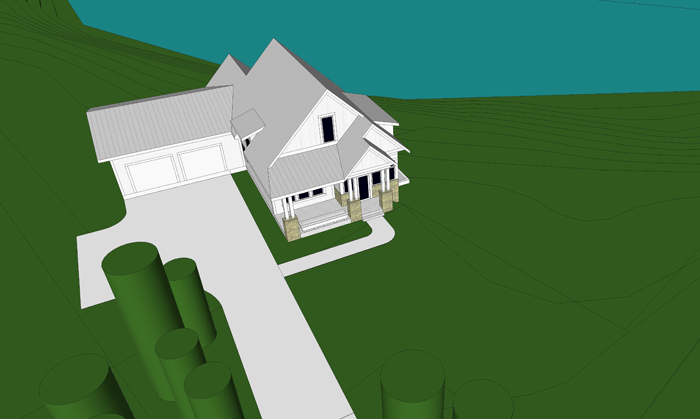
The cylinders are place holders for privacy trees (some of which are existing, and others that we hope to plant in the future. 


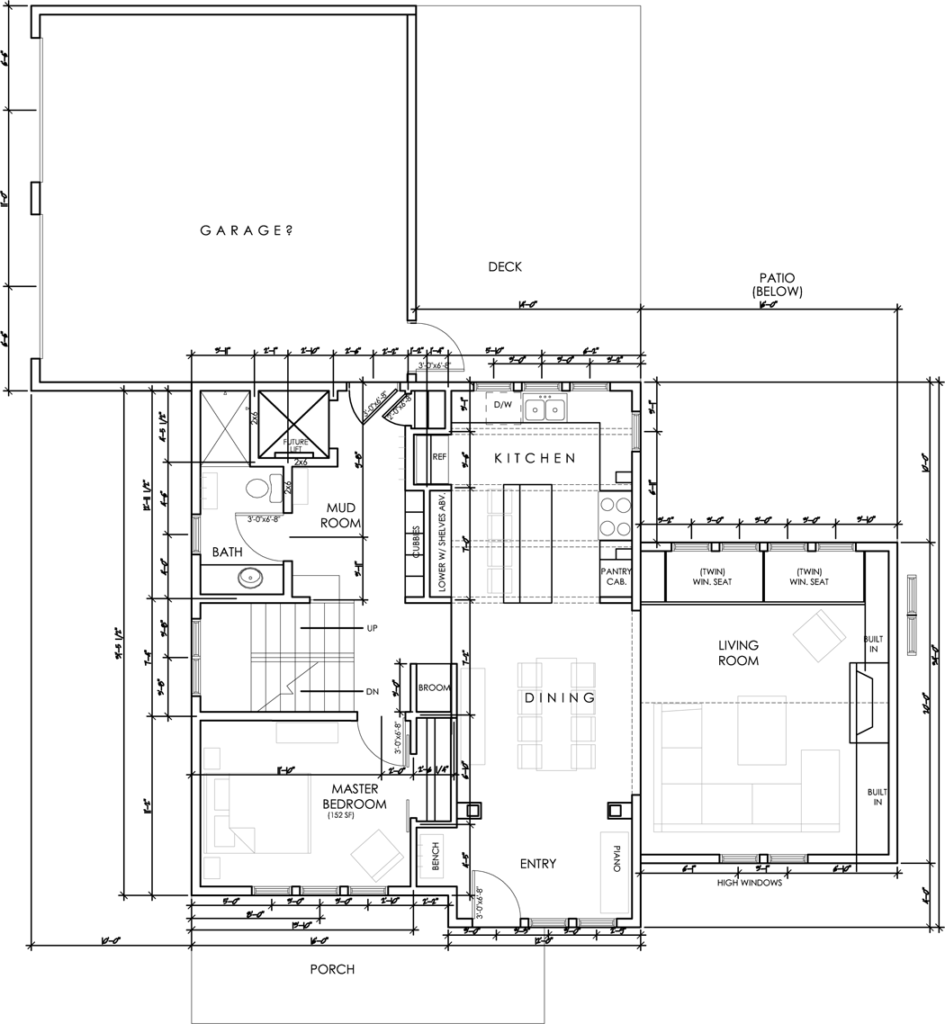
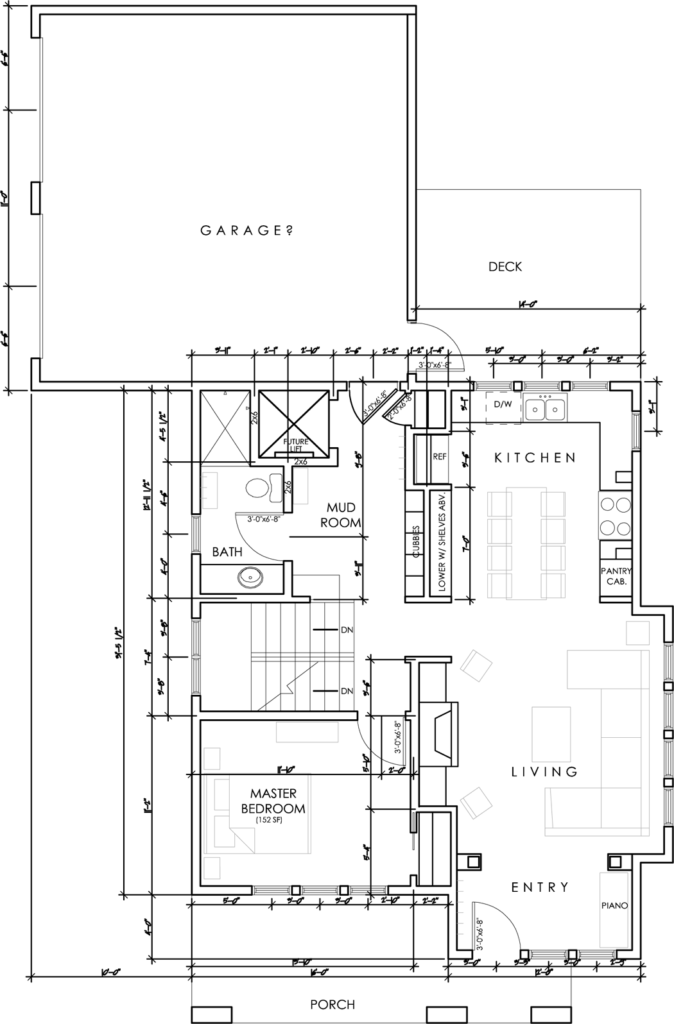
I worked a long time to find an appropriate position for the garage. I was sure that I wanted the garage doors to be set back from the front of the house/porch. For a while I had the garage rotated 90 degrees so that you accessed the doors from the side – but I eventually realized that this would not create ideal conditions for the driveway, making it both awkward and extremely long.  The garage is now accessed head on and set to the very back of the house so that it isn’t visually imposing.


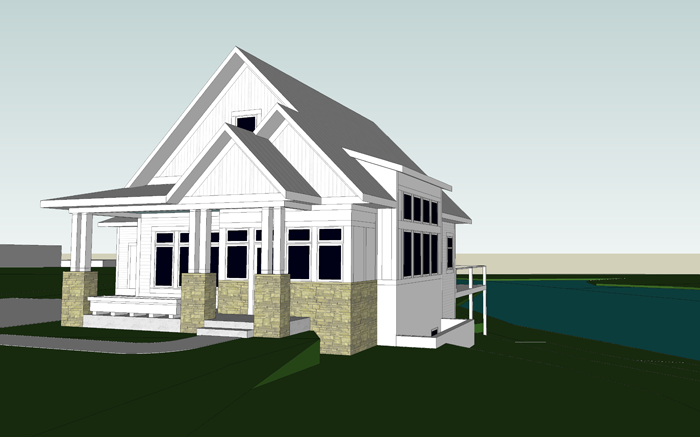
The wall of windows on the southeast elevation will let in a ton of wonderful natural daylight. It is one of my favorite features so far, and never would have happened if we hadn’t talked to our contractor about current building prices – which prompted us to make a major change to the design.


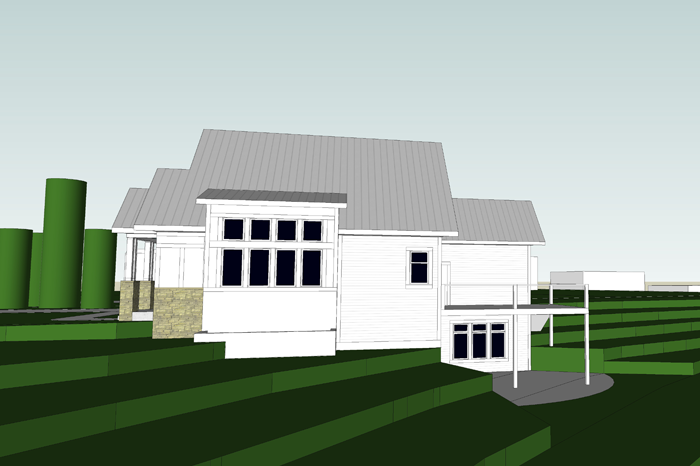
You can see from this image how the cottage interacts with the slope. There will be a bit of excavating and retaining involved in creating the lower level walkout patio.


As the weather warms up, I hope to make a trip to the land again – and maybe stake out the corners or use spray paint to get an even more visual perspective on what we will see out of each window of the cottage.

Exciting times ahead!


THOUGHTS ON BUILDING

Today is ‘National Walk Out Of School Day‘. It is an event that is part protest and part memorial – a way to acknowledge and mourn the loss of the 17 victims killed in the most recent, though sadly no longer uncommon, mass school shooting.

As you might imagine, this post is not at all about the building of our new house, but something altogether entirely different.

The building of our children

When I was a junior in high school, I remember filling out the job quality worksheet for the counselor. It was used as a way to direct the students who weren’t sure what path they would be taking after high school – College? Working in a trade? What industry? I’m sure there were plenty of my classmates who found the results of this worksheet useful, but I didn’t need any direction. I knew EXACTLY what I wanted to be. An architect.


I wanted to design buildings and watch them be built

And I did just that. I studied diligently for five years and received a Bachelor of Architecture degree and a final GPA of 3.99. I dare say that I was near the top of my graduating class. I loved everything about architecture and was ready to start putting my education to practice. I easily landed a job in my desired community and set to work.


Two years later, I got pregnant

Craig and I had agreed that when our first child arrived, I would become a stay at home mom. I remember how nervous I was to tell my boss. By all accounts, I was on track to reach my ultimate goal of becoming an architect – and suddenly, that plan was being derailed. Regret was filling my mind. Am I throwing away my career? What will my colleagues think about this decision? Is being a stay at home parent really important?

The months leading up to the birth of {D} were full of mixed emotions; And the day we left the hospital with him snuggled in the car-seat next to me – I sobbed. My life had done a literal 180.

Over the course of the next 11 years, we added 4 more bundles of love to our family – both through birth and the beauty of adoption. I found a good balance of being able to meet our children’s needs and to feed my passion for design – working from home for various architecture firms, on a very part time basis.


Here, 11 years later – I can reflect on that major decision

Was it worth it? I would say absolutely. I didn’t realize it then, but I was making a shift from the building of structures to the building of my children.

Children need parents to guide them, shape them, teach them right from wrong. They need someone there to pick them up if they fall, to catch the warning signs of depression or violent behavior. To provide them with a moral compass.

Sadly, I feel that too many children today are thrown into the waters of life and told to swim on their own – to find their own way in the dark. Parents are busy with their careers and in many cases are working hard to provide their children with every opportunity – Sport instruction, music lessons, the newest video game. In reality, what children need is time with their parents. Presence over presents.

What has been happening in schools is tragic. It’s political. It’s senseless. I don’t plan on getting into any sort of debate on the topic except for this one statement I think we can all agree on: It shouldn’t be this way.

Each time one of these heinous crimes is committed, we sit and wait for the media to report what we know will surely be the case – these are people, kids, whose warning signs were missed. They were troubled and ignored. Their emotional and mental needs were not met.


In response to today’s walk out – there is an additional movement.

WALK UP

Walk up to someone who is considered an outcast and let them know they have a friend. Walk up to the person sitting alone and start a conversation. Walk up to the person you have been arguing with and agree to resolve your differences. Walk up – and as a society we can wake up. We are all in this together.

Walk up to your children and hug them. Tell them you love them. Encourage your children. Speak life to them. Give them the building blocks to become a productive member of community. It all starts at home.


I understand that being a stay at home parent isn’t a path that is necessarily available (or desirable) for everyone; But personally, I will forever be grateful that it is the direction our family chose. And even though I may not be designing award winning structures, I feel that my contributions are equally important.

Long after the sky scrapers and monuments crumble and decay, humanity will continue on. It is built of stronger things.


A TOUGH LESSON LEARNED

I had an entirely different post prepared for today, but I need to take a moment and acknowledge something that happened this week, which will change the course of how I blog going forward.

I started this website in July 2017 without much knowledge at all of what I was getting myself into. Sure, I took a few free online courses and read a ton of material about best blogging practices, but nothing quite teaches you the ropes of blogging than a tough lesson learned.

On Thursday afternoon I had just laid our youngest daughter down for her afternoon nap when I heard the doorbell ring. The postal lady was standing there, certified mail in one hand and a digital scanner in the other. I immediately got the feeling that this was bad news. After signing for the package, I said “I’m nervous to open this!” then closed the door and walked over to my dining room table.

Inside, just as I suspected, was bad news – a letter from the legal counsel of an online presence with proof that I had infringed on their copyright with a graphic that I had used in one of my posts. They requested that I remove the graphic immediately and send them a large monetary damage settlement.


This felt like a punch to the throat.


Here I am, less than a full year into my blogging journey – being dealt what felt like a giant blow. It took me a second to really wrap my head around what I had just read. It was true. I HAD used their material in my post, there was absolutely no denying that. In fact, I hadn’t even tried to hide that the material wasn’t my own.  In the post I had included a link back to the original source of the graphic, which in my ‘baby blogger’ mind was what I was supposed to do in order to be sure that nobody reading my post thought that the graphic was my own.


That was naive reasoning, and it bit me back big time.


My next step was to get in touch with my blogging friends, and ask them if they had ever been through anything similar or if they had any advice. One friend pointed me to this blog post – which scared the living daylights out of me.

I immediately removed the graphic from my blog, then contacted the email address listed in the letter to beg for forgiveness. I’m thankful to report that they agreed to show me mercy and reduced my fine significantly. The check is in the mail.


So, what dos all this mean you might ask?

It means that I spent a good portion of Friday scouring through my past 93 blog posts and picking out the 14 that have material that could be considered questionable. It means that I will be spending the next couple of weeks contacting the owners of these images/graphics and asking them for permission to use them on my site.

It means that from this moment forward I will be strictly using my own photographs and graphics, or paid stock photos from reputable sites. Be expecting a lot of original content from this website from here on out!

It means that I have learned my lesson. And as tough of a lesson that it is to learn, I am actually very grateful that this wake up call came now – when my blog is still establishing itself – and not in the future when I have 993 blog posts to sort through instead of a mere 93. Goodness, I’m grateful for that.


I hope that my mistake can be a lesson to you as well. Do your research and know the rules.

Behind every image on the web, whether a photograph or informational graphic, is a person who worked to create it. They made the effort, and they have the right to choose where it is shown and how it is portrayed. And as I work to add more original content to my website, I will want the same protection and rights. Lesson learned.


A MINI GUIDE TO INTERIOR DOORS

Each home interior has it’s own personality. When it comes to decorating inside our homes – paint colors, furniture, and throw pillows are usually the first things that come to mind. During a more extensive decor remodel – the floors, walls and ceilings will typically get special attention. But many times an important element is overlooked.

Interior doors.

Choosing the interior doors for your home can be a challenge, but finding a type and style that flows with the rest of your interior can add an extra detail that will really make your home feel pulled together and unified. The great news is that there are many interior door choices available (both for purchase and as DIY endeavors) – and finding the right match for your home should not only be possible, but fun.

I have put together a little guide, complete with inspiring images, to help take the guess work out of your decision making.


DOOR OPERATION TYPES

Choose which will work best for the function and space you are trying to serve. Each has it’s own benefits. Listed below are the most popular types available in today’s market.


HINGED/CONVENTIONAL SWING

image source

This door type is the most common used for home interiors. They can be hinged on either the right or left side of the frame, and swing into or out of the room – depending on how you want them to function. These doors are readily available in a large variety of sizes. The most common residential size is a standard 2′-8″ wide by 6′-8″ high.


BI-FOLD

image source

Bi-fold doors are also called folding doors, and are most commonly used for closets in homes. The door, when closed, fills the entire cased opening – but, as the name would suggest, fold in half (outward) when opened. The benefit of the bi-fold door is that you do not need as much space in front of the door to be clear when opening.


FRENCH

image source

A pair of doors that swing either into our out of a room, hinged on the outer edge of the opening. When both doors are open a large opening is created. This door type is very popular to use between rooms – for privacy when needed, or the feeling of an open floor plan when privacy is not a concern. Generally french doors utilize some sort of glass panel configuration.


POCKET

image source

Pocket doors are considered the ultimate space savers. The door travels on rollers that are suspended in an overhead track. When fully open, the door is completely hidden in a cavity created in the adjacent wall. This type of door is becoming more common as the function has improved over the years. Pocket doors have the ability to lock, making them useful in a variety of applications – from closets to bathrooms.


BYPASS

image source

Bypass doors also come in pairs, or in a three door configuration (as shown). They are set on a track that fills the opening, with one door mounted slightly in front of the other – so that when they open they will slide past one another. These doors are almost exclusively used for closet applications. The benefit of this door type is that it does not take up extra floor space with a swing; But, you will only have access to those things behind the door that is open – making them a bit inconvenient.


SLIDING BARN

image source

This type of door has been made very popular recently by the tv show ‘Fixer Upper’. Barn doors hang from a track outside the room/closet that will be accessed. Because of this, the doors themselves need to be wider than the opening – and the track needs to be long enough so that the door can slide completely out of the way. Essentially, the track needs to be at least double the width of the opening you want to access. Be sure that the hardware used to mount and operate the door is high quality – so that you don’t end up with clunky (or squeaky) operation.


INTERIOR DOOR STYLES

You can find the above door operation types in a variety of styles to match the preferences for your home design. Listed here are the most common styles.


FLAT

image source

This style of door is also called ‘flush’. Essentially these are doors that have no extra ornamentation, and have a smooth simple finish. They are most commonly used in modern styled homes. They can be made of a solid piece of wood, but more commonly are composed of thinner veneer pieces of wood – which creates a door that is more lightweight.


SHAKER

image source

A shaker (or craftsman) style door is composed of a flat center panel and square edge raised panels. These doors have a clean, simple look and are one of the most popular varieties used today.


RAISED PANEL

image source

This type of door is a bit more ornamental in that the panels themselves are created with more detail – sometimes with arched top panels.


PLANK

image source

Plank doors are composed of a series of boards, or planks – either in a vertical or horizontal application. They are popular for homes with country styled decor.


CROSS BUCK

image source

When you see this type of door, you will most likely have visions of barns going through your mind. That classic ‘x’ pattern is called a cross buck. These doors are also becoming very popular with homes designed in the ‘farmhouse style’.


LOUVERED

image source

This style features a door that has slats, or louvers. They are a perfect choice for areas that need ventilation but also require a bit of privacy or screening, such as a laundry space or electrical closet. The filtered light that the louvers allow can be a benefit for some design applications.


Again, there are so many choices when it comes to interior doors! I hope that this mini-guide can help you determine the differences between the doors, and allow you to choose the perfect version to accent your home!


THE FIVE PHASES OF NEW HOME DESIGN

In the course of designing your new home, you will walk through a variety of phases – each a bit different in nature. Though they tend to flow into each other slightly, there are five general categories of progression: analysis, preliminary design, development, documents, and construction review.

Understanding what to expect in each phase can be a helpful guide for your home design process. If you are considering designing your home solo – or working with an architect or designer – you can prepare early by knowing what is to come.


PROGRAM ANALYSIS

In this phase you will determine what your needs and wants are for your future home. You will be looking at potential building sites and thinking about the number of bedrooms, bathrooms and common spaces your home will have. You will also begin to think about your project budget. To help you answer these program analysis related questions, visit this blog post and complete a series of worksheets.


PRELIMINARY DESIGN

Through this phase you will be determining the desired spacial relationships within your home and also the connections that will be made from indoors to outdoors. The spaces will begin to resemble a floor plan in it’s very basic sense. Drawings will be created in the form of quick basic sketches.

You will also be thinking about the house styles that appeal to you most, and likely searching Pinterest for inspiration photos.


DESIGN DEVELOPMENT

Just as it’s name implies, this phase of home design refines the spaces and their relationships. You will begin thinking about your home in three dimensions – focusing not only on the floor plan but also how the home will feel on the inside and look from the outside.

Near the end of this phase, you will want to get a better idea of what it would cost to build your home project. By obtaining estimates at this point, you will still be in the position to make major changes to the design if needed for budgetary reasons.


CONSTRUCTION DOCUMENTS / BIDDING

This is the phase when things begin to feel very real. Your drawings will include measurements and notes for the construction crew. Specifics on window and door sizes and styles will need to be made, as will finish material selections. Legal and technical information will be gathered and compiled to form the final ‘blueprints’ of your home.

During this step, you will be obtaining solid construction bids and determine who you will be hiring to build your home.


CONSTRUCTION ADMINISTRATION/ REVIEW

Homeowners vary greatly on the amount of involvement they have in this final phase of the process. While some choose to be on site every day to monitor progress, others pass the responsibilities onto their contractors (or architects) completely. I would advise that it is best to have at least some involvement – to build a great relationship with your contractor and design staff. The truth is that no matter how detailed you are able to get on your construction documents, there will inevitably be questions that will arise during construction; And if you put forth all the effort to be involved in the design of your home, you will want to follow through completely and ensure it is built the way you envisioned.


These five phases should work together seamlessly so that your ideas about home function and comfort can be brought to life. Each phase can be demanding, but the hard work will pay off in dividends when you are enjoying your brand new custom designed home.

AROUND HERE: FEBRUARY 2018

Around here we have been…

CELEBRATING {I} and his 9th birthday! It seems like just yesterday this little man entered our lives. He is a kind, gentle and committed friend, a brother who is always willing to lend a helping hand. He is our little inventor and has a very mechanical mind – spending large amounts of time taking things apart and putting them back together.

We love watching the story that God is writing in his life!


ENJOYING what will hopefully be the last portion of winter. We finally got a big snowfall at the end of the month. Those 11 or so inches gave us more accumulation than we have seen all winter long! The kids are now able to do a bit of sledding and snow fort building, and they are thrilled.


WORKING hard at school. In February, the kids celebrated their 100th day with some fun activities. They continue to bring home colorful art projects, and good grades. We have parent / teacher conferences soon and are excited to hear how they each have grown academically over the school year. It’s hard to believe that there are only about 12 weeks left until summer vacation!


FINISHING up the basketball season. It has been a lot of fun to watch {D} progress through the games. He has gone from looking confused on the court, to taking initiative and making plays. He really shines on defense and is able to out-hustle his opponents regularly. When the weather warms up this spring and summer, I am sure we will see him and his brothers honing their skills with the garage basketball hoop.


DESIGNING Arrow Hill Cottage, our future house. We made a big jump this month and began talking to a banker about loan options and visiting with a contractor about pricing. We are getting the house design buttoned up so that we can get some accurate cost estimates and see if it is at all possible to break ground this spring! We have been thinking all along that we would build the spring of 2019, so this would get us into our new house a year earlier than planned if it all works out. We are excited about that prospect, but are also willing to be patient another year if the timing (and pricing) isn’t right. You can follow along with our home design here.


This is just a glimpse at what our family has been up to. If you’d like a closer look, be sure to check out our weekly ‘mini vlogs’ on our YouTube channel ARROW HILL FAMILY. Be well everyone!

ORGANIZED MUDROOM + LAUNDRY IDEAS: MAKEOVER TAKEOVER FOR JOSH & TARA

The Makeover Takeover series focuses on helping my readers with bits of their own homes that are giving them challenges. Whether it is a room that they want guidance on styling, a floor plan that needs re-configuring, or they are stumbling with choosing an exterior color palette, I am happy to help. I offer solutions through virtual design and source links.

Today’s Takeover brings us to a working family ranch, one that is busy all the time. Josh and Tara built their house a couple of years ago. At that time, they made the decision to hold off on adding built in organization cabinetry for their mudroom and laundry, for budgetary reasons. Now, with two young children and a baby on the way – they are realizing that it is time to make these spaces more functional.

Because this is a newly built home, no walls will be moved, and no existing finishes changed. My plan was simply to offer organization solutions that could make these rooms efficient and ultra useful for this young family.

THE MUDROOM TODAY

The great news is that the space layout is wonderful and there is plenty of square footage to work with. Though the plan shows locations of cabinetry and built-ins, none of these items were built during the construction phase.


PROPOSED CHANGES

Organization, organization, organization. The space is here, but they need some family friendly techniques to make the space run efficiently. Tara mentioned that though she loves the look of white cabinetry and subway tile -they simply would not hold up at the ranch. They need durable finishes that will wear well and can be easily kept clean.

The family sees this as their forever home, and as such they asked for a timeless look – with finishes, colors, and cabinetry styles that aren’t too trendy.

This is the view the family sees when entering their home through the garage door. Tara admits that it has become a bit of a drop zone for items that don’t have a proper storage spot. I want to make this view welcoming – one that says ‘come in and relax… you’re home’.


Swinging around to face the door, you can see that the family has attempted some temporary organization solutions. They prefer not to have a traditional coat closet, and instead choose to hang their coats so that they are readily available. My plan was to transform this corner into a command center of sorts. A place where all the mail can be set and sorted, where phones and devices can be charged. The pocket door in the right of this photo leads into the laundry room.


This is the view as you enter the laundry room. The oversized washer and dryer seem to dominate the space, as does the large laundry sink. My goal with this room was to streamline the look and to scale down the appliances by adding additional elements, such as a folding center and shelving.


Across from the washer and dryer is a large alcove that the family currently uses as a place to hang clothing to dry. Tara requested that a more permanent drip dry station be positioned here, as the location functions well for this purpose.


There is also a smaller alcove close to the door. I imagined that this could make for a convenient spot for the brooms, vacuum cleaner and cleaning supplies.


FINISH INSPIRATION

With durability and timelessness in mind, I searched out materials and products to finish off the rooms.

Each of the products below combined will form a very efficient working mudroom. You can learn more about each product by clicking on the titles below.

SINK: A more shallow, stainless steel bowl is more in scale with the space and can be mounted into a counter space.

FAUCET: The spray nozzle can be detached with a hose, to easily spray down clothes in the sink.

COUNTER TOP MATERIAL: Faux marble finish in white – bringing a bit of brightness and luxury into the space.

TILES: The clean lines of these simple square tiles detracts the eye from the unevenness of the surfaces they connect.

CABINET FINISH: To match existing trim and door colors and wood species.

WALL CLOCK: This large element serves to bring your eye upward. It is also beautiful!

LAUNDRY BASKETS: One for each sorting cubby.

TOWEL RING: In a dark oil rubbed bronze finish.

METAL CANISTER SET: These tall galvanized canisters are the perfect fit for this rustic space.

HANGING RACKS: Can be stored on the wall, out of the way – but come in handy when needed!

CLOTHESPIN ART: A bit of whimsy!

LAUNDRY ART: This simple yet timeless sign is another little accent that brings life to the utilitarian space.

WICKER BASKETS: Used to store cleaning supplies or extra towels.

MOP AND BROOM HOLDER: Attached to the wall right inside of the pocket door, the brooms and mop will be easily accessible.

COLORED BINS: One bin in the ‘command center’ for each family member.

COAT HOOKS: The gunmetal finish adds another rustic touch

RUG: Jute material is the perfect durable choice for this space.

BOOT TRAY: Set under a handmade pine bench, the boot trays offer easy cleanup and practicality.

DRY ERASE/CORK BOARD: As part of the command center – the perfect spot to write notes or pin up important reminders.

CHARGING STATION: Every modern family has quite a few devices. This charging station offers a clutter free alternative.


AND NOW FOR THE BIG REVEAL!

I am very happy with how all of the elements came together! Because of the home’s location on a ranch – I wanted to offer a few subtle rustic touches. I also made sure to keep durability and organization in mind. Let’s take a little photo tour, shall we?


This gorgeous large stained wood bench becomes the focal point when walking into the house. It is offset by a wall of fun, yet durable, corrugated metal paneling. Hooks and shelving add function, while boot mats underneath the bench add practicality and make for easy clean up.


The opposite side of the room features the command center, easily accessible from the back door.


It has a place for just about everything, with cubbies and bins for each family member, drawers for small tools, cabinets for off season gear, and shelves for books. The over sized counter-top provides the perfect spot to sort mail and charge devices.


Sight lines into the laundry space can be left open to reveal natural daylight, or blocked with the beautiful pocket door. The mudroom is now functional, with a place for everything.


Walking into the laundry space, you are greeted by handsome wood cabinetry and sleek tiles.


This simple laundry sorting system is practical, and now efficient with the counter space above.


Above the large counter is a convenient spot to store frequently used items, such as laundry soap and clothes pins.


By adding counter space above the washer and dryer, their scale is reduced. The laundry sink and tile are tied together by the finish of the counter material – a faux marble.


New drying racks that can be easily folded up against the wall when not in use.


A bit of whimsical laundry room art is positioned next to the storage alcove. The broom, vacuum and cleaning supplies are within easy reach and ready for action at this busy ranch home.


I’ve created a 3d animation of the mudroom/laundry makeover for a closer look. Click the play button below to view.


I hope that Josh, Tara and the rest of their family will love the ideas for this new organized space! These functional additions would help keep everything in it’s place.


Remember that this is a FREE digital home design consultation, which is available to anyone who subscribes to the Arrow Hill Cottage website. If you or someone you know could benefit from this service, simply email me with a few photos and a description of what issues you would like resolved.

If chosen, I will offer a solution + inspiration through 3d images and sourced items. Hurry though! I only have the ability to do one Makeover Takeover each month and the spots are filling up quickly! I have plans to eventually make this a paid service, so if you have been thinking of contacting me about a project and want to get in on the free deal, don’t hesitate!


This post contains affiliate links to products for your convenience. If you purchase via my links, I may receive a small commission at no additional cost to you. Thanks for supporting Arrow Hill Cottage!


FIVE INSPIRING SMALL HOME BLOGS

Thank you all so much for your kind thoughts after my most recent post. Some of you reached out to offer the benefits of living in a smaller home, and many more commented that they actually prefer our revised/simplified design over the original.

I have to say that after a few days of simmering with the thoughts of the smaller design, Craig and I are in agreement that we too prefer it! In fact, I called the contractor last night to tell him to hold off on getting bids on the larger floor plan – and instead to focus his attention on the new configuration.

In turn, I have been focusing my design efforts as well. Here is a view of the revised living room, as seen from the far corner of the kitchen. Do you spy the vaulted wall of windows? The view out of them will be stunning!

interior view from kitchen


interior view from entry

I am very grateful that my husband and I are on the same page when it comes to ‘stuff’. We are both of the mindset that if something doesn’t bring us joy or serve a purpose – it isn’t needed. The same goes for square footage. Once we realized that the smaller living space would suit us just fine, the more elaborate design was no longer appealing.

We never set out to design a large house – in fact, we have said on many occasions that living in a tiny house would be comfortable if it were just the two of us. Our family now includes seven – and so our sights are on a small house instead – one with just enough room for our needs.

It is a joy to search the web and see others living in the same way. I thought it might be inspirational to share with you some of these people, and their amazing SMALL homes.


intentionally small | 1,150 sf | owner: Nicole

Nicole has an entire blog devoted to the small spaces of her readers


mockingbird hill cottage | 950sf | owner: Claudia

Claudia offers a series of posts dedicated to small house living


smoky mountain farmhouse | 1,000 sf | owners: Alex & Susan

This charming farmhouse can be rented via VRBO!


living large in a small house | 1,300 sf | owner: Lynn

Check out Lynn’s amazing home office!


the prairie homestead | 1,100 sf | owner: Jill

Wyoming homesteading + homeschooling family of five


Continuing on with the revised/ smaller design, things seem to be falling into place. All three levels are being re-worked slightly to match the needs of our family. For now, we sit and wait for those numbers -hopeful that construction can begin this spring, but maintaining patience if we need to wait a little longer.


SATURDAY SKETCHBOOK: PLANNING AND REVISING

This winter has been brutal. Think freezing or below for months at a time. No, I’m not exaggerating – anyone who lives in the Midwest will agree.

As I have mentioned before, our family currently lives in a rental house. As part of our agreement, we pay our own utilities – which includes the propane used to heat the house. Let’s just say the propane guy has been out here multiple times already this season, and gas isn’t cheap! The house just doesn’t heat well. It’s an older home and has leaks and cracks and windows that aren’t perfectly sealed.

This winter has been breaking us down.

One day at the dinner table Craig asked me “Is there ANY way that we can build our house sooner? I am not sure I can make it through another winter like this in the rental.” My honest answer was that I really did not know. I hadn’t let my mind go there.

But I agreed to check into it, and found myself at the bank the following week – sitting down with a loan officer who very kindly told me that our finances looked good but that she needed to have some clear estimates of how much this house would cost us to build. Gulp. Time for the dreaded bottom line.

I wrote about making sure you know what you can afford in THIS recent post. Craig and I are frugal people and no matter what a bank would tell us that we CAN spend, we would never put ourselves in a position where we had a monthly payment that was too difficult for us to meet. We had our best guess dollar figure about what we could handle/month on a loan, but had not yet determined full building costs – besides a general cost per square foot number.

We called up a contractor friend who met with us and talked us through various material decisions. He let us know industry standards and which finishes he thought weren’t worth their price tags. All very good information. Then he started throwing out numbers of recent newly built houses, similar in square footage to what we had designed, and the price tags they had attached to them. GULP again. Wow. Did he really just say that? His cost per square foot numbers were quite a bit higher than those I had been working with.

Of course, there is a range – but in all honesty even the lowest priced was slightly above our comfort level.

main level of the cottage (as designed when talking to the contractor)

Finishes will play a major role in the overall cost, and so in the next couple of weeks we are going to sit down with him once again and talk through actual numbers as they relate to our project. I am already guarding my heart – and I am pretty sure that the bottom line will require some major changes to be made. I’ll be honest that I was pretty bummed for a day or two after our meeting.

The good news is that we are heeding our own advice and finding out these costs early. We aren’t just hoping that everything will come in within our magical budget number.

And, it’s also good that I love to design. I’ve already gone back into the ‘archives’ of plans to see how different ideas could be incorporated. One of the first areas we noticed that could be revised was the large vaulted living room. The elimination of that wing of the house would essentially remove 640 square feet (320sf per level: main and lower). Based on what the contractor was telling us, in ‘real world dollars’ that may be a $100,000 decision. For our family that is a MAJOR amount of money.

I went looking for how that wing could be eliminated and eventually realized that by simply eliminating the kitchen island and moving the table into the kitchen in it’s place, a large area could be opened up and re-imagined into a living room. Interestingly, the positioning of the dining table in the kitchen is a building design trend that makes sense for a lot of families.

image source


Though this revised living room isn’t as large as the initial design and doesn’t come with all the bells and whistles I had been dreaming of, it’s okay. It has the potential to be a lovely space, maybe even with a small vault space and extra windows in the bump out area.

main level of the cottage – simplified and reduced square footage


The other major bonus is that nothing else on the main level would have to change much, so from the exterior the house looks essentially the same, minus the extra wing.

potential revised exterior without living room wing


These are all still ideas, and until we get actual bids on construction materials for our home we won’t know if this major cut will need to be made. But we are preparing for the potential, and know that whatever we end up with will be the perfect fit for our family – in size and style – while at the same time making sense for our pocketbook.


THE 4 QUESTIONS YOU SHOULD ASK YOURSELF BEFORE DESIGNING A NEW HOUSE

Designing a new house is an exciting and exhausting time for homeowners. It seems there are no less than a thousand decisions that will need to be made to create a house that is ‘just right’ for your family. And while each and every decision during the design process is an important one, there are four important questions you should ask yourself BEFORE you ever sit down at the drawing table by yourself or with a design professional.


1. WHICH HOME STYLES DO WE PREFER?

While it isn’t necessary to pick only one home style that your design MUST be based on -it is valuable to understand, at least generally, which types of homes you are drawn to. Are simple, clean lines your thing? Perhaps a modern home will be a good design guide. Do you love the charm of cozy houses? Consider the characteristics of the cottage or bungalow style. You can ask yourself if you prefer an open floor plan or one with more defined spaces, and if your family would benefit from one level living or multiple stories.

Each month I work through a series here on the blog entitled ‘Elements of Home’. I dive deep into what makes each home style unique, with the hope that the information can benefit you in determining which style would be best suited to your family’s lifestyle and preferences. You can access the series HERE.


2. WHERE WILL OUR HOUSE BE SITED?

Location, location, location. It is the mantra of real-estate. You can change a house in many ways, or in this case – build nearly anything you want – but you will not be able to change your home’s location once it is tied to the foundation; That is, unless you are willing to spend major money to do so.

You may be tempted to look at home plan books or online for floor plan ideas. And while these tools can be extremely helpful, you should at the very least have an idea of where your proposed home will be located before considering floor plans. Will you be building a new home in an established historic neighborhood? In that case, the sleek modern home with floor to ceiling panes of glass that you spied online may not be the best choice. Do you love the option of having a home with a basement level that you can walk out of? If so, you will want to make sure that you have a site in mind that will accommodate that type of setup – preferably somewhere with sloped land.

There are more detailed site related questions that you will need to answer, such as how the natural daylight will affect the interior spaces of the home – but these are questions for further in the design process.

3. WHAT DO WE NEED IN A HOME?

Generally speaking, we more easily identify our wants over our needs. Sometimes the two get mixed together, in fact. When designing a home it is very important to establish the difference. The needs are absolute must haves, whereas the wants are not as important – and can possibly be added at a later date.

Size is one of the most troubling aspects to determine. When considering home square footage, a variety of questions may arise. How many bedrooms should the house have? Will 1 bathroom be sufficient, or will we need more? What is a comfortable living room size? These questions about size can leave your head spinning – but they are some of the most important decisions regarding home design. A too small home can leave you feeling cramped; While a home too large will not be comfortable or cozy – perhaps leaving you with the feeling that you are living in a museum or office building.

As a guide to determine how much space you should design for your family, I have created a variety of worksheets – which can be accessed in THIS POST.


4. HOW MUCH CAN WE AFFORD?

It’s the age old question: How much is this going to cost me? It is best to consider the financial aspects of home construction well before you fall too in love with a design. If you speak with a loan professional about what a realistic budget for your project is, you will be able to make better informed decisions as the design process progresses. If you know you will be working with a fairly strict budget, you likely won’t be looking at the granite selection for your counter tops. Better to know what you can afford than to choose those expensive finishes only to be told you will need to downgrade the quality to something cheaper.

Another benefit to determining building budget early is that you can plan your project in phases. Perhaps the entire shell can be built straight away, with the main living spaces finished – and the basement or upper level left to be finished when the budget allows, in the future.

I lay out tips on ways you can save money on your new build in THIS POST.


If you have worked through each of the four above questions, you are well on your way to laying the groundwork for the design of your future home.

For your convenience, I have laid out these questions in a simple, one sheet print out – available in the RESOURCE LIBRARY. Search for the Preliminary Home Design Worksheet – and keep it handy for when you are ready to start thinking about designing your dream home.