CAST IRON SINK RESTORATION | POWDER ROOM

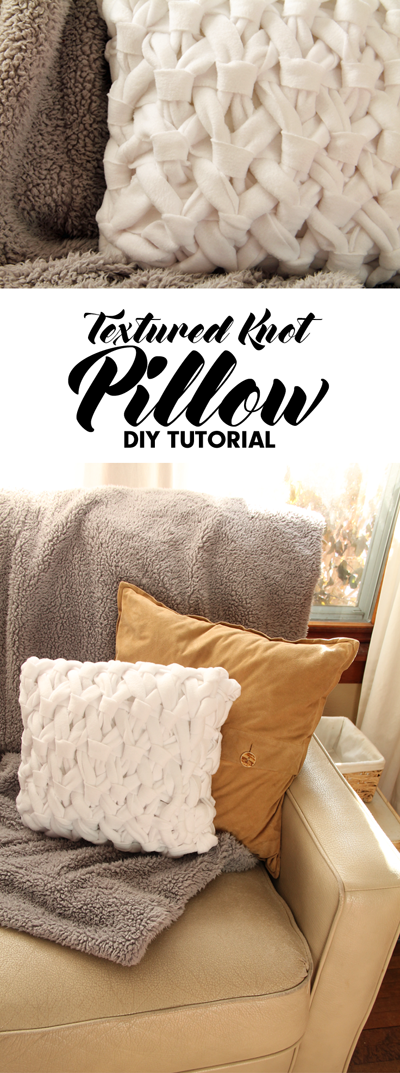
While the crews are hard at work on our house construction, my husband has been busy with a cast iron sink restoration. Read all about his progress and see how the sink looks now!

vintage cast iron sink


It’s been a super busy summer for the construction crews out at our house build site. They are currently finishing up the framing and sealing the exterior. Hopefully, all of that can be finished before the cold Fall weather starts up! In the meantime, We have been cleaning and preparing items that will be used in the new house. Bathroom vanities are getting painted, chairs are being refinished, and the cast iron sinks are getting restored!

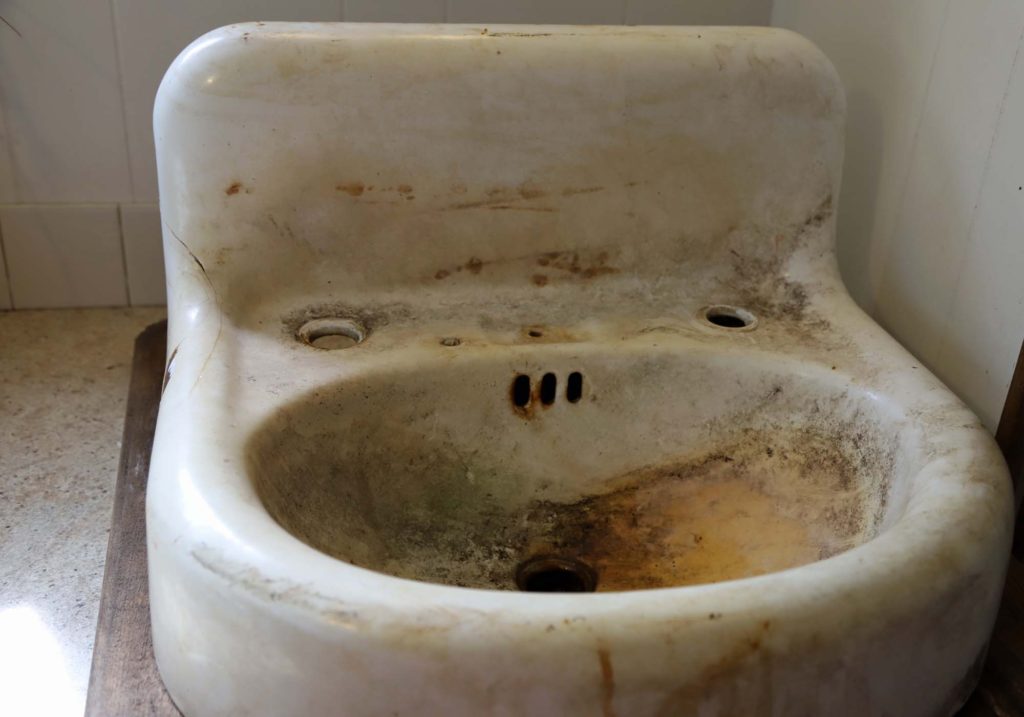
We have two vintage cast iron sinks that will be installed in the new house. One is a large, single basin farmhouse sink which will be used in the kitchen. The other is this smaller model 1930’s Kohler wall hung unit, which will be the perfect compliment to our main level powder room.

dirty cast iron sink


HISTORY OF THE CAST IRON SINKS

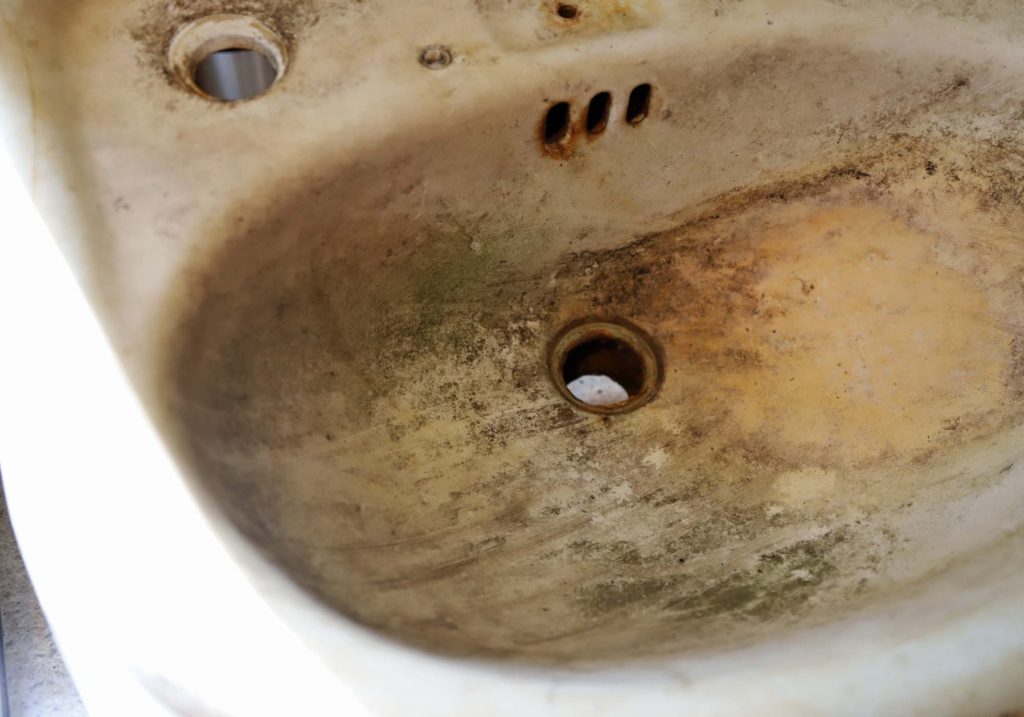
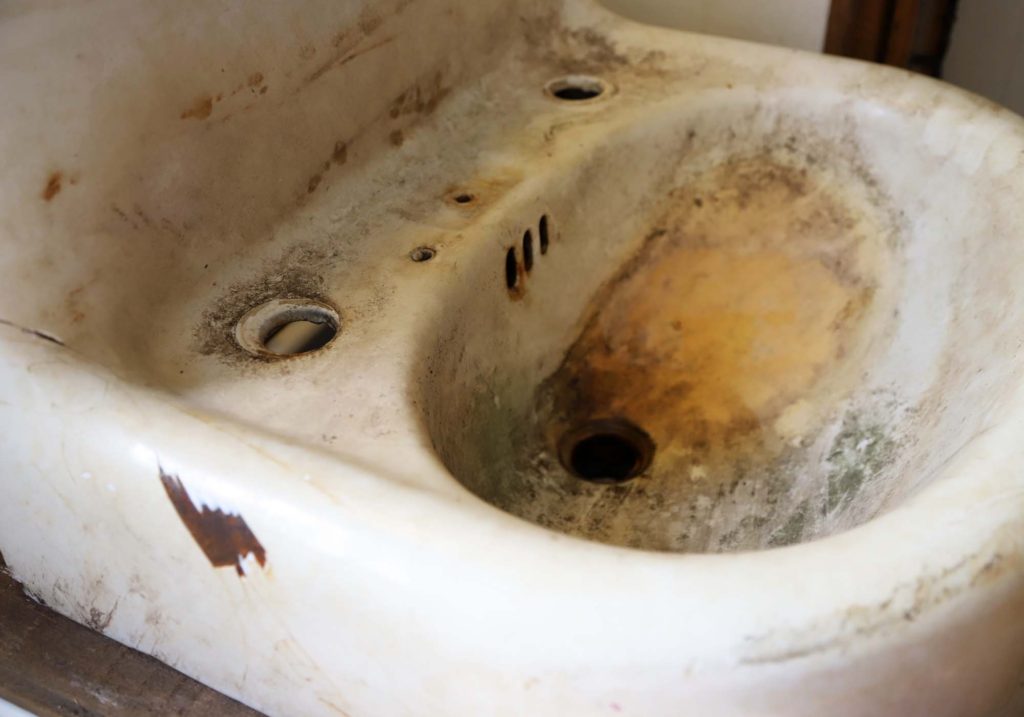
Both sinks were recovered from the property we are currently renting, my husband’s grandparents farmstead. They remodeled their house sometime in the 1960’s, and at that time put the sinks outside. They sat for 50+ years in the woods, covered with leaves and debris. Because of this, the sinks definitely needed some TLC.

We talked about hiring a company to do a complete restore, but decided to test out a DIY version on the smaller sink. Once we knew the results, we figured we would be able to make an informed decision about what to do with the larger one.


CAST IRON SINK CLEANING

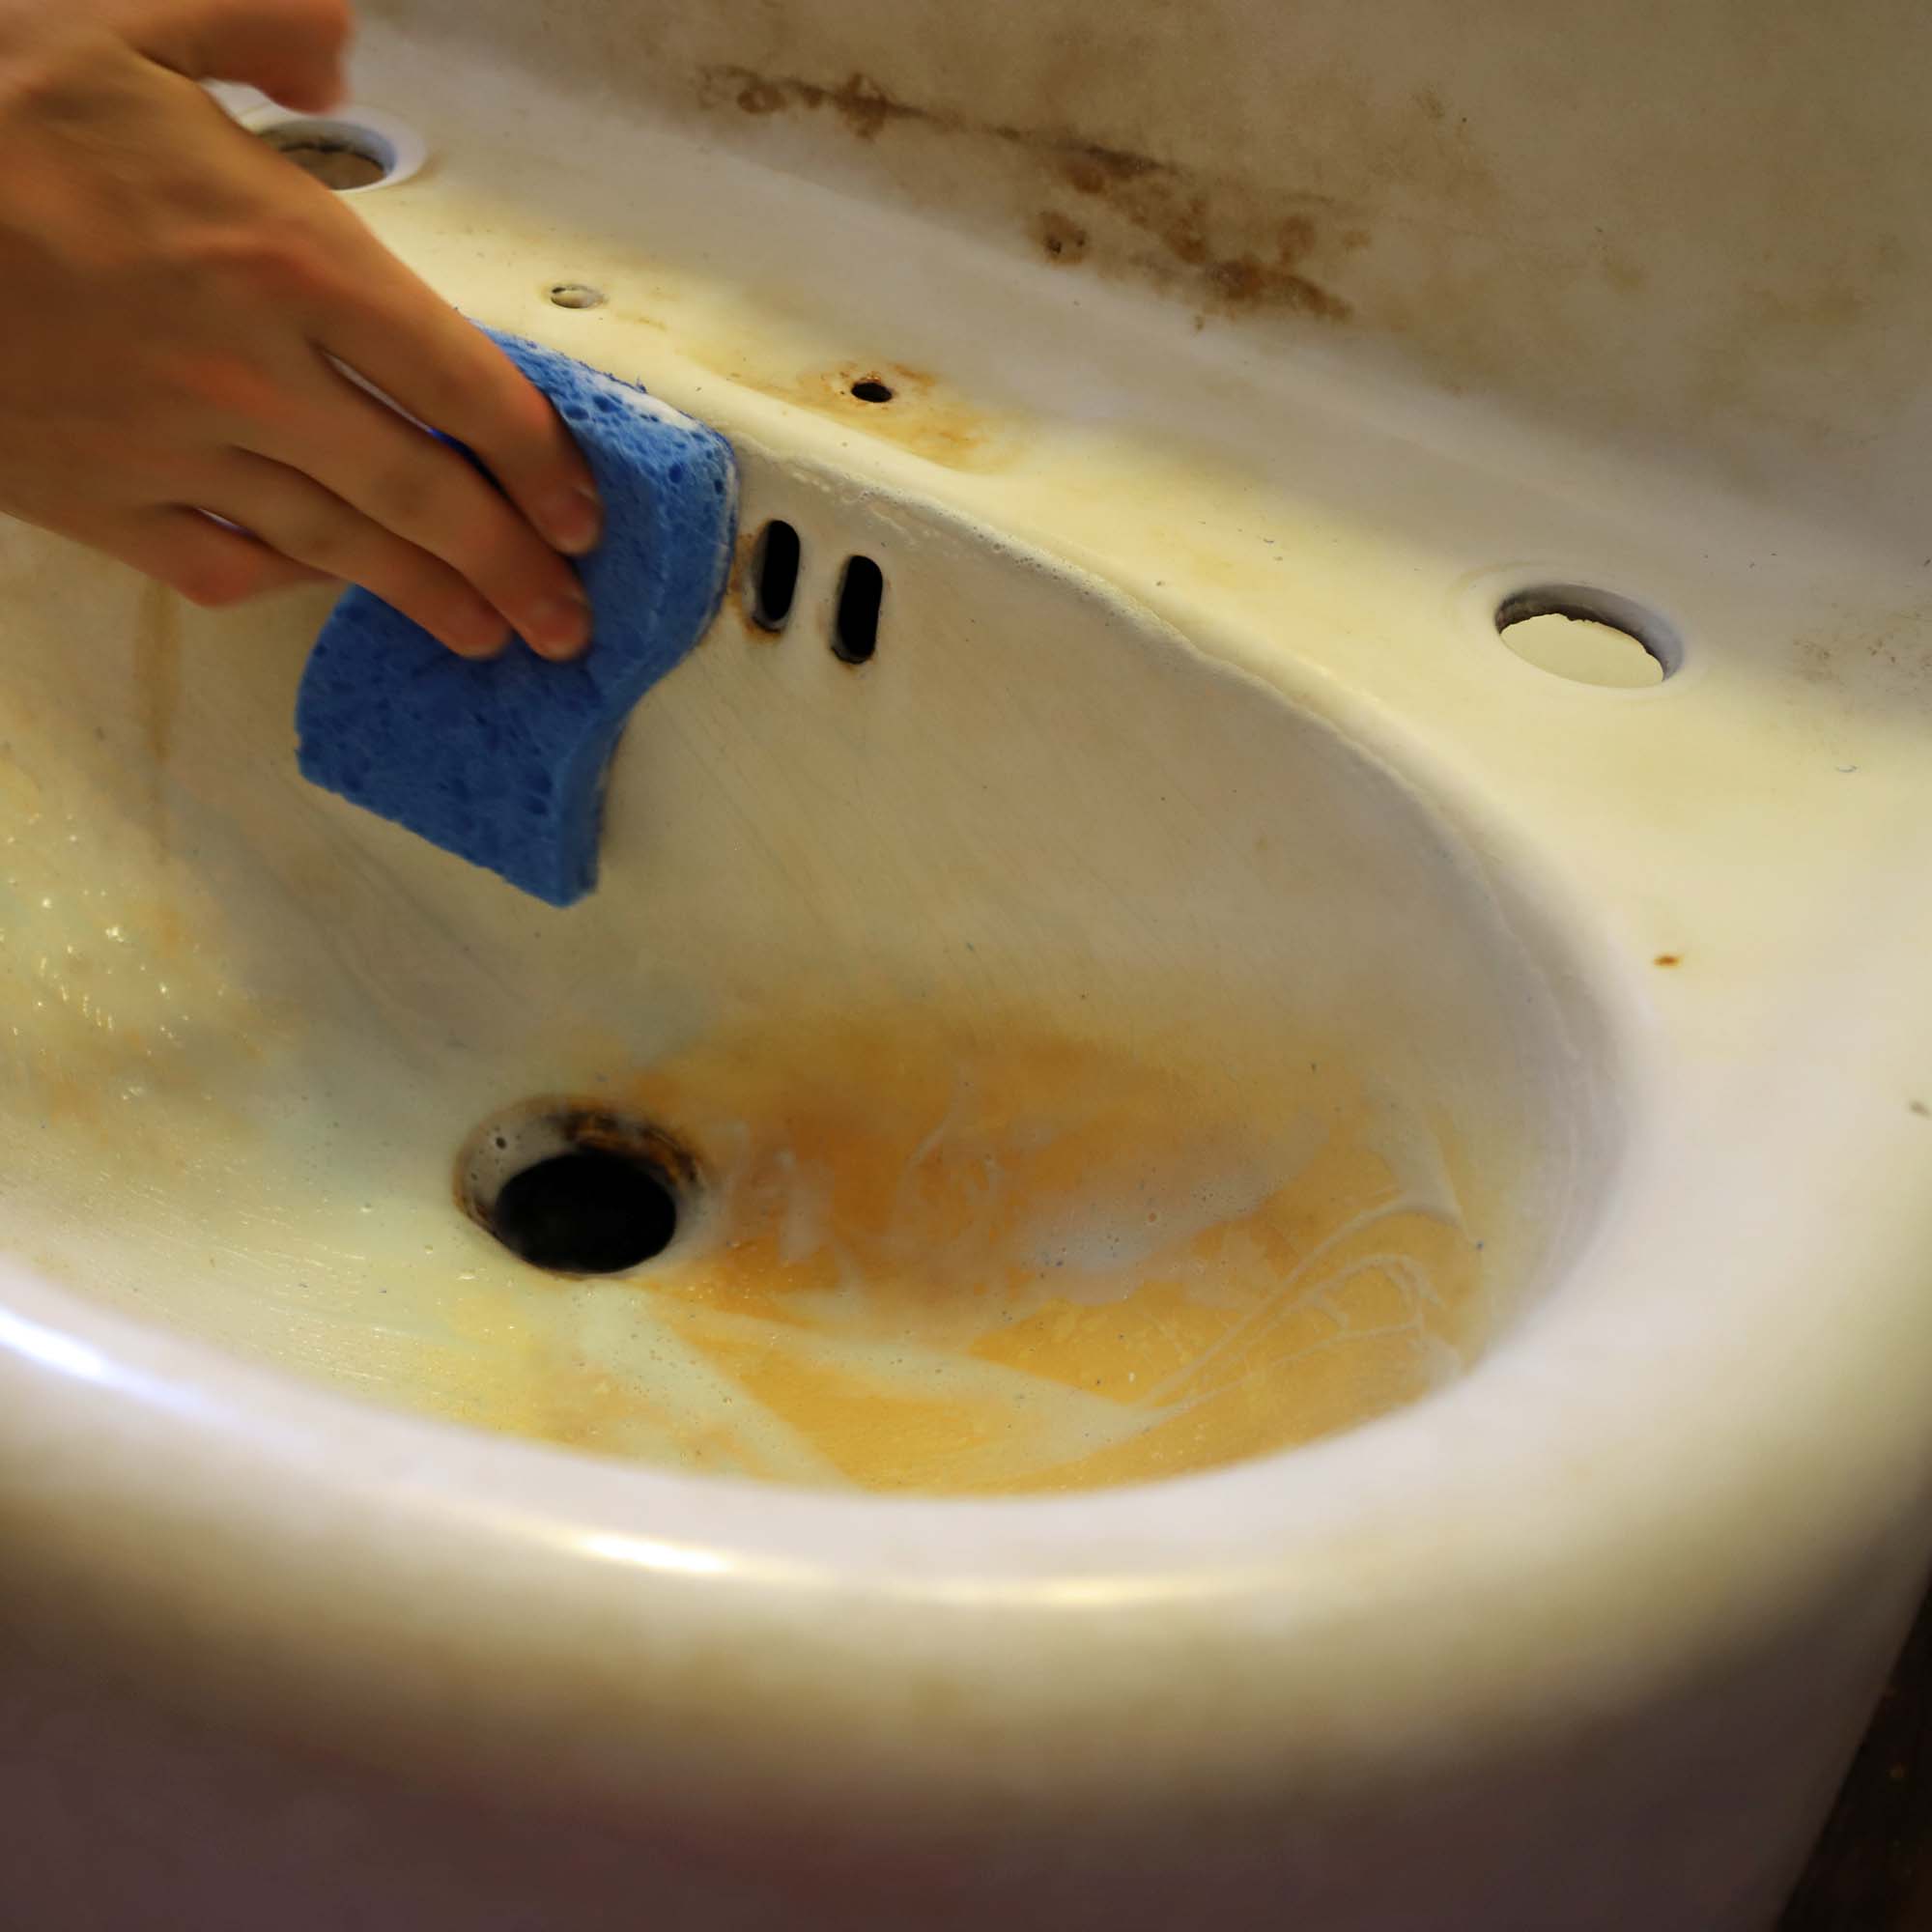
First, the sink needed some good old elbow grease. Craig started with very mild cleansers – such as a baking soda/water mixture. Eventually, he moved to harsher chemical cleaners, including ‘Iron Out’ and ‘Bar Keepers Friend.’ While they did clean the sink somewhat, none of the products were completely removing the rust stains.

cleaning the sink

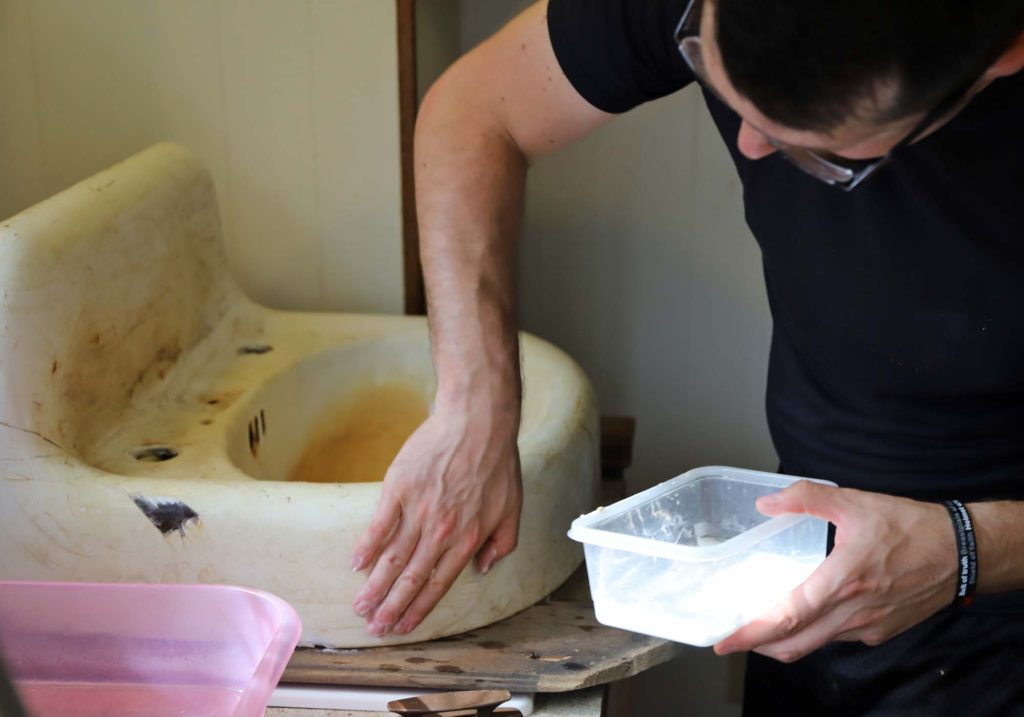
Craig really wanted to remove the rust, as it could affect the sink’s future integrity if not addressed properly. He ultimately needed to use a wire wheel brush to remove the rust spots.


FIXING THE CHIP

Besides the rust, the biggest issue with this sink was a large chip in the enamel, as well as a hairline crack that ran along the side and up the back splash. They were both cosmetic issues, as they did not cause any problems with the sink being able to hold water.

fixing a chip in enamel of cast iron sink

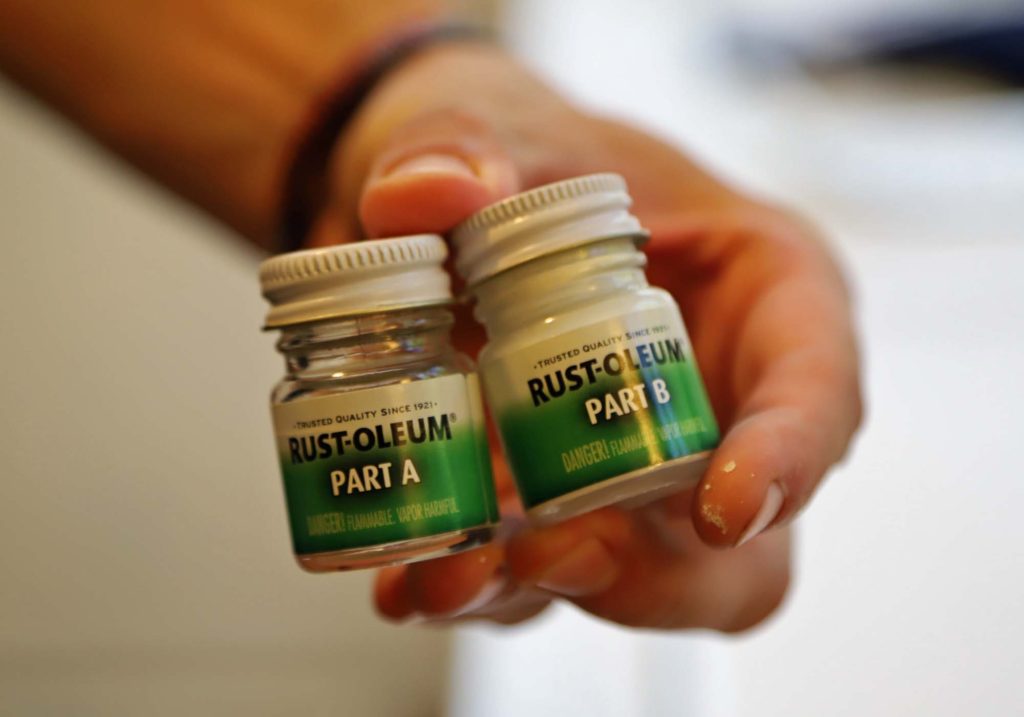
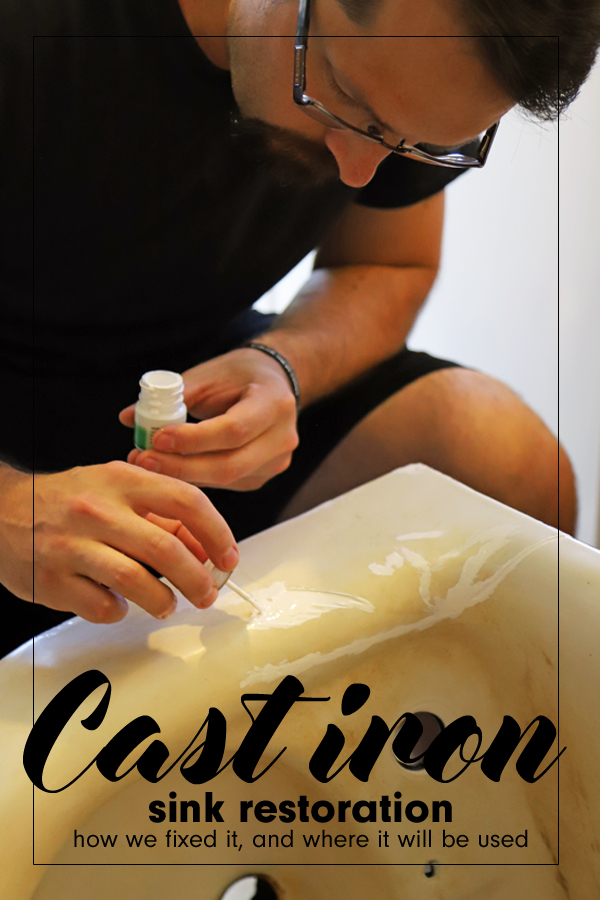
We found an epoxy material that could help fill in the imperfections. Over the course of a day, Craig applied layer after layer, allowing the epoxy to dry between coats. Once the material was above the height of the original enamel, it was left to dry for a few days before sanding.

epoxy material

filling the sink chip with epoxy

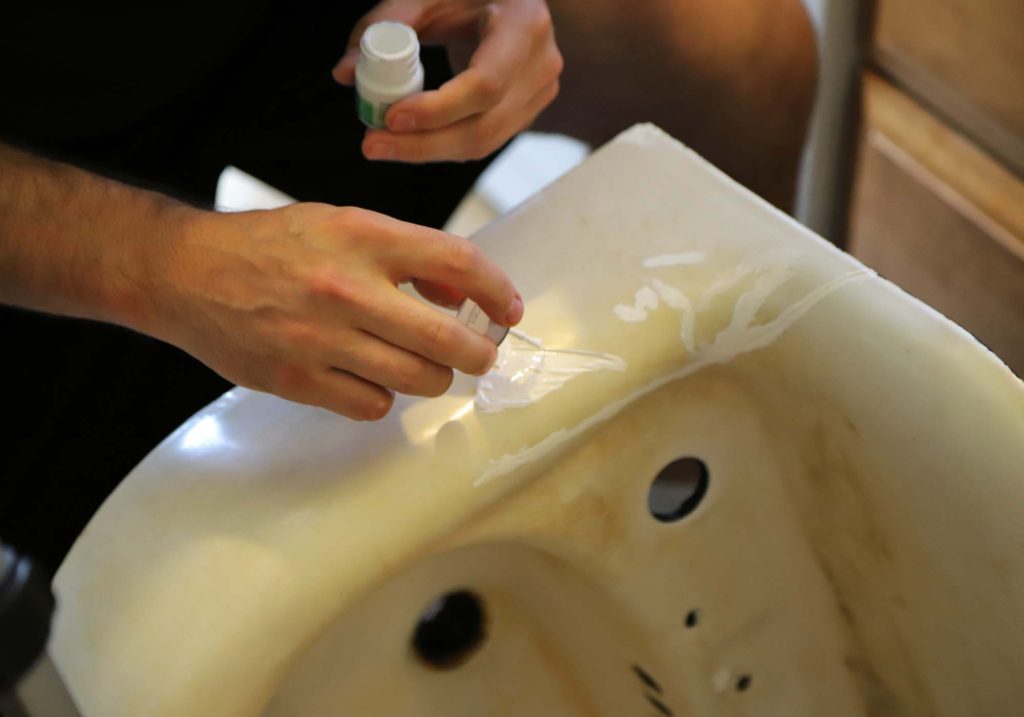
This product requires a ‘wet sanding’ technique – to help keep the dust down, and to eliminate scratches on the sink’s surface.


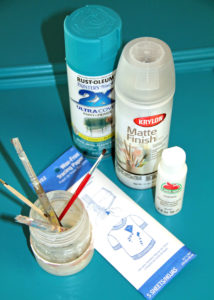
PAINTING THE CAST IRON SINK

We had determined, while cleaning, that the original enamel would need to be covered to get a uniform look. We were in no way looking for perfection, as we understand that this is an old sink. However, the discoloration was pretty bad from the years the sink had sat outdoors.

Once the epoxy had been sanded down smooth, it was time for paint! Craig started by painting the back of the sink with a black ‘rust inhibitor’ paint.

Rustoleum makes a specialty paint product that can be used for bathroom fixtures such as sinks and bathtubs. We decided to give it a try for the front!It goes on about the same as a standard can of spray paint, but the drying time is much longer. This allows the paint to harden.

painted cast iron

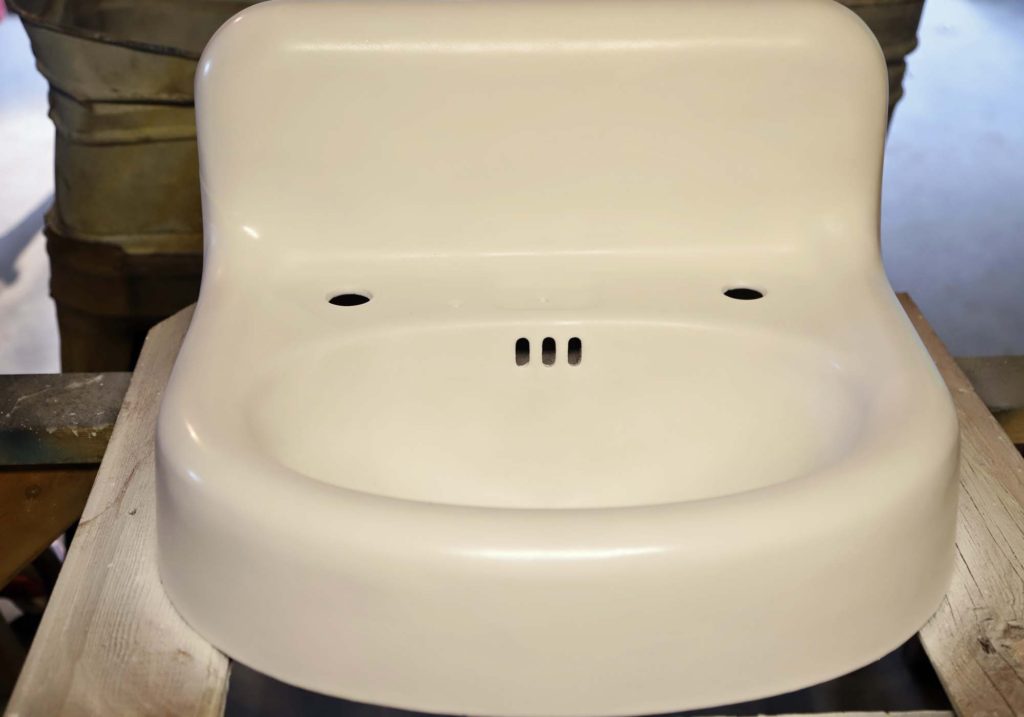
After three coats, the sink is looking great! The finish isn’t quite as shiny as the original enamel, but it is pure white and uniform. All of the rust spots are covered, and you would need to look extremely close to see any sign of the large chip or crack.

vintage sink repair

We are quite pleased with the outcome – especially considering the money we saved by doing it DIY style! Of course, until the sink is in use, we won’t know how this paint will hold up over time. I will try to remember to write an update after we have used the sink for several months.


WATCH THE CAST IRON SINK RESTORATION

For an even closer look at the steps involved in this restoration process, check out the THREE PART SERIES of videos that my husband created for his new YouTube channel, Weirdy Beardy Workshop. He has been busy filming a lot of projects, actually. So, if you want to see some behind the scenes footage, go check out his channel!


PIN THIS POST

how to restore a cast iron sink


DIY TODDLER BED | RE-PURPOSED CRIB

What should you do when your child outgrows his/her crib? Consider re-purposing it into an adorable DIY toddler bed, using this simple tutorial.


repurposed crib into a toddler bed. Adorable DIY toddler bed
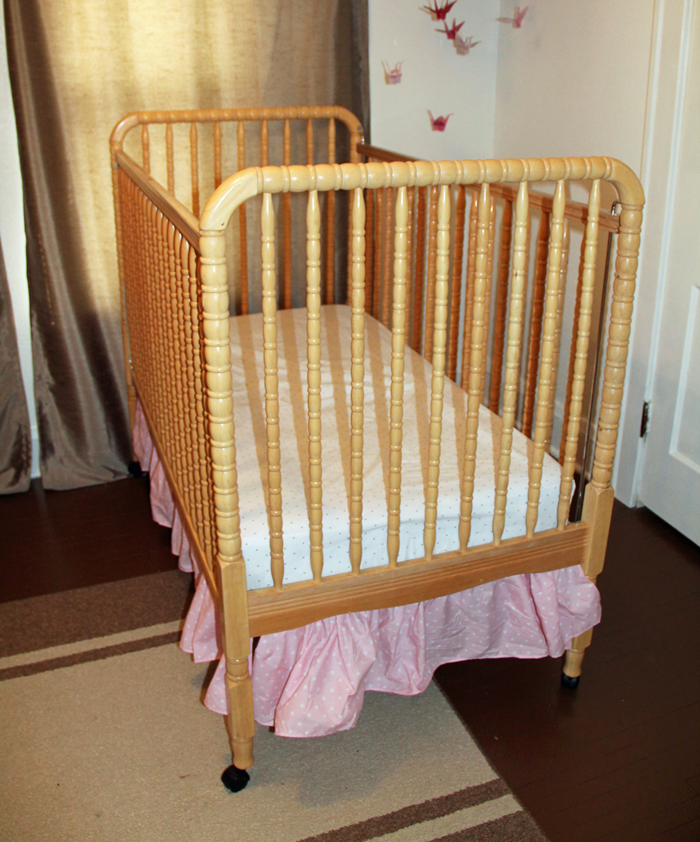
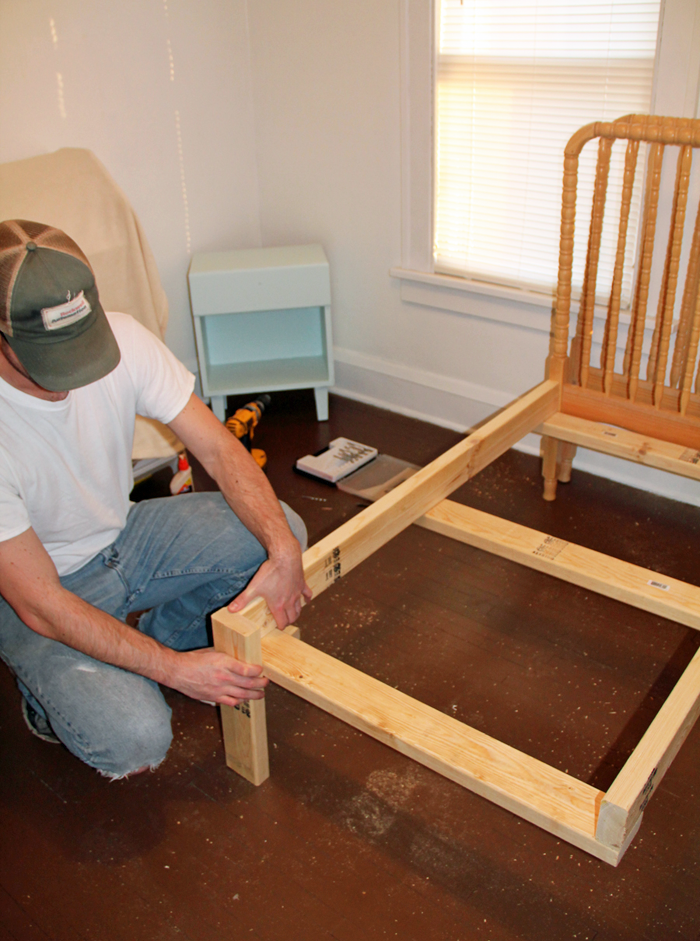
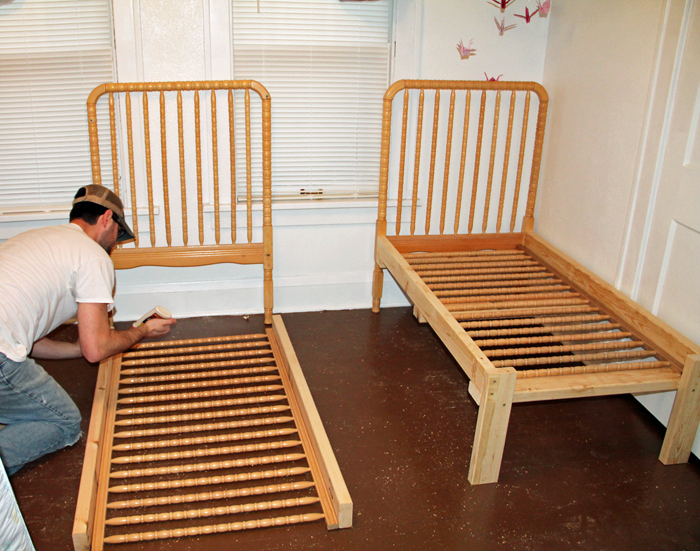
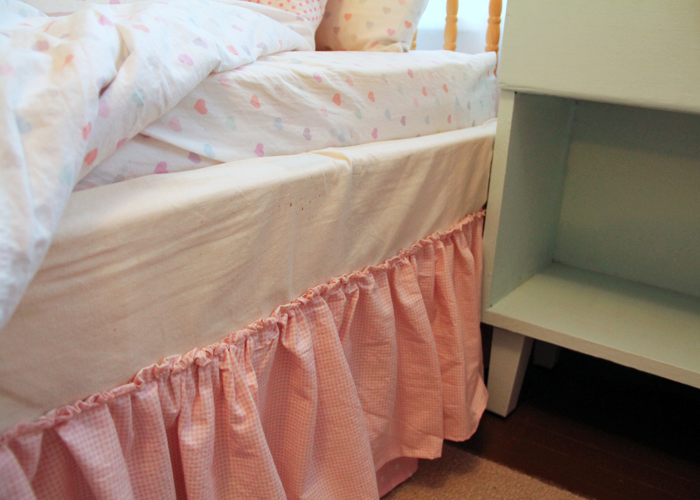
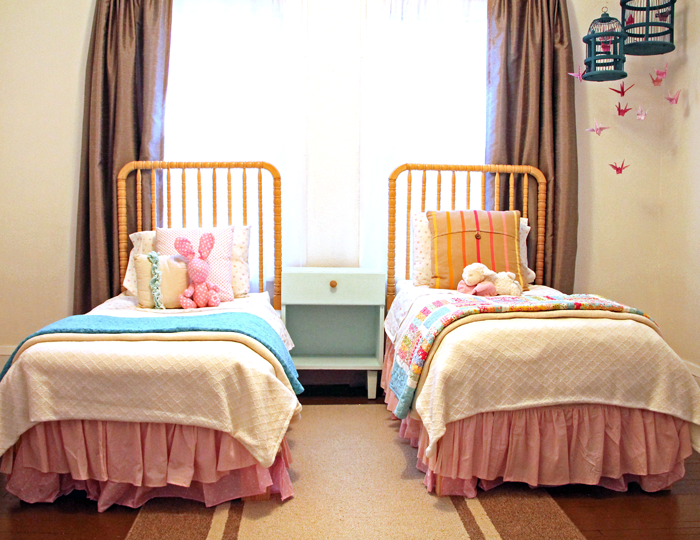
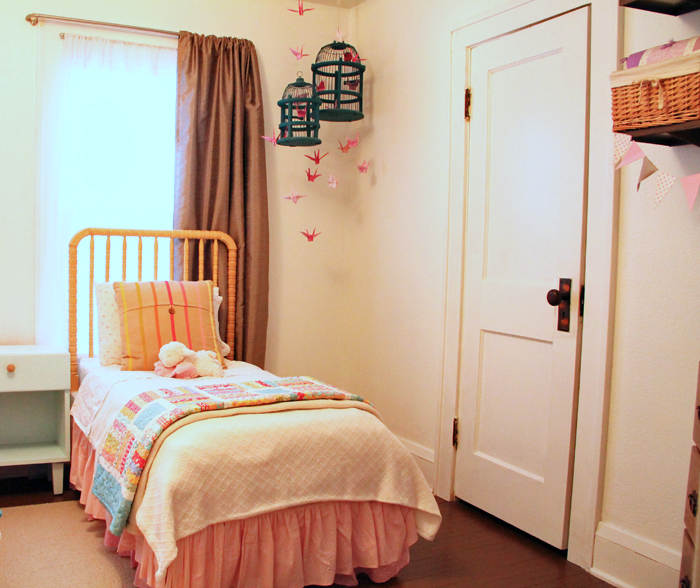
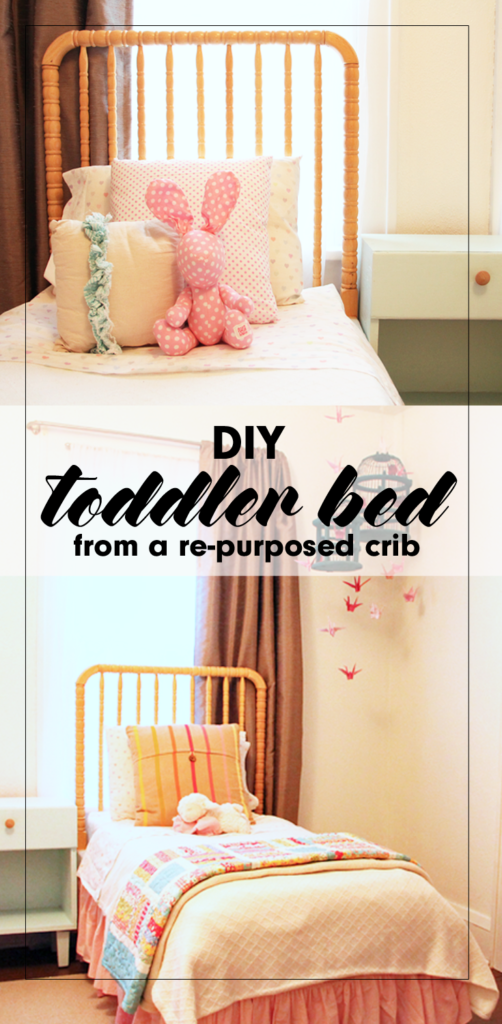
Not many moments spark the same amounts of joy and sadness as when the youngest child of the family finally outgrows the crib. With the celebratory occasion of assembling the ‘big boy/girl’ bed comes the equally emotional moment of taking the crib apart.

We were faced with this exact scenario in the months before we took the trip to China to finalize {K}’s adoption. {M} had always loved the security of her crib, the same crib that all three of our sons had also slept in, but at 3 1/2 years old, it was finally time for her to say goodbye as well.

converting an unused crib into an adorable toddler bed

It was at that moment we were faced with a difficult decision. What do we do with the crib? Maybe you are nearing this milestone and have had the same question. Today I am offering a tutorial explaining our personal crib re-purpose DIY project.


THE CRIB BEFORE

Our simple, Jenny Lind style crib was well loved but it’s natural wood finish and spindle details had a charm that we wanted to preserve.


crib transformed into toddler bed in 5 easy steps

It was given to us as a hand me down before {D} was born, over 11 years ago. Needless to say, it was equipped with the notorious ‘drop side’ – a feature now considered dangerous. We had long ago disabled the drop side, but legally the crib was no longer eligible to sell (or give away). Even still, the crib had a beautiful Jenny Lind style, and the thought of throwing it in the garbage just didn’t sit right with us.

We brainstormed a few different ideas, and eventually decided that the best option for our family was to turn this ONE crib into TWO toddler beds – one for 3 1/2 year old {M} and one for her 6 1/2 year old sister {K}, who has arthrogryposis and is small for her age. We knew they would both fit comfortably in the smaller sized bed for a while, and that the bed DIY project could save us some money as well!


CREATING THE DIY TODDLER BED

I’ll be honest that at the time of the project I wasn’t thinking in terms of getting enough pictures for a tutorial. I only have a few photos, but will try to fill in the gaps with words. If you have any questions about the process we used, feel free to comment below or send me an email!

STEP ONE

My husband Craig disassembled the crib, which actually made {M} very angry! She couldn’t see our ‘vision’ at the time and was just upset that he was breaking the comfy place where she loved to sleep. Essentially, all pieces of the crib were used to create the new beds with the exception of the hardware and the spring mat.

STEP TWO

We purchased standard 2×4 material, and Craig cut them to assemble a three sided ‘box’ that would hold the crib mattress. Because we planned to use the two tall sides of the crib as headboards, he only needed to make legs for the end of the box. He reinforced the center with a 2×4 cross base.

creating a diy toddler bed

diy toddler bed framework using crib parts as headboards


STEP THREE

Craig attached the assembled ‘box’ to the headboards, making sure everything was level. He then set one side rail into each of the ‘boxes’. The side rail piece spreads the weight from the mattress out over the 2x4s included in the ‘box’ construction.

using an old crib to make a diy toddler bed

STEP FOUR

The crib mattresses were then added. They were a perfect fit, as demonstrated by this goofy picture of {L}. Crib mattresses are a standard size, but they can vary slightly. If you try this project you will want to base your dimensions on the crib mattress you have. We happened to have two mattresses, one that was used in the crib and another that we had for a different toddler bed.

building a diy toddler bed


STEP FIVE

Dress it up! I created pink ruffle bed skirts using this easy tutorial. They really were simple to make, but a bit time consuming! I used muslin fabric to cover up the exposed 2x4s near the mattresses.

toddler bed diy ruffled bed skirt

I also found some adorable heart bedding from Pottery Barn Kids. Grandpa and Grandma purchased the bedding as a gift for the girls. A king sized texture blanket was the perfect size to cut in half, allowing me to make two matching comforters. Topped with accent pillows, and comfy colorful quilts, the beds look super cute on each DIY toddler bed!

girl bedroom bedding

repurposed crib turned into diy toddler bed


FINISHED IN THE ROOM

The finished beds look so sweet set up together in the room. I still love walking by and admiring them, over a year later!

old crib turned into two diy toddler beds

The girls really enjoy sharing a room and their little beds fit perfectly into their bright and cheery space. Although I am having fun designing their new shared space for Arrow Hill Cottage, I will be sad when we have to retire (or pass on) these special beds their daddy made them!

simple do it yourself toddler bed from an old crib


MORE SHARED BEDROOM DETAILS

Just for fun, here are a few more details of their shared bedroom.

girl bedroom reading nook

This rocker was Craig’s grandparents. We had it reupholstered before our first child was born, and have used it in the nursery ever since. It is a special piece. Next to it we have a bookshelf, making this the perfect spot for reading.

girl bedroom tour

The bookcase itself is a vintage piece from our local Carnegie Library, which is now closed. I love that the girls are able to see the fronts of the books when making their selections.

diy girl bedroom decor

Above the bookcase is a DIY piece that I put together using a mirror frame, which I spray painted white. I covered the mirror with a fabric. It is attached with temporary adhesive, because I imagine in the future the girls may opt to use the mirror itself. The heart was made by weaving strips of paper grocery bags.


girl bedroom decor ideas

Both of our girls were adopted from China – {M} at the age of two in 2015 and {K} at age six in 2017. We always want them to be aware of their beautiful birth culture. The paper crane bird cage/ mobile symbolizes peace and longevity. I folded each of the cranes by hand using a variety of pink patterned paper. The dresser was mine when I was a little girl. It was a gift to me from my grandpa, and I love that I can pass it down to daughters of my own.

shared girl bedroom ideas

Above the dresser are more symbolic and special pieces, including two panda bears from China – one from each trip.

diy toddler bed

We painted the floor in the girls room, and the entire upstairs of this rental house, a chocolate brown color. It has held up very well and is actually something I am considering for the new house.


PIN THIS DIY TODDLER BED IDEA

I hope you enjoyed this little tutorial and the impromptu room tour! I would love to see the creative ways you have re-purposed a piece into something new!

diy toddler bed from a re-purposed crib


SIMPLE NO SEW TEXTURED PILLOW TUTORIAL

This no sew textured pillow is extremely simple to make and looks great! If you can braid and tie a knot, you can make it. I’ll show you how!


I mentioned this textured pillow in a recent post about our home’s Christmas decorations. The pillow went perfectly with the rest of the festive green and red decorations. I love it so much that it is still gracing our couch this winter.

These cold months are the perfect time to experiment with cozy, chunky textures for the home. I’m excited to share how you can add some to your home easily and affordably, with this do it yourself project!

Though the finished product may appear complicated, I guarantee it isn’t! There is NO sewing NO knitting and NO complicated movements involved. Basically, if you can braid and tie knots, you can do this!


simple no sew pillow


SUPPLIES YOU WILL NEED

Fleece Fabric: 1 1/2 yards of fleece in any solid color. I used a 60″ wide variety, but they come in varying yard widths. Any width over 60 inches will work for this tutorial. My overall fabric size was 54 inches long x 60 inches wide. Fleece is perfect for this project because it does not fray when cut.

Pillow Form: This tutorial uses a 13″ pillow form (13 inches wide x 13 inches tall)

Scissors: Make sure they are sharp!

Ruler: Measure twice and cut once. I share a simple technique for cutting the fabric that will save time.

(2) Rubber Bands: Or some other temporary tying device – I used hair ties!

A clear, flat area, such as a table or the floor will make the initial steps of this project easier. Let’s get started!


STEP 1 : LAY OUT THE FABRIC

I recommend that you lay the fabric out so that the longest width is laying horizontally in front of you. In my case, the fabric was set out so that there were 60 inches from left to right when I was looking at the table. Fold the left side of the fabric over 8 inches.

textured pillow tutorial


STEP 2: CUT THE FABRIC INTO STRIPS

Here is where I introduce my handy little tip for cutting fleece fabric. Instead of marking on the fabric itself, I like to fold the fabric over  – then cut on the ‘looped’ side. First we will cut the loop of the 8″ measured fabric.

simple pillow diy project

While the 8 inch strip is still laying on the large piece of fabric, use it as a guide to cut another 8 inch strip. Continue this process of laying an 8 inch strip above the larger piece of fabric until you have used up the rest of the fabric. For the 60 inch long variety of fleece, that will yield you (7) 8 inch strips + an extra 4 inch strip.

These 8 inch strips will further be folded in half and cut on the ‘loop’. Each 8 inch strip will give you (2) 4 inch strips – by folding and cutting using the same technique.

no sew textured pillow project

And each 4 inch strip will give you (2) 2 inch strips.

textured pillow tutorial for beginners

All told, you will be left with (30) 2 inch strips – which is what you will be using for the next step. If there is a little wobble in the straight line cuts, that is no problem at all!


STEP 3: BRAID THE STRIPS

Lay (3) of the 2 inch strips on top of one another. Tie them together with a large knot on top.

textured pillow diy project for beginners

simple textured pillow

You will be creating 7 braids in total, using (21) of the 2 inch strips.

textured pillow tutorial project

They will be flat/ large braids. One tip that I found to allow them to lay flat is to make sure the top fabric strip becomes the center of the braid.

simple diy pillow project

Braid each section. I created a little video of a few portions of this project – linked at the end of this post – if you need a refresher on braiding.

braided textured pillow

textured knot pillow

pillow diy project

Tie each braid at the end with a knot. It is okay if the end portions of the braid aren’t perfectly flat – as these knots will be removed later in the process. Set the braids side by side so that the knots are at the top and bottom when laid in front of you on the flat surface.

simple diy tutorial

At this point in the process you might want to just double check that your pillow form fits on top of the braids. If you decided to use a pillow form size other than 13″ x 13″ you will need more or less braids, accordingly.

simple textured pillow project

Just make sure there is a little bit of the braid showing on either side of the pillow form, as the following step will tighten things up a bit.


STEP 4: COMBINE THE BRAIDS

I’m going to prep you now by saying that this next step is probably the most tricky. However, once you get the hang of it you will just repeat the process over and over. Pay careful attention to the next photos, and watch the video if you need a bit of extra guidance.

diy pillow instructions

Set two braids side by side and match up the second folds together. I didn’t start at the very top because the knots tend to get in the way a bit. It will be easier to get the hang of this technique when you are a little lower down the braid.

textured pillow diy instructions

There should be (9) remaining strips of 2 inch wide fabric remaining. These strips will be used to weave together the braids, giving the pillow its signature ‘knot’ look. Lace the fabric under the loops of the folds you are holding.

textured pillow step by step guide

Tie the weave fabric in a knot, allowing at least 3 to 4 inches on the right side of the knot. The remaining length of the fabric strip will be used to create the ‘knots’ through the rest of the braids.

simple no sew pillow instructions

Gather the next lined up ‘fold’ pieces, and repeat the process – only this time instead of applying a knot, wrap the fabric strip over the folds. (this is easily seen in the video)

textured pillow progress

textured pillow diy project

Continue this process until all seven braids are connected. Then move to the next row down and repeat the process. In all, you will use 9 strips of fabric to do the weaving.

Your finished product will look something like this.

simple diy textured pillow

At this point you should flip the braided/woven fabric piece over so that the best looking side is facing out. This may vary from person to person – depending on your preference – just make sure that whichever side you want to be seen for your finished project is laying face DOWN. Then place the pillow form on top – on one end.

textured diy project

Fold the rest of the woven braids over the top of the pillow form, so that the knots are lined up on top of one another – and you are ready for the final step!

no sew fleece textured pillow


STEP 5: FINISH THE TEXTURED PILLOW

Get ready for more tying! Start with the non-knotted fabric strips. Match the top and bottom strips and tie them into knots.

fleece tie pillow diy

To finish the sides, simply tuck the remaining fabric in – or, if you prefer, cut the ends of the strips a bit and leave them exposed for a fringed look.

simple diy fleece pillow

At this stage, it is safe to remove the knots from the bottom of the braids. Once the knots have been untied, lay the strips flat. Cut the extra length of the fabric from the strips so that there are between 6 and 9 inches of fabric loose below the faux ‘knots’ that remain.

textured fleece pillow

You are left with a lot of strips hanging down. Feel free to get creative with how you finish the bottom of the pillow. I initially decided to tie the strips together and leave a bit of a fringe hanging on the bottom; But eventually I decided to give the pillow a bit of a more finished look, and developed the following technique.

textured fleece pillow instructions

Flip the top ‘knotted’ strips up, gather them and tie temporarily. Turn the pillow over and repeat these steps. This will leave exposed strips in the center.

diy fleece pillow

Flip your pillow so that the skinny edge is up and oriented up and down in front of you. Working top to bottom, match up the fabric strips and tie/ loop them together. The extra fabric should be tucked in, the same way you tucked in the sides.

simple textured pillow project

The finished center bottom of the pillow will look something like this. Don’t worry too much about perfection, as this will all be covered soon.

simple fleece pillow

Lay the pillow flat again and untie the bundled portions now. There should be (7) sets of two on the top, and (7) on the bottom. Find the center sets, and position the strips as shown here.

textured pillow diy project

Tie the overlapping pieces together, then once again tuck the remaining fabric into the pillow.

simple textured pillow

You will continue this process working from the middle to the side edges. With the remaining portions, plan to make ‘loops’ instead of knots – as you did in the weaving portion of this project – and continue to tuck in the remaining fabric.

As promised, here is a link to the video showing little clips of the process – including the technique I used to finish the bottom.

Now you have a gorgeous textured pillow ready to cozy up to! It is sure to add style to any space in your home.

diy pillow tutorial

diy cozy textured pillow

I hope you will give this fun project a try! If you do, I would love for you to share with me your finished product! Don’t forget to save the pin below for reference!  Happy Crafting!

simple textured pillow tutorial


HOLIDAY HOME TOUR BLOG HOP

Can you believe we have less than two weeks until Christmas? This time of year is always full of beautiful things; And in honor of that, I’ve teamed up with some amazing fellow bloggers. We’re inviting you into our homes to share our Christmas decor and hopefully give some inspiration!  At the end of this post, I’ve linked to everyone’s posts so you can ‘hop’ on over and check out their homes. We hope you have fun!

Want to see how I have decorated our home for Christmas this year? I’m excited to share!

First, a bit of a disclaimer: We are living in a rental home as we prepare to build Arrow Hill Cottage. Though our rental is a pretty good fit for our family, it is difficult for this design oriented lady to accept some of the finishes. Yes, we have painted paneling. Yes, we have popcorn ceilings. No, the furniture isn’t optimally positioned. No, we can not remove walls. Ha Ha!

I worked with what I had. This is our family’s moment in time. Christmas 2017  – in the rental house.

We have five young children. They range in age from four to eleven. Old enough to understand the true meaning of Christmas, and young enough to still be excited about festive decorations and wrapped presents under the tree.

This is our daughter {K}’s first Christmas home (you can read about her adoption journey here). I really wanted her first experience of Christmas to be one of happiness, anticipation, and fun – and full of family togetherness. As such, I was sure to include the kids in the decorating festivities. I chose to keep the bulk of the decorating in the main living space, which you will see today.

I started with an amazing feed/flour sack that I found at a local antique store. Isn’t this just the most perfect fabric for the season? The bright colors and bold, fun patterns on this fabric were just right for what I was trying to achieve. I turned that one feed sack into two amazing throw pillow covers, complete with wooden buttons.

I layered in more texture on the furniture with cozy throw blankets, home made sweater pillows and a sweet DIY fleece knot pillow. Be looking for a tutorial on that coming soon!

I scored some comfy club chairs + ottomans recently for an absolute steal of a price. The bad news is that they will need to be reupholstered with something a bit less boisterous. The good news is that the fabric is red and I was able to blend it into the Christmas decor. Ha!

We don’t have a beautiful fireplace or mantle here. I chose instead to decorate our entertainment center. I covered the electronics, besides our massive TV, with burlap linen. I then put together a super colorful rag garland and draped it in front. For this craft, our boys got in on the action of ripping fabric and pretending they were the Incredible Hulk. Ha!

Perched on top of the cabinet are my Willow Tree figurines. I love the simple sentiment of this Nativity display.

Another simple garland that I created includes DIY pom poms. I had never made them before; but found this well written tutorial that showed me step by step how easy they are to create! The kids joined in the fun of creating these fluffy ‘snowballs’.

Our Christmas tree is the ultimate of hand-me-downs. Though I love the look (and smell) of a freshly cut evergreen, it is special to me that the tree which now sits in our living room is the same that my Christmas presents were placed under as a child. That’s right. This tree is as old as I am! I’d say she has aged pretty well!

The ornament and light positions were decided by the kids. I had thought of maybe moving them around to balance things a bit, but decided to embrace the quirkiness. They are so proud of their masterpiece.

I love taking photos of day to day life – sometimes though, those pictures tend to be stuffed into yet another computer file. Lately, I have been putting forth more of an effort to showcase the pictures I take. In fact, I started a YouTube channel just for that purpose! Our weekly photo vlogs have been so fun to create. At the end of the year, we plan to sit down with a big batch of popcorn and watch them together.

I decided to take one photo from each month and showcase them as part of the Christmas decor. A bit of a yearly time capsule. Each black and white photo is accented by a Popsicle stick frame. The kids helped to paint the sticks a whimsical shade of green and I assembled them.

It is a treat to be able to glance at the tree and be instantly transported back to that moment in time. We really have been through a lot this year! From traveling to China in April, as part of {K}’s adoption trip, to Craig’s knee surgery in August. What a year!

I’m not sure how I did it – but I somehow have managed to finish this year’s Christmas shopping already! I have wrapped the gifts in patterned paper that matches the colors in the rest of the room.

A little red birdie lives on top of the piano – nestled near a small painted wood sign of one of my favorite Bible passages, Psalm 127. I purchased the sign during a friend’s adoption fundraiser. It is a very special piece.

The red and green color scheme continues on the piano top, where a trio of ‘mini trees’ reside. This was another DIY project. The containers were covered in fabric and the trees were made out of a wired garland I had laying around.

Other whimsical items are spread throughout the room. This gallery of vintage frames adorned with fabric, pom poms and a pine cone was a favorite when I first put it up.

There’s that amazing fabric inspiration again. I was sure to use every last scrap. I love it so much!

I threw in a few more vintage finds for good measure.

I hope that you will gain a bit of inspiration from the decor our family is enjoying on these cold wintry days. I invite you now to visit these other amazing blogs to be further inspired!

HOLIDAY HOME TOUR

Bless Mama

Slice of Style

Babb Farm Life


CREATE A PAINTED WOOD SIGN IN 6 EASY STEPS

Painted wood signs are very popular right now. They are classic, and their neutral colors look great with a variety of home decor styles. They can be purchased at craft fairs or on Etsy. Many retail stores now sell mass produced varieties; but if you create a DIY version – a whole new world of possibilities opens up!

The great news is that creating a painted wood sign is easier than you might think. It can be accomplished in six simple steps!

SUPPLIES YOU WILL NEED

Wood ‘canvas’: A single slab of wood will work great, as will wood strips connected together. The wood can be newly purchased from a home improvement store or salvaged from an old building! Be sure to inspect it for knots or splintered pieces.

Paper/Printer: You can use computer design software to create and print your design or make a hand-drawn ‘rough draft’ on plain paper.

Transfer Paper: There is the standard carbon paper, or the colored version – which I prefer.

Pencil/Pen: Used to trace the design.

Acrylic Paint: I prefer to use Apple Barrel Paints. They are available in a wide variety of colors!

Paintbrushes: Start with a diverse selection of brushes to find your preferred size.

Sandpaper: The grit of sandpaper needed will depend on how thickly the paint is applied. Opt for a multi-pack and you will have plenty of options.

Rag: For the final cleaning.

Once you’ve gathered all the supplies listed above, you are ready to begin! Take a deep breath and let’s have fun!


STEP 1: PREPARE THE CANVAS

Sand rough edges and clean off any dirt and grime in preparation. This large piece of barn-wood I used is full of character – including holes, knots and sawed off nails!

When choosing your wood canvas, be sure to think ahead to what size your design will be.


STEP 2: PRINT OUT A DESIGN

Decide what you would like to create! This is where the DIY route comes in very handy. You can create a sign full of words or one that includes graphics. The sky is the limit, so get creative! I have been in the Holiday spirit lately and decided on a Christmas themed design. Because I had a larger wood board to paint on, I enlarged the pattern in Photoshop Elements and printed it on two pieces of standard 8.5 x 11 paper.

If you like the design I created, check out the RESOURCE TAB for a letter sized printable PDF that you can use for this project!


STEP 3: TRACE THE PATTERN

Lay the trace paper carbon/color side down onto your wood canvas. Place your printed design on top and position it to your liking. Tape the printed design onto the wood so that it stays in place. Beginning in the upper left corner of the design, trace over the pattern with a pen or pencil – applying a medium amount of pressure. You can see from the photo above that I have used this particular pattern multiple times.

When the trace paper and printed design are removed you will be left with a light outline of the pattern. This is erasable and sand-able – making it easy to revise parts that aren’t to your liking.


STEP 4: PAINT THE PATTERN

Using acrylic paint in your color of choice, fill in the pattern. If you are worried about the steadiness of your hand you can opt for an acrylic paint pen.

Allow the painted design to dry for a minimum of 12 hours.


STEP 5: SAND

Gently rub sandpaper over the painted design. This will remove some of the paint and will give the piece a softer, more vintage look. To me it seems that the sanding really helps the paint  to become ‘one’ with the wood. I love being able to see the wood grain through the paint.

I recommend you begin sanding with a finer grit of sandpaper and increase the grit depending on the amount of paint you would like to remove.


STEP 6: CLEAN

Use a damp cloth to clean the paint that has been removed by the sandpaper.

Once the water dries you can choose, as an additional step, to seal your piece with a clear poly spray. Personally, since most of my art pieces are kept indoors, I typically skip the poly.


ENJOY YOUR ART PIECE

These look great on a mantle, hanging on a gallery wall, or in a variety of different places. I am willing to bet that plenty of people on your Christmas gift list would love a painted wood sign!

And now, you can make them one!

After you try the techniques in this tutorial, please share your creations in the comments below. I would love to see them!


This post contains affiliate links. You can learn more about my policies here.

10 SIMPLE DIY CHRISTMAS WREATHS

It’s the weekend after Thanksgiving. The turkey and mashed potatoes have been consumed and the last crumb of pumpkin pie is now gone. We had a fabulous time visiting with family and friends. This is always such a special time of year as we reflect on all we have to be thankful for.

Those of us (myself included) who have not yet put up the Christmas tree and decorations are trying to ease into the next holiday. I personally have found that if I decorate a little bit at a time I don’t feel as intimidated by all that needs to be done to get the house looking festive.

One simple way to get in the Christmas spirit is to hang a wreath on the front door. You could purchase one, sure – but making a wreath yourself is also a great option; And lucky for us, there are tutorials for so many amazing styles.

I have gathered 10 Christmas wreaths from around the web that are not only simple to DIY, but also look great!


10 SIMPLE DIY CHRISTMAS WREATHS

via Nordstrom

This succulent wreath is absolutely stunning and surprisingly simple to create! The link above will redirect you to a page that lays out step by step how to make this beauty.


via Delightfully Noted

Have a few mismatched ornaments laying around? Give them a purpose by creating this fun wreath.


via Shades of Blue Interior

Made from olive branches tied together and a few bell ornaments, this wreath makes a simple statement.


via An American In Rome

This wreath might take a while to create, but there are only a few simple steps (which need to be repeated many, many times!) The good news is that you don’t have to collect all of those wine corks yourself – you can buy them in bulk!


via Up To Date Interiors

You can’t really go wrong with a simple pine cone wreath. It will easily bridge the gap between Fall and Winter, Thanksgiving and Christmas.


via The Shabby Creek Cottage

Can you believe this gorgeous wreath was created using only Frog Tape and a pair of scissors? It looks great!


via Recaptured Charm

This wreath gives off some cozy vibes and also has a bit of a shabby chic look! The bonus is that yarn is super inexpensive!


via This Old House

This is just too creative not to share. Cuts of PVC pipe combine with small colorful ornaments to create this quirky wreath.


via Lil Luna

I love the puffy look to this wreath! The secret is coffee filters.. Lots and lots of coffee filters! It reminds me of a gentle snowfall.


via Good Housekeeping

Those red berries really add a pop of color! You can purchase winter-berry branches here.


I hope you enjoyed this roundup of festive wreaths! In a few days I will get started on the Christmas decorating around here – be looking for a Holiday Home Decor tour coming soon!


FAMILY COMMAND CENTER

Let’s just take a moment and acknowledge (or stand in wonder/confusion) that I have been a mom for over 10 years and just recently put together our very first family command center.  When it was finished, I stood back and thought ‘WHY did it take me so long to do this?!’ It just makes good plain sense! As an organization junkie, I’m totally geeking out about it – and maybe sharing our space can give you some tips to help keep your own family organized!

Again, I’d like to mention that we are renting our current house from family members.  Though they have given us quite a bit of liberty to make design choices, Craig has drawn the line on a few things he will absolutely not allow me/us to tackle no matter how many times I ask.  One of them is the painting of the kitchen cabinets.  This kitchen was remodeled in the 1960’s and I believe the cabinets are primarily constructed of oak hardwood, which are stained a very dark color.  The only natural light source in the space is a small window above the sink, and so those cabinets really make the room seem very dark.  I’ve lobbied to paint them all white, and add some fresh new hardware – but he’s not budging and I would like to stay married, so it’s a no go.

But… what happens behinds closed doors stays behind closed doors, right?!  😉

In the kitchen there is a tall cabinet in one corner of the room.  We have used it for pantry storage since we moved in nearly 3 years ago; But it’s depth meant that a lot of items were inaccessible or were forgotten about – helllooooo stale cheerios!  Through time, the bottom portion even became a space where footballs were stored.  I cringe at the memory.

Here is a BEFORE picture.  The cleaned out pantry space.  Note the lovely contact paper on the shelves and the unfinished flooring below.

Let me tell you…. they don’t make contact paper like they did in the 1960’s.  That stuff was made to last!  I was eventually able to peel it all off, but woah.  Just woah.  I also managed to finally finish the flooring by using the more high quality peel and stick tiles over the existing chee-po peel and stick tiles.  It’s an upgrade. (Note to self: In the new house… REAL thickness tile only.  Please!)

I then used some barn wood that we had on hand to line the back wall.  I found a floating shelf at Target that matched the texture and color perfectly and though it gave him quite a struggle, Craig was eventually able to attach it to the barn wood wall.  The inside of the cabinet doors were painted the same mint blue color as the decorative ‘niches’ we have in our kitchen.  From there it was a matter of adding the functional pieces and making it pretty!  I thought it might be easier (and more fun!) to do a video of the space pointing out all of the little details instead of typing them.  Behold the first ever YouTube video that includes my face talking.  Be gentle on me people, it can only get better from here.

And there you have it!  Our family is now on track to be ultra organized! Though we have only had it functional for about a week, I’m happy to report that the kitchen counters aren’t littered with papers, and the kids have been having fun playing with all the activities that are right at their fingertips. And can I just say that pointing them in the command center’s direction when they ask, yet again, ‘what’s for dinner?!?’ has been a treat.

Everything can be tucked away behind closed doors – great for when company comes over!  There is a sweet space for photos, and a charging station for the phones/ipads.

There is space in this command center for both adults (top half) and kids (bottom half).  I get a sleek barn wood wall to look at when I am writing a blog post or browsing on Pinterest.  The kids have access to all sorts of fun activities down below – coloring books, play doh, etc – as well as a spot for their Ticket System (chores/ commission)

The Meal Rotation clipboard is in easy viewing distance for the kiddos, so they don’t need to ask mom what’s for dinner.  Stylish file folders make organizing bills and paperwork more tolerable.

My favorite piece?  Probably the three ‘Plan of Action’ calendars!  I’m a list maker… remember?  I love sitting down at the end of the day and writing down my top 3 goals for the following day.  I think that seeing what is to come helps prepare me, and makes me less anxious.  I have made each of these calendars (monthly, weekly and daily) available in pdf form.  By clicking on the images below you can print your own to use.  As mentioned in the video, I print off one of each sheet and then make them into DIY dry erase boards by placing them in a clear plastic binder protector (then folding back the binder portion or cutting it off).  That way, I waste less paper and spend less time printing.

Maybe these calendars can be your first step toward making a command center for your own family.


Enjoy and happy organizing!

DIY – PAINTING A DOOR (AND FREE PRINTABLE ART!)

I’ve been wanting to tackle this project since we moved into the farmhouse nearly 3 years ago – but other things have always taken priority.  Tiny matters such as making sure people are fed and have clean clothes for school – BORING!

this weekend I was finally able to bring this idea to life!  As I have mentioned before, we are renting the farmhouse we live in.  However, we are renting from family members who have given us quite a bit of leeway to do whatever repairs or cosmetic fix ups we deem necessary, which is great because adding personal touches really helps make a house into a home.  The front door serves as a gateway from public to private space – and you can’t get more personal than that! We could have added a festive wreath to the door, and that may have done the personalizing trick – but with 5 little ones running around, the chances of a physical wreath surviving for longer than a few hours is basically zero. I turned my sights in a different direction.

If you remember from this Saturday Sketchbook installation – I played around with some design ideas through sketching.  I had initially thought of using a monogram, but didn’t want to have to paint the door again once we move and the house becomes available to other renters.  I then toyed around with the idea of painting ‘welcome’ on the door – but that just seemed too formal for the farm.  Eventually I landed on a simple springy wreath motif and the more informal ‘hello.’  The sketch was hand drawn until I cleaned it up via the magic of editing software.

This is our BEFORE

It should be noted that our front door is of the flat slab metal variety – very plain Jane and not very common.  In fact, we are basically positive that the detail you see near the bottom of the door was mirrored on the top portion.  At some point that must have been removed/ fallen off.  It just looked really unbalanced and awkward.

Keep in mind that most houses have raised panel doors, so depending on your panel design, this project may or may not work for you. Never fear though- you could find a square of plywood, follow the steps below, and make yourself a pretty piece of artwork for your entry!


These are the items you will need to tackle this project yourself:

* A door!  Or, a piece of wood that will fit your design

* Spray paint in your choice of color.  (at least 1 can per side) We chose this very pretty aqua from Rustoleum.  It has paint and primer in one, which gave great coverage for our metal door.

* Acrylic paint (matte finish) + a fine tipped paint brush

* Protective clear paint fixative (optional).  Just an added layer to protect the finished product.  I like Krylon Matte Finish – it dries quickly and doesn’t leave any residue.

* Wax free tracing paper

* A printer, paper, scissor, pencil & a bit of tape


Here’s what to do:

(Step 1) Remove the door from the hinges and bring outside to sturdy sawhorses (I employed the assistance of my strong and willing husband for this task)

(Step 2) Clean the door thoroughly with mild soap and water.  Allow to dry completely.  Note: if there are any loose or rough patches, scrape and sand them down before cleaning! Confession: Our door did have some damage that once scraped left some pitted spots.  If we were going to be living here long term we would have filled them in and sanded them smooth before completing the next steps, but we figured ‘eh!  good enough!’

(Step 3) Follow directions on the spray paint can and paint your door.  We chose to leave the inside color the existing brown and paint only the exterior portion + sides.

(Step 4) Allow paint to dry, depending on the instructions on the can.  This can be anywhere from 2 to 48 hours!

(Step 5) Add an additional coat of paint if needed.  While the door is drying, you can begin preparing the design.

(Step 6) I resized my design so that it was approximately 20 inches x 20 inches.  I then printed the image on multiple sheets of 8.5 x 11 paper and taped then together to form the entire image.  I could have brought the enlarged file to a print shop and asked them to print it on a single large sheet, but I’m too cheap for that!

(Step 7) Place the wax free tracing paper underneath your design sheet so that the colored side is facing the painted surface.  Working in small sections at a time, trace the design image with a pencil.  It will transfer the design onto the painted surface – so handy!

(Step 8) Using a fine tipped paintbrush, trace over the design with the white paint.  I love the contrast of crisp white on a bold, fun color.

Here I am painting the design on the door – Funny how the time-lapse makes it look like I got this accomplished in under a minute! (Truth: it actually took about 45!)

(Step 9) Allow the white paint to dry, then touch up as needed.  I had a couple of parts that needed a second coat.  Allow all paint to dry completely.

(Step 10: optional) ***If you are painting on a wood surface, now would be the perfect time to take a little fine sandpaper and sand down the brush stroke lines of the white paint.  This isn’t quite so easy over a spray painted metal surface as it tends to leave scratch marks.***

(Step 11) Spray the clear coat fixative over the design.  Allow to dry

(Step 12) Re-install the door, stand back and admire!


I am so pleased with how the finished product turned out that I want to share the love with a free 8×10 printable in 3 different colorways (white, black, and aqua).  Simply click on your color of choice below, print, trim, and pop in a frame.  Enjoy friends!


ON THE ROCKS

At the start of this summer season, we busted out the grill.  A hand-me-down 1970’s Weber charcoal unit that has seen it’s fair share of misery through the years.  Dents and rust prove that it has been well loved, and we decided that it was finally time to let the old guy retire.  As a Father’s Day gift, Craig chose a brand new dual burner unit with a unique feature – it can cook with gas OR charcoal!  Charcoal for the days when taste is a high priority and gas for convenience.  It is the best of both worlds, but it did present us with some challenges because of it’s size. It is at least 3 times larger than the Weber and does not hide discretely near the side of the garage when not in use.

Craig has been such a good sport for the past 15 + years we have been together.  Most of the time he will entertain my crazy ideas and is usually the one handling the bulk of the labor to bring them to life.  Begrudgingly at times, perhaps… but he gets the job done.  Every once in a while I try to contribute my own sweat equity and tackle a project without enlisting his help – to give the poor man a rest!  And so, with the goal of giving the grill a home and Craig a space to enjoy some solitude while he uses it, I set to work on a long forgotten corner of the yard.

Many of you know that we sold our American Foursquare home in the historic district of our city and moved out to ‘the farm’ in 2015. We are currently renting the homestead of Craig’s grandparents.  The lived here for well over 50 years before moving to an apartment when they were in their late 80’s.  Needless to say, in those last few years they lived at the farm, they did not have the energy to keep up the yard work and other home repair projects.  This little patch was no exception.  While it used to be the backdrop of nice landscaping, it had been overtaken by weeds. The landscape rocks? They were pretty well buried under the weeds and years of sediment.  Exhibit A: The Before

Ugh, well that was embarrassing to share!  See that broken window?  Yeah, not safe, especially when you have kids who like to roam around barefoot during the summer months!

The idea was simple.  Get rid of the weeds, free all of the landscape rocks from their dirt prison, and clean up the area. Before I go any further let me just say that if any of you reading this believe that sounds like fun, you might want to have your friends and family hold an intervention.  It wasn’t fun.at.all.  Part way through the project Craig looked at me and said something along the lines of ‘Why do you keep doing this to yourself?’ – I could only muster up a small sigh and a shrug of my shoulders. What could I say? I’m a glutton for punishment apparently.  As time went on and the rocks seemed to be multiplying, I came up with some creative ways to sort them faster.  There was the ‘rake sifter’ method, the ‘scoop and sort’, and my all time favorite (and fastest) the ‘rock and roll’ – where I essentially kept rolling the rocks down the sidewalk until the bits of dirt and debris fell off and only the rocks remained.  True insanity.  Every once in a while the kids would stop by to make sure their mom hadn’t completely lost her mind. They would pluck a few rocks into the buckets before boring of the tedious task and finding something fun to do.

Kids are fast learners.

So there you have it:  I sorted and moved around thousands and thousands of rocks.  Now I’m done, and Craig has a place to grill.  If that doesn’t prove my unending love for him, I’m pretty sure nothing will. Please be impressed with Exhibit B: The After