SATURDAY SKETCHBOOK: LOWER LEVEL

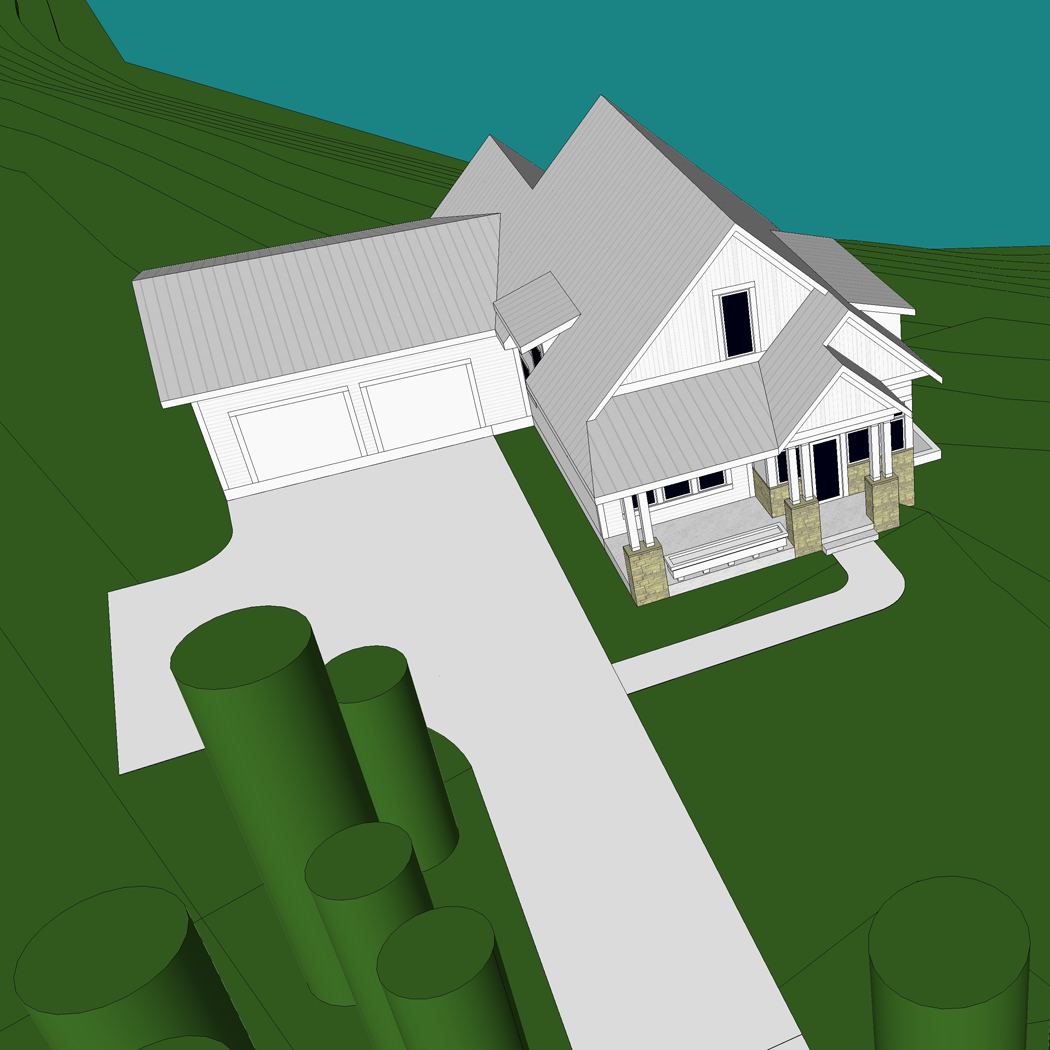
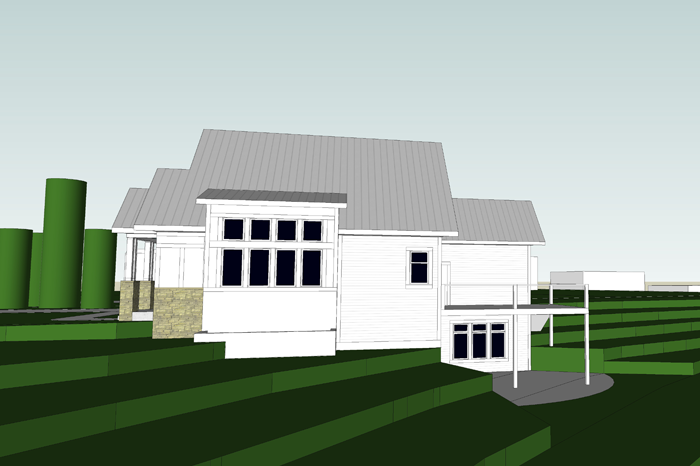
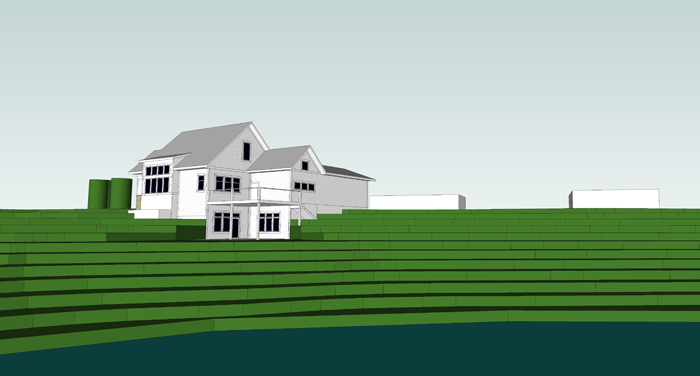
The lower level of the cottage is really starting to take shape! I think it is pretty close to what the final revision will be, and thought it might be a good time to share it with all of you.

I have to say that one of the things we have missed the most while living in our rental farmhouse is a finished basement. We used the basement in our last house as a place for the kids to be rowdy during the day, and a quiet retreat for the grownups at night. I wanted to design in those same functions for the new house – also keeping in mind that our kids will be teenagers in not too many years, and we would love it if they had friends over to our house to hang out.

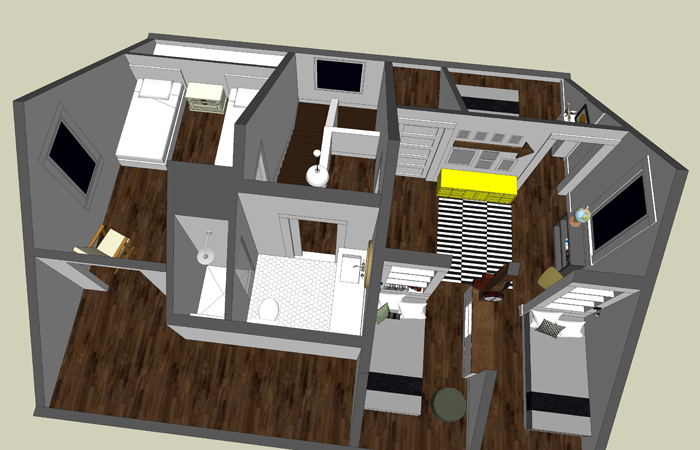
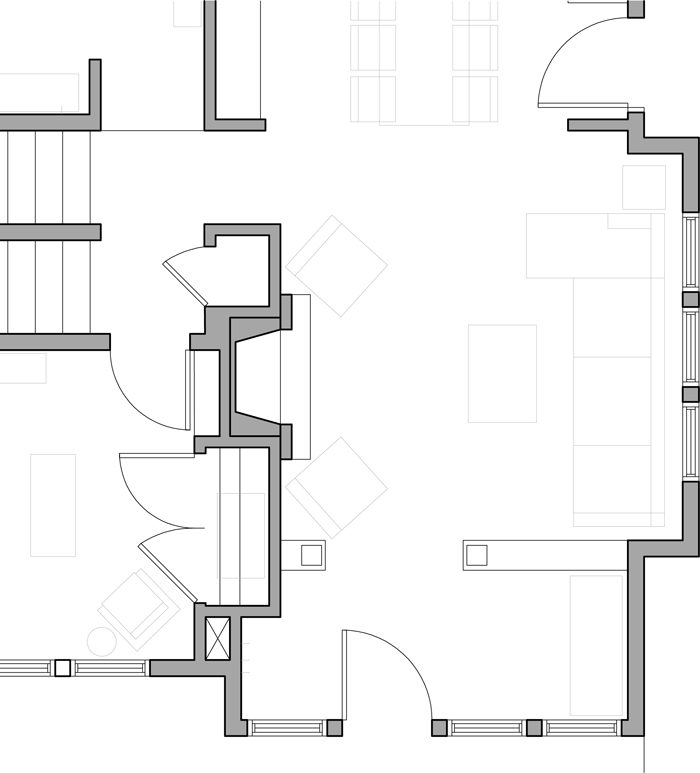
The layout of the lower level is quite simple, with one very exciting bonus space
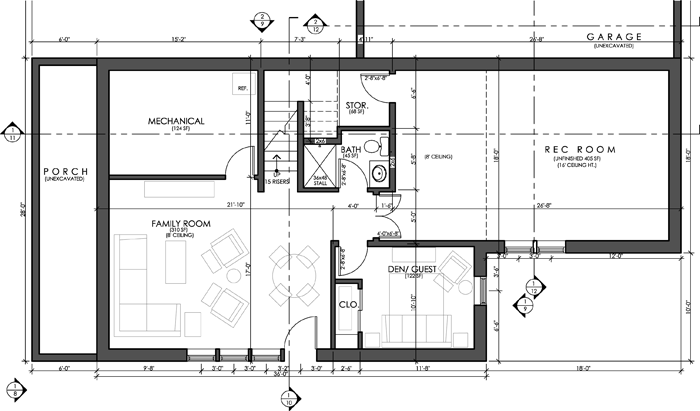
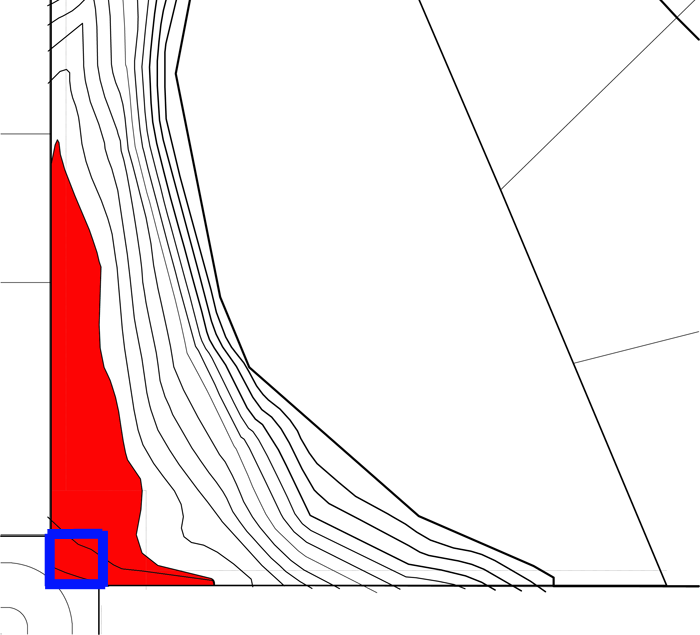
lower level plan

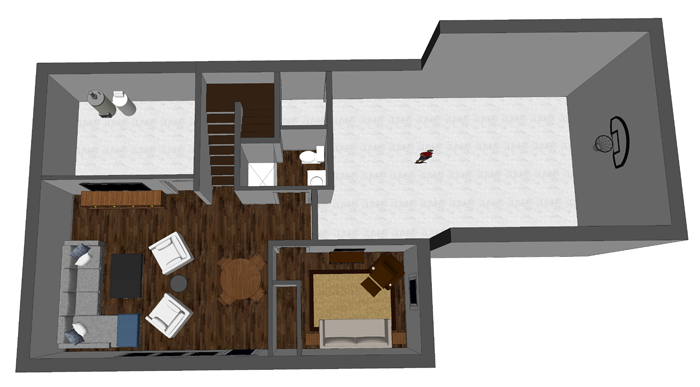
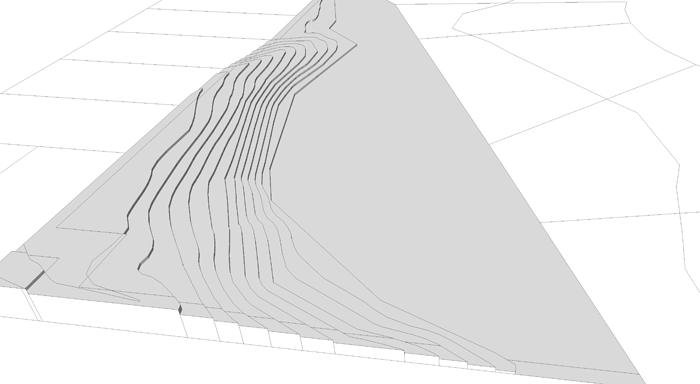
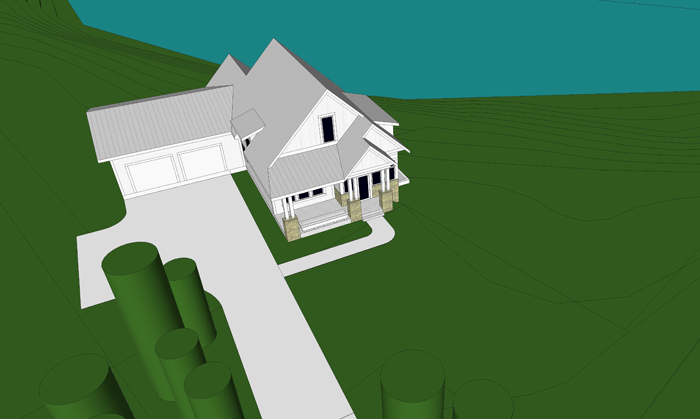
The lower level in 3D plan form


To the right of the stairs is a large mechanical room, which will probably have a little space within it for storage of items such as Christmas decorations.

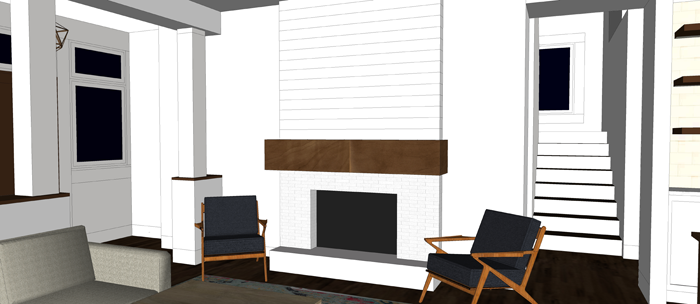
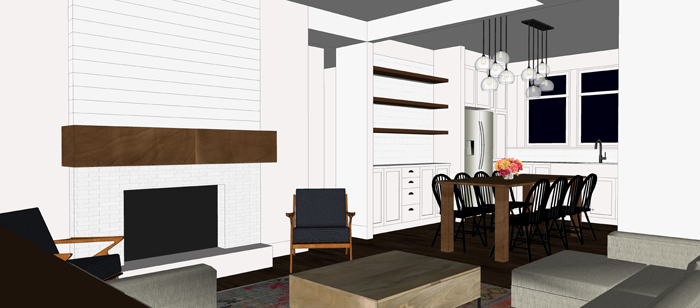
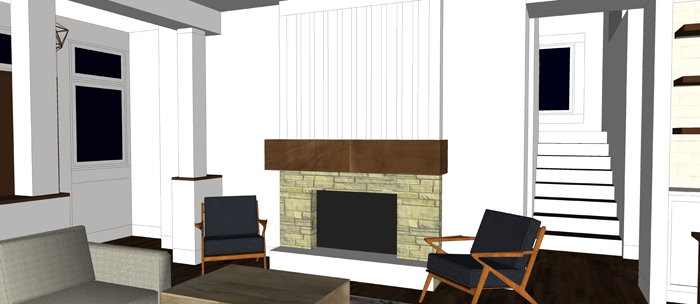
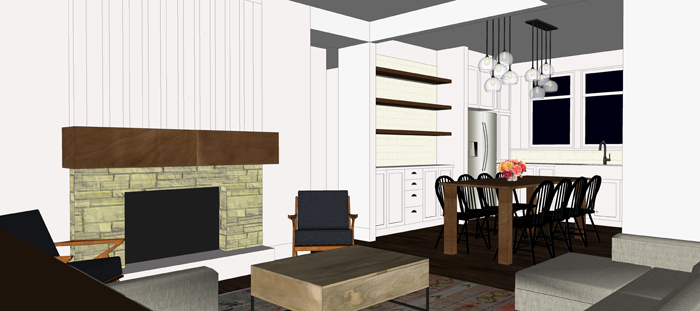
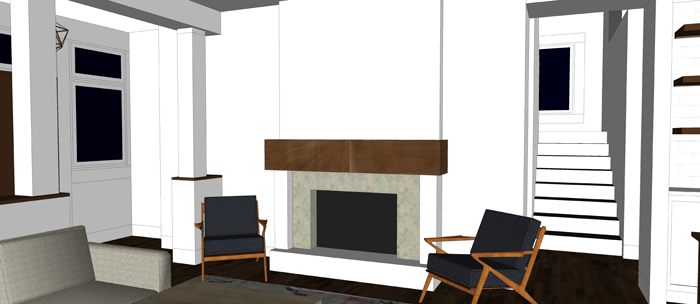
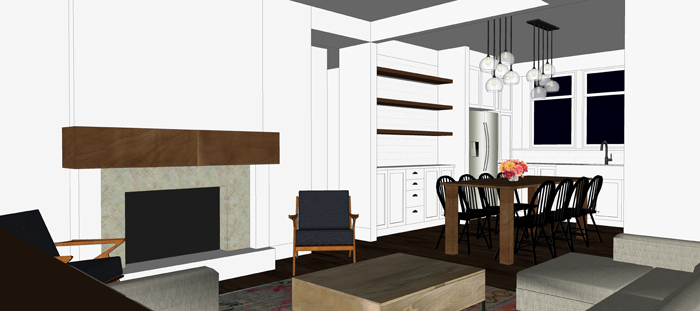
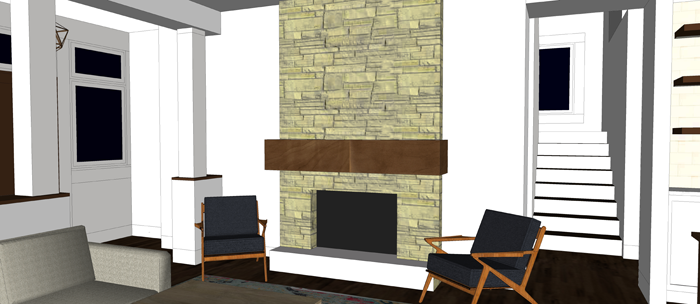
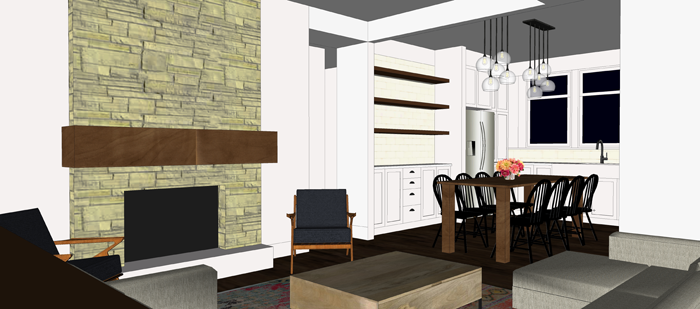
When you first step down the stairs you enter an open family room. I have always envisioned a large, comfy sectional sofa and a couple of overstuffed chairs. On the wall – a giant tv – one of the things that Craig and the boys are most excited for. I imagine this area will be used for family movie night, as well as Playstation tournaments with friends!


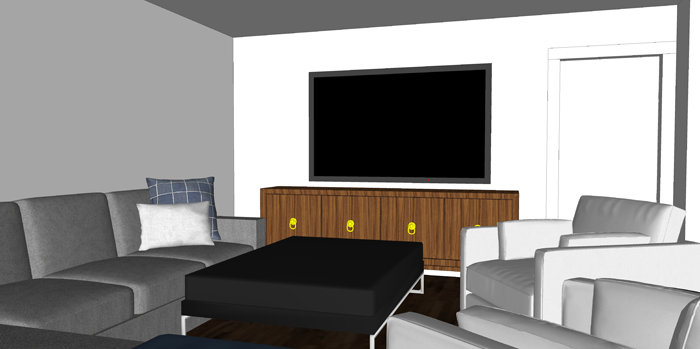
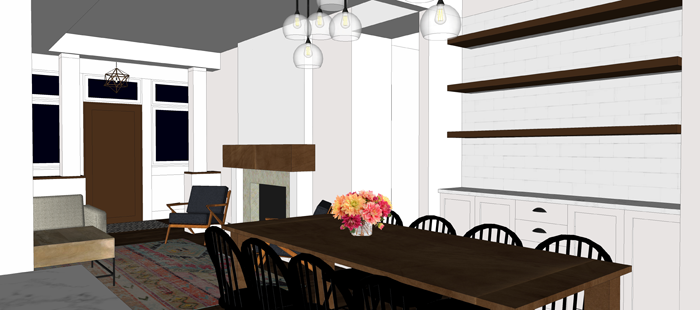
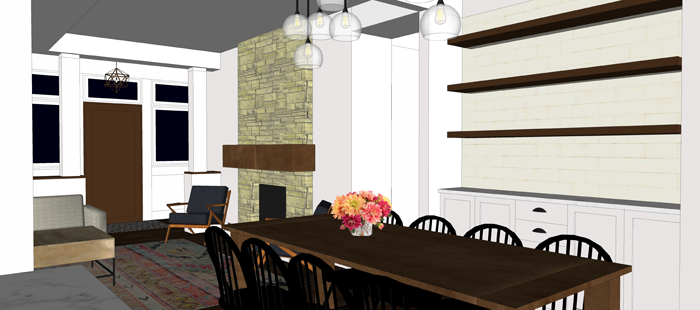
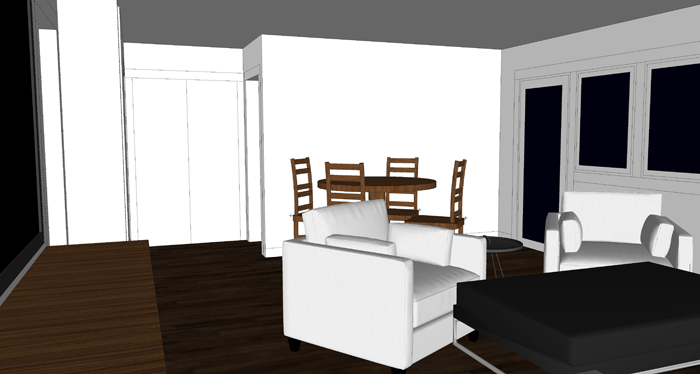
Off to the other side of the room is a small space for a table and chairs. This is the table we are currently using in our dining space – and is a hand me down from Craig’s grandparents. It’s an antique piece and will serve as the perfect spot to play games as a family, or set up snacks.


After much debate, we decided to add a walkout door from the family room. This door will provide access to a future outdoor patio / fire pit area. We love that the large windows in this room will let in a lot of natural light and the visual connection to the outdoors will ensure that the space won’t feel like a basement.


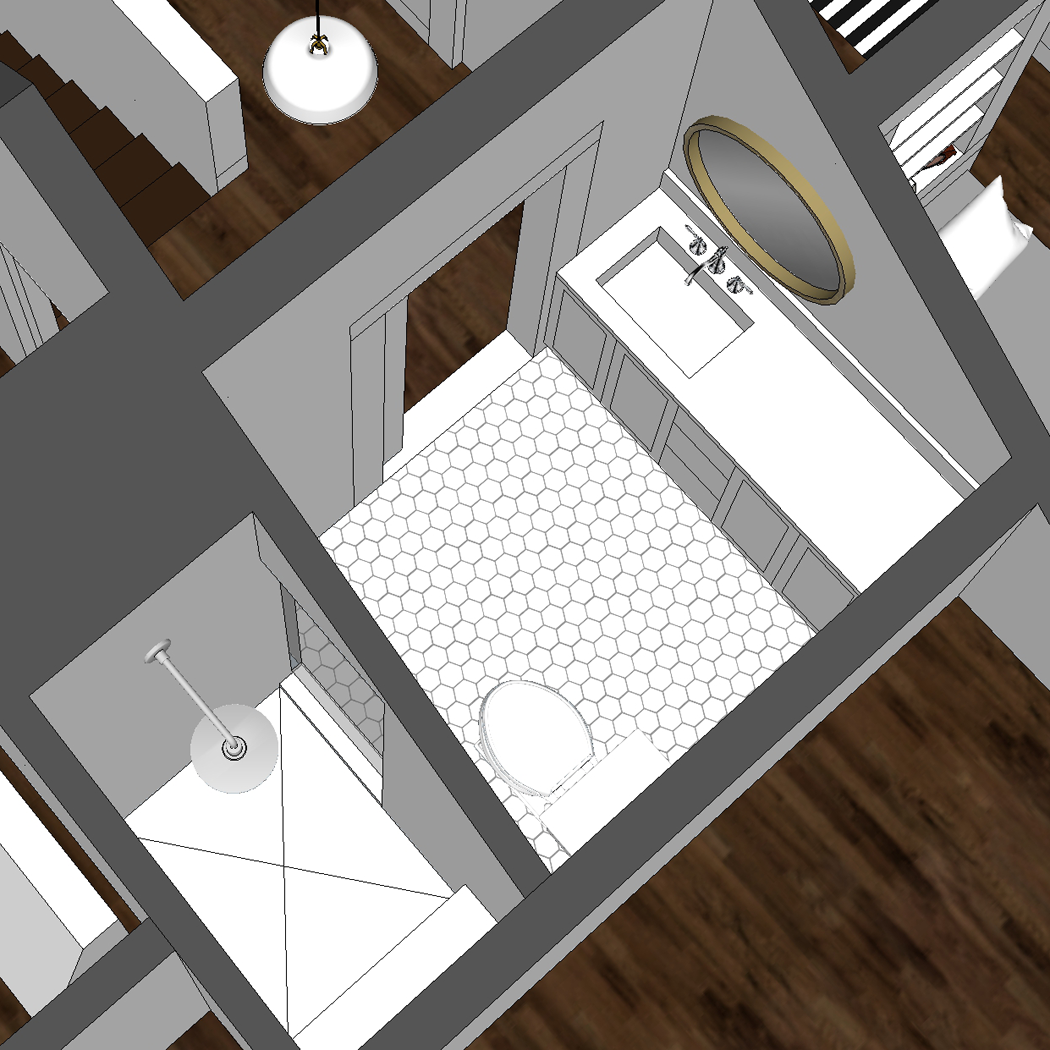
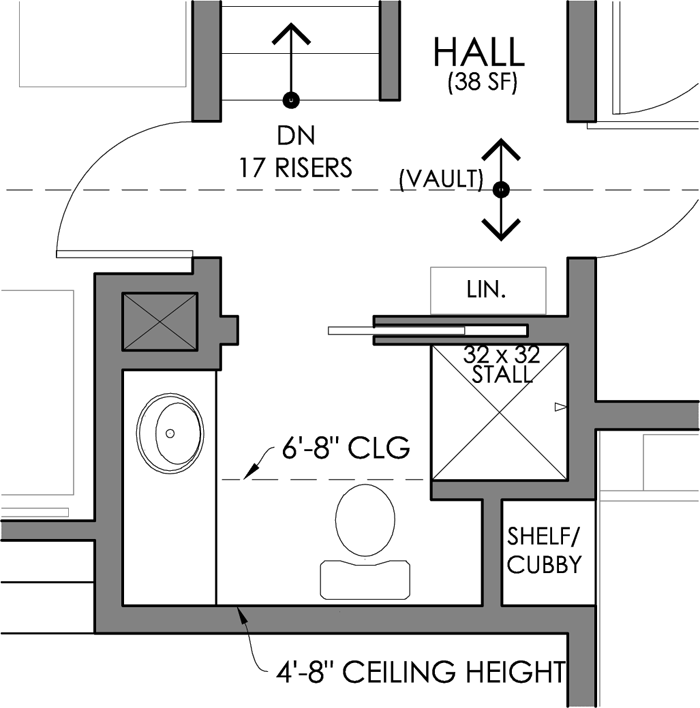
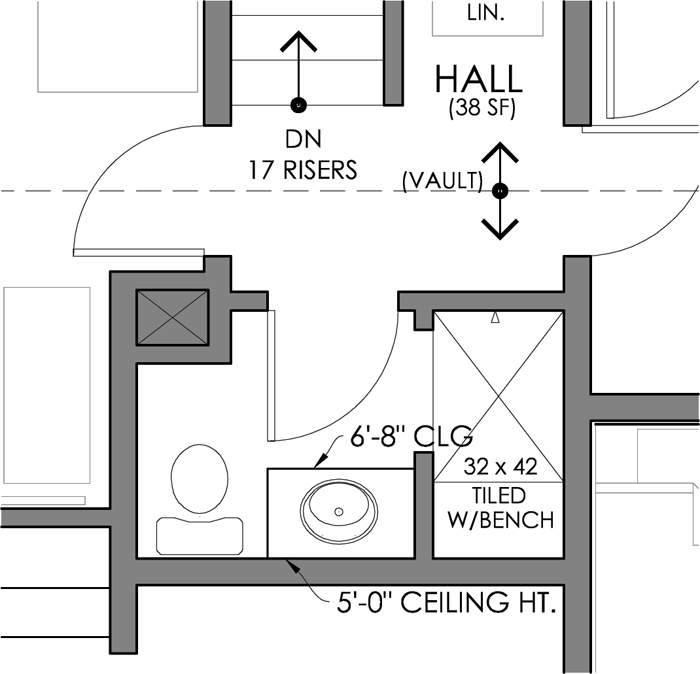
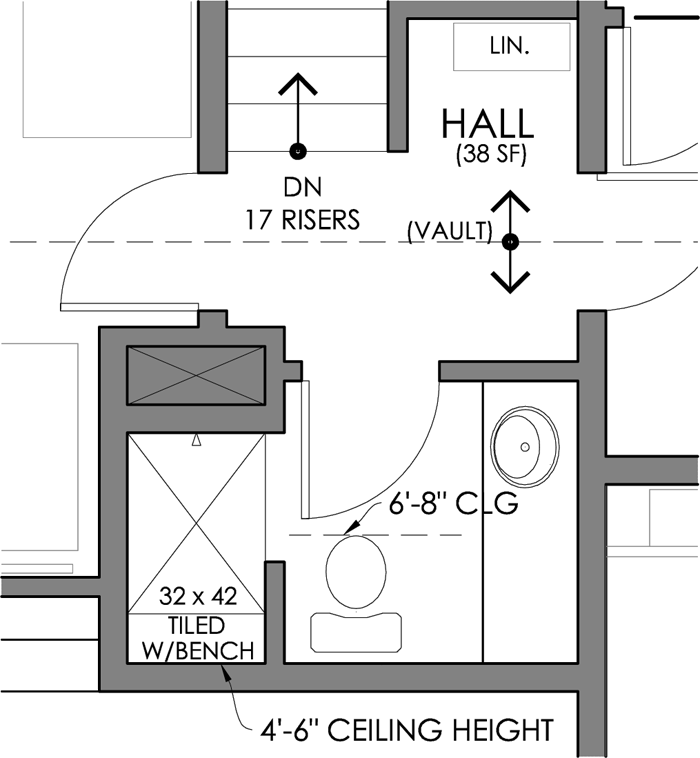
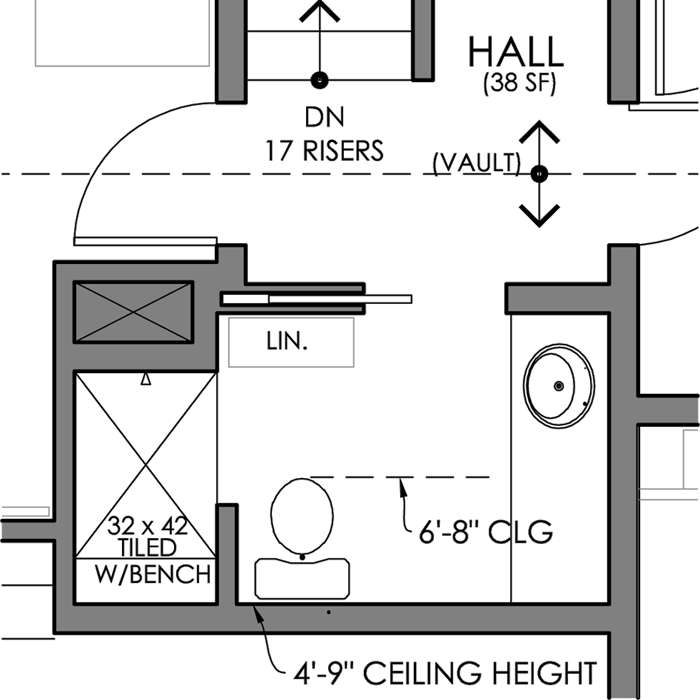
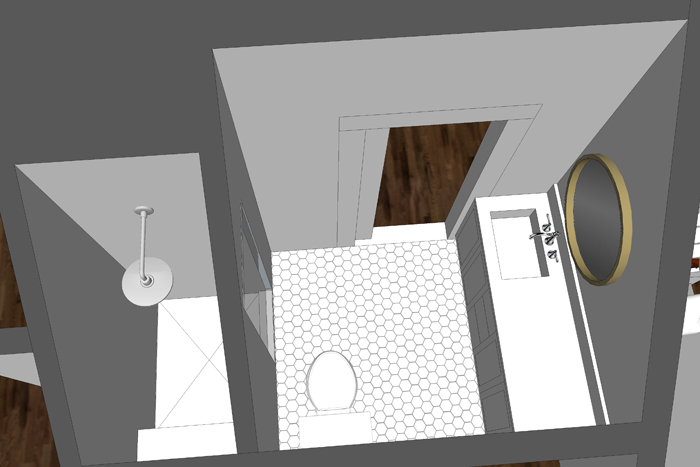
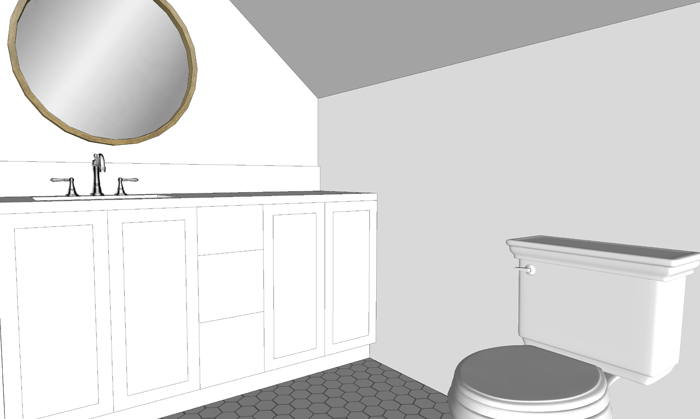
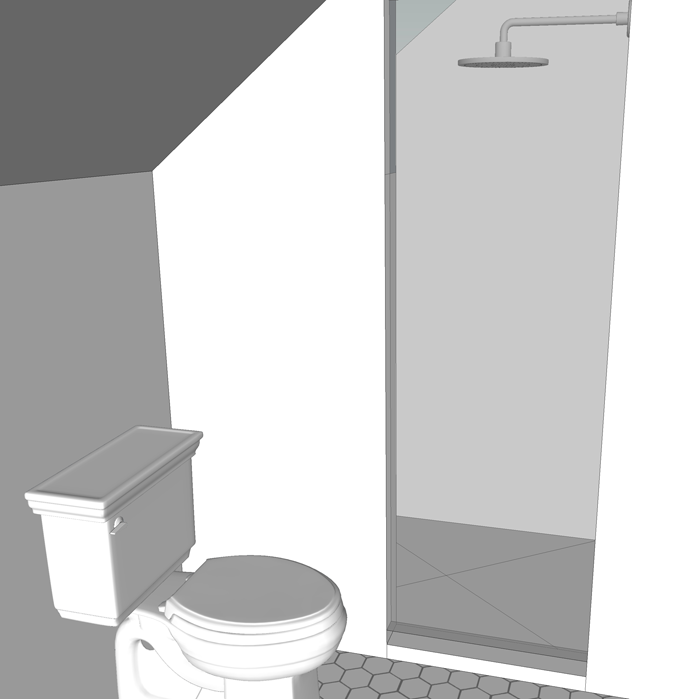
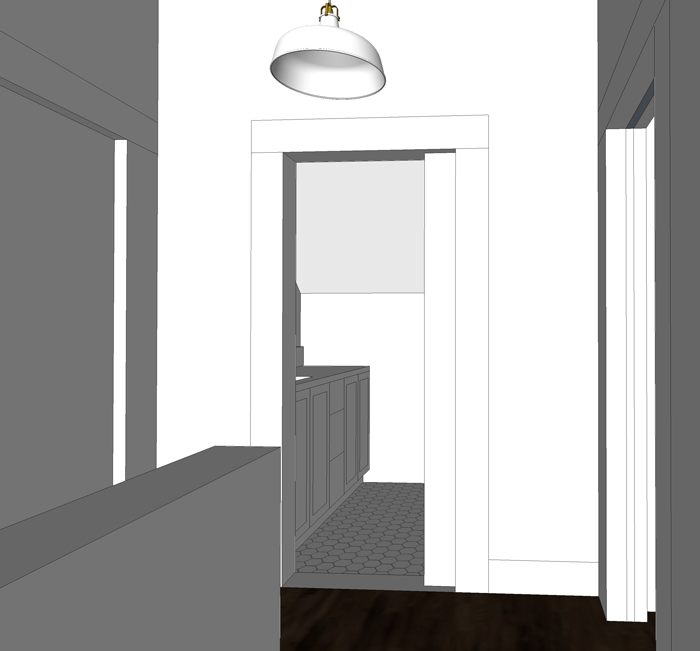
From the family room, there is a small hallway space that has access to a 3/4 bathroom on one side and the den on the other. Though the room will have both an egress window and closet, so that it can be considered another legal ‘bedroom’ for the house, the den is technically going to be Craig’s space – or ‘man land’ as he calls it. He has been dreaming of a little room of his own for years! In each of the places we have lived, I have had my own office or craft room/ creative space. It’s about time that he has a chance. I imagine he will spend many hours here working on computer projects and watching sports on tv, maybe reading a book in the recliner with a cup of coffee in hand.

The couch contains a pull out queen size bed that can be used for guests when they visit.


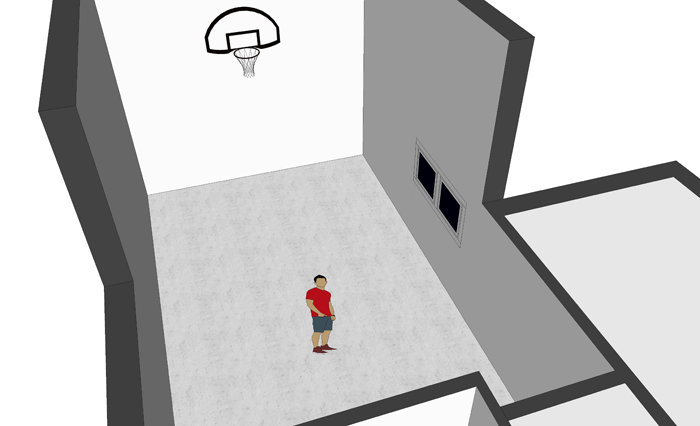
The final space in the lower level is quite possibly going to be the most used room in the entire house. The Rec Room. A 16′ x 25′ open space for large motor activities – running, jumping, kicking, etc – it will serve as a small indoor gym.  A portion of the ceiling will be 16′ high, so that we can set up a basketball hoop and shoot free throws.


This room was on the drawing board, then off, then back on again. Once we got word from our contractor that the extra space won’t be terribly expensive (because of how our site slopes and how deep the footings will need to go for other portions of the house), we figured we would not regret adding it. It will be unfinished at the beginning of the build, until we can afford to finish it the way we’d like.


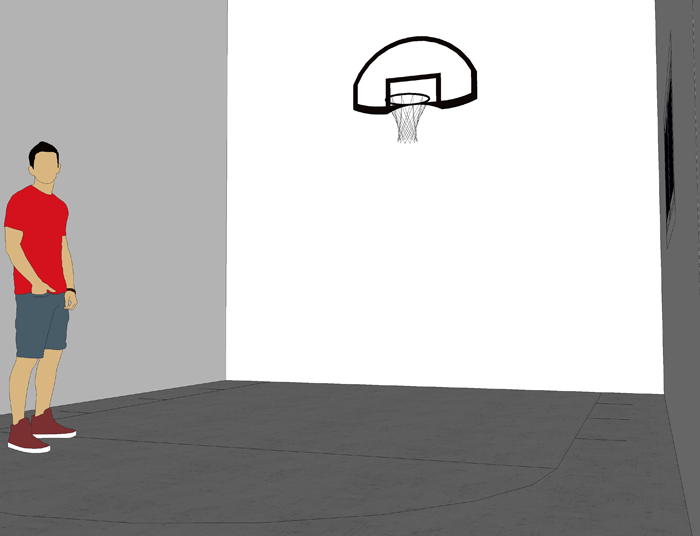
The room is large enough to shoot free throws in!

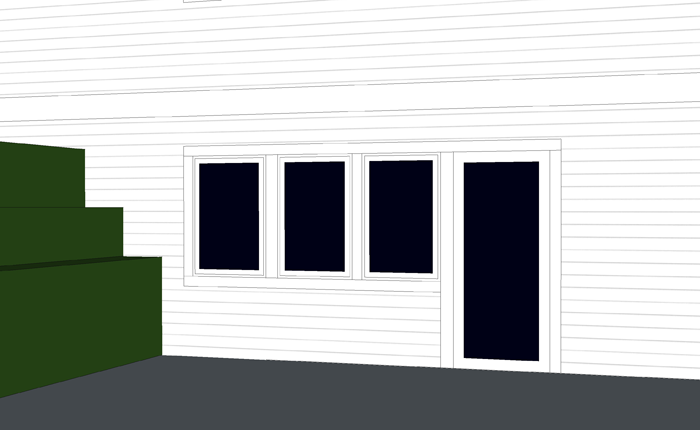
A pair of windows provide some natural lighting


If you ask the kids which room they are most excited for – I think they would collectively say that the Rec Room is the most anticipated. And, Craig and I might be right there with them on that sentiment! This indoor space will allow us to stay active even in the cold winter months, and will be especially handy now that we have discontinued our local gym membership. We have been talking about getting a treadmill, some free weights, a kicking net, pull up bar, and possibly incorporating a small rock climbing area. It will also, of course, be the perfect spot to play ping pong! All sport equipment will be stored in a large walk in closet located in the back of the room – keeping the rec room as open and uncluttered as possible.

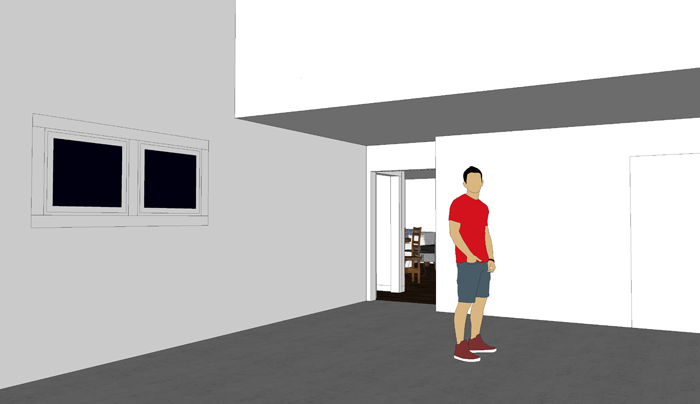
View from rec room into family room space. Closet door is to the right in this image.

Notice the ceiling height change from 8′ to 16′


As we approach the cold winter months here in the Midwest, we are bracing ourselves while at the same time thinking that we should be in our new house next year at this time. When the snow melts in the spring, we want to be ready to break ground as soon as possible! So exciting!

SATURDAY SKETCHBOOK: BATHROOM LAYOUT UPDATE

While it is still fresh in everyone’s minds, I wanted to take some time and say ‘thank you’ to you awesome people for all of the help you gave me last weekend.

When I wasn’t sure which layout was best for our future upstairs bathroom, I went ahead and made a post about it – offering three options, and asking you to choose your favorite. I thought maybe two or three of you might comment or offer suggestions. I was completely blown away by the amount of interaction that post received both here on the blog and on social media – especially through the AHC Facebook page!

I will need to go back and look at the stats to be positive, but i’m pretty sure that it was my most engaged post of all time. Kind of crazy, considering the subject matter! If you would like to review the options, you can read the post again RIGHT HERE.


The post went live right away in the morning, around 7am; And as the day progressed, I could see that there was a strong trend emerging. Barely anyone was choosing Option #1, with the smaller shower stall. Most people agreed that when given the chance to have a larger tiled shower, they would choose it over a fiberglass or plastic unit.

people were not loving the idea of a small shower stall! 

That little tidbit was interesting to us, as Craig and I have never lived in a house with a custom/tiled stall. We have always either had the smaller stall units or a bath/shower combo unit. I guess we don’t know what we’re missing!


That left option #2 and #3.

And, between the two, another common theme emerged. Many people agreed that seeing the toilet first thing as you walk up the steps would not be attractive. Seeing the vanity first, as Option #2 showcased, was the primary reason given by people who made that choice.

However, I have a feeling that not everyone who chose the second option fully realized that the ceiling behind the vanity was sloping, hindering the ability to install a full height mirror. This was Craig’s biggest worry, I believe. He felt that a vanity with a small mirror (or no mirror) in front of it would, essentially, be useless.

toilet is hidden, but the vanity is small and there is little to no space for a mirror


The final trend in comments that we saw was regarding the counter space itself. Many of you pointed out that the larger vanity in Option #3 far outweighed the negative aspect of seeing the toilet first thing when walking into the bathroom. As one person commented, “Everyone knows it’s in there!” I’ll admit, there is a lot of truth in that statement!

people didn’t like the toilet directly in front of the door (I didn’t either) – but some thought that the additional counter space made option #3 their top choice regardless. 


You know how sometimes when you stare at something for a really long time and it starts to get fuzzy and not make sense anymore? That is what I think was happening to me. But you guys… you helped me bust through! By the end of the day, the topic had received so much discussion, that new ideas started popping into my head.

And from all those comments about how you and your families use your bathrooms, questions about swinging vs pocket doors, and thoughts about what is most visually pleasing – a brand new OPTION #4 was born!


By ‘stealing’ a mere 8 inches from the girl’s bedroom, I was able to figure out a layout complete with BOTH the large tiled shower and the extra long counter space, a pocket door, and a toilet hidden from view. I figure there is even room for a small linen cabinet or hamper in the corner.

I brought it into 3D – just to verify that all of the fixtures will work out. And I do believe we have a winner!

Rainfall shower head? check! Extra large vanity? check! Pleasant view into the room? check!


I like the idea of a round mirror and a rectangular sink. Still debating about adding a second. As you can see, the headroom will be a bit more tight on that side of the counter. The back wall behind the toilet is 4′-9″. 


At your suggestion, I am also planning to allow for a glass shower door. 


This is the view a person walking up the stairs will see. I am loving that the door is essentially centered on the back wall. I am planning a pendant light fixture for the hall, to hang in the center. I think it looks pretty balanced! I envision colorful art pieces hanging on either side of the door – maybe a ‘kid gallery’? 


Just for fun… here is an aerial view of the second floor as it is right now. I’m just getting started on the girl’s bedroom design – so it isn’t detailed. Also trying to determine what height knee walls, if any, will need to be added. 


I will be working some more on the 3D imagery – adding color and texture – and will give the big reveal of the room right here on the blog when it’s finished.

Again, I want to thank you for hanging out and helping me with this! I have other tricky spaces that have been leading me to dead ends. Maybe if I post about them, you can help me another time or two (or twenty)? Have a wonderful weekend, friends!


SATURDAY SKETCHBOOK: FIREPLACE IDEAS


My husband and I have lived in 3 old houses over the course of our marriage – a 1905 farmhouse, a 1904 American Foursquare, and a 1920’s farmhouse. And although each of these houses have had their own share of character items, not a single one has had a fireplace.

We love the ambiance that a fireplace can add to the spaces it serves, and so for Arrow Hill Cottage we are working one into the design. For ease and safety reasons we are going to be utilizing a gas insert unit. I’m thinking something simple and not too large – maybe a model similar to this.

I have a feeling the firebox insert will be the easy decision to make. The more complicated endeavor will be determining what the fireplace surround should look like! Initially, I had designed in bookcases on either side of the fireplace; but ultimately decided that a larger bedroom closet, and a broom closet were more important for the function of the house; And so the fireplace itself will be positioned on a wall in our living room and serve as a stand-alone feature piece.

I have been tinkering around in Sketchup with a few different options of how to finish the surround, and thought it might be fun to share with you today and take a poll about which is everyone’s favorite. All four options include a chunky wood mantle, which we hope to have milled out of a tree that will need to be removed from our property for the construction of the house. I’ve intentionally left the top of the mantle bare, so that your eye can focus on the fireplace itself – but you’d better believe I will have a TON of fun changing out the decorations to dress it up!

I am sharing multiple images of each fireplace option, so that you can see how it relates to the spaces around it.


OPTION 1: WHITE BRICK + SIMPLE SHIPLAP


This is a really clean look, and pretty straightforward. It is also probably the most cost effective of all the options. If I have one concern about this option, it would be that it may be TOO white – and wouldn’t stand out enough as a focal point in a room that has all white walls and a white ceiling.


OPTION 2: STONE WITH BOARD AND BATTEN


The exterior of the cottage utilizes a bit of cultured stone on the porch column bases, as well as board and batten siding on the gable ends. I thought it might be nice to connect these element to the interior by using the same stone and paneling technique on the fireplace.


OPTION 3: CLASSIC WITH TILE


This is the fireplace finish that first comes to mind when I think about a historic home. It is clean, simple, and stately without much fuss. We have friends who had their tile laid in a herringbone pattern, which gave their fireplace a more contemporary feel and looks great! The portion above the mantle could be accented with a different color of paint, perhaps a bright pop of something dramatic.


OPTION 4: ALL STONE


This option has me a bit worried about the budget – as stone is not cheap! I do like the ‘cottage feel’ that it seems to give the space though! And it definitely draws your eye toward the fireplace as a focal point.


What do you think? Which fireplace option is your favorite? If you have any real-life personal experience about fireplaces – whether it is something not to do, or something you have done and love – please let us know by commenting to this post or on one of our social media locations!

Have a great Saturday everyone!


SATURDAY SKETCHBOOK: POSITIONING THE COTTAGE

The building site where a new home will be constructed is so, so important. Generally, it is recommended that you don’t even begin designing your house until a potential building site has been selected – so that the house can be developed to utilize the best features of the land, and avoid the pitfalls.


We purchased our building site in 2009. You can read more details about how we found and fell in love with our 4.5 acres in this post. Through the years, as I have been sketching ideas for the cottage, I have been careful to keep the lay of the land in mind – at least conceptually. I am now far enough in the design that I need to look more closely at how the cottage will actually be positioned.

This week I spent quite a bit of time fine tuning design details – the garage placement, the driveway configuration, and where the walkout door from the basement will be. Each of these decisions were heavily based on the site.


Our site is super unique, and has some interesting challenges. These are some of the site related issues that have been guiding our design:


SLOPED LAND

I’m sure that this particular parcel of land was passed over by multiple people solely because of its most dramatic natural feature – the slope. From the roadside there is a bit of flat land, but the slope down to the pond below is quite dramatic.


SETBACKS

The red area shown in the above graphic is the ‘flat’ land. The portion of land closest to the road (shown outlined in blue) is not build-able, because of setbacks and easements. Right from the start, we knew that we would likely have a longer driveway than most because of these setbacks alone.


MANY NEIGHBORS

Our land borders quite a few properties – both on the south and west property lines and, visually, across the pond. 14 parcels border ours. While this could be seen as a major drawback, I have been working strategically on the design so that our privacy within the home is maintained.


DENSE TREES

the kids standing by one of the many large trees that will need to be removed (2017)

One of the reasons we fell in love with our building site was that it was absolutely FILLED with mature trees: oak, maple, and other varieties. Sadly, there will be tree removal when the time comes to build. There is absolutely no avoiding that fact. By minimizing the overall footprint of the cottage, we hope to remove as few trees as possible.


EXPOSURE TO THE ELEMENTS

A view from our property, looking south. Our mini van is parked on the curved portion of the road.

An often overlooked, but important aspect of home design is the orientation it has in regard to the sun and wind. Because we live in a Northern climate, our strongest sunshine comes from the south. It is generally advised in this climate that you position your home with windows facing south (both for daylight, and for heating purposes in the winter). Thankfully, once a few trees are removed, we will have quite a bit of southern exposure.

It can get very cold in our state during the winter months – and the prevailing wind direction is from the northwest. I plan to rotate the cottage so that the garage can be used a bit for protection from those strong winds.


THE IDEAL POSITION FOR OUR COTTAGE

With all of these site issues in mind, I have narrowed down the placement of our cottage. I am working on finding the best angle of rotation and also determining how exactly the driveway will function – but we are getting close!


Just for fun, here are a few 3d images showing the cottage positioned on the land.

The cylinders are place holders for privacy trees (some of which are existing, and others that we hope to plant in the future. 


I worked a long time to find an appropriate position for the garage. I was sure that I wanted the garage doors to be set back from the front of the house/porch. For a while I had the garage rotated 90 degrees so that you accessed the doors from the side – but I eventually realized that this would not create ideal conditions for the driveway, making it both awkward and extremely long.  The garage is now accessed head on and set to the very back of the house so that it isn’t visually imposing.


The wall of windows on the southeast elevation will let in a ton of wonderful natural daylight. It is one of my favorite features so far, and never would have happened if we hadn’t talked to our contractor about current building prices – which prompted us to make a major change to the design.


You can see from this image how the cottage interacts with the slope. There will be a bit of excavating and retaining involved in creating the lower level walkout patio.


As the weather warms up, I hope to make a trip to the land again – and maybe stake out the corners or use spray paint to get an even more visual perspective on what we will see out of each window of the cottage.

Exciting times ahead!


THE FIVE PHASES OF NEW HOME DESIGN

In the course of designing your new home, you will walk through a variety of phases – each a bit different in nature. Though they tend to flow into each other slightly, there are five general categories of progression: analysis, preliminary design, development, documents, and construction review.

Understanding what to expect in each phase can be a helpful guide for your home design process. If you are considering designing your home solo – or working with an architect or designer – you can prepare early by knowing what is to come.


PROGRAM ANALYSIS

In this phase you will determine what your needs and wants are for your future home. You will be looking at potential building sites and thinking about the number of bedrooms, bathrooms and common spaces your home will have. You will also begin to think about your project budget. To help you answer these program analysis related questions, visit this blog post and complete a series of worksheets.


PRELIMINARY DESIGN

Through this phase you will be determining the desired spacial relationships within your home and also the connections that will be made from indoors to outdoors. The spaces will begin to resemble a floor plan in it’s very basic sense. Drawings will be created in the form of quick basic sketches.

You will also be thinking about the house styles that appeal to you most, and likely searching Pinterest for inspiration photos.


DESIGN DEVELOPMENT

Just as it’s name implies, this phase of home design refines the spaces and their relationships. You will begin thinking about your home in three dimensions – focusing not only on the floor plan but also how the home will feel on the inside and look from the outside.

Near the end of this phase, you will want to get a better idea of what it would cost to build your home project. By obtaining estimates at this point, you will still be in the position to make major changes to the design if needed for budgetary reasons.


CONSTRUCTION DOCUMENTS / BIDDING

This is the phase when things begin to feel very real. Your drawings will include measurements and notes for the construction crew. Specifics on window and door sizes and styles will need to be made, as will finish material selections. Legal and technical information will be gathered and compiled to form the final ‘blueprints’ of your home.

During this step, you will be obtaining solid construction bids and determine who you will be hiring to build your home.


CONSTRUCTION ADMINISTRATION/ REVIEW

Homeowners vary greatly on the amount of involvement they have in this final phase of the process. While some choose to be on site every day to monitor progress, others pass the responsibilities onto their contractors (or architects) completely. I would advise that it is best to have at least some involvement – to build a great relationship with your contractor and design staff. The truth is that no matter how detailed you are able to get on your construction documents, there will inevitably be questions that will arise during construction; And if you put forth all the effort to be involved in the design of your home, you will want to follow through completely and ensure it is built the way you envisioned.


These five phases should work together seamlessly so that your ideas about home function and comfort can be brought to life. Each phase can be demanding, but the hard work will pay off in dividends when you are enjoying your brand new custom designed home.