RESTORING OLD WOOD DOORS

I have to say, I’m pretty proud of myself.  Just two weeks after my big post regarding all the projects I want to accomplish, I was able to check one of them off of the list, and start two more!

There are projects on the list that range from minor to major, and I had a bit of a tough time deciding which to tackle first. Ultimately, I chose to work on the doors for the girl’s future bedroom closet – a project that I felt pretty confident I couldn’t mess up, and that wouldn’t take too long.

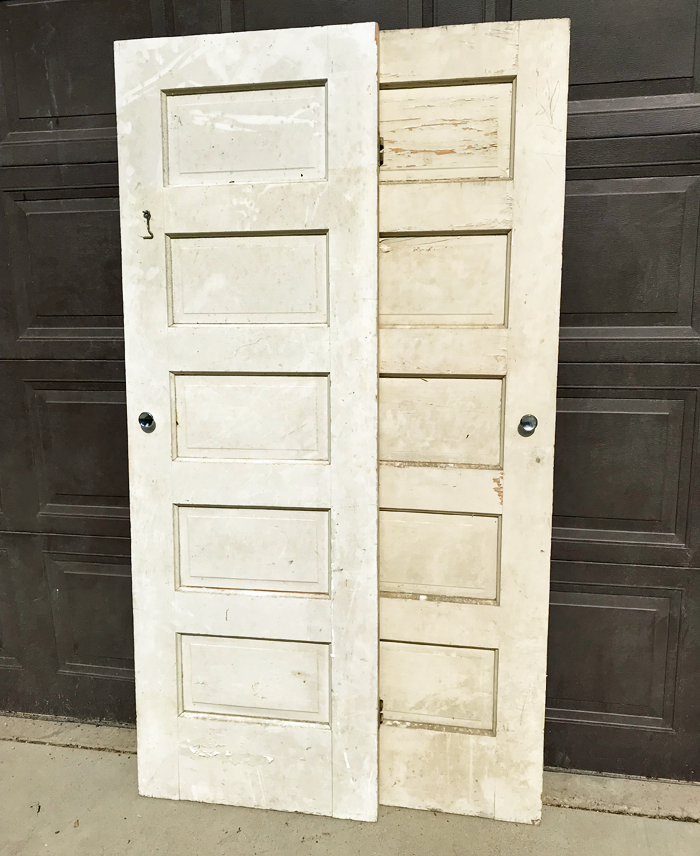
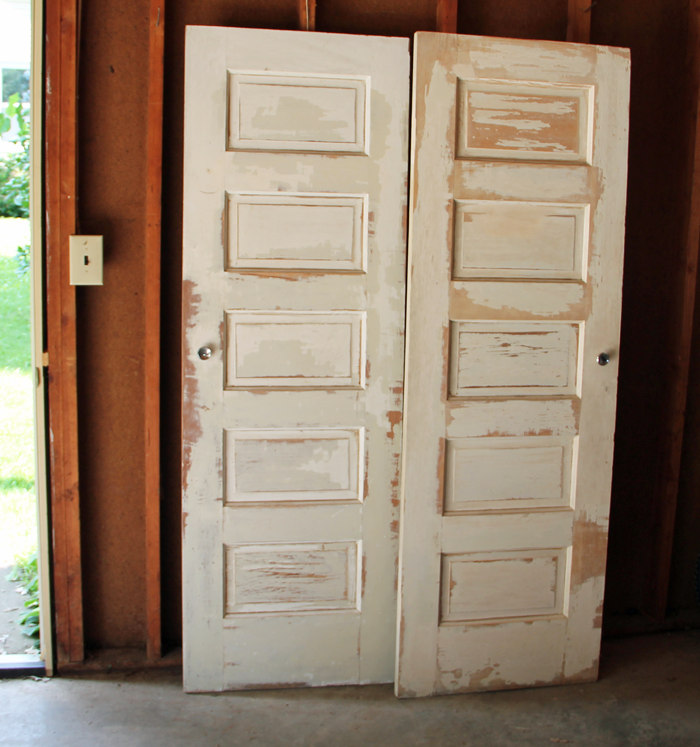
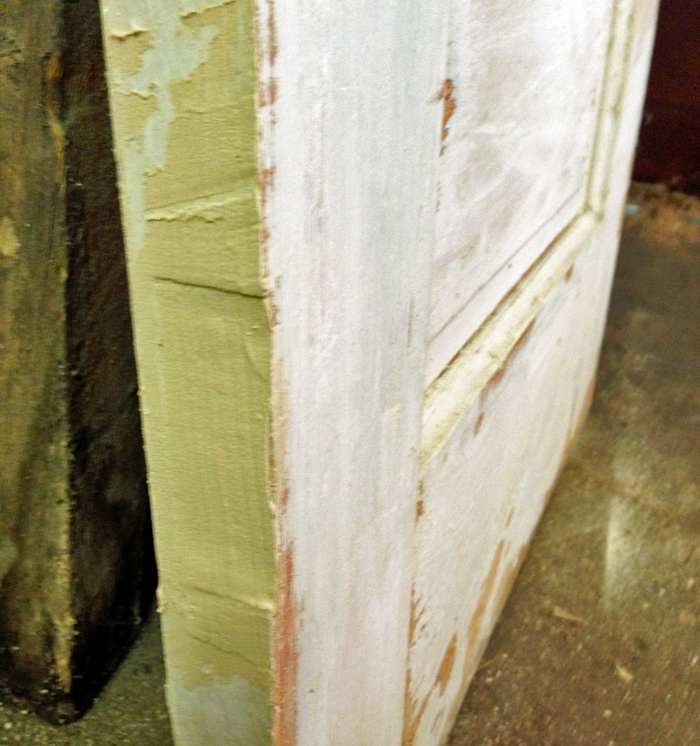
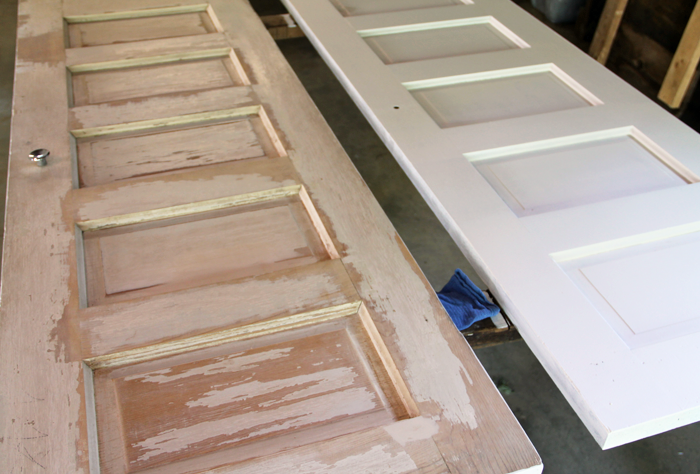
These old five panel doors were found in a barn over 15 years ago, and stored in various garages and sheds ever since. They were looking pretty rough, grungy and with mismatched paint – but for the most part were still solid.


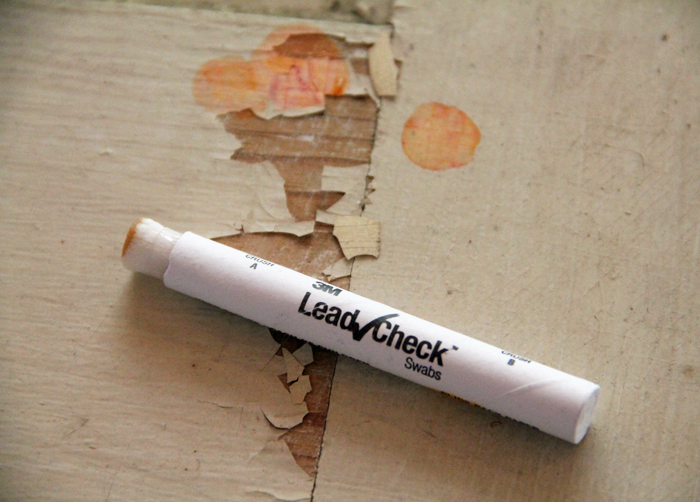
STEP 1: REMOVE PEELING PAINT

I had a hunch that the doors were covered with lead-based paint. To confirm, I purchased a 3M lead test kit from our home improvement center. Sure enough, the reddish color appeared, indicating that lead was present.


The presence of lead paint isn’t overly alarming. If the application is solid and it is left untouched, it can be harmless. However, lead poisoning can occur if flaking, peeling, or chipping paint is ingested, or through the inhalation of dust created during removal. Because of this, sanding with a power sander is not a safe removal technique.


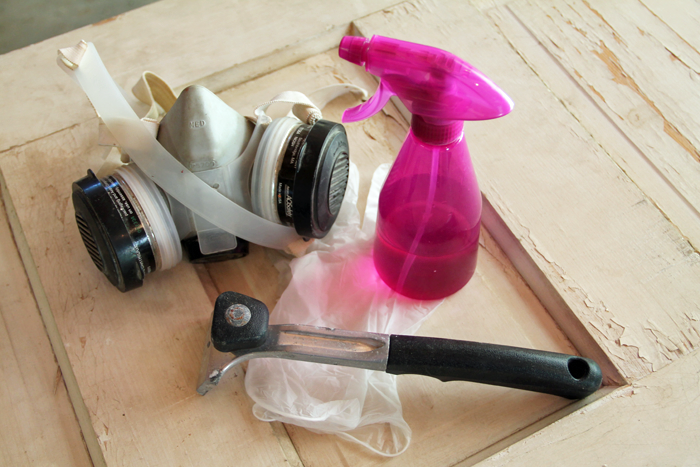
Instead, I found an article by Family Handyman – which outlines the steps needed to properly remove lead paint. I’ll admit that it did feel a bit cumbersome, especially wearing a face mask on a 90 degree + humid afternoon, but it wasn’t overly difficult.

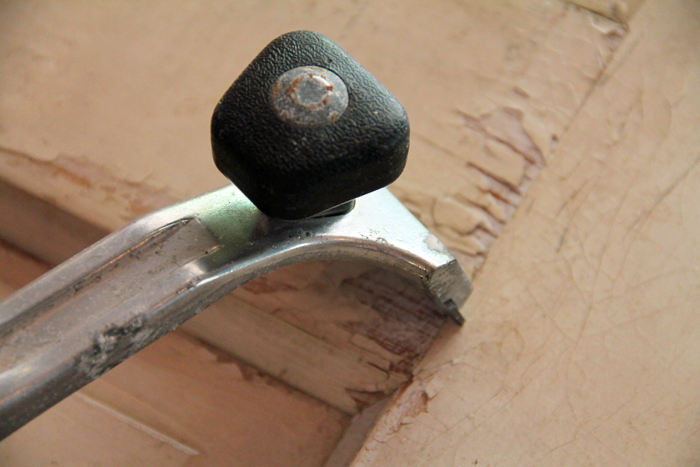
I started with wetting the surface down with water, and then used a scraping tool to remove the paint.


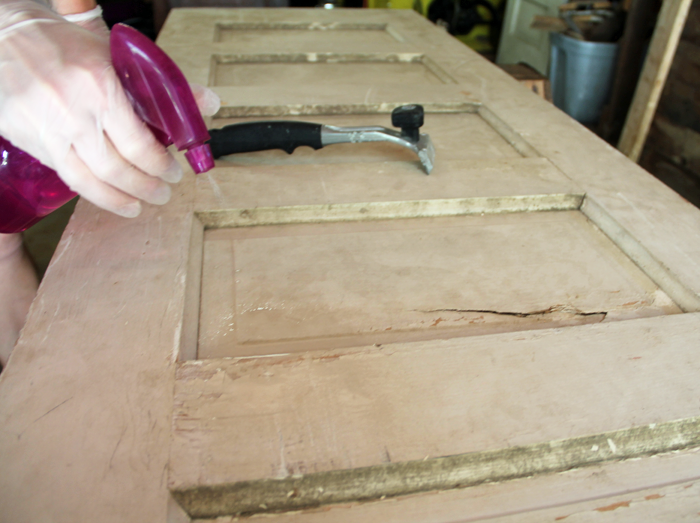
I made sure to wear my face mask and rubber gloves the entire time, and disposed of the paint chips properly. I then cleaned it all really well and let it dry. Because of the intensity of the job, I only removed the paint areas that were flaking or damaged. If I had been able to sand, I may have gone all the way down to bare wood for a completely fresh start.


STEP 2: FILL/REPAIR CRACKS

In some ways, because it was covered only partially in paint, the doors looked more rough after the first step was complete. There was a bit of repair that needed to be completed though, before the new paint could be applied.

A panel on one of the doors was broken. There wasn’t a hole, but more like a pushed-in crack. Craig and I tried to position the wood back into place, but it wasn’t possible – likely because the area had warped through the years. Instead, I attempted to fill the crack with a product called Plastic Wood.


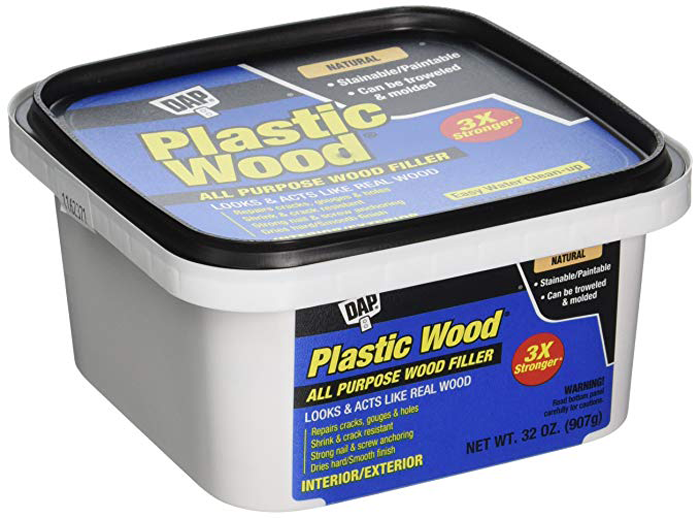
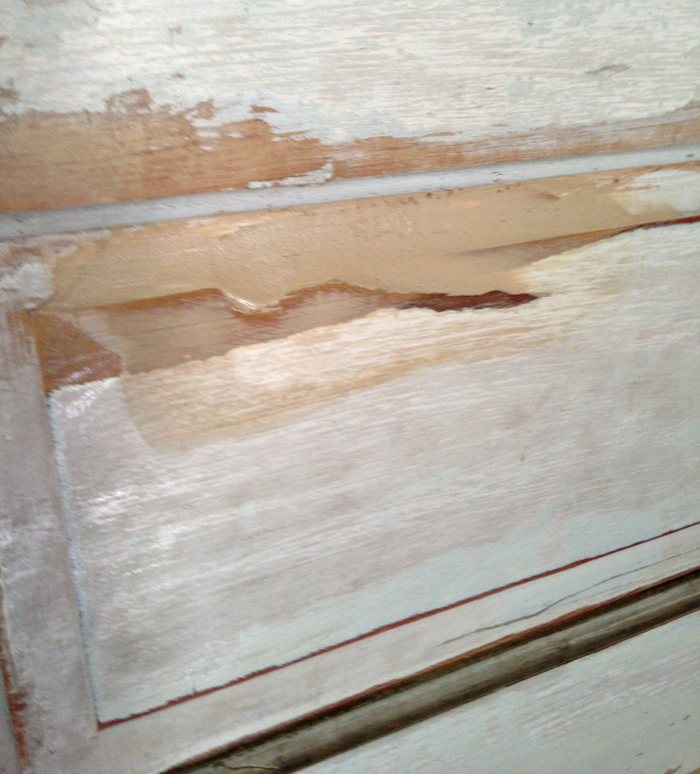
I applied the filler to the cracked panel, allowing it to dry and sanding between applications. I also filled in the areas on the side of the doors that were cut out for the hinges. The hinges were removed earlier in the prep process, because the doors will be hung with barn hardware.

The product did an amazing job of covering up the blemishes. I was super impressed! After another round of cleaning the doors, It was finally time to paint!


STEP 3: PAINT THE DOORS

It’s no secret that I love the clean look of white paint. If you have seen the 3-D renderings I have done for the cottage, you know that we will be using quite a bit of it in our home decor. I have known all along that I want to have white trim, cabinets, and doors. I’m not sure if you’ve researched white paint at all – but, there are about a million shades to choose from. It’s a tad overwhelming!


I caught a lucky break though, when I received the kitchen cabinet samples from Cliq Studios. Their ‘Cloud White’ finish is, to me, the perfect shade of white! Not too creamy or glaring, no grey or yellow tint. Just right. And since it is looking pretty positive that we will use their company for our cabinetry, I figured it would be nice to have doors that coordinated.

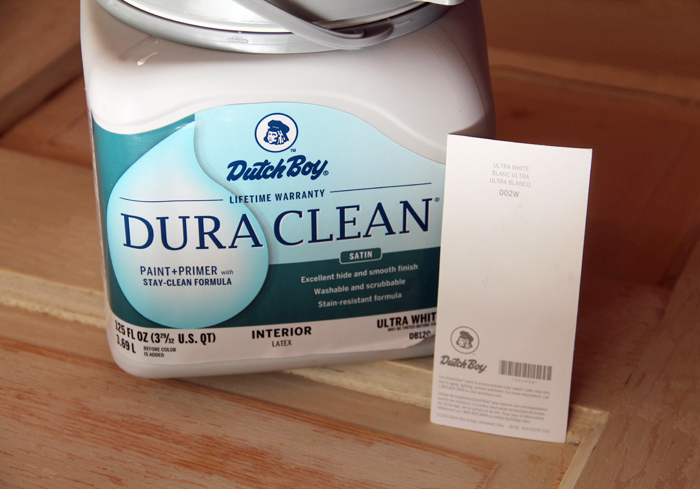
Turns out, Dutch Boy ‘Ultra White’ is a nearly identical match! I bought the DuraClean paint + primer in a satin finish. It went on really smooth!


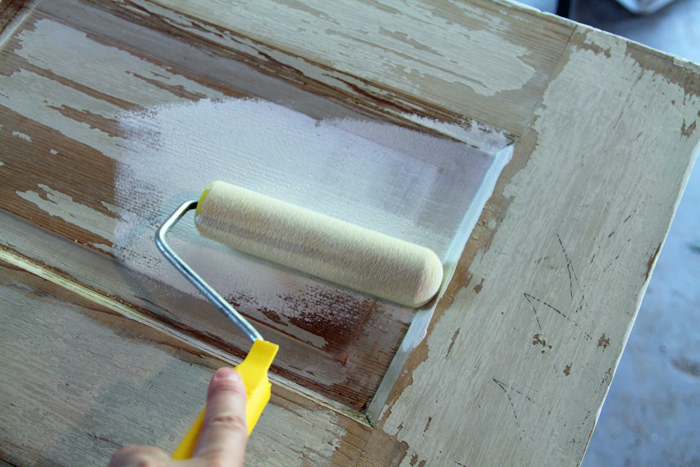
I chose to use a foam roller to apply the paint.  I like using small rollers because I can more easily get into the little corners, using the end of the roller. I also feels like I am able to cover more evenly with a roller. You can see from this side by side picture the difference that even one coat of paint makes. It’s pretty incredible.


After three coats on each side, the doors were officially finished! I am so happy with how they turned out! Once we move into the new house, we will have the doors installed on barn hardware and I will do any touch-ups that are required. I haven’t decided yet if we will keep the silver knobs or not. That’s something else that can wait a while.


As I mentioned at the beginning of this post, I have already started the next two projects from the list. One is sanding down all the wood boards that will go on the ceiling in the master bedroom, the other is sanding down one of the wood chairs in preparation for painting it black. So yes, a whole lot of sanding – which is something I actually love! Sanding gives me a lot of time to think and let my mind wander, to daydream about our future home.

If you’d like to follow along with these projects in real-time, I record short clips on Instagram stories and have them saved as ‘Projects’ under my profile. I hope you can check it out!


*This post contains affiliate links*

DIY – PAINTING A DOOR (AND FREE PRINTABLE ART!)

I’ve been wanting to tackle this project since we moved into the farmhouse nearly 3 years ago – but other things have always taken priority.  Tiny matters such as making sure people are fed and have clean clothes for school – BORING!

this weekend I was finally able to bring this idea to life!  As I have mentioned before, we are renting the farmhouse we live in.  However, we are renting from family members who have given us quite a bit of leeway to do whatever repairs or cosmetic fix ups we deem necessary, which is great because adding personal touches really helps make a house into a home.  The front door serves as a gateway from public to private space – and you can’t get more personal than that! We could have added a festive wreath to the door, and that may have done the personalizing trick – but with 5 little ones running around, the chances of a physical wreath surviving for longer than a few hours is basically zero. I turned my sights in a different direction.

If you remember from this Saturday Sketchbook installation – I played around with some design ideas through sketching.  I had initially thought of using a monogram, but didn’t want to have to paint the door again once we move and the house becomes available to other renters.  I then toyed around with the idea of painting ‘welcome’ on the door – but that just seemed too formal for the farm.  Eventually I landed on a simple springy wreath motif and the more informal ‘hello.’  The sketch was hand drawn until I cleaned it up via the magic of editing software.

This is our BEFORE

It should be noted that our front door is of the flat slab metal variety – very plain Jane and not very common.  In fact, we are basically positive that the detail you see near the bottom of the door was mirrored on the top portion.  At some point that must have been removed/ fallen off.  It just looked really unbalanced and awkward.

Keep in mind that most houses have raised panel doors, so depending on your panel design, this project may or may not work for you. Never fear though- you could find a square of plywood, follow the steps below, and make yourself a pretty piece of artwork for your entry!


These are the items you will need to tackle this project yourself:

* A door!  Or, a piece of wood that will fit your design

* Spray paint in your choice of color.  (at least 1 can per side) We chose this very pretty aqua from Rustoleum.  It has paint and primer in one, which gave great coverage for our metal door.

* Acrylic paint (matte finish) + a fine tipped paint brush

* Protective clear paint fixative (optional).  Just an added layer to protect the finished product.  I like Krylon Matte Finish – it dries quickly and doesn’t leave any residue.

* Wax free tracing paper

* A printer, paper, scissor, pencil & a bit of tape


Here’s what to do:

(Step 1) Remove the door from the hinges and bring outside to sturdy sawhorses (I employed the assistance of my strong and willing husband for this task)

(Step 2) Clean the door thoroughly with mild soap and water.  Allow to dry completely.  Note: if there are any loose or rough patches, scrape and sand them down before cleaning! Confession: Our door did have some damage that once scraped left some pitted spots.  If we were going to be living here long term we would have filled them in and sanded them smooth before completing the next steps, but we figured ‘eh!  good enough!’

(Step 3) Follow directions on the spray paint can and paint your door.  We chose to leave the inside color the existing brown and paint only the exterior portion + sides.

(Step 4) Allow paint to dry, depending on the instructions on the can.  This can be anywhere from 2 to 48 hours!

(Step 5) Add an additional coat of paint if needed.  While the door is drying, you can begin preparing the design.

(Step 6) I resized my design so that it was approximately 20 inches x 20 inches.  I then printed the image on multiple sheets of 8.5 x 11 paper and taped then together to form the entire image.  I could have brought the enlarged file to a print shop and asked them to print it on a single large sheet, but I’m too cheap for that!

(Step 7) Place the wax free tracing paper underneath your design sheet so that the colored side is facing the painted surface.  Working in small sections at a time, trace the design image with a pencil.  It will transfer the design onto the painted surface – so handy!

(Step 8) Using a fine tipped paintbrush, trace over the design with the white paint.  I love the contrast of crisp white on a bold, fun color.

Here I am painting the design on the door – Funny how the time-lapse makes it look like I got this accomplished in under a minute! (Truth: it actually took about 45!)

(Step 9) Allow the white paint to dry, then touch up as needed.  I had a couple of parts that needed a second coat.  Allow all paint to dry completely.

(Step 10: optional) ***If you are painting on a wood surface, now would be the perfect time to take a little fine sandpaper and sand down the brush stroke lines of the white paint.  This isn’t quite so easy over a spray painted metal surface as it tends to leave scratch marks.***

(Step 11) Spray the clear coat fixative over the design.  Allow to dry

(Step 12) Re-install the door, stand back and admire!


I am so pleased with how the finished product turned out that I want to share the love with a free 8×10 printable in 3 different colorways (white, black, and aqua).  Simply click on your color of choice below, print, trim, and pop in a frame.  Enjoy friends!