SATURDAY SKETCHBOOK: BATHROOM LAYOUT UPDATE

While it is still fresh in everyone’s minds, I wanted to take some time and say ‘thank you’ to you awesome people for all of the help you gave me last weekend.

When I wasn’t sure which layout was best for our future upstairs bathroom, I went ahead and made a post about it – offering three options, and asking you to choose your favorite. I thought maybe two or three of you might comment or offer suggestions. I was completely blown away by the amount of interaction that post received both here on the blog and on social media – especially through the AHC Facebook page!

I will need to go back and look at the stats to be positive, but i’m pretty sure that it was my most engaged post of all time. Kind of crazy, considering the subject matter! If you would like to review the options, you can read the post again RIGHT HERE.


The post went live right away in the morning, around 7am; And as the day progressed, I could see that there was a strong trend emerging. Barely anyone was choosing Option #1, with the smaller shower stall. Most people agreed that when given the chance to have a larger tiled shower, they would choose it over a fiberglass or plastic unit.

people were not loving the idea of a small shower stall! 

That little tidbit was interesting to us, as Craig and I have never lived in a house with a custom/tiled stall. We have always either had the smaller stall units or a bath/shower combo unit. I guess we don’t know what we’re missing!


That left option #2 and #3.

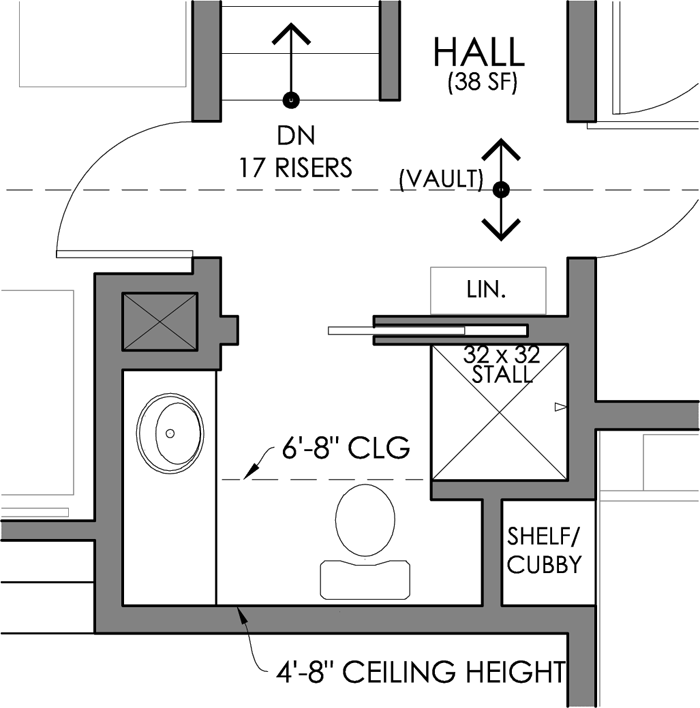
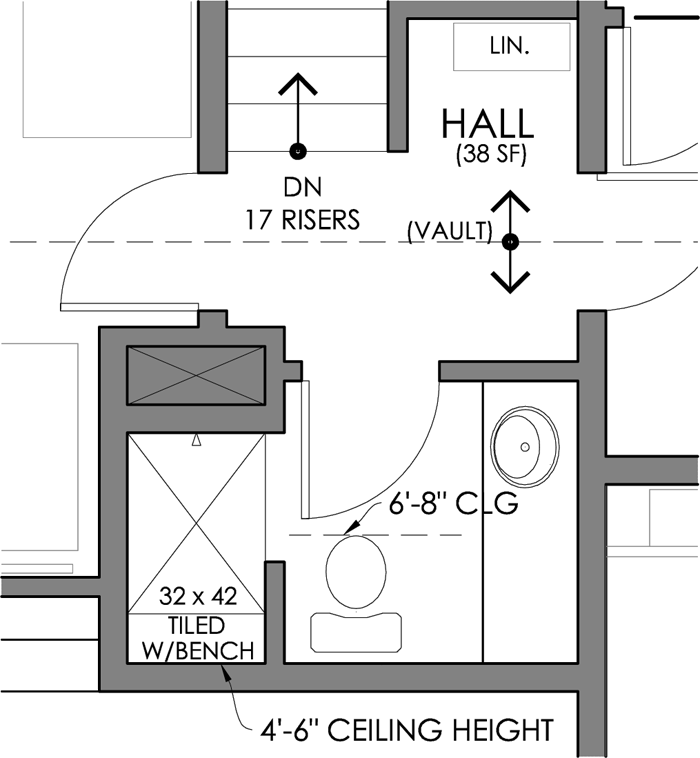
And, between the two, another common theme emerged. Many people agreed that seeing the toilet first thing as you walk up the steps would not be attractive. Seeing the vanity first, as Option #2 showcased, was the primary reason given by people who made that choice.

However, I have a feeling that not everyone who chose the second option fully realized that the ceiling behind the vanity was sloping, hindering the ability to install a full height mirror. This was Craig’s biggest worry, I believe. He felt that a vanity with a small mirror (or no mirror) in front of it would, essentially, be useless.

toilet is hidden, but the vanity is small and there is little to no space for a mirror


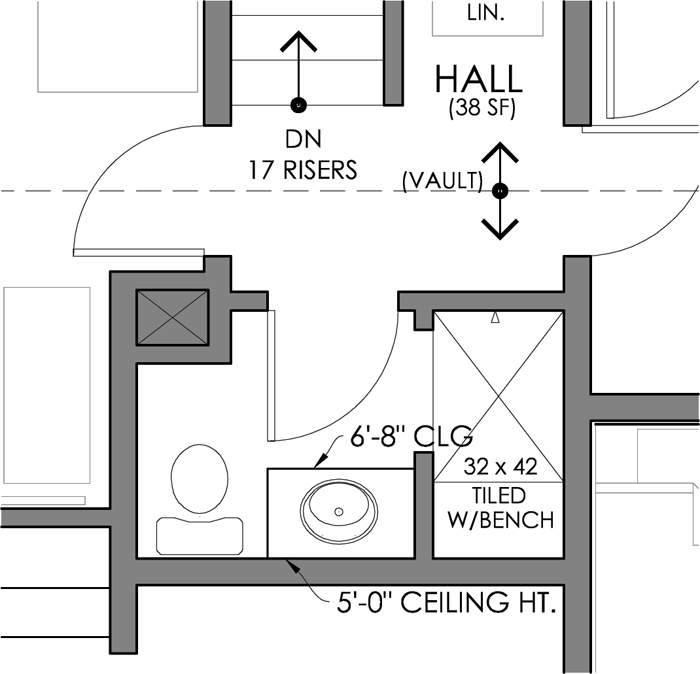
The final trend in comments that we saw was regarding the counter space itself. Many of you pointed out that the larger vanity in Option #3 far outweighed the negative aspect of seeing the toilet first thing when walking into the bathroom. As one person commented, “Everyone knows it’s in there!” I’ll admit, there is a lot of truth in that statement!

people didn’t like the toilet directly in front of the door (I didn’t either) – but some thought that the additional counter space made option #3 their top choice regardless. 


You know how sometimes when you stare at something for a really long time and it starts to get fuzzy and not make sense anymore? That is what I think was happening to me. But you guys… you helped me bust through! By the end of the day, the topic had received so much discussion, that new ideas started popping into my head.

And from all those comments about how you and your families use your bathrooms, questions about swinging vs pocket doors, and thoughts about what is most visually pleasing – a brand new OPTION #4 was born!


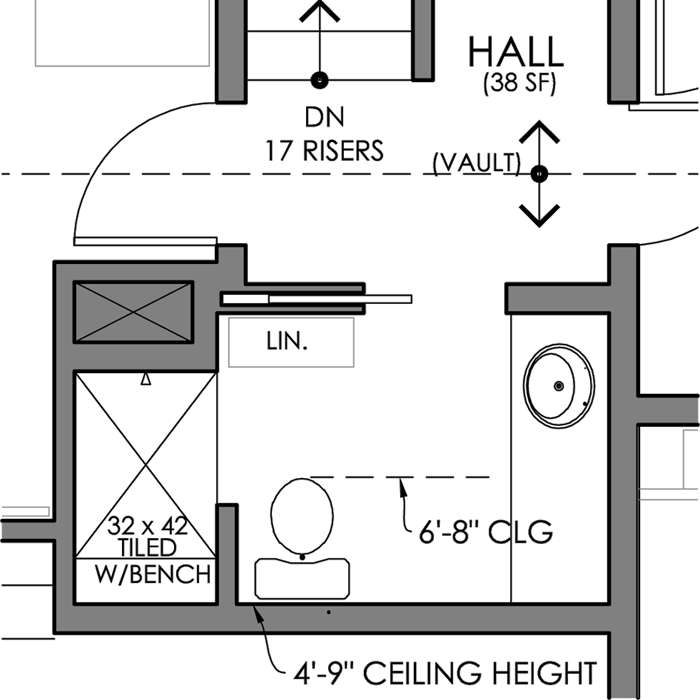
By ‘stealing’ a mere 8 inches from the girl’s bedroom, I was able to figure out a layout complete with BOTH the large tiled shower and the extra long counter space, a pocket door, and a toilet hidden from view. I figure there is even room for a small linen cabinet or hamper in the corner.

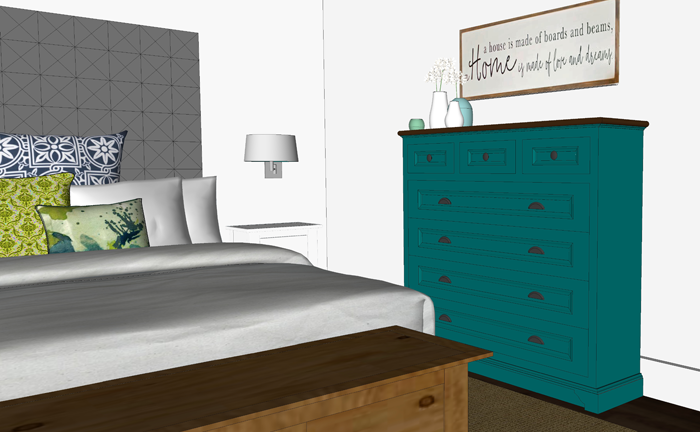
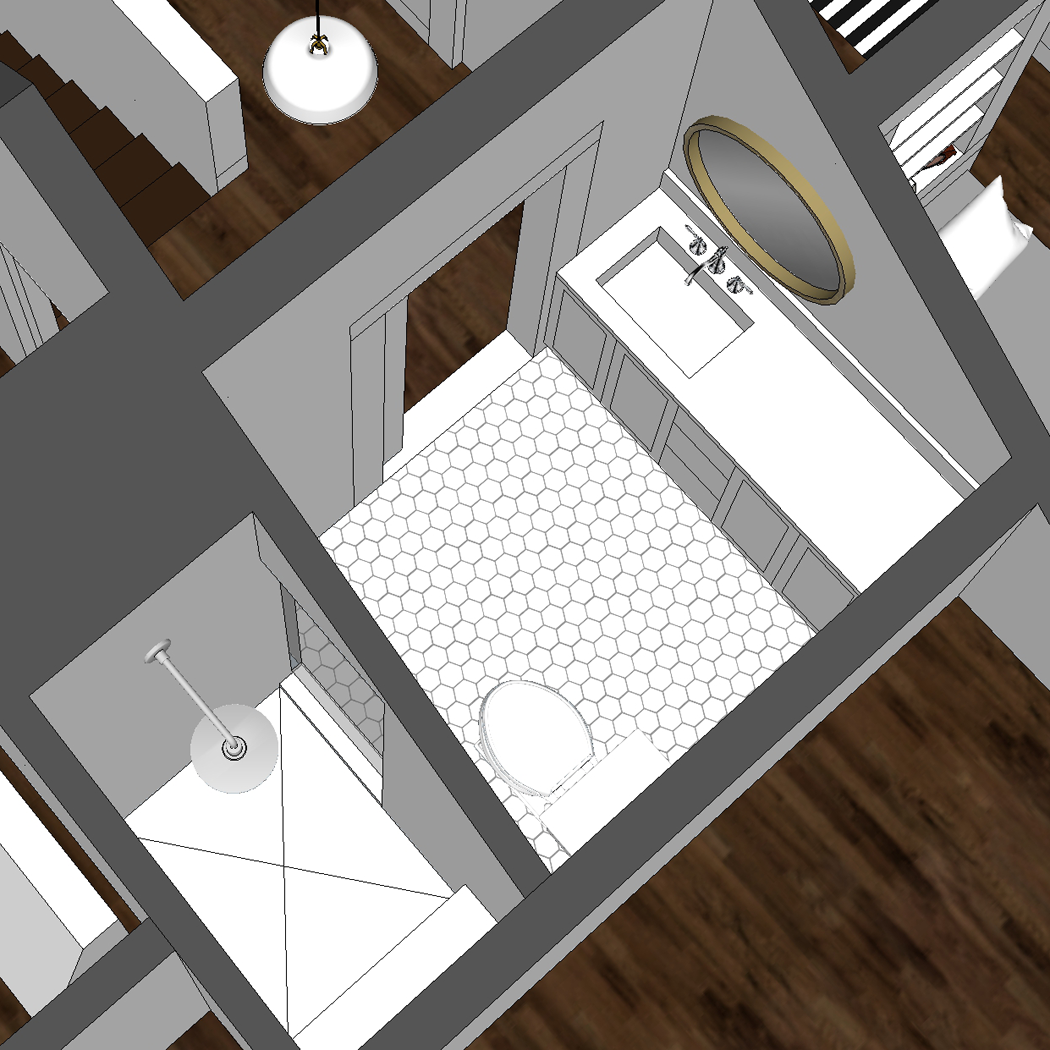
I brought it into 3D – just to verify that all of the fixtures will work out. And I do believe we have a winner!

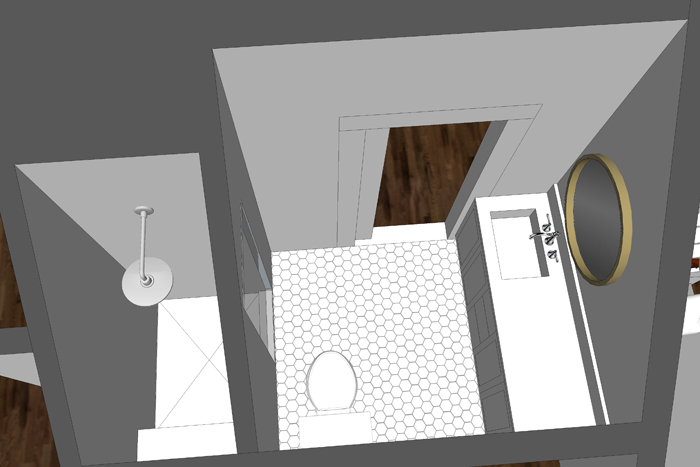
Rainfall shower head? check! Extra large vanity? check! Pleasant view into the room? check!


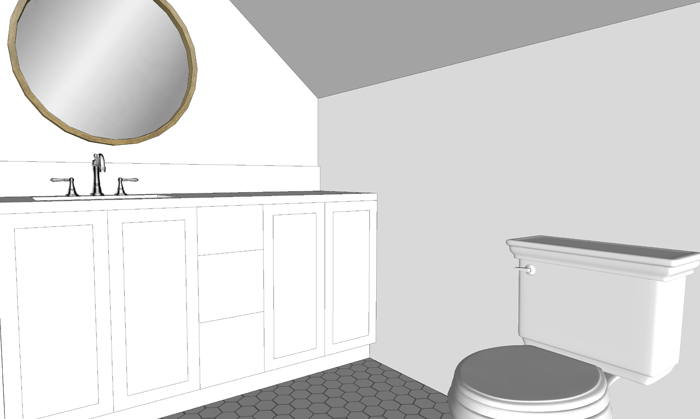
I like the idea of a round mirror and a rectangular sink. Still debating about adding a second. As you can see, the headroom will be a bit more tight on that side of the counter. The back wall behind the toilet is 4′-9″. 


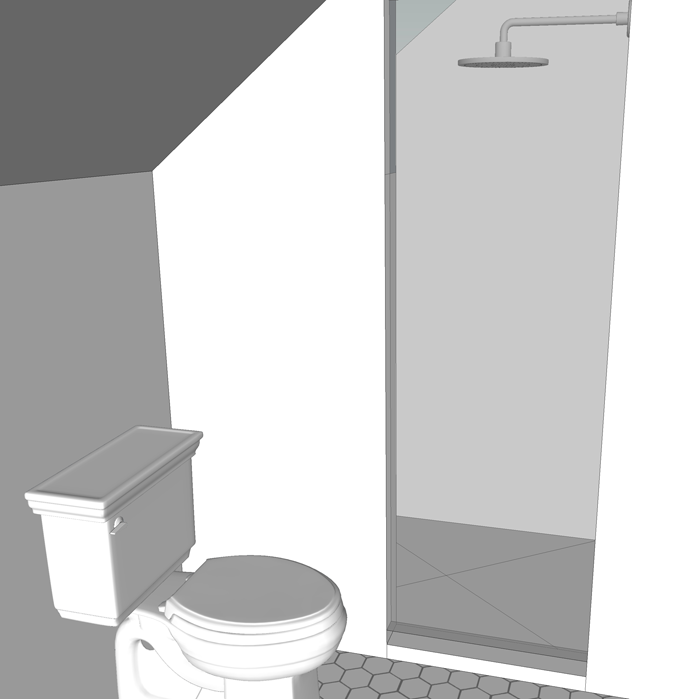
At your suggestion, I am also planning to allow for a glass shower door. 


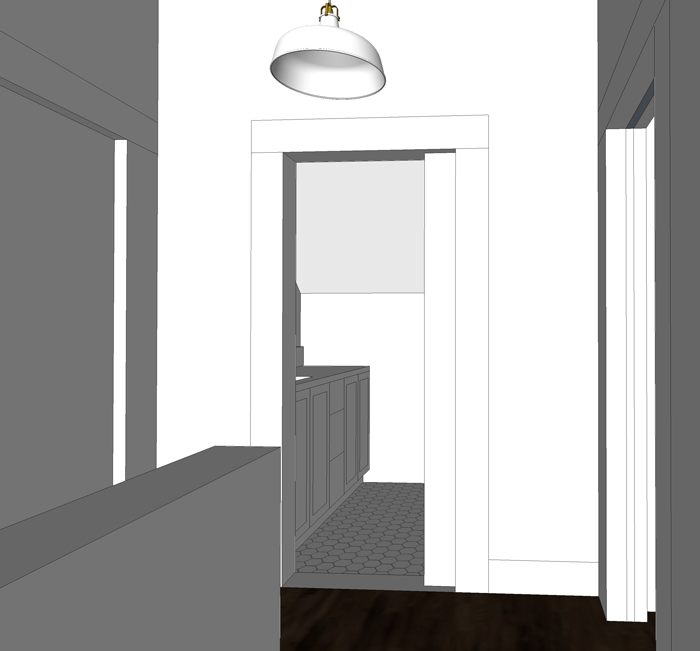
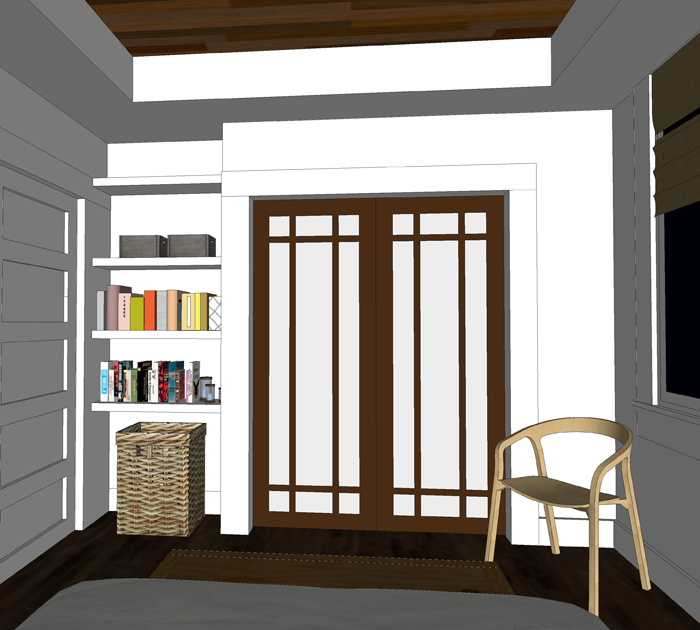
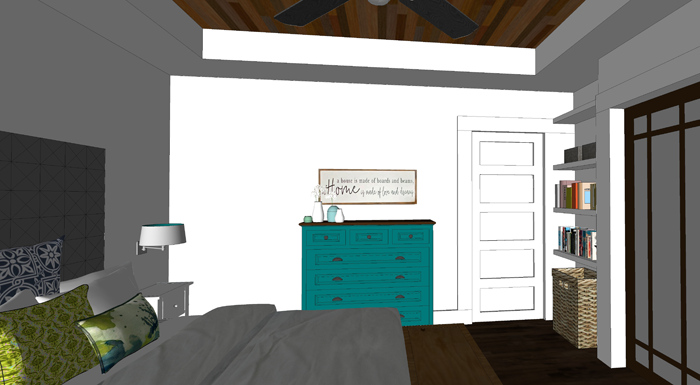
This is the view a person walking up the stairs will see. I am loving that the door is essentially centered on the back wall. I am planning a pendant light fixture for the hall, to hang in the center. I think it looks pretty balanced! I envision colorful art pieces hanging on either side of the door – maybe a ‘kid gallery’? 


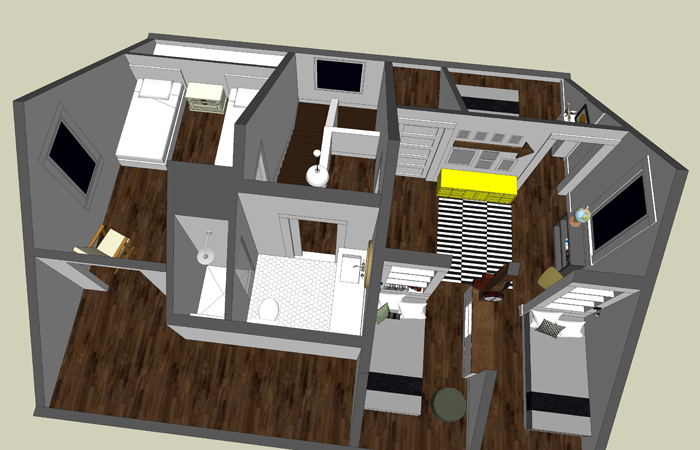
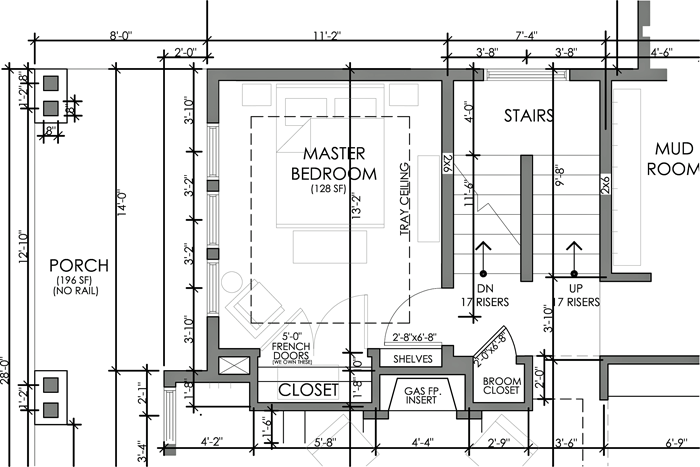
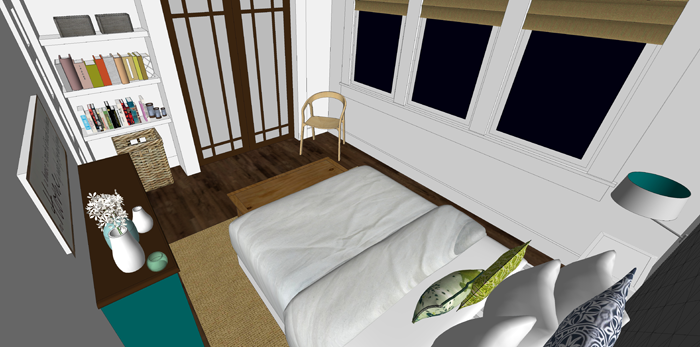
Just for fun… here is an aerial view of the second floor as it is right now. I’m just getting started on the girl’s bedroom design – so it isn’t detailed. Also trying to determine what height knee walls, if any, will need to be added. 


I will be working some more on the 3D imagery – adding color and texture – and will give the big reveal of the room right here on the blog when it’s finished.

Again, I want to thank you for hanging out and helping me with this! I have other tricky spaces that have been leading me to dead ends. Maybe if I post about them, you can help me another time or two (or twenty)? Have a wonderful weekend, friends!


SATURDAY SKETCHBOOK: MASTER BEDROOM

I hesitate to call this room the ‘Master Bedroom’, since it lacks some of what would be considered standard features. There will be no on-suite bathroom or walk-in closet. But it is the bedroom that Craig and I will use – and since we are the ‘masters’ of the property, per se’, I guess the phrase will work. Ha!

As I mentioned in this recent post – the room is not at all large. When dividing up square footage in the floor plan, we made the decision to give more to the shared/ public spaces in the house (such as the living room and kitchen) and to make the private spaces (such as bathrooms and bedrooms) a bit smaller. This is a decision that we are 100% okay with, as the members of our family tend to rarely spend time in the bedrooms.

The location of the bedroom itself was something I thought about for a very long time. Because we intend to live in Arrow Hill Cottage for as long as life allows, I wanted to be sure and include at least one bedroom on the main level. Our kids are old enough now that it works for our family to have their bedrooms upstairs – giving them (and us) a bit of separation and privacy. Besides the bedroom, the rest of the main level is shared/ public space – In order to make the room feel as private as possible, I used the stairway as a ‘buffer’ and also located the closets, fireplace, and built-ins between the living room and bedroom – which should help to reduce noise transfer.

The Master Bedroom is 10′-4″ wide by 12′-5″ long, 128 square feet. But even with it’s small size, it should be able to pack a good design punch – with a few key features.


NATURAL LIGHT

I have said before that I love natural daylight. The Master Bedroom will have three large South facing windows that overlook the front porch. They are sure to let in some great light, which I am very excited about! And because they are across from the bedroom door, the view out of these large windows is likely to be the first thing you notice when you walk in. For privacy and light filtration, these windows will likely have some sort of covering.

I like the look of a simple natural roman shade.


TRAY CEILING

We have a large amount of tongue and groove barn-wood, which was removed from an old summer kitchen on Craig’s parent’s property. I am hoping to re-purpose some of the wood in the trayed portion of the Master Bedroom ceiling. I think it will add a bit of warmth to the room, as well as sentimental/ personal appeal.

I also love sleeping with the white noise of a fan, and want to find a pretty ceiling fan to replace the chunky box fan that we are currently using.


FRENCH DOORS

The closet, though not the walk-in variety, is a decent size. We plan to use a set of vintage french doors (from the farmhouse we are currently living in) to access the closet space. Of course, the glass on the doors will need to be frosted in some way so that our clothes and shoes aren’t on display!

The doors have such a great patina, but I may need to sand and stain them to mix a bit better with the other wood tones.


TUFTED HEADBOARD

We have a queen size bed with the world’s most comfortable mattress. Although it has probably outlasted it’s life expectancy at this point, we are not ready to part with it.  I have wanted a diamond tufted headboard for a very long time. The thought of aqua velvet keeps popping up in my mind, but I think a more neutral fabric choice would better suit the room – without overpowering it.

There are a ton of great DIY tutorials for tufting, such as this one from Homeade by Carmona. It looks pretty straightforward and the directions are detailed enough that I may just get brave enough to tackle this project, and save a few dollars.

A nightstand and reading lamp with an operable arm will be situated on either side of the bed – giving the bed wall a very balanced and symmetrical look.


At the foot of the bed, I plan to position a special pine chest that my uncle built for me as a seventh birthday present. It is full of memories and keepsake items – and I cherish it!


READING NOOK

A few years ago I found this cute chair through a local online ad. It’s in a bit of rough condition currently, but it has a great shape and I can see a lot of potential! I am thinking of reupholstering it and maybe painting the frame, or staining it a different color.

There will be a series of shallow shelves behind the door, where I plan to house our book collection, as well as a few mementos and collectibles.

And of course, there will be baskets. No room is complete without baskets.


The rest of the accessories and art for the room are a bit sketchy in my mind at the moment – but I know that I want the vibe to be calm and relaxing, yet not too stuffy or formal. I am envisioning pops of color to add interest, and lots of visual texture. I love textiles such as rugs, pillows and bedding – and will surely have plenty of fun making each of those choices. Here are a few that have already caught my eye.

These pretty embroidered floral accent pillows are simply gorgeous. From Say It With Pillows on Etsy


Fun navy blue and white patterned pillow from Hayneedle


Grey and white striped sheet set from Target


This jute rug from Overstock would be a perfect natural accent to the room.


There may be enough room to have a tall and shallow dresser on the long wall.


Shallow dressers can be somewhat difficult to come by, but I did find some nice options from Wayfair, including this gorgeous piece.


On top of the dresser, I will layer art and possibly a mirror and other accessories. I love this sign from Rooted & Grounded Home (on Etsy)


I’m excited for this beautiful, clean and relaxing bedroom!


COTTAGE HOME STYLE ELEMENTS

Welcome to the first installment of the ELEMENTS OF HOME series. Each month I plan to showcase a different residential style here on the blog. It is my hope that by laying out the basics of each home style, you will be able to determine which suits your lifestyle and preferences the most. When designing a new house, or searching for one to buy, this information can come in very handy!

I am going to start by over viewing the main elements of the cottage style home. Our own home, as you might have guessed by the name of this blog, is being designed with the cottage style in mind.

image source

Be prepared for plenty of cottage style home inspiration images!

HISTORY OF THE COTTAGE STYLE

The term ‘cottage’ comes from England architecture. It referred to a home with ground floor living spaces and sleeping spaces in the upper level, nestled into the roof eaves. In the Middle Ages, cottages housed agricultural workers and their friends and families. The term ‘cottage’ denoted the dwelling of a cotter (a worker of the land). The cottage house was modest, with a typical arrangement of two rooms on the main level and two rooms on the upper level. Typically these cottages were situated on a small plot of land, between 2 and 5 acres.

Today, when people think of cottages they have a vision of these small houses of days gone by. The term is used in many cultures to refer to a vacation property, usually situated near water or on a secluded and peaceful piece of land.


MAIN ELEMENTS OF THE COTTAGE STYLE HOME

LOCATION

Generally a cottage home is situated in a rural or natural setting, perhaps on a small plot of land near water or in the country. Though less common, there are also urban cottages – which, at the very least, feature a small garden or ornate flower beds.


image source


image source

Cottages boast a wonderful connection to nature; and most that are built (or remodeled) today are careful to respect the flow from indoors to outdoors. They include a variety of indoor/outdoor rooms and spaces – such as porches, patios or wood clearings, allowing the home’s owners to enjoy the serenity of nature.


image source


image source

SIZE

Most cottages are modest in scale. They are built to the needs of the people who will live in them, and not as a way to showcase wealth or prestige. Each square inch in a cottage is useful and serves a purpose.


Generally a cottage will be either one story or a story and a half. One and one half storied versions have upper levels that feature sloping ceilings and either short walls (4′ high or less) or no walls at all – where the ceiling slope extends to the floor.


image source

EXTERIOR TRADEMARKS

From the curb, a cottage appears small in scale. Typically they feature a steeply pitched roof and asymmetrical balance, with focus being placed on the front door.


image source

Local materials such as stone and wood are commonly used. Shutters may be added as a simple accent to windows.

image source


INTERIOR SPACES

Inside, cottage spaces are informal, encouraging flow from one room to the next. Their relaxed nature invites visitors and full time occupants to feel at home. To maximize useful square footage, hallways are often eliminated.

image source

These homes are often full of charming nooks and crannies.


image source


image source

COLOR SCHEME

Cottages tend to utilize a refined and simple color palette, both inside and out. The softer more neutral colors are common; But bright white is the most popular color used.


image source


image source

The use of neutral colors on the walls, ceilings, and floors leaves room for statement pieces to shine. You can often find a playful splash of color on a furniture piece or fabric embellishments.


image source


image source


FEATURES

Though the style is unrefined and personal, there are statement features that many cottage homes possess.

EXPOSED STRUCTURE: By exposing the structure of the cottage, not only is construction simplified, but a level of charm is added.


image source


image source


image source

DORMERS: Primarily used to create extra space on the upper level of these homes, dormers also add a touch of whimsy.


source of images

TALL WINDOWS: They do a wonderful job of letting in natural daylight. The light then bounces off of the light colored walls, adding to the overall cheeriness of the space. Manufacturers such as Marvin have recognized the charm and appeal of these tall windows and have created the ‘cottage style’ window, which is essentially a double hung with a smaller upper sash.


image source


image source

INTERIOR DECOR

The cottage decorating style is personal and forgiving. There is room for a mix of old and new, expensive and thrifted finds, hand made and store bought. It is an eclectic technique that is all about finding what you love and bringing it into your home to surround yourself with inspiration.


source of images

Linen, burlap and wool are common textures used in cottage decorating. Painted and distressed wood furniture pieces are often present, as are vases of fresh cut flowers in each room.


image source


INSPIRING COTTAGE STYLE HOMES FROM AROUND THE WEB

These homes showcase the cottage style well. Take a closer look!

Left to Right: 12 | 3

I hope you enjoyed learning a bit more about the Cottages. Stay tuned for another home style next month!