CAPSULE WARDROBE | DECLUTTER CHALLENGE

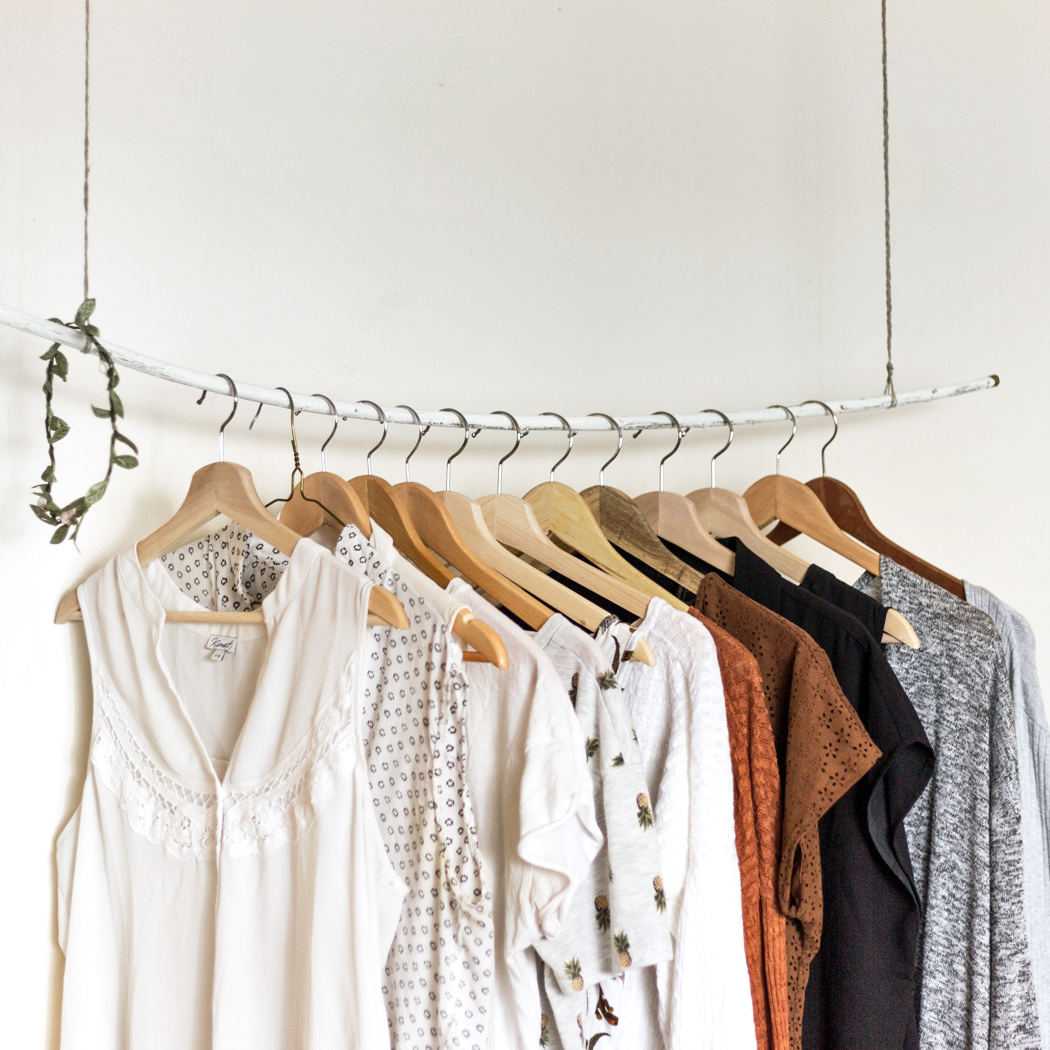
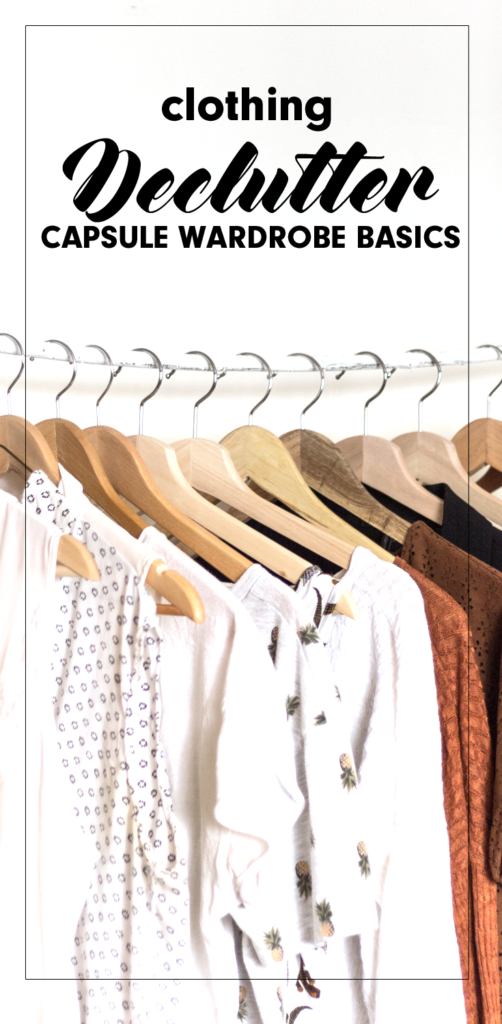
Clothes have a way of sticking around and cluttering closets and drawers. This week I attempted to build my very first capsule wardrobe, as the fourth challenge in the December Declutter!

starting a capsule wardrobe


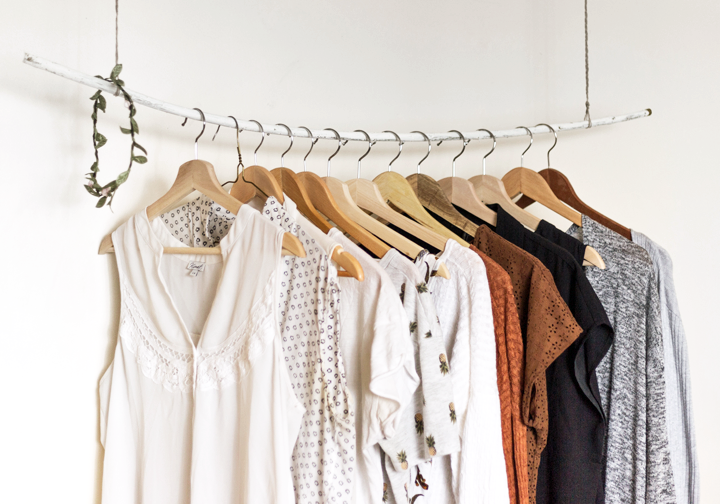
Welcome back to the fourth and final week of the December Declutter Challenge! This month I have already completed a Konmari declutter of our Christmas Decor, a speed declutter, and a deep cleaning of one room, top to bottom. Today I am sharing how I decluttered my clothing in an attempt to create my first capsule wardrobe.


CAPSULE WARDROBE PRINCIPLES

The main idea behind the capsule wardrobe is to fill your closet with clothing items you like and that you like on your body. Though the term was coined in the 1970’s by  Susie Faux, the concept has become even more popular in recent years. With people busier than ever, overwhelmed by their lives and jobs, minimalism has gained recognition as a way to slow down and simplify. Capsule wardrobes are in line with minimalism techniques.

A typical capsule wardrobe includes between 25 and 50 pieces. Some include enough pieces for year round wear, while others offer a seasonal selection only. The great thing about a capsule wardrobe is that it is personalized to fit each individual. As such, the rules can vary from person to person.


MY CAPSULE WARDROBE RULES

Because we live in the Midwest, we experience dramatic temperature changes with each season. My wardrobe has to incorporate shorts as well as sweaters. For this reason, I opted to allow my capsule to include the maximum number of fifty pieces.

This will be a full year capsule wardrobe. I chose not include jewlery/scarves, pjs, or outerwear (coats, snow boots, etc.) Even so, I attempted to minimize the number of items in these categories to a combined twenty. Undergarments were not included in any item totals.

My long term goal for this challenge is to actually use the clothing I have. To create different outfit combinations with a minimal amount of items. I want to get to the point that I love everything in my closet.


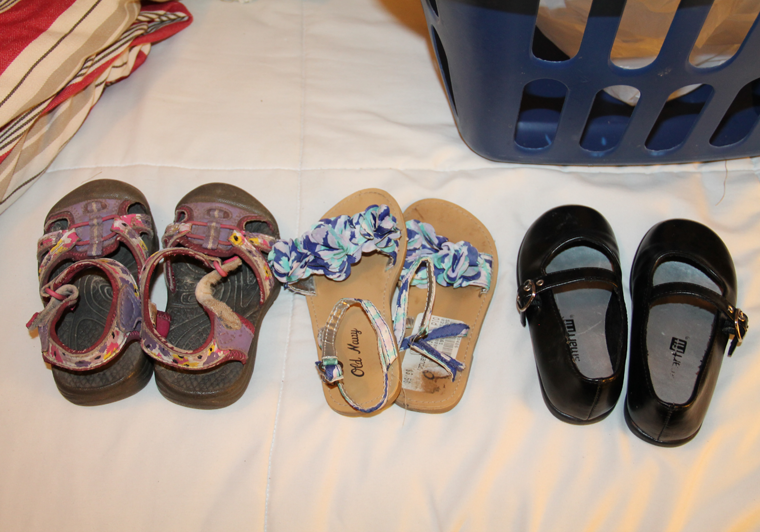
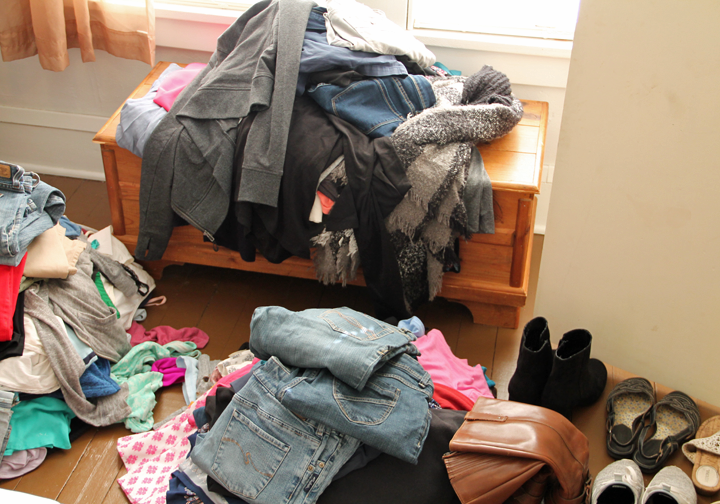
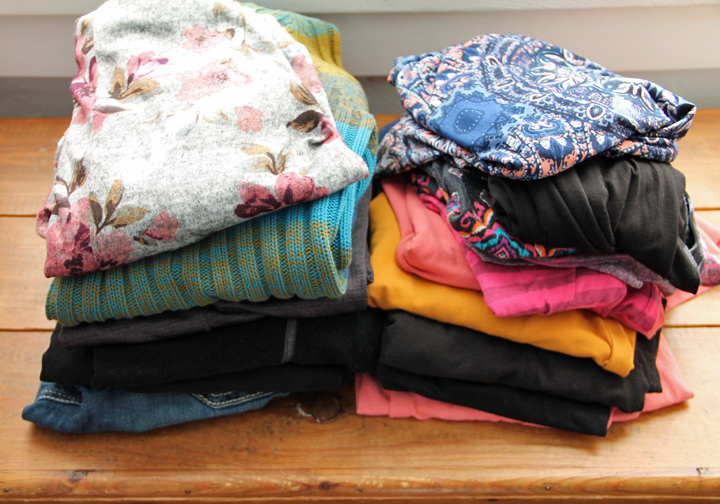
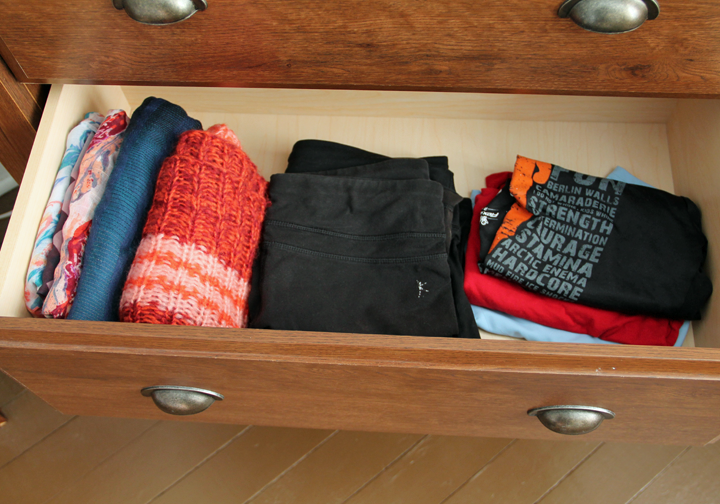
CLOTHING CLUTTER (BEFORE)

My husband and I share a teeny tiny closet that is built into the eaves at our rental farmhouse. It was pretty well stuffed to the brim on the hanging bar.

how to create a capsule wardrobe

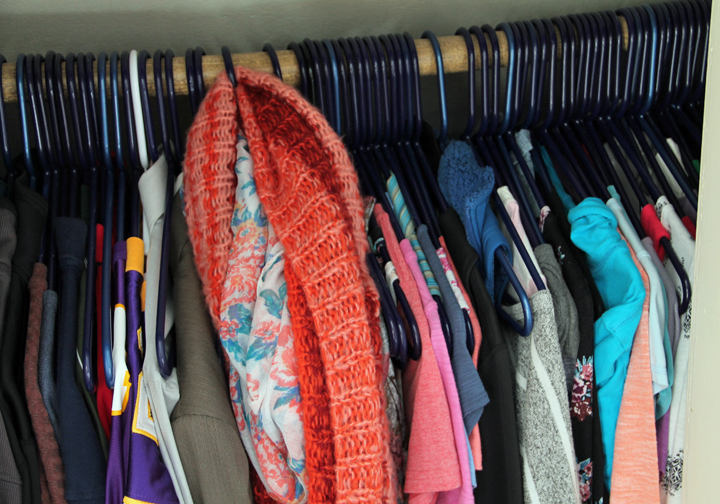
We also had some bins on the closet floor that held bulkier items such as pants and sweatshirts. And I had one dresser drawer plump full of workout and lounging clothes.


SORT THROUGH THE CLOTHING

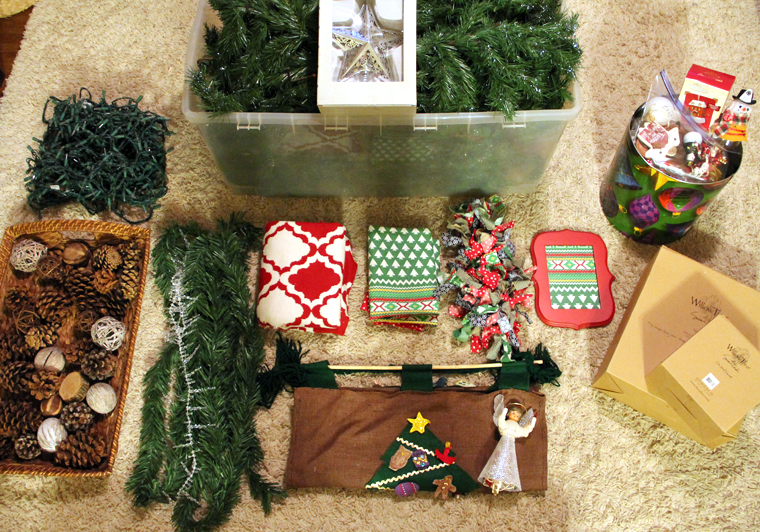
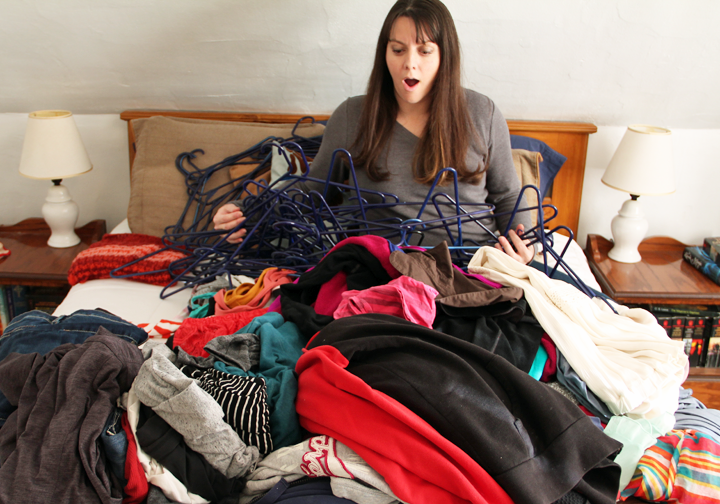
I used a method outlined on the website The Penny Hoarder when sorting through my clothing. The first step involved gathering all clothing items and footwear in one area, similar to what is done in the KonMari method.

Taking every item out of the closet, drawer and bins and laying them all on the bed was a huge eye opener to me. It was a massive pile of clothing. Considering that I can only wear one outfit at a time, I would say it’s obvious that I had far too many clothes.

clothing clutter to capsule wardrobe


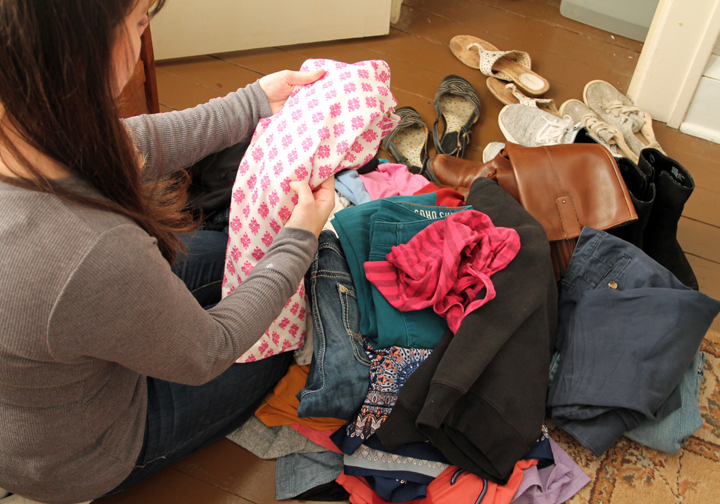
The next step in the process is to sort all of the clothing items into three separate piles. One pile for items that you love, your favorites. Another pile for items that you like, and a final pile of items that you are certain you no longer need. Clothing that doesn’t fit properly or has stains/tears should go into the third pile.

Even if at one time the pieces were your favorites, if they don’t fit or are damaged do you really want to include them in your minimal wardrobe?

sorting through clothing to create a capsule wardrobe


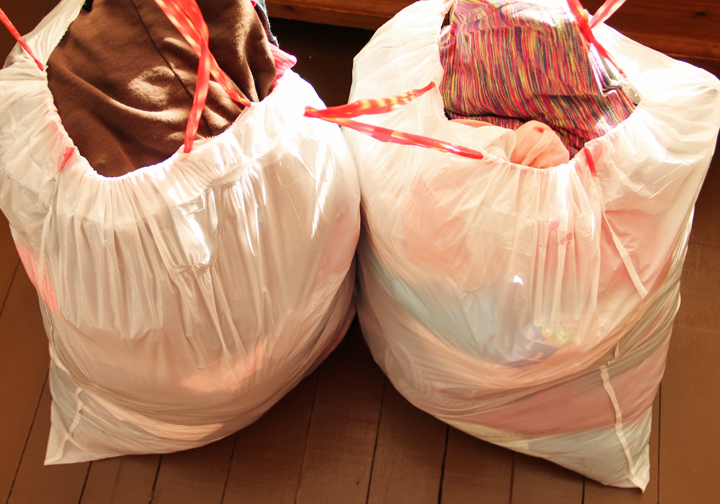
After my sorting was complete I was left with quite a few items that were destined to be sold or donated. I went ahead and bagged them up straight away. In this way, I wasn’t tempted to go back through those items searching for something to keep.

clothing donations. Clothing declutter


FINE TUNE THE SELECTIONS

The two remaining piles including clothing pieces that I love, and those that I like. At this point I needed to do some more critical thinking. I thought about which items could be used in multiple ways to form various outfits. I thought about how many seasons each piece would be useful in. Further sorting through these two piles back and forth, I was able to narrow down my capsule wardrobe to the pre-set 50 pieces.
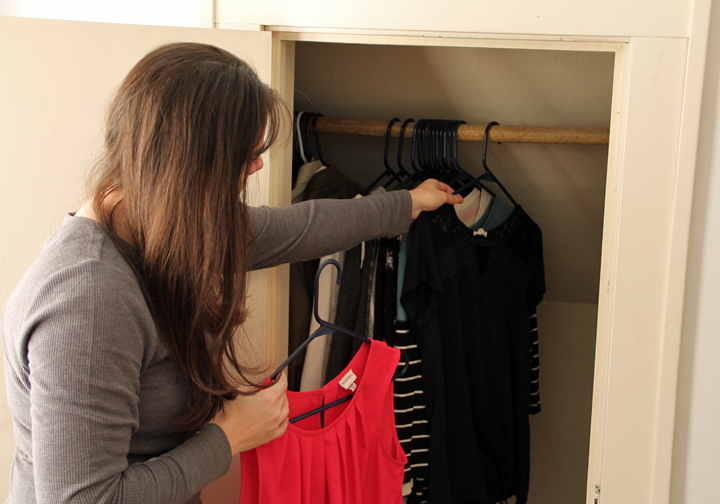
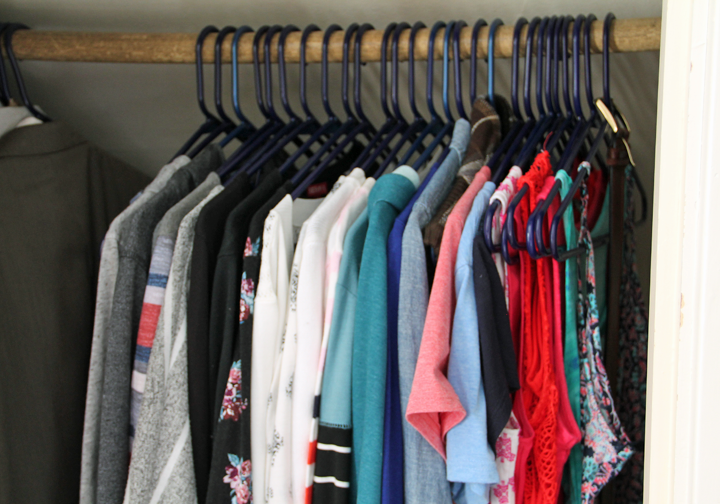
clothing declutter challenge. Creating a capsule wardrobe


HANG UP FAVORITES

My favorites were then hung back into the closet. I tend to arrange my clothing in color categories and by sleeve length.

how to create a simple capsule wardrobe

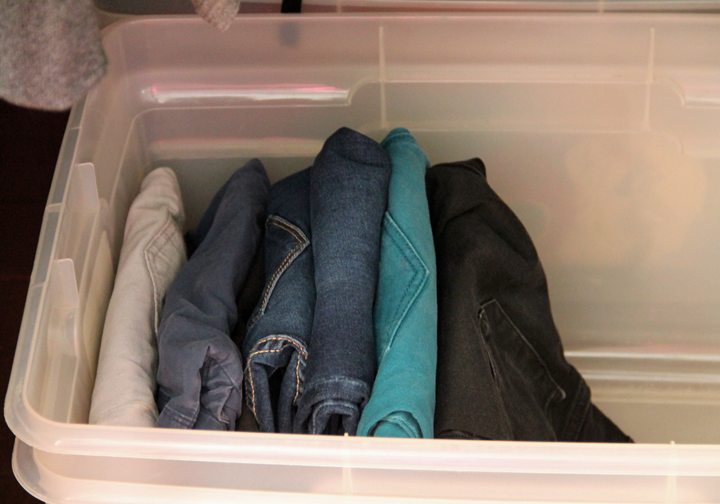
Because this is my first capsule wardrobe, I decided to keep a ‘back up’ of 16 items that were from my maybe pile. These clothing pieces were placed into a bin and are stored in the back of my closet for the moment. If, after 365 days none have been needed, they will be moved into the donation bags.

year round capsule wardrobe

While I am learning the ins and outs of my particular capsule wardrobe, I am giving myself lots of flexibility and the freedom to make fine tuning decisions. For example, I may find that I need fewer long sleeve/ winter items but more short sleeve options.

Each time a new item is added, either from my back up pile or purchased new from a store, one of the items in my capsule must be set aside. This will allow me to keep the item count consistent throughout the year.

I am hopeful that after a full year using these fifty items that I will have a good handle on what I need and use most often.


WATCH ME CREATE A CAPSULE WARDROBE

Take a virtual tour of my clothing before, and watch me declutter my clothing to create my very first capsule wardrobe!


MY CAPSULE WARDROBE SELECTIONS

I will admit that this was probably the most difficult of all the challenges I was faced with this month. Perhaps it has something to do with the intimate nature of clothing, which causes a person to become attached more easily.

Even still, it was an exciting exercise. I personally am really looking forward to knowing that everything in my closet fits and is useful. My final capsule wardrobe includes the following 50 items:
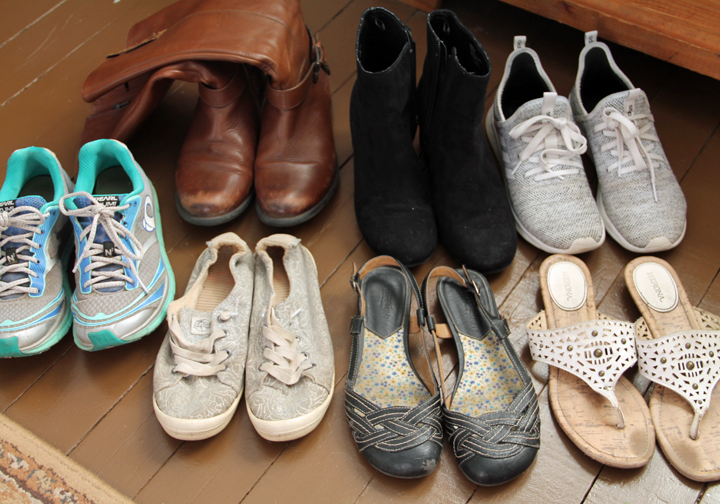
 

FOOTWEAR

7 pairs total: 2 flats, 2 boots, 1 casual canvas, 1 nicer pair of sneakers, 1 pair of running shoes.

capsule wardrobe shoe collection


BOTTOMS

8 total: 4 pants/jeans, 1 Capri, 2 shorts, 1 yoga pant

50 piece year round capsule wardrobe


TOPS

27 total: 6 tanks, 3 short sleeve, 1 vest, 1 cover/wrap, 4 cardigan/pull over, 6 long sleeve, 5 sweaters, 1 dress

small year round capsule wardrobe. Minimalist clothing collection


WORKOUT

8 total pieces: 3 bottoms (1 short, 1 Capri, 1 pant), 1 long sleeve shirt, 1 short sleeve shirt, 3 tank tops

clothing in minimalist capsule wardrobe


ADDITIONAL ITEMS (not included in the capsule wardrobe total)

20 total items: 1 swimsuit, 1 pair of snow boots, 2 winter coats, 1 spring/summer jacket, 1 poncho, 4 PJ pieces, 5 scarves, 3 necklaces, 1 pair earings, 1 ring.


OUTFIT OPTIONS

Probably my favorite part of the entire challenge was coming up with different outfit ideas with the smaller number of pieces. These are just a few of the options that I am excited to wear!

outfit options from year round capsule wardrobe

one year capsule wardrobe outfits

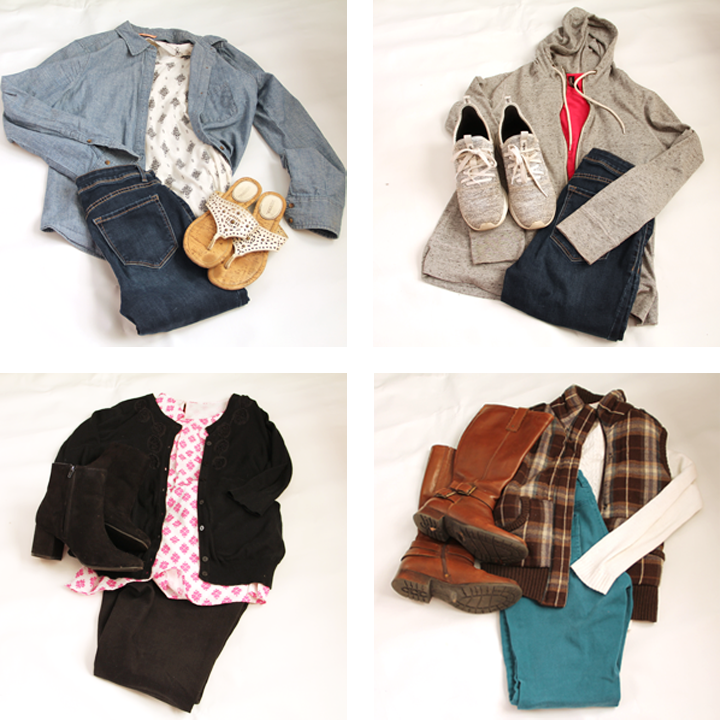
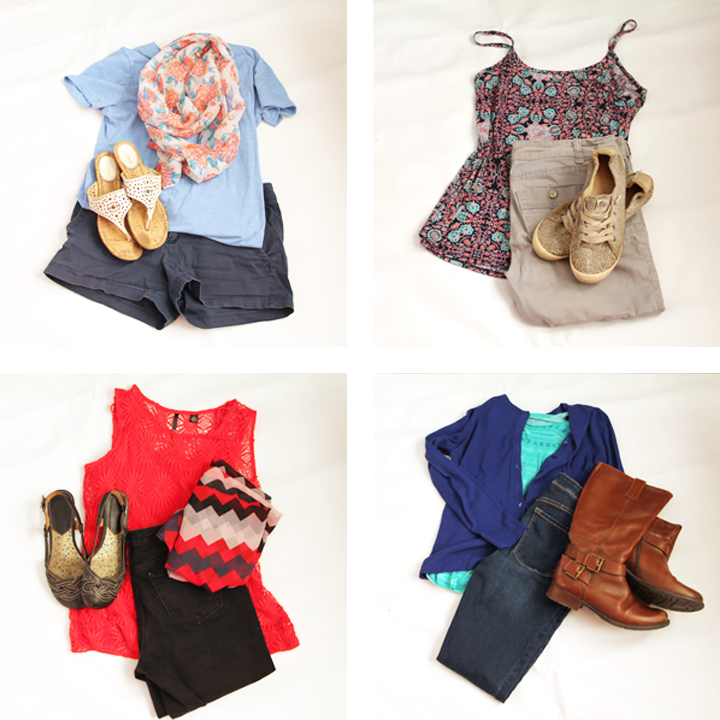
I love how most of the items can be either dressed up or down depending on how they are paired and with different accessories. For example, a basic t-shirt can be worn with a pair of shorts or yoga pants for a comfortable casual look. The same shirt can also be dressed up with a scarf and nicer shoes.

I plan to print off index card sized pictures of outfit options. These cards can then be placed on a binder ring and stored in my dresser. That way, if at any time I feel that I have ‘nothing to wear’, I will have visual outfit inspiration!


WHAT I LEARNED FROM THIS CHALLENGE

This challenge was eye opening for sure. If you had asked me before how many total clothing items I had, I doubt I would have thought I owned even fifty total. The truth is that I had nearly two hundred. Essentially, this exercise cut my wardrobe in less than half.

While having a final item count might seem restrictive to some people, I actually found it useful. Knowing that I couldn’t go over my predetermined number caused me to really think about which pieces I wanted to hang onto.

I also found it surprising that the items I chose to keep in my capsule wardrobe shared a lot of similarities. Apparently, I enjoy wearing comfortable pieces that are generally plain or have small patterns/prints. There are also quite a few striped items that made the cut. Color wise, there is a definite palette of favorites – something I never realized before!

capsule wardrobe color palette


My side of the closet is in order and looking awesome. Perhaps for this reason, my husband has given me the green light to tackle his wardrobe next. I call that a declutter win!


PIN THESE IDEAS FOR LATER

Are you ready to tackle a clothing declutter and create a capsule wardrobe of your own?

clothing declutter. How to create a basic capsule wardrobe. Capsule wardrobe for beginners


ONE ROOM CHALLENGE : DEEP CLEANING

Join me for the third installation of the December Declutter series. This week I attempted a One Room Challenge, deep cleaning one room in our home. Read on to see how I did!

One room challenge deep cleaning

Welcome to Week #3 of the December Declutter challenge. During this month, I am tackling various challenges to help us sort through our household belongings. Our end goal is to bring only those with great value and purpose to our new home, Arrow Hill Cottage.

I have previously taken on a KonMari declutter of our family’s Christmas decorations, and performed a speed declutter – finding 60 items in 60 minutes to either donate or sell. While both of these techniques were effective and freeing, neither provided a radical visual improvement to any one space. The One Room Challenge is different.


ONE ROOM CHALLENGE PRINCIPLES

The basic idea behind the One Room Challenge is to, obviously, focus on one room only. Decluttering and cleaning efforts should be concentrated in that space to create an environment that is functional and pleasing to look at. Because the entire room will be sorted through, decluttered and organized, it is also a great time to do a deep cleaning.


OUR ROOM CHOICE

Of all the rooms in our rental farmhouse, the mudroom is by far the one that becomes cluttered most often. In actuality, it is a multi purpose space. It is the entrance point into our home, as well as a laundry room. And, because our only bathroom on the main floor is very small and located on the other side of the house, we also use the space to get ready in the morning.

It is a hard working room, to say the least. So it isn’t a huge surprise that it gets cluttered easily.


THE CLUTTER PROBLEM (BEFORE)

Keep in mind that we are renting this farmhouse. It was built in the 1920’s and later remodeled in the 1960’s. The style of finishes isn’t what we would have chosen, nor is the layout of the rooms. As renters, we have no ability to change these features. However, we don’t have a great excuse as to why the clutter has gotten so bad, except that we haven’t kept on top of it.

You can see a video tour of what the space looked like before the cleaning, later in this post. First though, I will share a couple of the more difficult aspects I was facing when starting the One Room Challenge.


LOW THRESHOLD

The floor in the front entry has been built up over the years with layer upon layer of linoleum, meaning that there is very little threshold. Because of this, there is no way that a welcome mat can be placed in front of the door. This becomes a problem in the winter months when the Midwestern skies open up in all of their snowy glory.

one room challenge cluttered entryway

We have, at times, resorted to throwing a few bath towels down so that we don’t immediately slip when walking through the door. Tacky, yes. Functional, kind of. We are looking for a more permanent and eye pleasing solution.


LAUNDRY SHELF

Flat spaces seem to be a magnet for clutter. As you can see, our laundry shelf is no exception. While I had Craig add this soon after we moved in, as a place to temporarily set folded clothes, it has become a catchall. It seems that any random knickknack that didn’t have a place anywhere else found a home here.


cluttered shelf before. One Room Challenge 
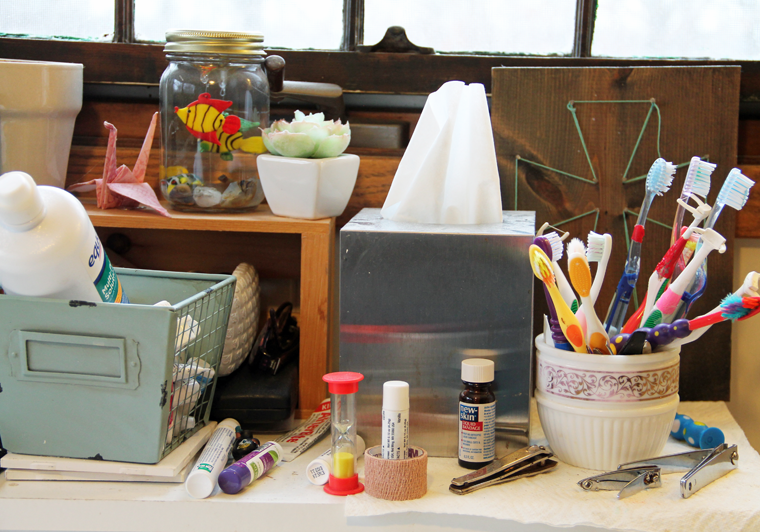
Worse yet, our family’s toothbrushes were also stored here because it is the most convenient and accessible space to brush our teeth.


WATCH ME DEEP CLEAN AND DECLUTTER

The room needed a lot of work, and an entire afternoon of focused concentration. Take a look at what it looked like before, and watch me whip it into shape!


THE RESULTS (AFTER)

I am absolutely thrilled with the way the room looks now. More importantly, our entire family is happy with the way the space now functions.


clear entryway after One Room Challenge

The entryway rug, pulled away from the door a bit, is a place where we can step while we take off our shoes. It is simple, yet pretty. Goodbye old towels!


minimalist family home. cutlery try as toothbrush divider 
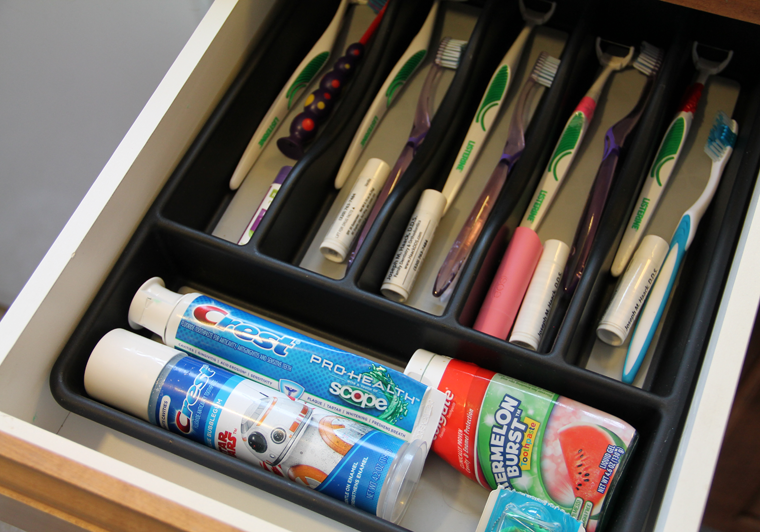
The drawers were thoroughly decluttered, and then organized with our everyday essentials. An inexpensive cutlery tray was the perfect fit for the top drawer, which now is a clean and safe spot for our toothbrushes. Each family member, besides the girls who do all of their brushing upstairs with help, has their own divided space. The perfect size for a toothbrush, flosser, and personal chap-stick.


minimalist family home. Organized drawer with personal care items.

The second drawer was emptied of the many reusable and disposable plastic bags that it housed. Smaller bins were placed in the drawer, and organized with personal care products.


antique anchor brand washer wringer. Laundry room decor. One room challenge 
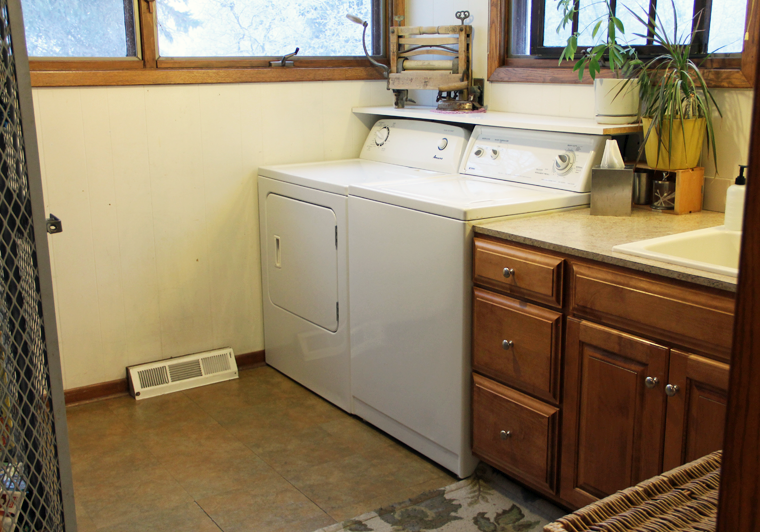
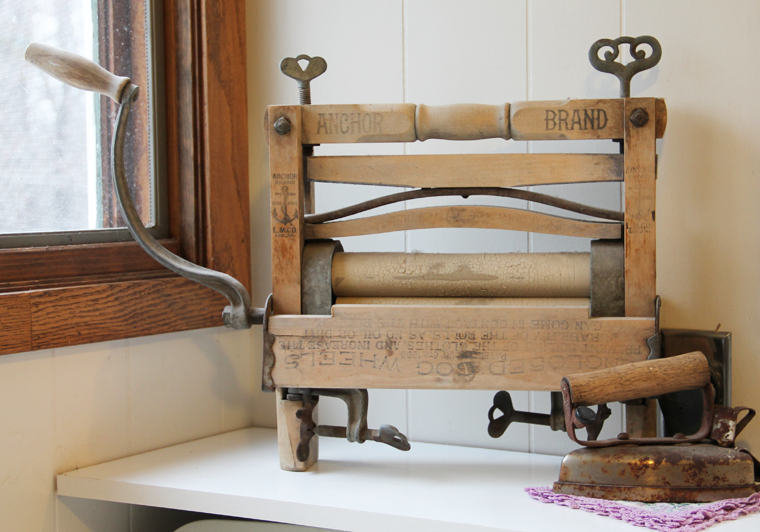
Perhaps the greatest visual improvement is the open shelf. With all of the clutter gone, the vintage clothes wringer and steam iron take center stage. Two houseplants serve to soften the space, as well as camouflage oddly placed outlets. And my antique window adds a bit of charm.


one room challenge after. clean laundry room 
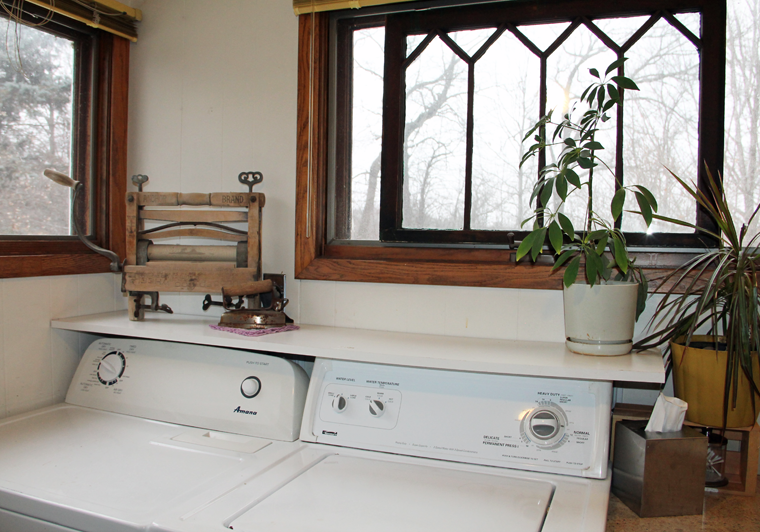
The room is bright and clutter free, and I think it seems larger than before!


WHAT I LEARNED FROM THIS CHALLENGE

I have to say that it feels great to have this one room cleaned top to bottom. Even though the rest of the house has a lot of decluttering left to do, this room is like a breath of fresh air. Because it is the first space we enter in our home, the impact is even greater. It now brings a smile to my face rather than anxiety. That’s a great ‘welcome home’ feeling.

clean minimal laundry room after One Room Challenge


I do have a few words of advice if you would like to take on the One Room Challenge for yourself.

Depending on the size of the room you take on, this may be an all day or multiple day exercise. In order to achieve a true deep clean, you want to allocate enough time.

Also, know that when items are removed from one room they may make their way into another. In our case, most items that I didn’t want to keep in the space were put into the garbage or a donation bin. But there were a few things that we have yet to decide the fate on. They were moved into another room, for now.


I definitely appreciated the finality of this challenge. I could see using the same technique on other rooms in the future, until each has been gone through. The Spruce has some great tips on how to tackle each type of room. Until then, we are going to focus on keeping this one room clutter free and organized, because it feels great!


PIN THIS FOR LATER

If you are thinking about taking on your own One Room Challenge, but aren’t quite ready to dive in quite yet, pin this image as a reminder!

One room Challenge. Minimalist family home. Declutter and deep cleaning

SPEED DECLUTTER: 60 IN 60 CHALLENGE

It’s Week TWO of my December Declutter Challenge! Follow along as I attempt to speed declutter my house using the 60 in 60 technique!

declutter challenge

Last week, I decluttered our entire Christmas decoration collection, using the KonMari method. That was an effective technique, and we were left with only our favorites, which made decorating a breeze! This week I am trying a brand new method of decluttering, one that involves quick decisions. It is called the 60 in 60 challenge.


60 IN 60 BASIC PRINCIPLE

Essentially, this is a speed declutter challenge. The idea is to set a timer for 60 minutes, then use that time to find 60 (or more) items to donate or sell. While doing this challenge, do not look for items that could be thrown. That would be too easy! Instead, find items that you are no longer using, but might have value to somebody else.


WHAT YOU NEED

There are only two things you will need to complete this speed declutter challenge. A timer, or a clock, and a basket or box to put your found items in. I personally chose an egg timer to count down my minutes. This allowed me to pause the task if I was interrupted, which I was. Several times.

speed declutter


SPEED DECLUTTER TECHNIQUE

While the KonMari method suggests that you pull similar items out of their storage spots before you begin sorting, this challenge is almost the opposite. Drawers are to be opened, closets rummaged through. Honestly, it feels like a bit of a scavenger hunt! Decisions are to be made quickly and on the spot.

speed declutter technique

My speed declutter challenge found me digging through bins in our storage closet, drawers in my kitchen, and our shoe rack, among other spots.


WATCH ME SPEED DECLUTTER

It’s amazing how quickly a person can make decluttering decisions when a time limit is involved! Check out all the items that made it into my basket!


ITEMS THAT WILL BE DONATED

The basket filled up pretty quickly. As a result, I eventually needed to start setting items on my bed. Though I didn’t count as I went through the process, I was surprised to find that I had set aside exactly 60 items! That could not have been planned any better if I tried! Here are a few of the items that will be sold or donated.

decluttering challenge 60 in 60

This high quality Pottery Barn bedding has been taking up space in our linen closet since we moved into the rental farmhouse. Because we do not currently have a guest bedroom, and do not have plans for one at Arrow Hill Cottage, it is time this bedding becomes useful for someone else.


60 in 60 decluttering challenge

We are a large family of seven, and this smaller crock pot just doesn’t get much use. To make meals for our crew, we need the jumbo sized version, which we already own.

whole house speed declutter

As our youngest child grows, I am steadily going through the clothing that no longer fits her. These shoes, for example, still have a lot of life in them. For another little girl.


WHAT I LEARNED FROM THIS CHALLENGE

I will admit that I was a bit nervous starting this challenge. We have been decluttering our home over the past few months. We even have an entire storage closet dedicated to items for our upcoming summer garage sale. Because of this, I was worried that it would be difficult to find 60 items that we could easily part with.

minimalist family home

I was wrong! Once I started to open cabinet doors and drawers, I was finding items that I didn’t even remember existed. If they had been hiding for months, or in some cases even years, it was obvious that they were not necessary to keep. Into the basket they went!

Perhaps the greatest obstacle to this challenge was that I couldn’t finish what I started. Because this is a speed declutter, there was not time for me to thoroughly sort through each space I looked. In some ways, that aspect was hard on my brain. For example, it is a bit of mental burden knowing that my kitchen is still filled with many items that we don’t need.

Certainly though, this feeling will help me remember to go back and finish, which is a good thing!


In conclusion, I feel that this speed declutter challenge was a quick win toward my overall simplifying goals. I would definitely recommend that you give it a try!

Join me next week, when I take on a new challenge for the December Declutter!


PIN THIS CHALLENGE FOR LATER

Try it for yourself!

speed declutter

KONMARI DECLUTTER – CHRISTMAS DECOR

Join me as I begin a four week decluttering challenge for the month of December. My first challenge is a KonMari declutter of our Christmas decorations.

Konmari decluttering method


It’s no secret that this time of year gets busy. Extra busy. In years past, we have been right in on the action. Buying all the gifts. Attending all the parties. Hanging all the twinkle lights. This year though, we are attempting to slow down and be truly mindful of the special nature of this season.

Our family is on a journey toward simplicity in all aspects of life. Because of this, we are also attempting to be more mindful of the things that surround us. We want to be faced with less stuff, so that we can enjoy more life.

For the month of December, I will be attempting one declutter challenge each week. It is my hope that by the end of the month, and the start of the new year, we will have cleared our spaces and our minds a bit.

I am starting in week number one with a pretty obvious first step, the Christmas decorations.

Christmas decor KonMari declutter


DECORATING IN YEARS PAST

Each year, our typical first step to decorating for Christmas is pulling all of the items out of storage. Multiple bins are hauled into the room where the tree will be set up. Then, we proceed to dig through each one, in an effort to determine which items will brighten up the room and the tree.

Ironically, but maybe not so coincidentally, we almost always go for the same things. Year after year, our favorites make it out of the bins. The rest is put back into storage.


NEW TECHNIQUE TO TRY

This year, I decided to go through all of the items BEFORE the decorating session begins. Once again, I pulled the items out of storage, but did so while the kids were at school. Without all of their little hands rummaging through the bins, I was able to slow down the pace a bit. This allowed me to hold each and every piece and give it consideration.

I used the Konmari declutter method. This organizing technique was developed by Marie Kondo and is quite popular among minimalists.

Ms. Kondo recommends that all items of a similar type be grouped together and laid out on a flat surface. This allows you to see the large amount of items that all serve essentially the same purpose. In my case, with the Christmas decorations, it was a pretty obvious visual that we had accumulated far more than was necessary for the job of decorating for the season.

Christmas declutter before and after


Most organizing methods have you asking yourself which items can be thrown/ given away. A KonMari declutter is different in that you are supposed to focus instead on which items to keep. The end goal is that you will choose the items that bring you the most joy.


OUR JOYFUL CHRISTMAS DECORATIONS

With everything laid out in front of me, my focus was immediately drawn to my favorites. These items bring me the most joy or have the strongest memories.

KonMari method Christmas decor declutter

I knew for sure that our Willow Tree Nativity Set would be kept. It is usually the first of the decorations to be put up each year. We love the simple details of each piece. And, it is the perfect visual reminder for our family of the true meaning of Christmas.


Christmas decor declutter

Another favorite item that I found is this antique angel Christmas tree topper, which was my absolute favorite as a little girl. I have plans to remove her wiring, and turn her into an ‘Advent Angel’ – the Christian alternative to Elf on the Shelf – as a new family tradition.


SORTING THROUGH THE ORNAMENTS

We had an entire box full of ornaments, most of which haven’t made it up on the tree for many years. Using the KonMari declutter method, I picked up each and every ornament. A quick decision was then made whether it would find it’s place in the keep pile, or the donation box.

Konmari Christmas decorations

While sorting, I found many precious ornaments that hadn’t been used for years because they were hidden. For example, this collection of fire department related ornaments.

Christmas decor decluttering using KonMari method

My husband was on the fire department in our city for ten years. The department gifted him a special ornament each Christmas. We have always said that we would like to have a small tree to display the collection. Unfortunately, we have never actually done it. They will be saved, to be used at our new house.


WHAT TO DO WITH WHAT’S LEFT

After the KonMari declutter was complete, two large boxes of decorations were ready to be donated. In turn, we were left with only a handful of Christmas decor items, and a small bin of ornaments.

KonMari Christmas decor simplified

I decided to keep two vintage suitcases, one of which was my grandparent’s, to store the decorations in. Because they are hard-cased suitcases, I was able to discard most of the protective packaging for the breakable items. I opted instead to wrap them in light-weight bubble wrap. All of our decorations, minus one large basket and the Christmas tree, fit in these two suitcases.

Christmas decoration storage idea KonMari method declutter

They will be easy to store, and bring out each year when we are ready to decorate. Another benefit to having fewer items is that we will not be digging through multiple bins anymore.


DECORATING WITH LESS

A very interesting thing happened when the kids got home from school and were ready to decorate. Though the items that remained were far less, they were not at all upset. Instead, rather than rushing through the task in an effort to be the one who put the most ornaments on the tree, they slowed down. They took the time to observe each individual piece before finding it’s perfect place.

KonMari Christmas decorating simplifying decorations

This alone made the KonMari declutter worth it to me. They truly seemed to enjoy the decorating even more than in years past. In turn, I did too.


WATCH ME KONMARI DECLUTTER

I documented myself sorting through all the Christmas decorations, to share the process with all of you. I’m still pretty amazed at all I was able to get rid of, without regret!

WHAT I LEARNED FROM THIS CHALLENGE

This was my first time using the KonMari declutter method. I have to say that although laying everything out was a bit more work upfront, it was beneficial. Seeing all those like-items together made it easier for me to spot our favorites.

I could see this method being used for all types of items – from clothing to kitchen gadgets. It is likely I will try to declutter this way in the future.

Above all, I learned from this challenge that the intentions behind your actions mean more than the action itself. Decorating with 200 items doesn’t mean that you enjoy or love Christmas more than someone who decorates with 20 items. And so, with that in mind, going forward, I plan to focus on the right number of decorations for OUR family. Because we know our intentions at Christmastime, and they may not always match up with what society says.


Join me next week, when I take on a new challenge for the December Declutter!

PIN THIS FOR LATER

KonMari declutter of Christmas decorations


This post contains affiliate links. By following the link and purchasing the product, I may earn a small commission at no extra expense to you. Thank you for supporting Arrow Hill Cottage! 

AROUND HERE: NOVEMBER 2018

Around here, we have been…


ANTICIPATING the start of a very long winter. The fall has been unseasonably cold already, and we are bracing ourselves. Technically, winter hasn’t even begun! We have seen a little bit of snow, though not too much accumulation.

The kids have taken what little snow that has stuck and begun their winter project. They want to build a luge, to use as a sledding hill. I suppose that is one way to keep busy! We’ll see if they will follow through or not.


CELEBRATING Thanksgiving. We have so much to be thankful for this year! Grandpa and Grandma Jackson invited us over for a delicious meal and great conversation. It’s always wonderful to just take some time to relax and think about all of your blessings.


ENJOYING planning our forever house. The more that we work on the design, the more we realize that we are really looking forward to a smaller and more simple home. And, along with it, we are also anticipating a simplified lifestyle.

I suppose we are somewhat on a journey toward minimalism. And there are five minimalism techniques that we are incorporating to our new home design.


DECORATING for the Christmas season. As part of our decluttering, we went through all our Christmas decoration bins. It was great to look at each item one by one and decide which items really bring us joy. The other items were boxed up and brought to a thrift store, with the hope that somebody else will be able to pick them up and use them this year.

I love the simplicity of our tree this year, with it’s white lights and crocheted snowflake ornaments. This Christmas will be special in that it is the last year we will spend at the farmhouse. Many memories have been made within these walls.


This is just a glimpse at what our family has been up to. If you’d like a closer look, be sure to check out our weekly ‘mini vlogs’ on our YouTube channel ARROW HILL FAMILY. Be well everyone!

MINIMALIST HOME IDEAS FOR OUR NEW BUILD

As we work toward simplifying our lifestyle, we have also thought of ways that our future house can be more minimal. We have adopted the following minimalist home ideas for our new build.

minimalist home


SIMPLE + SMALL DESIGN

The first minimalist home idea that we incorporated in our design is related to the look of the house itself. We wanted the shape of the structure to be as simple as possible. The end result is a basic rectangular form, with a high pitched single gabled roof. An added porch gives the exterior a bit of extra charm.


simple cottage exterior

Overall, we will have approximately 2,000 livable square feet, including the basement. For a family of seven this equates to about 285 sf per person. Considering the average in America is closer to 800 sf per inhabitant, our cottage is on the small side. Of course, compared to homes in other parts of the world it could be labeled as a large home.

small home minimalist floor plan

We have made the best use of every available square foot by configuring the main level in an open concept format. The design also incorporates many large windows as well as white ceilings and walls. By doing so, the interior will actually feel quite spacious.


SHARED BEDROOMS

Our home will essentially include three bedrooms. The main floor bedroom, for Craig and I to share, and two bedrooms for our kids. All three of our sons will be in one of the upstairs bedrooms. Our two daughters will be in the other.

shared kid bedroom minimalist home idea

We believe it is a good life lesson for kids to learn to share a room. Though, we do understand that they will also appreciate their privacy as they reach the teen years. We were able to accomplish this by carving out small ‘sleeping nooks’ for each of the boys. You can read more about the boy’s bedroom design in THIS POST.

minimalist home shared kid bedroom


LIMITED STORAGE

Of all of the minimalist home ideas, this one quite possibly gets us the most questions. People are sure that we will need more closets and places to store things. We are of the philosophy though, that the less storage space that is available, the less inclined we will be to keep unnecessary items.

small minimalist floor plan

Each of the bedrooms will have a closet, and there will be a cabinet in the mudroom for misc. items such as a broom and vacuum. There will also be storage in various cabinets throughout the house. These few storage areas will be for items we use on a daily basis. For long term storage, such as seasonal decor, there will be access to space under the eaves – through the girl’s closet.


FUNCTIONAL KITCHEN, WITHOUT THE EXTRAS

I’ll admit that when we first began designing our dream house, it featured all of the standard luxuries that modern day kitchens employ. We then began to simplify the design and think carefully about the features we really needed. Interestingly, that large center island was not a priority. Neither was a dishwasher. Though some people might think we are crazy for not including one, we know we don’t need it. We have lived our entire lives washing dishes by hand, and have never missed the extra appliance.

simple minimalist kitchen

And, just like the limited storage we employed for the rest of the house, we thought a lot about what our needs were for kitchen storage. Because of this, we determined that we would need only very few upper cabinets. And that stylish walk-in-pantry? It isn’t a necessity in our simple home design.

Instead of placing our dining table in a separated room, it will be accessed directly off of the kitchen. This is one of my favorite minimalist home ideas incorporated in our new home design.

TECHNOLOGY FREE ZONES

Though we will have modern technology in our home, we are planning to limit the accessibility for a variety of reasons. Primarily, we don’t want technology to be the main focus. Without the distractions, we will be able to spend more time together as a family when at home.

simple minimalist living room

We will have no TV in our main floor living room, or anywhere on the first (and second) floor for that matter. Instead, we will be installing speakers so that we can listen to our favorite music.

In the main living space will be one central charging station for all of our devices. We recently refinished an ANTIQUE CABINET that will be the perfect home base for all of the cell phones, ipads, and laptops.

minimalist home ideas for new construction

The devices will be left in this cabinet overnight, since the kids will not be allowed to take any electronics up to their bedrooms. We feel that this rule will allow us to keep an eye on their internet use, for safety reasons.


ONE FEATURE THAT ISN’T SO MINIMAL

The BASEMENT REC-ROOM is probably the one large luxury that Arrow Hill Cottage will have.

While it does seem to be going against the grain of minimalism, it actually has the ability to simplify our lives. It will serve as a multi-functional space. It’s primary use will be a home gym and play space – reducing our need to have a family gym membership. Available at all times, the rec-room will be especially helpful as a way to keep our kids active in the winter months.

home gym minimalist home idea


When we have a large number of overnight guests, we envision the rec-room serving as a place for all the kids to ‘camp out’. Tents can be set up in the room, and the kids will be kept toasty by the in-floor heat.

Another way that this addition was justified for us is that we see it as a trade off. Where most American homes feature a 3 car garage, we instead opted for a 2 car space. The additional square footage was then given to the rec-room, where it will be more useful for our family.


OTHER MINIMALIST HOME IDEAS

This idea of simplifying life and embracing fewer material possessions is quite popular at the moment. Check out these other great minimalist home ideas from around the web:

50 minimalist bedroom ideas

minimalist living room decorating tips

minimal kitchen essentials


SAVE THESE IDEAS!

If you are preparing to design or build a new home for your family, consider these 5 minimalist home ideas. We are very excited to see them in place in our future home!

small minimalist home


PLEATED TABLE RUNNER DIY

This simple table runner is striking, yet inexpensive and easy to make! If you have 30 minutes and a few dollars, your table can be dressed for success!

pleated table runner

I love staple decorating pieces that can be re-used season after season. To fit that bill for me, they generally need to be neutral and quite basic. But nobody said that basic had to be boring! While this table runner would be the perfect compliment for a Thanksgiving table, it could just as easily dress up a Christmas or Easter table setting.

The best part of this do-it-yourself project is that it can be made inexpensively and quickly!


SUPPLIES YOU WILL NEED

DIY table runner

A roll of Kraft brown paper. I used a 30″ wide roll

sharp scissors

pencil

sewing machine / thread

straight pins (optional)


DETERMINE A RUNNER SIZE

The first step in this project is to determine the width of table runner you will create. Because working with the full 30″ roll of material would be difficult, I decided to cut the kraft paper in half. This left me with a finished table runner that is 15″ wide.

Feel free to play around with the material a bit to determine the size that will work best for you.

If you do decide to cut the material down, try to maintain as straight of an edge as possible. Having a straight edge will be helpful when folding the pleats. Don’t fret if you can’t get the edge perfect though, as any unevenness can be trimmed later.

table runner tutorial

You will also need to think about how long you would like your finished table runner to be. Because of the way that the paper will be folded, you will need 3′ of length for every 1′ of finished runner. For example, if you would like to create a 6′ table runner, you will need the roll of kraft paper to be 18′ long.


CREATE THE PLEATS

The pleats in this project are accomplished in a very similar fashion to folding a paper fan, with one important difference. The folds used to make a paper fan are ‘accordion folds’ – meaning they are all even. For this project, we will be using what is called a ‘knife fold’. The pleats for this technique are done at a 2:1 ratio. Learn the basics about the knife fold in the first few minutes of this video.

I chose to make my pleats 1″. That meant that the other fold needed to be 2″. If you choose to do a different size of pleating, just be sure to remember the 2:1 ratio. A 2″ pleat would require that every other fold be 4″, for example.

diy table runner tutorial

It helps me when I give myself small guides to work from. You can see in the above photo that I have a mark at 2″, and another 1″ further. I continued this marking pattern all the way to the end of the paper, on both sides.

Pinch slightly at the first 2″ markings on either side, then fold upward.

table runner DIY steps

Pinch at the next two markings, and fold downwards. Continue this process, folding up and down alternately.

table runner project


Be sure to make the lines as crisp as possible. I like to use my fingernail to get a nice clean line.

pleated table runner


When you have pleated a few feet of paper, it may become difficult to keep the folds laying flat. At that point, consider placing some temporary straight pins to hold things together. You may instead choose to move onto the next step.

DIY pleated table runner


SEW THE PLEATS TOGETHER

Sewing the pleats down will allow the table runner to stay flat. A simple straight line stitch, set 1″ from the edge, can get the job done.

sewing a diy pleated table runner


Or you may want to play around with the settings on your machine to find a more decorative stitch. This zigzag stitch looked really cute!

stitched pleated table runner


Finish by cutting the extra thread, erasing any visible pencil marks, and cutting the edge if needed.

table runner for holidays


ENJOY THE TABLE RUNNER

Your neutral pleated table runner is now ready for action! Layer it over a table cloth for extra dimension or place a bit of lace on top for extra texture. Add seasonal decorations for the final touch to a festive tablescape.

neutral pleated table runner


simple homemade table runner


pleated table runner project


ALTERNATE IDEA

If the idea of creating an entire table runner seems overwhelming, consider this alternate. A smaller version can be created with less material and used as place mats.

pleated place mat

Kraft paper place mat


PIN THIS PROJECT FOR LATER

simple diy table runner


BLOG GROWING PAINS

When you are learning something new, there are bound to be growing pains. My blog is going through some of those at the moment, as I discover what this world is all about.


blog focus


There’s a whole lot to learn about when starting a website and blog. Analytics, Content creation, and the all important SEO. Yep, that’s right, SE… Okay – I still have no idea what I’m talking about. Basically it has to do with how people find my little corner of the web. The more people who visit my blog, the more possible it will be to grow.

To be honest, I have been a bit discouraged that I consistently write what I think is great content, and yet do not get many page views each month.


blogging stats


Knowledge is power, and I made the decision to sign up for a course on some of the more technical aspects behind building a good website. It has been pretty eye opening already and has proved that over the last year I have done quite a bit right. On the other hand, I am also now more aware of the mistakes I have made and why people haven’t visited my blog.

The good news is that by reversing some of those mistakes, I can send things in a positive direction. The bad news is that the reversal won’t be easy.


WHAT NEEDS CHANGING

Without getting all technical, I will just say that the basic framework of the website itself needs some re-working. The layout isn’t as user friendly as it could be.

In addition to that, a good number of my past posts will need to be edited so that they are more easily found.


learning to blog


It goes without saying that these changes will take time. Unfortunately, time is something that I tend to not have much of these days. Because of this, I will be scaling back the amount of new posts I put out each week.

I have consistently been able to add two new posts each week for the past year. Typically, on Wednesdays and Saturdays. Going forward until I get caught up, I will have a new goal of posting only once per week, on Thursdays.


CONTENT FOCUS

Our house build should begin in about 5-6 months. Though I have the basic floor plans finally nailed down, there are still a lot of details that need to be worked through. Interior finishes, furniture selections, kitchen cabinet layout, etc.


beginning to blog


In order to be fully prepared for our build, I plan to develop mood boards for each space. My posts will be reflective of this part of the design process. While this will be super helpful for us to look back on as the house is being built, I am also hopeful it will be useful for others. When possible, I will try to list our material and product sources.

The posts will also document the house construction while that is happening. It should be good insight for those of my readers who are considering their own new home build.


GOING FORWARD

This blogging course has challenged me to take a closer look at my overall goals. Where it was initially started to share our design process, it has slowly been evolving into more of an overall design blog.

I’ve written about design trends, residential architecture home styles, and building tips. I have even shared some of the design work I have done for clients.

blogging basics

Writing a general home design blog has been fun! Once Arrow Hill Cottage is actually built though, a whole world of possibilities will open up. I will have an entire home to decorate and learn how to manage. There will be closets that need organizing and floors that need cleaning. I would love to learn to garden! And develop healthy recipes for my large family!

That being said, I foresee my blog focus turning more toward the subject of Simple Home + Simple Living.

I am super excited about this decision and, with this focus in mind, I will be making my website changes. The title bar will likely get a sprucing up, as might the logo and branding. Just be aware that my end goal is in mind!

simple home


There you go friends, that’s my update for today. Tune in next Thursday for the first of my newly focused posts to go live! Once again, thank you for your support and encouragement on this journey!


LIVING ROOM FURNITURE ARRANGEMENTS

Rearranging furniture is a great way to add variety and interest in your home. In this post, I share the living room furniture arrangements I have designed for our cottage. 


living room furniture arrangment

Even as a little girl, I enjoyed rearranging my bedroom furniture to give the space a fresh look.

When Craig and I got married, this was an even more exciting adventure as I began to develop my decorating style. I must have come up with about 8 different living room furniture arrangements in our first house.


It is no surprise then, that while designing Arrow Hill Cottage I have had the idea of furniture placement in the back of my mind. With our original main floor layout, there wasn’t much wiggle room in terms of where the pieces could be situated. This sort of bummed me out, but I figured that if I could come up with one great placement I could learn to live with it long term.

I was excited though, once I made the major plan breakthrough that opened up the main level. Not only does the layout have a more relaxed and spacious feeling, it also allows for multiple furniture arrangements!


FURNITURE PIECES FOR THE LIVING ROOM

We have not yet selected our furniture, but I have in mind a few key pieces to search for.


Couch: I would like to find a sleek, tailored back couch – perhaps around 7 feet long. Nothing too stuffed or with a high back. Since this will be the largest piece on the main level, besides our long harvest dining table, I want to be sure that it isn’t overpowering.

A Pair of Side Chairs: Again, preferably not overstuffed. I will be looking for simple chairs with a basic and classic shape.

Coffee Table: This piece may have a bit more visual weight to it. I haven’t decided yet if it will include storage or not. In my mind right now, I envision it with black metal legs and a wooden top.

Small Side Table: To coordinate with the coffee table. A simple place to set a book or a drink.

Area Rug: In the following images, the area rug is an 8′ x 10′ size. Potentially, we could purchase a larger 10′ x 12′ size. I envision this to be a semi colorful or patterned piece.


ARRANGING THE FURNITURE

I love the ease of planning furniture placement through computer drafting. Obviously, it is much easier to move the pieces around and come up with a variety of ideas quickly. I was able to determine four living room furniture arrangements that I think would work well for our cottage.


Arrangement 1

This layout is very fireplace focused. From the front entry, a person can easily see the fireplace and the furniture is arranged to make it a focal point as well. Even though the side chairs are positioned in front of the large wall of windows, I believe there will still be a very open feel and a great view to the woods and pond.

The couch serves as a bit of a visual divider between the living room and the kitchen/dining space.


Living room furniture arrangement 1


In the 3D images, you can see that the view from the windows is not greatly compromised by the chairs. One note for this arrangement is that I might want to consider adding a sofa table into the furniture mix, so that there isn’t so much couch back exposed.


Arrangement 2

For this next layout, I used the exact same furniture placement but rotated it 90 degrees. The fireplace is flanked by the chairs, which makes the living room more intimate and cozy.

The flow between living and kitchen/dining is open, with plenty of space to walk.


The couch back is one of the first things a person entering the house from the front door would see with this furniture layout. Again, this might be a good opportunity for a sofa table. It is also one of the reasons that a lower profile couch will be a priority when making the furniture selection.

Living Room furniture arrangement 2


Arrangement 3

This living room set up gives off a more formal vibe. The couch is placed with it’s back to the large wall of windows and the chairs directly across, with the coffee table in between. The benefit of this layout is that the room feels open from both the entry and the dining space, since the couch isn’t visually dividing the passage from either direction.


Again, a low profile couch will be important so that it does not block any of the wonderful natural light that is sure to spill through the living room windows.


Arrangement 4

This combination is what I am calling the ‘Holiday Furniture Placement’. This layout might be my go-to when we have company. In the living room, the chairs and couch are set up for maximum conversation in a U-shape facing the fireplace. Additional chairs could be brought for more seating.

There is also a bit of a configuration change that could happen in the kitchen/dining space. By rotating the table, the counter space overlooking the windows could be opened up for seating as well.


I can see that there would be plenty of space for a Christmas tree in the corner closest to the entry. This would allow it to be visible, yet out of the way.


I will need to work through my ideas for this a bit more to determine if setting the cabinets a bit might be worth the compromise of less storage. The very valuable aspect of this furniture placement, and why it would work so well for large gatherings, is that it would allow us to seat 14 for a meal. For a house that has a small main floor, that is a big deal!


BENEFITS OF ARRANGING FURNITURE

Rearranging furniture is worthwhile, and not just because it provides a good cardio workout! There are many other benefits that make re-arranging furniture a good idea.


Deep Cleaning: It’s amazing the amount of toys and cracker crumbs that can be found when furniture is moved. By arranging furniture more frequently, those dust bunnies will have no place to hide.

Furniture Wearing Evenly: People have a tendency to find their favorite spot and stick with it. By moving furniture, you just might make someone give another place to sit a try.

Sunlight also has a tendency to fade certain types of fabric. By rotating which furniture has a place in front of the windows, the sun fading will be less noticeable over time.

Appreciating the Space: When a room is always set up in the exact same way, it has a tendency to become visually stagnant. By changing furniture pieces around you can invoke new life into the space. This fresh perspective can allow you to appreciate the room again.


GIVE YOUR SPACE A FRESH LOOK

If you’d like to try out some new living room furniture arrangements without sweating, check out this link from Better Homes & Gardens!

Better Homes & Gardens Furniture Arrangement Tool


Do you have tips on how often you like to re-arrange furniture? Which of the four living room furniture arrangements of the four shown above is your favorite? I would love to hear from you!


PIN THESE FURNITURE LAYOUT IDEAS FOR LATER

living room furniture arrangements


AROUND HERE: OCTOBER 2018

Around here, we have been…


EXPERIMENTING with different things. Apparently {M} wanted to try to see what it might be like to be a hairdresser. She grabbed a scissor and cut a big chunk right out of the front of her hair!

It’s crazy to think that even though we have 5 children and have been parents for nearly 12 years, this is the FIRST time we have had this issue. One of the boys went through a phase where he would cut small holes in his shirts and pants, but never his hair! Luckily, we can easily cover {M}’s little whoopsie with a strategically placed bow or hair clip!


RECOVERING from a scary accident. Unfortunately, {L} got hurt. It was a strange twist of events that caused him to break the pinky finger on his right hand and sever one of the tendons in the finger. Craig took him directly to the ER, where they needed to do emergency surgery. The tendon was stitched back together, as was the skin. All told, he was given over 10 stitches. Because the bone in his finger was exposed, he needed to spend one night in the hospital to receive antibiotics through an IV.

A few days later he was put in a cast to protect his finger. He chose purple, for the Vikings of course. They were able to cast him so that his pointer and thumb where left out. This allowed him to be able to use his right hand as a ‘helper’ and to write! The cast was on for two weeks, during which time {L} learned to do many things left handed, including throwing a football.

New X-rays were then taken which showed that the finger is healing nicely. He was given the option of a new cast for 2 weeks, or a removable sling. He chose the sling.

This has all been a lot for a seven year old to take in, and honestly, he still has a little bit of post traumatic stress from the incident. He doesn’t like to talk about it much at all, and refuses to look at his finger when the wound is exposed. We don’t blame him. He has been so brave though, and we are all happy that he is on the road to a full recovery.


PRACTICING with the big boys. After finishing the season completely undefeated AND without any points being scored against them, Craig and {D}s team was pumped. In the final game of the season, they felt confident enough to kick field goals during the game itself.

From what we understand, it is the first time that a field goal has been attempted in 6th grade football history in our community. The first kick {D} tried was blocked, but the second, from 25 yards, soared straight through the uprights! It was such an exciting moment and the perfect cap for a great season. Though coaching definitely took Craig out of his comfort zone, he gained hours of special boding time with our oldest son, which is something he will cherish forever.

{D}’s kicking practice caught the eye of the high school football coach, who was able to put him in touch with a former college kicking athlete from the U of M. He has been training {D}, as well as the high school kicker, on proper form techniques.

This is such a great opportunity for him and his form has already improved! We don’t see his love for this sport going away anytime soon. In fact, he has been mentioning summer camps that are available and can be seen in our backyard for at least an hour every day, kicking.


PREPARING for Halloween. We have decided to take this year off from trick or treating, and will instead hang out at home with our favorite candy and a movie. Carving pumpkins and roasting the seeds is also on the agenda.

Though we aren’t dressing up, the boys still wanted to try on some things at the store. This ape mask was a hit.


We are considering this a bit of a ‘transition’ year. By this time next year, we will hopefully be in our new house. Those who don’t want to go out trick or treating can stay home and pass out candy, while the others will be able to walk around our new neighborhood. Having lived in the country for over 4 years now, we are looking forward to that!


This is just a glimpse at what our family has been up to. If you’d like a closer look, be sure to check out our weekly ‘mini vlogs’ on our YouTube channel ARROW HILL FAMILY. Be well everyone!