A FARMHOUSE SINK FOR OUR COTTAGE

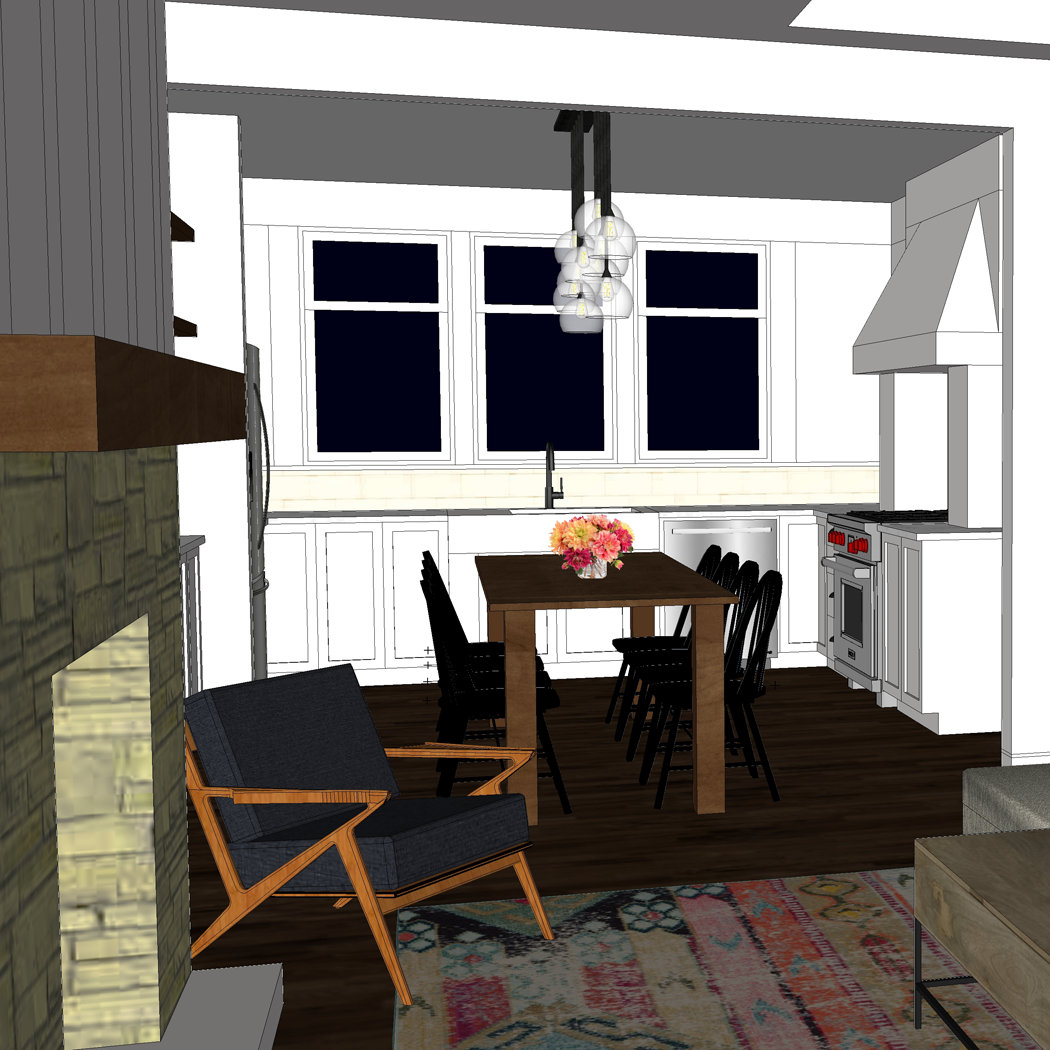
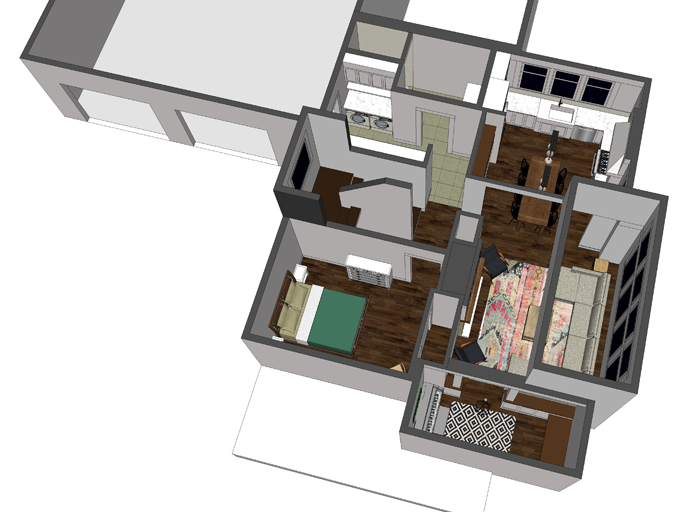
They say that the kitchen is the heart of the home; And a beautiful kitchen is high on the priority list of many homeowners. I am in agreement with these sentiments. After all, if my family is going to be spending a lot of time in one room, it should function well AND look nice.

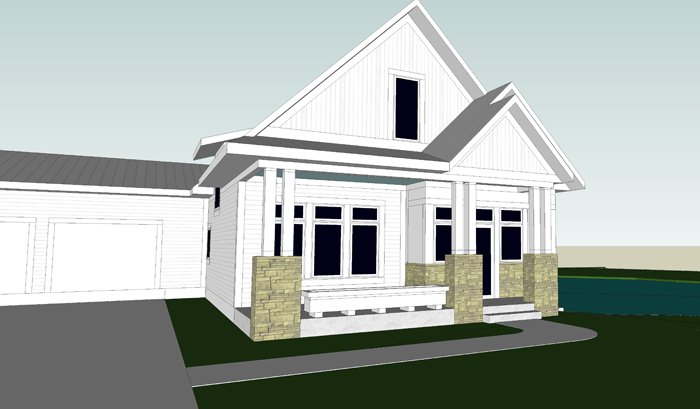
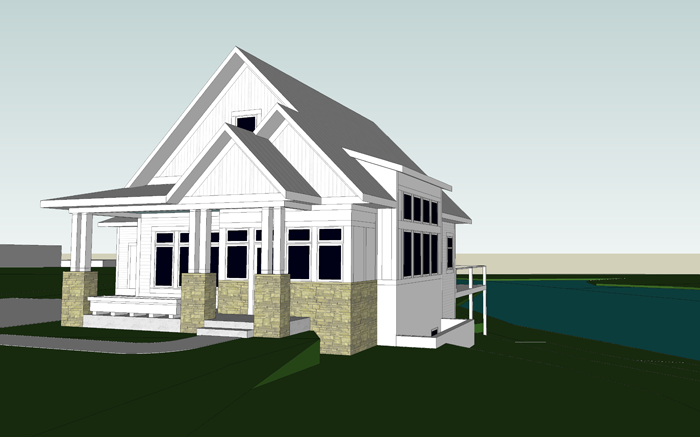
The kitchen for Arrow Hill Cottage will have a classic look, with clean materials and tons of natural light. But I have to say, in all honesty, the feature I am most excited about is the kitchen sink.


Time for a little story:

About eight years ago, when my husband Craig’s family was helping his grandparents clean out their farmhouse (the very one we are living in at the moment), I spotted a cast iron sink laying in the weeds on their property – ready to be hauled away by a scrap metal collector who was paying by the pound. I am pretty sure I let out an audible shriek, then quietly and as calmly as possible, asked Craig to please find out more about it.

Turns out that it was the farmhouse’s original 1920’s kitchen sink that was removed (and tossed outside) in the late 60’s, when the room was remodeled to a more modern style.

It didn’t take too much begging for his grandparents to agree that we could save it from the pile. Craig though, needed a bit more convincing. Mostly because the thing was a beast, and hauling things around is low on his list of favorite things to do. He loves me though, and eventually gave in to my desire. We had absolutely no place to store the relic of a sink, and so we asked Craig’s parents if we could keep it in one of the sheds on their property until we built our house. And that is exactly where it has been ever since.

Craig was there last weekend, and I asked him to get a few measurements for me so that I could fine tune the kitchen design a bit more. He took pictures of the sink – in all her muddy, rusty glory – and seeing them made me fall in love all over again.


We will need to look into getting it refinished – probably at a body shop – but even with that expense I believe we are sitting on a great deal. I saw a very similar model on Etsy selling for $1,800! Another sink, on Ebay is listed for close to $1,000. Even reproduction models are over $700!

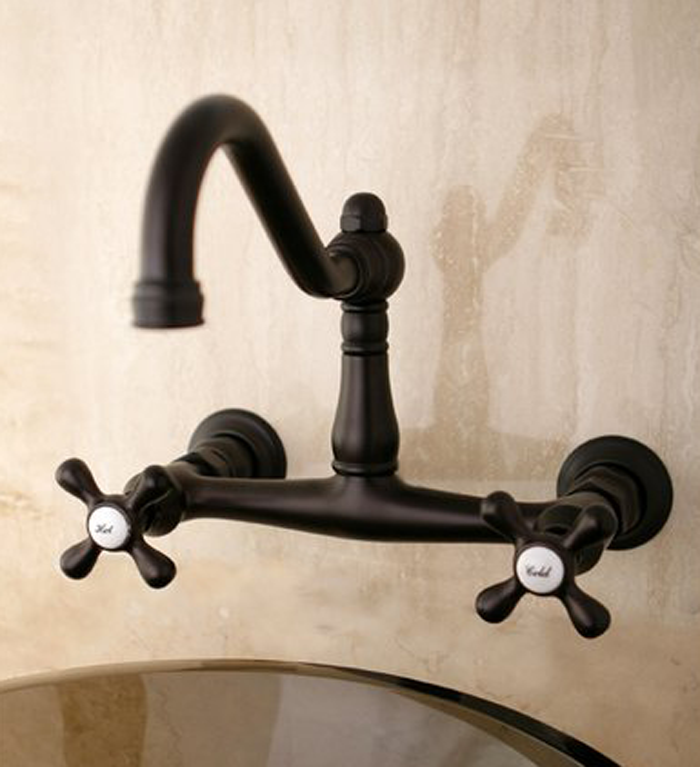
There are a couple of challenges that this farmhouse/apron sink will present. One is finding wall mounted faucet hardware. They aren’t quite as common as the counter mounted variety.

I like the look of this bronze faucet from Wayfair.


I have a feeling that lever handles might be a bit easier to operate though – so this option from American Standard might do the trick.


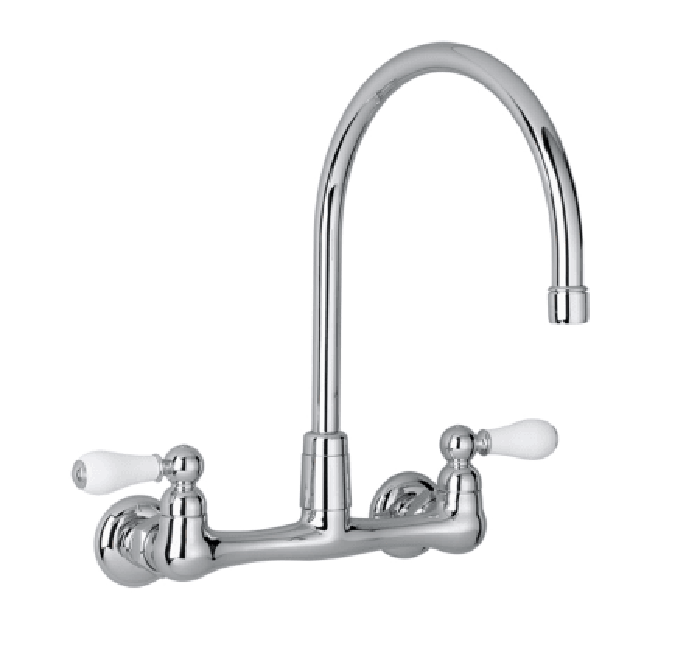
This one with a pull out spray faucet would be very functional – but I’m afraid it might not quite be in the budget. Maybe I can find something similar for less when the time comes to make a decision.


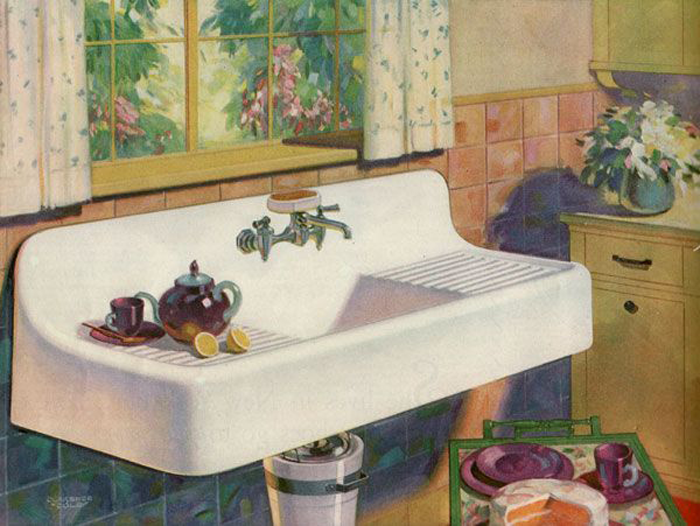
Another challenge will be determining how to lay the counter material. This sink style was originally designed to be a free standing unit. It probably had matching legs at some point. Kitchen design & style has changed quite a bit since the 20’s.

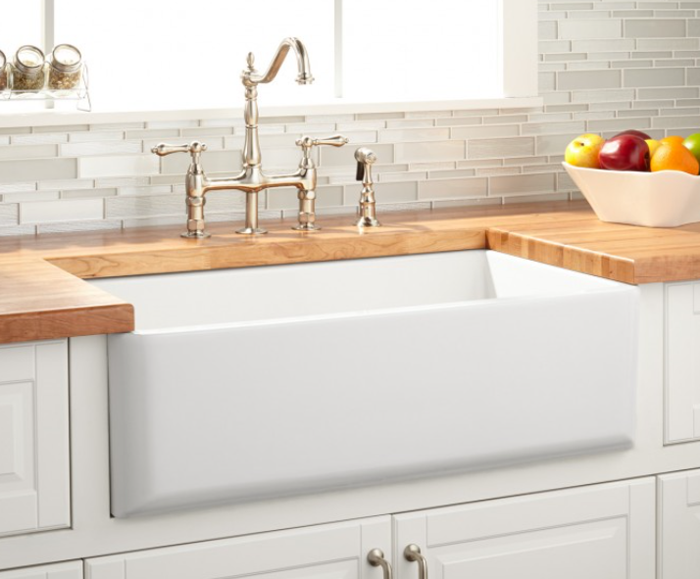
I am still pretty set on using a quartz counter-top material. I love the clean look. The sink will will either need to be set a bit lower than the counter height, so that the counter material can overlap the edges – to ensure that no water slips onto the cabinet below – similar to this:


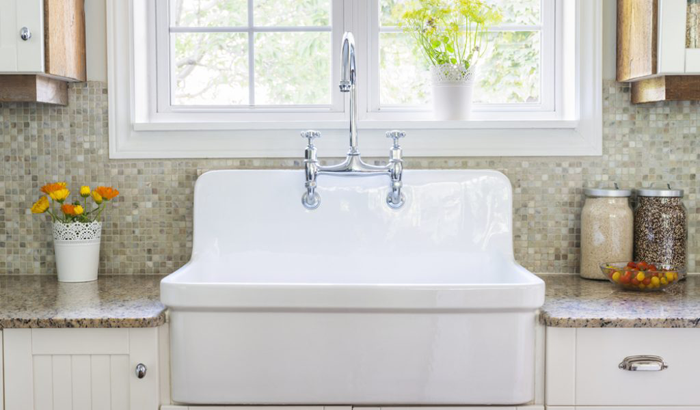
OR possibly more likely, because of it’s integral back-splash, we will need to set the sink up higher and butt the counter-top material into the sides, like this:


The final design challenge that I can foresee, and perhaps the largest, is the placement of the sink itself. Because it is a single bowl sink, the placement of the faucet will be further to the right (and not in the center of the overall unit. There will be three large windows on the wall where the sink will be located, and I am unsure if I want the entire sink to be centered on the middle window (and hence, the faucet offset), or the faucet / sink basin portion centered on the middle window. Maybe you can all help me out.  Tell me which you prefer!


SINK UNIT CENTERED ON MIDDLE WINDOW


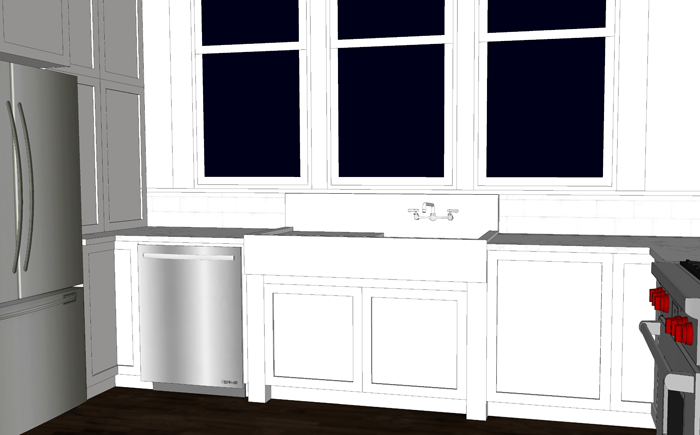
FAUCET CENTERED ON MIDDLE WINDOW


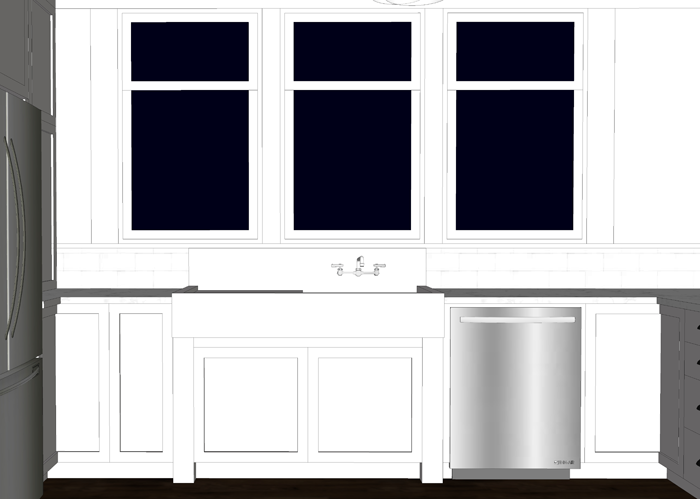
I should note that the dishwasher will likely have a cabinet panel front, so that it blends with the rest of the cabinetry. I feel like it seems to have more space on the right of the sink. Thoughts? Maybe I should take another look at the window placement and series?

Please comment below or via social media. Would love some help!


THOUGHTS ON PERSPECTIVE

I began this week feeling out of sorts

The weather was yucky, the kids had cabin fever (as did the parents for that matter), and I was working feverishly on getting the plan set for Arrow Hill Cottage fine tuned and ready to submit to local contractors for bids. Just all around a stressful time.

I love designing houses – with an absolute PASSION. And to be able to design a home for my family has been very special; But the stress of knowing that it will ultimately be our pocketbook that will be paying for this design? That has taken a bit of the excitement away. This is real life, and we are just average people who need to work within a realistic and manageable budget. Essentially, every decision that I make while fine-tuning the design of the cottage has to be filtered through the bottom line of what it will cost.


And, this week, the filter took away some of the design elements I was really looking forward to implementing 


I have been working on these rooms for months now – first as lines on paper, and eventually through 3D visualization. I have written about how 3D modeling can give you a fresh perspective on a space; And this week, I got a new perspective on LIFE as well.

This same week has brought severe darkness to a couple of my friends whom I know through the adoption community.

One, a mother of ten, whose husband has been diagnosed with terminal stage 4 brain cancer, with an estimated 6-18 months to live.  Another whose sweet six year old daughter is on life support with a grim prognosis- her little body fighting.

And through it all, both of these ladies have remained SO very faithful to God. Singing His praises and relying on Him for peace, comfort, and guidance. I have so much to learn from them.

While I was fretting about how many windows the living room in my brand new home might have, what type of beautiful flooring I might choose, or which contractor is most qualified to get the job done – these women are wondering how much longer they will have their loved one here on Earth.


This thought hit me like a punch to the gut. Perspective.


Life is always changing and there is no person who can plan their life into perfection. Each of us is dealt circumstances that stretch and shape us. We experience unexpected happy moments and find that some dreams will never be realized. And through it all, we take each day as they come – one at a time.

This process of designing, and eventually building our family home is a blessing. Truly, it is a dream that we have been chasing for many years. But even this we need to take one day at a time. There will be days that will be more difficult than others, and I want to be mindful always to remember that this process is something we have wished for.

I wish to remain grateful in this journey.

SATURDAY SKETCHBOOK: MORE SIMPLIFYING?

This week has been a busy one complete with my birthday, the kids starting school after Spring break, yucky weather, and the planning of a luau themed Father/daughter dance. In the midst of it all, we received a cost estimate for the building of Arrow Hill Cottage.

The estimate was higher than we thought/ hoped it might be. I want to be completely transparent with this process for all of you. Designing a house and having it built is going to be full of ups and downs, and in documenting them I hope to encourage anyone who is following a similar path.


I want my readers to understand that the process is not a straight path from point A to point B, but that each step will eventually lead to a final finished home. 


Craig and I are not complicated people, we have said all along that we want our house to be simple. Big enough for now, when we are raising 5 growing children under it’s roof – but not so large that it becomes a burden when we are empty-nesters.

When we first got the dollar figure, I will admit that we were a bit flustered once again. Not long ago, when we were told VERY preliminary costs to build, I had done a huge reduction in the size and complication of the design. We thought that these bold moves would get the number down to a more comfortable level. And surely, they did reduce the overall cost – just not enough.


Even though the bank may loan us the full amount that this contractor is estimating, we aren’t comfortable with what that would mean in terms of monthly payments.


We do not intend to be house poor. When you have a family, there are so many situations needing monetary attention that could potentially arise. If all of our monthly income is tied up in a house, it would  definitely add more stress during those times.

And so, we are at a cross roads once again. I am taking a look at the design to see where we could save and have identified a couple of areas that could be revised to be more cost effective if need-be. We will also be taking a close look at this post, and heeding our own advice. Even though we are friends with our preferred contractor, it is important to get second (and maybe third) opinions/quotes on cost.


In the end, I am confident we will be living in the house of our dreams – but that house might be a little different than what we had first imagined going into the process. And that is okay.

5 REASONS THE HOME DESIGN PROCESS SHOULD INCLUDE 3D MODELING

I have written before that I wholeheartedly believe that homes should be designed in both plan (2D) form and in the third dimension. Years ago architects and designers – in order to understand all aspects of space- would make physical 3d models. Physical models involve a considerable amount of time and attention to detail, and any little change to the design can add hours to the process. For that reason, designers would create rough models while working on concepts and save the detailed models for the very end stages of design.


Designers today have the benefit of technology on their side. Specialized software allows us to work in the third dimension through the entire design process. There are many 3D programs available for use, each with their own set of advantages. I personally use Sketchup, which I find to be extremely user friendly and powerful at the same time. One of the major bonuses of this program is that it is available FREE for personal use! In the future, I plan to offer tutorials here on the website – teaching easy steps to get started using Sketchup! In the meantime, I am offering the top five benefits of implementing 3D modeling during the home design process.


1: UNDERSTANDING THE FLOOR PLAN

Many people struggle to make sense of floor plans. Because we naturally don’t see walls cut through, or view furniture from above, a floor plan is difficult for the mind to process. It literally feels like a second language to some. Designers are trained to read these documents – but because their clients are not, frustration can arise when using a floor plan as a point of discussion.

standard floor plan view of Arrow Hill Cottage


By adding the third dimension, we are able to more fully understand how walls relate to one another, and also determine sight lines from one room to the next.  This is not only helpful for the designer, but also for the client that they may be sharing the information with.

three dimensional floor plan


2: ADDITION OF DEPTH + DIMENSION 

Construction documents are very useful for the crew who will ultimately build the house – these people are used to reading and understanding a plan set, and know how to transfer the information into a three dimensional built form. But the average person who sees a two dimensional drawing can not bring their mind to see beyond the flat image.

This is the front of Arrow Hill Cottage, as seen in a flat elevation drawing. From this view, it appears that the cottage is very long, and without depth.


Seeing the same design in three dimensional form gives you additional information – and as you can see, the garage is actually pulled back from the face of the porch by nearly 30′, giving it much less importance and prominence than what the elevation drawing would have you believe.


In this instance, the 3D model combined the information from BOTH the floor plan and the elevation into one image, making it easier to understand.


3: SCALE COMPARISON

Have you ever been in a space and found it to be either uncomfortably large or so small that it was not functional? The scale of a space is an important element that can be overlooked easily when working only in 2D.

Volume can only fully be understood with the addition of the third dimension. When designing in 3D you can easily determine the differences of how a room would look and feel with a flat ceiling versus a ceiling with a vault. In rooms with sloped ceilings, it is considerably easier to understand the amount of headroom available. Consider our boy’s bedroom design. This is a very unique space with a ceiling that slopes from 11 feet in the center, all the way down to the floor. In order to determine where to place the boy’s beds so that they wouldn’t knock their heads on the ceiling in the middle of the night, I turned to 3D modeling.


Once the Sketchup model of their room was complete, I was able to show these images to the boys – and they could literally imagine themselves IN the room. Huge smiles all around! It is really comforting to know that after all the work, they will enjoy the final product.


4: PRECISION IN PROBLEM SOLVING

There are many little details that can be missed when working only with two dimensional drawings. I find that adding the third dimension is especially helpful when I am fine tuning the design. For example, When I was looking at the cubbies in our future mudroom, I wasn’t sure which height would work best for the individual shelves and hooks. I measured items in our existing home to get a general idea of what would be most functional, but when I put those dimensions into the 3D model, I realized that the heights of the shelves competed with the height of the nearby trim, creating an awkward look.

With a bit of tweaking to the dimensions, the design is now visually appealing.


5: VISUALIZING THE FINISH PRODUCT SELECTIONS

Many of today’s 3D modeling programs, including Sketchup, have the capability to render in a semi-realistic way. Designers can add material selections, such as wood floors or a subway tile back splash. They also offer the ability to add furnishings and accessories.  These extra capabilities allow designers to create views of what the final product may look like, before the builder ever lifts a hammer.

When designing the living room of the cottage, I could tell that the space would benefit from the use of a sectional sofa. I was able to use Sketchup to find an amazing couch that fit perfectly. When the time comes to furnish the room, I can simply purchase the exact piece that I used in the design, or find an item with similar dimensions. Retailers are beginning to see this as a benefit, and have begun offering their furniture in three dimensional form, for designers to use in their mock ups – with the hope that their clients will purchase the exact pieces once they visualize how they could look in the room.


If these five reasons have convinced you that adding 3D modeling to your home design process is beneficial, I hope you will join me in the future as I share tutorials on how YOU can get started.  And, as always, if you need help in visualizing the space you can ask for a Makeover Takeover!


SATURDAY SKETCHBOOK: POSITIONING THE COTTAGE

The building site where a new home will be constructed is so, so important. Generally, it is recommended that you don’t even begin designing your house until a potential building site has been selected – so that the house can be developed to utilize the best features of the land, and avoid the pitfalls.


We purchased our building site in 2009. You can read more details about how we found and fell in love with our 4.5 acres in this post. Through the years, as I have been sketching ideas for the cottage, I have been careful to keep the lay of the land in mind – at least conceptually. I am now far enough in the design that I need to look more closely at how the cottage will actually be positioned.

This week I spent quite a bit of time fine tuning design details – the garage placement, the driveway configuration, and where the walkout door from the basement will be. Each of these decisions were heavily based on the site.


Our site is super unique, and has some interesting challenges. These are some of the site related issues that have been guiding our design:


SLOPED LAND

I’m sure that this particular parcel of land was passed over by multiple people solely because of its most dramatic natural feature – the slope. From the roadside there is a bit of flat land, but the slope down to the pond below is quite dramatic.


SETBACKS

The red area shown in the above graphic is the ‘flat’ land. The portion of land closest to the road (shown outlined in blue) is not build-able, because of setbacks and easements. Right from the start, we knew that we would likely have a longer driveway than most because of these setbacks alone.


MANY NEIGHBORS

Our land borders quite a few properties – both on the south and west property lines and, visually, across the pond. 14 parcels border ours. While this could be seen as a major drawback, I have been working strategically on the design so that our privacy within the home is maintained.


DENSE TREES

the kids standing by one of the many large trees that will need to be removed (2017)

One of the reasons we fell in love with our building site was that it was absolutely FILLED with mature trees: oak, maple, and other varieties. Sadly, there will be tree removal when the time comes to build. There is absolutely no avoiding that fact. By minimizing the overall footprint of the cottage, we hope to remove as few trees as possible.


EXPOSURE TO THE ELEMENTS

A view from our property, looking south. Our mini van is parked on the curved portion of the road.

An often overlooked, but important aspect of home design is the orientation it has in regard to the sun and wind. Because we live in a Northern climate, our strongest sunshine comes from the south. It is generally advised in this climate that you position your home with windows facing south (both for daylight, and for heating purposes in the winter). Thankfully, once a few trees are removed, we will have quite a bit of southern exposure.

It can get very cold in our state during the winter months – and the prevailing wind direction is from the northwest. I plan to rotate the cottage so that the garage can be used a bit for protection from those strong winds.


THE IDEAL POSITION FOR OUR COTTAGE

With all of these site issues in mind, I have narrowed down the placement of our cottage. I am working on finding the best angle of rotation and also determining how exactly the driveway will function – but we are getting close!


Just for fun, here are a few 3d images showing the cottage positioned on the land.

The cylinders are place holders for privacy trees (some of which are existing, and others that we hope to plant in the future. 


I worked a long time to find an appropriate position for the garage. I was sure that I wanted the garage doors to be set back from the front of the house/porch. For a while I had the garage rotated 90 degrees so that you accessed the doors from the side – but I eventually realized that this would not create ideal conditions for the driveway, making it both awkward and extremely long.  The garage is now accessed head on and set to the very back of the house so that it isn’t visually imposing.


The wall of windows on the southeast elevation will let in a ton of wonderful natural daylight. It is one of my favorite features so far, and never would have happened if we hadn’t talked to our contractor about current building prices – which prompted us to make a major change to the design.


You can see from this image how the cottage interacts with the slope. There will be a bit of excavating and retaining involved in creating the lower level walkout patio.


As the weather warms up, I hope to make a trip to the land again – and maybe stake out the corners or use spray paint to get an even more visual perspective on what we will see out of each window of the cottage.

Exciting times ahead!