


If you share your home with children, you know that they are little art making machines. There is something so precious about your child’s creativity and imagination that you just want to bottle it up and save it for all time. Even still, it can be quite overwhelming trying to figure out what to do with each of these masterpieces.
In my search for unique and stylish solutions to this very problem, I have discovered 18 creative ways to display kid artwork. I think you will enjoy what I found.
.png)
This setup requires little to no prep work. When a child creates something that they want displayed, use a bit of tape or another removable adhesive such as poster putty, and add to the wall. Personally, I feel that this technique is best suited for a kid friendly space, such as a toy room, as it has a tendency to look a bit more cluttered than other display options.
.png)
This highly adaptable hanging technique is accommodating for various sizes and shapes of projects. All you need for this simple DIY is a thin twine rope, a few clothes pins, and your child’s creativity. The great thing about this option is that the kids can clip up and take down the art all on their own!
.png)
Positioning an extra large cork board against the wall and adding a desk can create an instant art station. Though similar to a raw art wall, the chaos is a bit more consolidated. Learn how this set up was created using cork squares, on the blog Young House Love.
.png)
These clipboard displays may tidy things up a bit more, but will mainly accommodate similar sized pieces of artwork. I love the added touch of the nameplate, which can be changed up as often as the artwork is.
.png)
If your child is a master at one type of artwork – flowers, glitter, abstract – this may be the option for you. Grouping similar styles of art pieces lends itself to a beautiful gallery style display. I imagine the frames used in this setup are either poster size or custom created to fit the artwork.
.png)
A simple shelf ledge arrangement may be the perfect option may be preferable if you tend to change out your child’s artwork frequently. Anna White has a wonderful tutorial on how to build these ledges out of standard materials – for only $10!
.png)
Another way to tie varied art pieces together is by removing glass from old frames and painting them all the same color. This also gives the display a gallery look. These sunny yellow frames are really helping the art shine!
.png)
Perhaps you love the idea of framing your child’s art pieces but imagine that changing them out would be too much of a hassle. This hinged frame product may be the option you are looking for. They are said to be able to hold up to 50 sheets of paper! Click on the link above to purchase, or make them yourself!
.png)
This is an inexpensive craft – and it looks cute too! You can create various sizes and change up the patterns and colors of the tape. The wonderful thing about washi tape is that it is easily removable and doesn’t leave residue – meaning you can have a traveling gallery that moves from room to room.
.png)
For a more permanent look, painting frame patterns on the wall could be another simple fix. This display sets the mood for a creative art station where the littles can be inspired.
.png)
If you have access to basic computer software, you can easily create this stunning look. Simply take photos of or scan each art piece, then crop and scale the images and arrange them in a grid pattern. Hang photos of the little artists nearby for an added personalized touch.
.png)
mini masterpieces
Another miniaturization of artwork, this display is created by scaling and printing the images and gluing them to bits of foam board. The individual mini art pieces are then arranged in a single frame.
.png)
Displaying of artwork doesn’t always need to happen on the walls or shelves of your home. A binder filled with projects may be the perfect low-tech option to keep things clean and organized. This is such an easy technique that you might be tempted to save every last artistic scrap. Try to be selective or your child may end up with a storage room full of filled binders when they are ready to move out!
.png)
Photo books are very popular and may be just the thing you are looking for to display (and keep) your child’s artwork. Add photos of your child and short write ups about their projects to create a wonderful keepsake. Popular photo book companies include Snapfish and Shutterfly.
.png)
Is your fridge the place where most of the artwork migrates? Reclaim space by resizing each masterpiece digitally and creating fun, kid-friendly magnets! The kids will love rearranging their art pieces and making their own small exhibits.
.png)
Custom blocks are another fun option to transform artwork into useful play things. Imagine the colorful castles and roads the kids could build!
.png)
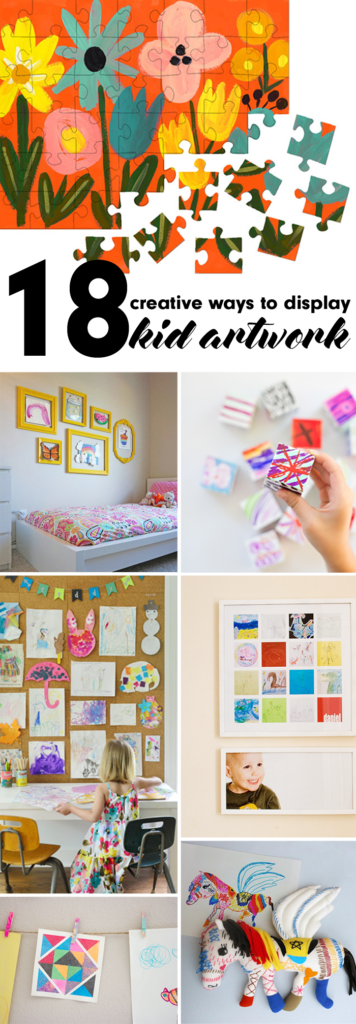
Artwork can also easily be turned into puzzles! Websites such as Collage.com and PuzzleYou.com allow you to upload scanned images and create these custom, fun keepsakes.
.png)
If you really want to up the wow factor there are various artists, such as Custom Plush Art , who will bring your child’s artwork to life with a hand made stuffie! Just look at the details!
Each of these 18 ideas for displaying kid’s artwork is so creative and fun! I hope you will give some of them a try.
If you want to save this information for later, remember to pin!

Great ideas ! I have art work from the Grandchildren that I will be displaying in other ways & other than on the refridgerator door 🙂 ?
It’s amazing how quickly that fridge can get filled up, isn’t it?