


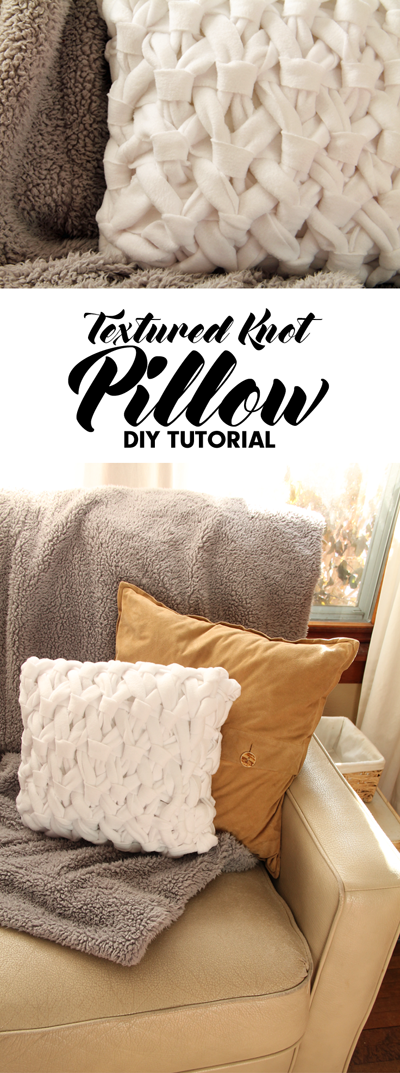
This no sew textured pillow is extremely simple to make and looks great! If you can braid and tie a knot, you can make it. I’ll show you how!
.png)
I mentioned this textured pillow in a recent post about our home’s Christmas decorations. The pillow went perfectly with the rest of the festive green and red decorations. I love it so much that it is still gracing our couch this winter.
These cold months are the perfect time to experiment with cozy, chunky textures for the home. I’m excited to share how you can add some to your home easily and affordably, with this do it yourself project!
Though the finished product may appear complicated, I guarantee it isn’t! There is NO sewing NO knitting and NO complicated movements involved. Basically, if you can braid and tie knots, you can do this!
.png)
SUPPLIES YOU WILL NEED
Fleece Fabric: 1 1/2 yards of fleece in any solid color. I used a 60″ wide variety, but they come in varying yard widths. Any width over 60 inches will work for this tutorial. My overall fabric size was 54 inches long x 60 inches wide. Fleece is perfect for this project because it does not fray when cut.
Pillow Form: This tutorial uses a 13″ pillow form (13 inches wide x 13 inches tall)
Scissors: Make sure they are sharp!
Ruler: Measure twice and cut once. I share a simple technique for cutting the fabric that will save time.
(2) Rubber Bands: Or some other temporary tying device – I used hair ties!
A clear, flat area, such as a table or the floor will make the initial steps of this project easier. Let’s get started!
STEP 1 : LAY OUT THE FABRIC
I recommend that you lay the fabric out so that the longest width is laying horizontally in front of you. In my case, the fabric was set out so that there were 60 inches from left to right when I was looking at the table. Fold the left side of the fabric over 8 inches.
.jpg)
STEP 2: CUT THE FABRIC INTO STRIPS
Here is where I introduce my handy little tip for cutting fleece fabric. Instead of marking on the fabric itself, I like to fold the fabric over – then cut on the ‘looped’ side. First we will cut the loop of the 8″ measured fabric.
.png)
While the 8 inch strip is still laying on the large piece of fabric, use it as a guide to cut another 8 inch strip. Continue this process of laying an 8 inch strip above the larger piece of fabric until you have used up the rest of the fabric. For the 60 inch long variety of fleece, that will yield you (7) 8 inch strips + an extra 4 inch strip.
These 8 inch strips will further be folded in half and cut on the ‘loop’. Each 8 inch strip will give you (2) 4 inch strips – by folding and cutting using the same technique.
.png)
And each 4 inch strip will give you (2) 2 inch strips.
.png)
All told, you will be left with (30) 2 inch strips – which is what you will be using for the next step. If there is a little wobble in the straight line cuts, that is no problem at all!
STEP 3: BRAID THE STRIPS
Lay (3) of the 2 inch strips on top of one another. Tie them together with a large knot on top.
.png)
.png)
You will be creating 7 braids in total, using (21) of the 2 inch strips.
.png)
They will be flat/ large braids. One tip that I found to allow them to lay flat is to make sure the top fabric strip becomes the center of the braid.
.png)
Braid each section. I created a little video of a few portions of this project – linked at the end of this post – if you need a refresher on braiding.
.png)
.png)
.png)
Tie each braid at the end with a knot. It is okay if the end portions of the braid aren’t perfectly flat – as these knots will be removed later in the process. Set the braids side by side so that the knots are at the top and bottom when laid in front of you on the flat surface.
.png)
At this point in the process you might want to just double check that your pillow form fits on top of the braids. If you decided to use a pillow form size other than 13″ x 13″ you will need more or less braids, accordingly.
.png)
Just make sure there is a little bit of the braid showing on either side of the pillow form, as the following step will tighten things up a bit.
STEP 4: COMBINE THE BRAIDS
I’m going to prep you now by saying that this next step is probably the most tricky. However, once you get the hang of it you will just repeat the process over and over. Pay careful attention to the next photos, and watch the video if you need a bit of extra guidance.
.png)
Set two braids side by side and match up the second folds together. I didn’t start at the very top because the knots tend to get in the way a bit. It will be easier to get the hang of this technique when you are a little lower down the braid.
.png)
There should be (9) remaining strips of 2 inch wide fabric remaining. These strips will be used to weave together the braids, giving the pillow its signature ‘knot’ look. Lace the fabric under the loops of the folds you are holding.
.png)
Tie the weave fabric in a knot, allowing at least 3 to 4 inches on the right side of the knot. The remaining length of the fabric strip will be used to create the ‘knots’ through the rest of the braids.
.png)
Gather the next lined up ‘fold’ pieces, and repeat the process – only this time instead of applying a knot, wrap the fabric strip over the folds. (this is easily seen in the video)
.png)
.png)
Continue this process until all seven braids are connected. Then move to the next row down and repeat the process. In all, you will use 9 strips of fabric to do the weaving.
Your finished product will look something like this.
.png)
At this point you should flip the braided/woven fabric piece over so that the best looking side is facing out. This may vary from person to person – depending on your preference – just make sure that whichever side you want to be seen for your finished project is laying face DOWN. Then place the pillow form on top – on one end.
.png)
Fold the rest of the woven braids over the top of the pillow form, so that the knots are lined up on top of one another – and you are ready for the final step!
.png)
STEP 5: FINISH THE TEXTURED PILLOW
Get ready for more tying! Start with the non-knotted fabric strips. Match the top and bottom strips and tie them into knots.
.png)
To finish the sides, simply tuck the remaining fabric in – or, if you prefer, cut the ends of the strips a bit and leave them exposed for a fringed look.
.png)
At this stage, it is safe to remove the knots from the bottom of the braids. Once the knots have been untied, lay the strips flat. Cut the extra length of the fabric from the strips so that there are between 6 and 9 inches of fabric loose below the faux ‘knots’ that remain.
.png)
You are left with a lot of strips hanging down. Feel free to get creative with how you finish the bottom of the pillow. I initially decided to tie the strips together and leave a bit of a fringe hanging on the bottom; But eventually I decided to give the pillow a bit of a more finished look, and developed the following technique.
.png)
Flip the top ‘knotted’ strips up, gather them and tie temporarily. Turn the pillow over and repeat these steps. This will leave exposed strips in the center.
.png)
Flip your pillow so that the skinny edge is up and oriented up and down in front of you. Working top to bottom, match up the fabric strips and tie/ loop them together. The extra fabric should be tucked in, the same way you tucked in the sides.
.png)
The finished center bottom of the pillow will look something like this. Don’t worry too much about perfection, as this will all be covered soon.
.png)
Lay the pillow flat again and untie the bundled portions now. There should be (7) sets of two on the top, and (7) on the bottom. Find the center sets, and position the strips as shown here.
.png)
Tie the overlapping pieces together, then once again tuck the remaining fabric into the pillow.
.png)
You will continue this process working from the middle to the side edges. With the remaining portions, plan to make ‘loops’ instead of knots – as you did in the weaving portion of this project – and continue to tuck in the remaining fabric.
As promised, here is a link to the video showing little clips of the process – including the technique I used to finish the bottom.
Now you have a gorgeous textured pillow ready to cozy up to! It is sure to add style to any space in your home.
.png)
.png)
I hope you will give this fun project a try! If you do, I would love for you to share with me your finished product! Don’t forget to save the pin below for reference! Happy Crafting!


This is such a fun DIY🙋🏼
thank you! Was a lot of fun to dream up!
How cool, will have to try it.
Yes, give it a try and then send me a pic of the finished product!
This is a great little project and I love the cozy look of the finished piece!
thank you! It really does add some cozy texture!
This pillow is so cool! You did a great job!
Thanks so much Samantha!